
User Guide
Page 6
... Supports Intel® Turbo Boost Technology 2.0* * Intel® Turbo Boost Technology 2.0 support depends on the next page) vi resolution up to www.asus.com for the following items. Motherboard ASUS H81M-R motherboard Cables 2 x Serial ATA 6.0 Gb/s cables Accessories 1 x I/O Shield Application DVD Support DVD Documentation User Guide If any of DDR3 1600MHz. Please refer...
... Supports Intel® Turbo Boost Technology 2.0* * Intel® Turbo Boost Technology 2.0 support depends on the next page) vi resolution up to www.asus.com for the following items. Motherboard ASUS H81M-R motherboard Cables 2 x Serial ATA 6.0 Gb/s cables Accessories 1 x I/O Shield Application DVD Support DVD Documentation User Guide If any of DDR3 1600MHz. Please refer...

User Guide
Page 9
ASUS H81M-R 1-1 The edge with the component. • Before you install or remove any component, ensure that you unplug the power cord before installing or removing the ...
ASUS H81M-R 1-1 The edge with the component. • Before you install or remove any component, ensure that you unplug the power cord before installing or removing the ...

User Guide
Page 11
...) 13. Serial port connectors (10-1 pin COM) Page 1-19 1-15 1-16 1-3 1-7 1-17 1-11 1-19 1-16 1-17 1-14 1-15 1-14 ASUS H81M-R 1-3 1.2.3 Motherboard layout 1 2 34 5 17.7cm(7.0in) 26 KBMS ATX12V CPU_FAN DVI TPM DDR3 DIMM_B1 (64bit, 240-pin module) DDR3 DIMM_A1 (64bit,...I/O BATTERY Intel® F_PANEL 14 H81 8 AUDIO USB56 USB910 9 SPEAKER SATA3G_2 SATA3G_1 Realtek® 8111GR PCIEX1_1 64Mb BIOS 10 ALC 887 CHASSIS H81M-R 11 AAFP PCIEX16 13 12 1.2.4 Layout contents Connectors/Jumpers/Slots/LED 1. Intel® H81 Serial ATA 6.0Gb/s connector (7-pin SATA6G_1~2 [...
...) 13. Serial port connectors (10-1 pin COM) Page 1-19 1-15 1-16 1-3 1-7 1-17 1-11 1-19 1-16 1-17 1-14 1-15 1-14 ASUS H81M-R 1-3 1.2.3 Motherboard layout 1 2 34 5 17.7cm(7.0in) 26 KBMS ATX12V CPU_FAN DVI TPM DDR3 DIMM_B1 (64bit, 240-pin module) DDR3 DIMM_A1 (64bit,...I/O BATTERY Intel® F_PANEL 14 H81 8 AUDIO USB56 USB910 9 SPEAKER SATA3G_2 SATA3G_1 Realtek® 8111GR PCIEX1_1 64Mb BIOS 10 ALC 887 CHASSIS H81M-R 11 AAFP PCIEX16 13 12 1.2.4 Layout contents Connectors/Jumpers/Slots/LED 1. Intel® H81 Serial ATA 6.0Gb/s connector (7-pin SATA6G_1~2 [...

User Guide
Page 13
ASUS H81M-R 1-5 2 3 4 C 5 A B 1.3.2 CPU heatsink and fan assembly installation Apply the Thermal Interface Material to the CPU heatsink and CPU before you install the heatsink and fan if necessary.
ASUS H81M-R 1-5 2 3 4 C 5 A B 1.3.2 CPU heatsink and fan assembly installation Apply the Thermal Interface Material to the CPU heatsink and CPU before you install the heatsink and fan if necessary.

User Guide
Page 15
...Channel B. 1.4 System memory 1.4.1 Overview This motherboard comes with 8GB or above DIMMs. ASUS will run at the maximum transfer rate of the same version or date code (D/C) from the same vendor. ASUS H81M-R 1-7 For effective use of memory, we recommend that you want to install 4GB... notched differently from the higher-sized channel is recommended to the DDR3 slot. DIMM_A1 DIMM_B1 Channel Channel A Channel B Sockets DIMM_A1 DIMM_B1 H81M-R H81M-R 240-pin DDR3 DIMM sockets 1.4.2 Memory configurations You may install 1GB, 2GB, 4GB, and 8GB unbuffered non‑ECC DDR3 DIMMs...
...Channel B. 1.4 System memory 1.4.1 Overview This motherboard comes with 8GB or above DIMMs. ASUS will run at the maximum transfer rate of the same version or date code (D/C) from the same vendor. ASUS H81M-R 1-7 For effective use of memory, we recommend that you want to install 4GB... notched differently from the higher-sized channel is recommended to the DDR3 slot. DIMM_A1 DIMM_B1 Channel Channel A Channel B Sockets DIMM_A1 DIMM_B1 H81M-R H81M-R 240-pin DDR3 DIMM sockets 1.4.2 Memory configurations You may install 1GB, 2GB, 4GB, and 8GB unbuffered non‑ECC DDR3 DIMMs...
User Guide
Page 17
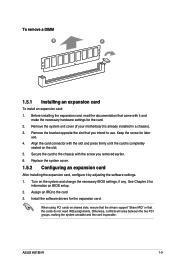
... arise between the two PCI groups, making the system unstable and the card inoperable. See Chapter 2 for the expansion card. Assign an IRQ to use . 4. ASUS H81M-R 1-9 Before installing the expansion card, read the documentation that came with the slot and press firmly until the card is already installed in a chassis). 3. When...
... arise between the two PCI groups, making the system unstable and the card inoperable. See Chapter 2 for the expansion card. Assign an IRQ to use . 4. ASUS H81M-R 1-9 Before installing the expansion card, read the documentation that came with the slot and press firmly until the card is already installed in a chassis). 3. When...

User Guide
Page 19
... +3V_BAT PIN 1 H81M-R Clear RTC RAM To erase the RTC RAM: 1. enter data. • If the steps above do not need to clear the RTC when the system ... data. Hold down and reboot the system, then the BIOS automatically resets parameter settings to re- Plug the power cord and turn ON the computer. 4. ASUS H81M-R 1-11 Use a metal object such as system passwords. The onboard button cell battery powers the RAM data in CMOS, which include system setup information such...
... +3V_BAT PIN 1 H81M-R Clear RTC RAM To erase the RTC RAM: 1. enter data. • If the steps above do not need to clear the RTC when the system ... data. Hold down and reboot the system, then the BIOS automatically resets parameter settings to re- Plug the power cord and turn ON the computer. 4. ASUS H81M-R 1-11 Use a metal object such as system passwords. The onboard button cell battery powers the RAM data in CMOS, which include system setup information such...

User Guide
Page 21
... Out Front Speaker Out Front Speaker Out Mic In Bass/Center Bass/Center - - These two 4-pin Universal Serial Bus (USB) ports are for a PS/2 keyboard. ASUS H81M-R 1-13 6. This port connects the tape, CD, DVD player, or other audio sources. 7. This port connects a microphone. Side Speaker Out For an 8-channel speaker setup...
... Out Front Speaker Out Front Speaker Out Mic In Bass/Center Bass/Center - - These two 4-pin Universal Serial Bus (USB) ports are for a PS/2 keyboard. ASUS H81M-R 1-13 6. This port connects the tape, CD, DVD player, or other audio sources. 7. This port connects a microphone. Side Speaker Out For an 8-channel speaker setup...

User Guide
Page 23
... USB+5V USB_P5USB_P5+ GND NC USB+5V USB_P9USB_P9+ GND NC PIN 1 PIN 1 USB+5V USB_P6USB_P6+ GND USB+5V USB_P10USB_P10+ GND H81M-R H81M-R USB2.0 connectors Never connect a 1394 cable to 480Mbps connection speed. ASUS H81M-R 1-15 Do not place jumper caps on the motherboard, ensuring that the black wire of each cable matches the ground...
... USB+5V USB_P5USB_P5+ GND NC USB+5V USB_P9USB_P9+ GND NC PIN 1 PIN 1 USB+5V USB_P6USB_P6+ GND USB+5V USB_P10USB_P10+ GND H81M-R H81M-R USB2.0 connectors Never connect a 1394 cable to 480Mbps connection speed. ASUS H81M-R 1-15 Do not place jumper caps on the motherboard, ensuring that the black wire of each cable matches the ground...

User Guide
Page 25
... (7-pin SATA3G 1~2 [dark brown]) These connectors connect to [AHCI]. H81M-R SATA3G_1 GND RSATA_TXP1 RSATA_TXN1 GND RSATA_RXN1 RSATA_RXP1 GND SATA3G_2 GND RSATA_TXP2 RSATA_TXN2 GND RSATA_RXN2 RSATA_RXP2 GND H81M-R SATA 3.0Gb/s connectors When using hot-plug and NCQ, set the...connectors (7-pin SATA6G_1~2 [yellow]) These connectors connect to [AHCI]. 8. ASUS H81M-R 1-17 SATA6G_1 GND RSATA_TXP1 RSATA_TXN1 GND RSATA_RXN1 RSATA_RXP1 GND H81M-R SATA6G_2 GND RSATA_TXP2 RSATA_TXN2 GND RSATA_RXN2 RSATA_RXP2 GND H81M-R SATA 6.0Gb/s connectors When using hot-plug and NCQ, set ...
... (7-pin SATA3G 1~2 [dark brown]) These connectors connect to [AHCI]. H81M-R SATA3G_1 GND RSATA_TXP1 RSATA_TXN1 GND RSATA_RXN1 RSATA_RXP1 GND SATA3G_2 GND RSATA_TXP2 RSATA_TXN2 GND RSATA_RXN2 RSATA_RXP2 GND H81M-R SATA 3.0Gb/s connectors When using hot-plug and NCQ, set the...connectors (7-pin SATA6G_1~2 [yellow]) These connectors connect to [AHCI]. 8. ASUS H81M-R 1-17 SATA6G_1 GND RSATA_TXP1 RSATA_TXN1 GND RSATA_RXN1 RSATA_RXP1 GND H81M-R SATA6G_2 GND RSATA_TXP2 RSATA_TXN2 GND RSATA_RXN2 RSATA_RXP2 GND H81M-R SATA 6.0Gb/s connectors When using hot-plug and NCQ, set ...

User Guide
Page 27
...pin HDD_LED) This 2-pin connector is for the chassis-mounted reset button for the system power LED. ASUS H81M-R 1-19 F_PANEL GND PWR PWR_LEDPWR_LED+ (NC) HWRST# Ground HDD_LEDHDD_LED+ PIN 1 H81M-R H81M-R System panel connector • System power LED (2-pin PWR_LED) This 2-pin connector is purchased separately....integrity. TPM LCLK GND LFRAME# LREST# NC LAD3 LAD2 +3V LAD1 LAD0 GND NC NC +3VSB SERIRQ GND CLKRUN# H81M-R LPCPD# NC H81M-R TPM Connector The TPM module is for system reboot without turning off button (2-pin PWR_BTN) This connector is for the ...
...pin HDD_LED) This 2-pin connector is for the chassis-mounted reset button for the system power LED. ASUS H81M-R 1-19 F_PANEL GND PWR PWR_LEDPWR_LED+ (NC) HWRST# Ground HDD_LEDHDD_LED+ PIN 1 H81M-R H81M-R System panel connector • System power LED (2-pin PWR_LED) This 2-pin connector is purchased separately....integrity. TPM LCLK GND LFRAME# LREST# NC LAD3 LAD2 +3V LAD1 LAD0 GND NC NC +3VSB SERIRQ GND CLKRUN# H81M-R LPCPD# NC H81M-R TPM Connector The TPM module is for system reboot without turning off button (2-pin PWR_BTN) This connector is for the ...

User Guide
Page 29
... automatically update your motherboard's softwares, drivers and the BIOS version easily. ASUS H81M-R 2-1 To launch EZ Update, click EZ Update on the AI Suite 3 main menu bar. Copy the original motherboard BIOS using the ASUS Update utility. 2.1.1 EZ Update EZ Update is a utility that allows you... update your motherboard's driver, software and firmware Model Name: H81M-R Version:0203 Release Date: 06/25/2014 File: H81M-R-ASUS-0205.CAP Model Name: H81M-R Version:0205 Release Date: 07/02/2014 C:\Users\test\Downloads\H81M-R-ASUS-02... With this utlity, you can also manually update the...
... automatically update your motherboard's softwares, drivers and the BIOS version easily. ASUS H81M-R 2-1 To launch EZ Update, click EZ Update on the AI Suite 3 main menu bar. Copy the original motherboard BIOS using the ASUS Update utility. 2.1.1 EZ Update EZ Update is a utility that allows you... update your motherboard's driver, software and firmware Model Name: H81M-R Version:0203 Release Date: 06/25/2014 File: H81M-R-ASUS-0205.CAP Model Name: H81M-R Version:0205 Release Date: 07/02/2014 C:\Users\test\Downloads\H81M-R-ASUS-02... With this utlity, you can also manually update the...
User Guide
Page 31
...BIOS file in the removable device to update the BIOS in the support DVD may not be the latest version. ASUS H81M-R 2-3 Download the latest BIOS file from http://support.asus.com and save them in your USB flash drive. The utility automatically checks the devices for reference only and ...updating BIOS • Prepare the motherboard support DVD and a USB flash drive. • Download the latest BIOS file and BIOS Updater from the ASUS website at www.asus.com. Turn on your computer has a DVD optical drive. The screen captures used in FAT32/16 format. • Turn off the computer. ...
...BIOS file in the removable device to update the BIOS in the support DVD may not be the latest version. ASUS H81M-R 2-3 Download the latest BIOS file from http://support.asus.com and save them in your USB flash drive. The utility automatically checks the devices for reference only and ...updating BIOS • Prepare the motherboard support DVD and a USB flash drive. • Download the latest BIOS file and BIOS Updater from the ASUS website at www.asus.com. Turn on your computer has a DVD optical drive. The screen captures used in FAT32/16 format. • Turn off the computer. ...

User Guide
Page 33
... boot failure. Are you sure you want to security regulations. 5. Restart your motherboard user guide for DOS V1.30 [2014/01/01] Current ROM BOARD: H81M-R VER: 0302 (H :00 B :00) DATE: 07/15/2014 PATH: C:\ Update ROM BOARD: Unknown VER: Unknown DATE: Unknown C: FORMAN~1 D: H81MR.CAP 8390656 2014-07...[Up/Down/Home/End] Move [Tab] Switch [Esc] Exit [V] Drive Info Files panel 3. Select the Load Optimized Defaults item under the Exit BIOS menu. ASUS H81M-R 2-5 Select Yes then press . See Chapter 2 of your computer. Drives panel ASUSTeK BIOS Updater for details.
... boot failure. Are you sure you want to security regulations. 5. Restart your motherboard user guide for DOS V1.30 [2014/01/01] Current ROM BOARD: H81M-R VER: 0302 (H :00 B :00) DATE: 07/15/2014 PATH: C:\ Update ROM BOARD: Unknown VER: Unknown DATE: Unknown C: FORMAN~1 D: H81MR.CAP 8390656 2014-07...[Up/Down/Home/End] Move [Tab] Switch [Esc] Exit [V] Drive Info Files panel 3. Select the Load Optimized Defaults item under the Exit BIOS menu. ASUS H81M-R 2-5 Select Yes then press . See Chapter 2 of your computer. Drives panel ASUSTeK BIOS Updater for details.

User Guide
Page 35
ASUS H81M-R 2-7 Refer to the Setup Mode item in section 2.7 Boot menu for entering the BIOS setup program can be changed. Selects the display language of the ... setup program without saving the changes, saves the changes and resets the system, or enters the Advanced Mode Power Saving mode Selects the boot device ASUS Optimal mode Loads optimized default Selects the priority Displays the system properties Advanced mode Normal mode of the basic system information, and allows you to...
ASUS H81M-R 2-7 Refer to the Setup Mode item in section 2.7 Boot menu for entering the BIOS setup program can be changed. Selects the display language of the ... setup program without saving the changes, saves the changes and resets the system, or enters the Advanced Mode Power Saving mode Selects the boot device ASUS Optimal mode Loads optimized default Selects the priority Displays the system properties Advanced mode Normal mode of the basic system information, and allows you to...

User Guide
Page 37
... submenu options • User-configurable items such as language and boot device order • Configuration items such as Memory SPD Information, system time and date ASUS H81M-R 2-9
... submenu options • User-configurable items such as language and boot device order • Configuration items such as Memory SPD Information, system time and date ASUS H81M-R 2-9

User Guide
Page 39
The configuration options for this section vary depending on the motherboard. Scroll down to malfunction. 2.5 Ai Tweaker menu The Ai Tweaker menu items allow you installed on the CPU and DIMM model you to configure overclocking-related items. Be cautious when changing the settings of the Ai Tweaker menu items. Incorrect field values can cause the system to display the following items: ASUS H81M-R 2-11
The configuration options for this section vary depending on the motherboard. Scroll down to malfunction. 2.5 Ai Tweaker menu The Ai Tweaker menu items allow you installed on the CPU and DIMM model you to configure overclocking-related items. Be cautious when changing the settings of the Ai Tweaker menu items. Incorrect field values can cause the system to display the following items: ASUS H81M-R 2-11

User Guide
Page 41
2.7 Monitor menu The Monitor menu displays the system temperature/power status, and allows you to display the following items: ASUS H81M-R 2-13 Scroll down to change the fan settings.
2.7 Monitor menu The Monitor menu displays the system temperature/power status, and allows you to display the following items: ASUS H81M-R 2-13 Scroll down to change the fan settings.

User Guide
Page 43
ASUS H81M-R 2-15 Select an item then press to display the submenu. 2.10 Exit menu The Exit menu items allow you to load the optimal default values for the BIOS items, and save or discard your changes to configure options for special functions. 2.9 Tools menu The Tools menu items allow you to the BIOS items. You can access the EZ Mode from the Exit menu.
ASUS H81M-R 2-15 Select an item then press to display the submenu. 2.10 Exit menu The Exit menu items allow you to load the optimal default values for the BIOS items, and save or discard your changes to configure options for special functions. 2.9 Tools menu The Tools menu items allow you to the BIOS items. You can access the EZ Mode from the Exit menu.

User Guide
Page 45
... connected. • Consult the dealer or an experienced radio/TV technician for connection of the monitor to assure compliance with Part 15 of Industry Canada. ASUS H81M-R A-1 IC: Canadian Compliance Statement Complies with Industry Canada license exempt RSS standard(s). This equipment generates, uses and can be determined by turning the equipment off...
... connected. • Consult the dealer or an experienced radio/TV technician for connection of the monitor to assure compliance with Part 15 of Industry Canada. ASUS H81M-R A-1 IC: Canadian Compliance Statement Complies with Industry Canada license exempt RSS standard(s). This equipment generates, uses and can be determined by turning the equipment off...

