
User Guide
Page 6
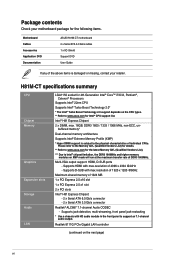
...an 7.1-channel audio output. Supports HDMI with HD audio module in the front panel to www.asus.com for the following items. Motherboard Cables Accessories Application DVD Documentation ASUS H81M-CT motherboard 2 x Serial ATA 6.0 Gb/s cables 1 x I/O Shield Support DVD User Guide ...If any of 4096 x 2304 @24Hz - H81M-CT specifications summary CPU Chipset Memory Graphics Expansion slots Storage Audio LAN...
...an 7.1-channel audio output. Supports HDMI with HD audio module in the front panel to www.asus.com for the following items. Motherboard Cables Accessories Application DVD Documentation ASUS H81M-CT motherboard 2 x Serial ATA 6.0 Gb/s cables 1 x I/O Shield Support DVD User Guide ...If any of 4096 x 2304 @24Hz - H81M-CT specifications summary CPU Chipset Memory Graphics Expansion slots Storage Audio LAN...

User Guide
Page 9
... cause severe damage to the motherboard, peripherals, or components. 1.2 Motherboard overview Before you install the motherboard, study the configuration of your chassis to the chassis. ASUS H81M-CT 1-1 Product introduction 1 1.1 Before you proceed Take note of the following precautions before you install motherboard components or change any motherboard settings. • Unplug the power...
... cause severe damage to the motherboard, peripherals, or components. 1.2 Motherboard overview Before you install the motherboard, study the configuration of your chassis to the chassis. ASUS H81M-CT 1-1 Product introduction 1 1.1 Before you proceed Take note of the following precautions before you install motherboard components or change any motherboard settings. • Unplug the power...
User Guide
Page 11
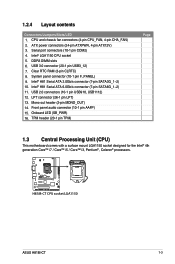
.... ATX power connectors (24-pin ATXPWR, 4-pin ATX12V) 3. USB 3.0 connector (20-1 pin USB3_12) 7. LPT connector (26-1 pin LPT) 13. Serial port connectors (10-1 pin COM2) 4. H81M-CT H81M-CT CPU socket LGA1150 ASUS H81M-CT 1-3 Clear RTC RAM (3-pin CLRTC) 8. System panel connector (10-1 pin F_PANEL) 9. DDR3 DIMM slots 6. 1.2.4 Layout contents Connectors/Jumpers/Slots/LED 1.
.... ATX power connectors (24-pin ATXPWR, 4-pin ATX12V) 3. USB 3.0 connector (20-1 pin USB3_12) 7. LPT connector (26-1 pin LPT) 13. Serial port connectors (10-1 pin COM2) 4. H81M-CT H81M-CT CPU socket LGA1150 ASUS H81M-CT 1-3 Clear RTC RAM (3-pin CLRTC) 8. System panel connector (10-1 pin F_PANEL) 9. DDR3 DIMM slots 6. 1.2.4 Layout contents Connectors/Jumpers/Slots/LED 1.

User Guide
Page 13
4 C 5 A B 1.3.2 CPU heatsink and fan assembly installation Apply the Thermal Interface Material to the CPU heatsink and CPU before you install the heatsink and fan if necessary. ASUS H81M-CT 1-5
4 C 5 A B 1.3.2 CPU heatsink and fan assembly installation Apply the Thermal Interface Material to the CPU heatsink and CPU before you install the heatsink and fan if necessary. ASUS H81M-CT 1-5

User Guide
Page 15
...) sockets. 1.4 System memory 1.4.1 Overview This motherboard comes with the same CAS latency. DIMM_A1 DIMM_B1 Channel Channel A Channel B Sockets DIMM_A1 DIMM_B1 H81M-CT H81M-CT 240-pin DDR3 DIMM sockets 1.4.2 Memory configurations You may install 1GB, 2GB, 4GB, and 8GB unbuffered non-ECC DDR3 DIMMs into the DIMM ...excess memory from the same vendor. Check with the retailer to get the correct memory modules. • Due to protect the CPU. ASUS H81M-CT 1-7 A DDR3 module is recommended to the memory address limitation on 32-bit Windows® OS, when you do any of the same...
...) sockets. 1.4 System memory 1.4.1 Overview This motherboard comes with the same CAS latency. DIMM_A1 DIMM_B1 Channel Channel A Channel B Sockets DIMM_A1 DIMM_B1 H81M-CT H81M-CT 240-pin DDR3 DIMM sockets 1.4.2 Memory configurations You may install 1GB, 2GB, 4GB, and 8GB unbuffered non-ECC DDR3 DIMMs into the DIMM ...excess memory from the same vendor. Check with the retailer to get the correct memory modules. • Due to protect the CPU. ASUS H81M-CT 1-7 A DDR3 module is recommended to the memory address limitation on 32-bit Windows® OS, when you do any of the same...
User Guide
Page 17
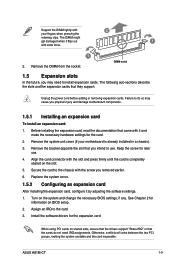
... assignments. Before installing the expansion card, read the documentation that you removed earlier. 6. Turn on the system and change the necessary BIOS settings, if any. ASUS H81M-CT 1-9 Failure to install expansion cards. Keep the screw for the card. 2. Install the software drivers for information on BIOS setup. 2. When using PCI cards on...
... assignments. Before installing the expansion card, read the documentation that you removed earlier. 6. Turn on the system and change the necessary BIOS settings, if any. ASUS H81M-CT 1-9 Failure to install expansion cards. Keep the screw for the card. 2. Install the software drivers for information on BIOS setup. 2. When using PCI cards on...
User Guide
Page 19
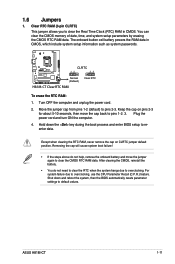
...: 1. For system failure due to pins 2-3. 1.6 Jumpers 1. Turn OFF the computer and unplug the power cord. 2. Plug the power cord and turn ON the computer. 4. ASUS H81M-CT 1-11 Clear RTC RAM (3-pin CLRTC) This jumper allows you to pins 1-2. 3. After clearing the CMOS, reinstall the battery. • You do not help, remove...
...: 1. For system failure due to pins 2-3. 1.6 Jumpers 1. Turn OFF the computer and unplug the power cord. 2. Plug the power cord and turn ON the computer. 4. ASUS H81M-CT 1-11 Clear RTC RAM (3-pin CLRTC) This jumper allows you to pins 1-2. 3. After clearing the CMOS, reinstall the battery. • You do not help, remove...
User Guide
Page 21
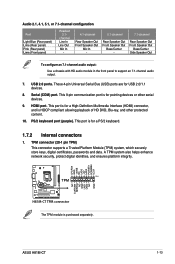
...separately. HDMI port. channel Line In Line Out Mic In - 4.1-channel 5.1-channel 7.1-channel Rear Speaker Out Front Speaker Out Mic In - ASUS H81M-CT 1-13 A TPM system also helps enhance network security, protect digital identities, and ensures platform integrity. Rear Speaker Out Front Speaker Out Bass/...an 7.1-channel audio output. 7. PS/2 keyboard port (purple). LPCPD# GND +3VSB NC LAD0 +3V LAD3 PCIRST# LFRAME# LCLK H81M-CT TPM PIN 1 NC CLKRUN# SERIRQ NC GND LAD1 LAD2 NC GND H81M-CT TPM connector The TPM module is for pointing devices or other protected content. 10.
...separately. HDMI port. channel Line In Line Out Mic In - 4.1-channel 5.1-channel 7.1-channel Rear Speaker Out Front Speaker Out Mic In - ASUS H81M-CT 1-13 A TPM system also helps enhance network security, protect digital identities, and ensures platform integrity. Rear Speaker Out Front Speaker Out Bass/...an 7.1-channel audio output. 7. PS/2 keyboard port (purple). LPCPD# GND +3VSB NC LAD0 +3V LAD3 PCIRST# LFRAME# LCLK H81M-CT TPM PIN 1 NC CLKRUN# SERIRQ NC GND LAD1 LAD2 NC GND H81M-CT TPM connector The TPM module is for pointing devices or other protected content. 10.
User Guide
Page 23
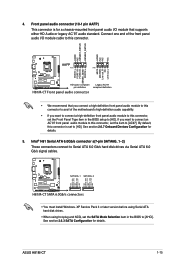
...® H81 Serial ATA 6.0Gb/s connector s(7-pin SATA6G_1~2) These connectors connect to [AHCI]. H81M-CT SATA6G_1 SATA6G_2 GND RSATA_RXP1 RSATA_RXN1 GND RSATA_TXN1 RSATA_TXP1 GND GND RSATA_RXP2 RSATA_RXN2 GND RSATA_TXN2 RSATA_TXP2 GND H81M-CT SATA 6.0Gb/s connectors • You must install Windows. ASUS H81M-CT 1-15 4. AGND NC SENSE1_RETUR SENSE2_RETUR AGND NC NC NC AAFP PIN 1 PIN 1 MIC2...
...® H81 Serial ATA 6.0Gb/s connector s(7-pin SATA6G_1~2) These connectors connect to [AHCI]. H81M-CT SATA6G_1 SATA6G_2 GND RSATA_RXP1 RSATA_RXN1 GND RSATA_TXN1 RSATA_TXP1 GND GND RSATA_RXP2 RSATA_RXN2 GND RSATA_TXN2 RSATA_TXP2 GND H81M-CT SATA 6.0Gb/s connectors • You must install Windows. ASUS H81M-CT 1-15 4. AGND NC SENSE1_RETUR SENSE2_RETUR AGND NC NC NC AAFP PIN 1 PIN 1 MIC2...
User Guide
Page 25
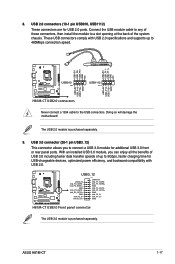
... USB connectors. USB+5V USB_P11USB_P11+ GND NC USB+5V USB_P9USB_P9+ GND NC H81M-CT USB910 PIN 1 USB1112 PIN 1 USB+5V USB_P12USB_P12+ GND USB+5V USB_P10USB_P10+ GND H81M-CT USB2.0 connectors Never connect a 1394 cable to connect a USB 3.0 module ... IntA_P2_SSTXIntA_P2_SSTX+ GND IntA_P2_DIntA_P2_D+ PIN 1 USB3+5V IntA_P1_SSRXIntA_P1_SSRX+ GND IntA_P1_SSTXIntA_P1_SSTX+ GND IntA_P1_DIntA_P1_D+ GND H81M-CT USB3.0 Front panel connector The USB 3.0 module is purchased separately. 9. ASUS H81M-CT 1-17 USB 2.0 connectors (10-1 pin USB910, USB1112) These connectors are for additional USB...
... USB connectors. USB+5V USB_P11USB_P11+ GND NC USB+5V USB_P9USB_P9+ GND NC H81M-CT USB910 PIN 1 USB1112 PIN 1 USB+5V USB_P12USB_P12+ GND USB+5V USB_P10USB_P10+ GND H81M-CT USB2.0 connectors Never connect a 1394 cable to connect a USB 3.0 module ... IntA_P2_SSTXIntA_P2_SSTX+ GND IntA_P2_DIntA_P2_D+ PIN 1 USB3+5V IntA_P1_SSRXIntA_P1_SSRX+ GND IntA_P1_SSTXIntA_P1_SSTX+ GND IntA_P1_DIntA_P1_D+ GND H81M-CT USB3.0 Front panel connector The USB 3.0 module is purchased separately. 9. ASUS H81M-CT 1-17 USB 2.0 connectors (10-1 pin USB910, USB1112) These connectors are for additional USB...

User Guide
Page 27
12. Ground HWRST# (NC) H81M-CT PIN 1 +HDD_LED RESET H81M-CT System panel connector • System power LED (2-pin PWR_LED) This 2-pin connector is for the chassis-mounted reset button for system reboot without turning off ... is for the system power button. • Reset button (2-pin RESET) This 2-pin connector is for the HDD Activity LED. H81M-CT SB_PWR ON OFF Standby Power Powered Off H81M-CT Onboard LED ASUS H81M-CT 1-19 System panel connector (10-1 pin PANEL) This connector supports several chassis-mounted functions. Connect the HDD Activity LED cable to...
12. Ground HWRST# (NC) H81M-CT PIN 1 +HDD_LED RESET H81M-CT System panel connector • System power LED (2-pin PWR_LED) This 2-pin connector is for the chassis-mounted reset button for system reboot without turning off ... is for the system power button. • Reset button (2-pin RESET) This 2-pin connector is for the HDD Activity LED. H81M-CT SB_PWR ON OFF Standby Power Powered Off H81M-CT Onboard LED ASUS H81M-CT 1-19 System panel connector (10-1 pin PANEL) This connector supports several chassis-mounted functions. Connect the HDD Activity LED cable to...
User Guide
Page 29
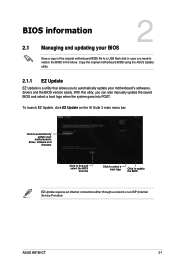
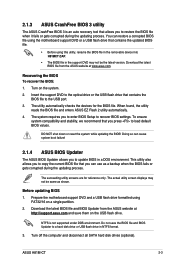
... Provider). Copy the original motherboard BIOS using the ASUS Update utility. 2.1.1 EZ Update EZ Update is a utility that allows you can also manually update the saved BIOS and select a boot logo when the system goes into POST. BIOS information 2.1 Managing and updating your motherboard's softwares, drivers and the BIOS version easily. ASUS H81M-CT 2-1
... Provider). Copy the original motherboard BIOS using the ASUS Update utility. 2.1.1 EZ Update EZ Update is a utility that allows you can also manually update the saved BIOS and select a boot logo when the system goes into POST. BIOS information 2.1 Managing and updating your motherboard's softwares, drivers and the BIOS version easily. ASUS H81M-CT 2-1
User Guide
Page 31
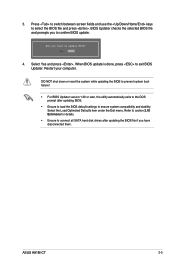
...BIOS in NTFS format. 3. Download the latest BIOS file and BIOS Updater from the ASUS website at http://support.asus.com and save the BIOS file and BIOS Updater to load default BIOS values. ASUS H81M-CT 2-3 Insert the support DVD to the optical drive or the USB flash drive that ...contains the BIOS file to restore the BIOS file when it fails or gets corrupted during the updating process. Doing so can cause system boot failure! 2.1.4 ASUS BIOS Updater The ASUS BIOS Updater...
...BIOS in NTFS format. 3. Download the latest BIOS file and BIOS Updater from the ASUS website at http://support.asus.com and save the BIOS file and BIOS Updater to load default BIOS values. ASUS H81M-CT 2-3 Insert the support DVD to the optical drive or the USB flash drive that ...contains the BIOS file to restore the BIOS file when it fails or gets corrupted during the updating process. Doing so can cause system boot failure! 2.1.4 ASUS BIOS Updater The ASUS BIOS Updater...
User Guide
Page 33
... settings to confirm BIOS update. 4. Select Yes and press . When BIOS update is done, press to select the BIOS file and press . Restart your computer. ASUS H81M-CT 2-5 BIOS Updater checks the selected BIOS file and prompts you have disconnected them. DO NOT shut down or reset the system while updating the BIOS...
... settings to confirm BIOS update. 4. Select Yes and press . When BIOS update is done, press to select the BIOS file and press . Restart your computer. ASUS H81M-CT 2-5 BIOS Updater checks the selected BIOS file and prompts you have disconnected them. DO NOT shut down or reset the system while updating the BIOS...
User Guide
Page 35
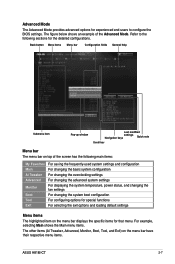
... shows the Main menu items. The other items (Ai Tweaker, Advanced, Monitor, Boot, Tool, and Exit) on the menu bar have their respective menu items. ASUS H81M-CT 2-7 Advanced Mode The Advanced Mode provides advanced options for experienced end-users to the following main items: My Favorites Main Ai Tweaker Advanced Monitor Boot...
... shows the Main menu items. The other items (Ai Tweaker, Advanced, Monitor, Boot, Tool, and Exit) on the menu bar have their respective menu items. ASUS H81M-CT 2-7 Advanced Mode The Advanced Mode provides advanced options for experienced end-users to the following main items: My Favorites Main Ai Tweaker Advanced Monitor Boot...
User Guide
Page 37
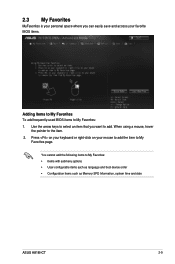
... submenu options • User-configurable items such as language and boot device order • Configuration items such as Memory SPD Information, system time and date ASUS H81M-CT 2-9
... submenu options • User-configurable items such as language and boot device order • Configuration items such as Memory SPD Information, system time and date ASUS H81M-CT 2-9
User Guide
Page 39
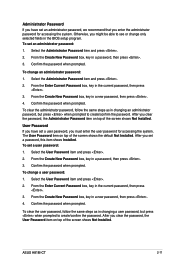
... If you have set a password, this item shows Installed. To change a user password: 1. From the Create New Password box, key in a new password, then press . 4. ASUS H81M-CT 2-11 From the Create New Password box, key in the current password, then press . 3. To change an administrator password: 1. From the Enter Current Password box...
... If you have set a password, this item shows Installed. To change a user password: 1. From the Create New Password box, key in a new password, then press . 4. ASUS H81M-CT 2-11 From the Create New Password box, key in the current password, then press . 3. To change an administrator password: 1. From the Enter Current Password box...
User Guide
Page 41
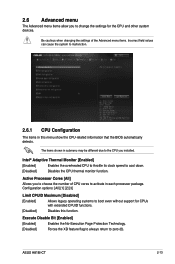
... and other system devices. Intel® Adaptive Thermal Monitor [Enabled] [Enabled] Enables the overheated CPU to throttle its clock speed to the CPU you installed. ASUS H81M-CT 2-13 2.6 Advanced menu The Advanced menu items allow you to choose the number of the Advanced menu items. Incorrect field values can cause the system...
... and other system devices. Intel® Adaptive Thermal Monitor [Enabled] [Enabled] Enables the overheated CPU to throttle its clock speed to the CPU you installed. ASUS H81M-CT 2-13 2.6 Advanced menu The Advanced menu items allow you to choose the number of the Advanced menu items. Incorrect field values can cause the system...
User Guide
Page 43
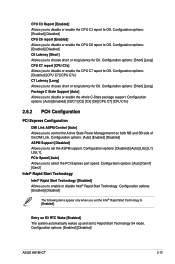
Configuration options: [Short] [Long] Package C State Support [Auto] Allows you to OS. Configuration options: [Enabled] [Disabled] ASUS H81M-CT 2-15 Configuration options: [Disabled] [CPU C7] [CPU C7s] C7 Latency [Long] Allows you to choose short or long latency for C6. Entry on both NB ...
Configuration options: [Short] [Long] Package C State Support [Auto] Allows you to OS. Configuration options: [Enabled] [Disabled] ASUS H81M-CT 2-15 Configuration options: [Disabled] [CPU C7] [CPU C7s] C7 Latency [Long] Allows you to choose short or long latency for C6. Entry on both NB ...
User Guide
Page 45
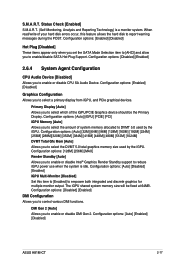
... DVMT 5.0 total graphics memory size used by the iGPU. The iGPU shared system memory size will be the Primary Display. Configuration options: [Auto] [Enabled] [Disabled] ASUS H81M-CT 2-17 Configuration options: [128M] [256M] [MAX] Render Standby [Auto] Allows you to empower both integrated and discrete graphics for multiple-monitor output. Configuration options: [Auto...
... DVMT 5.0 total graphics memory size used by the iGPU. The iGPU shared system memory size will be the Primary Display. Configuration options: [Auto] [Enabled] [Disabled] ASUS H81M-CT 2-17 Configuration options: [128M] [256M] [MAX] Render Standby [Auto] Allows you to empower both integrated and discrete graphics for multiple-monitor output. Configuration options: [Auto...


