

User Manual
Page 2
...This Manual...iv Safety Precautions...v Chapter 1: Knowing the Parts Top Side...1-2 Bottom Side...1-5 Front Side...1-6 Right Side...1-7 Left Side...1-8 Keyboard Usage...1-9 Special Function Keys 1-9 Touchpad Usage...1-11 Multi-finger gesture input 1-11 Chapter 2: Getting Started Powering on your Eee PC...2-2 First-time Startup...2-3 Desktop...2-4 Network Connection...2-5 Configuring a wireless network connection 2-5 Local Area Network 2-6 Browsing web pages 2-9 WLAN Setup FAQ (Windows XP 2-10 Chapter 3: Using the Eee PC ASUS Update...3-2 Updating the BIOS through...
...This Manual...iv Safety Precautions...v Chapter 1: Knowing the Parts Top Side...1-2 Bottom Side...1-5 Front Side...1-6 Right Side...1-7 Left Side...1-8 Keyboard Usage...1-9 Special Function Keys 1-9 Touchpad Usage...1-11 Multi-finger gesture input 1-11 Chapter 2: Getting Started Powering on your Eee PC...2-2 First-time Startup...2-3 Desktop...2-4 Network Connection...2-5 Configuring a wireless network connection 2-5 Local Area Network 2-6 Browsing web pages 2-9 WLAN Setup FAQ (Windows XP 2-10 Chapter 3: Using the Eee PC ASUS Update...3-2 Updating the BIOS through...
User Manual
Page 4
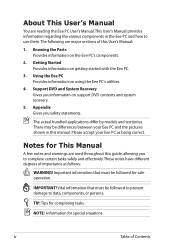
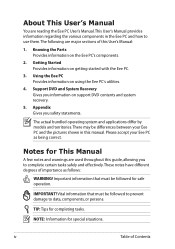
... be followed for This Manual A few notes and warnings are used throughout this guide, allowing you to use them.The following are major sections of Contents Getting Started Provides information on support DVD contents and system recovery. 5. The actual bundled applications differ by models and territories. Notes for safe operation. About This User's Manual You are reading the Eee PC User's Manual.This User's Manual provides information regarding the...
... be followed for This Manual A few notes and warnings are used throughout this guide, allowing you to use them.The following are major sections of Contents Getting Started Provides information on support DVD contents and system recovery. 5. The actual bundled applications differ by models and territories. Notes for safe operation. About This User's Manual You are reading the Eee PC User's Manual.This User's Manual provides information regarding the...

User Manual
Page 11
... function by pressing + . 5 Power Switch The power switch allows powering ON and OFF the Eee PC and recovering from STR. Power Indicator The power indicator lights when the Eee PC is turned ON and blinks slowly when the Eee PC is in the Save-to -RAM (Suspend) mode. The power switch only works when the display panel is turned OFF. 6 Keyboard The keyboard provides keys with traditional single microphones. 2 Built-in Camera 3 Display Panel 4 Touchpad key Toggles the touchpad ON/OFF. This indicator is OFF when the Eee PC is opened. 1 Digital Microphone...
... function by pressing + . 5 Power Switch The power switch allows powering ON and OFF the Eee PC and recovering from STR. Power Indicator The power indicator lights when the Eee PC is turned ON and blinks slowly when the Eee PC is in the Save-to -RAM (Suspend) mode. The power switch only works when the display panel is turned OFF. 6 Keyboard The keyboard provides keys with traditional single microphones. 2 Built-in Camera 3 Display Panel 4 Touchpad key Toggles the touchpad ON/OFF. This indicator is OFF when the Eee PC is opened. 1 Digital Microphone...
User Manual
Page 17
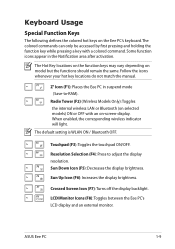
... accessed by first pressing and holding the function key while pressing a key with an on model but the functions should remain the same. The Hot Key locations on the function keys may vary depending on -screen-display. When enabled, the corresponding wireless indicator will light. Some function icons appear in suspend mode (Save-to adjust the display resolution. Sun Down Icon (F5): Decreases the display brightness. LCD/Monitor Icons (F8): Toggles between the Eee PC's LCD display and an external monitor. Keyboard...
... accessed by first pressing and holding the function key while pressing a key with an on model but the functions should remain the same. The Hot Key locations on the function keys may vary depending on -screen-display. When enabled, the corresponding wireless indicator will light. Some function icons appear in suspend mode (Save-to adjust the display resolution. Sun Down Icon (F5): Decreases the display brightness. LCD/Monitor Icons (F8): Toggles between the Eee PC's LCD display and an external monitor. Keyboard...

User Manual
Page 22
... Eee PC. Powering on your Eee PC These are only quick instructions for use with a faulty ACDC adapter. • When you use a different adapter to power the Eee PC. You may damage both your Eee PC. 1. The output voltage of working data. Remember to fully charge the battery (8 hours or more) before first use and whenever it down to the table or else the hinges may occur if you open the display panel...
... Eee PC. Powering on your Eee PC These are only quick instructions for use with a faulty ACDC adapter. • When you use a different adapter to power the Eee PC. You may damage both your Eee PC. 1. The output voltage of working data. Remember to fully charge the battery (8 hours or more) before first use and whenever it down to the table or else the hinges may occur if you open the display panel...

User Manual
Page 37
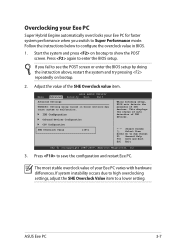
... overclocking settings, adjust the SHE Overclock Value item to see the POST screen or enter the BIOS setup by doing the instruction above, restart the system and try pressing repeatedly on bootup to save the configuration and restart Eee PC. ASUS Eee PC 3-7 Follow the instructions below sections may cause system to Super Performance mode. Press again to configure the overclock value in below to enter the BIOS setup. Adjust...
... overclocking settings, adjust the SHE Overclock Value item to see the POST screen or enter the BIOS setup by doing the instruction above, restart the system and try pressing repeatedly on bootup to save the configuration and restart Eee PC. ASUS Eee PC 3-7 Follow the instructions below sections may cause system to Super Performance mode. Press again to configure the overclock value in below to enter the BIOS setup. Adjust...
User Manual
Page 43
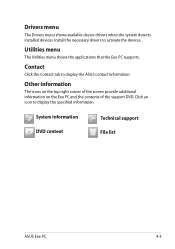
... system detects installed devices. Install the necessary drivers to display the specified information. Click an icon to activate the devices. System information DVD content Technical support File list ASUS Eee PC 4-3 Contact Click the Contact tab to display the ASUS contact information. Other information The icons on the top right corner of the screen provide additional information on the Eee PC and the contents of the support DVD. Utilities menu The Utilities menu shows...
... system detects installed devices. Install the necessary drivers to display the specified information. Click an icon to activate the devices. System information DVD content Technical support File list ASUS Eee PC 4-3 Contact Click the Contact tab to display the ASUS contact information. Other information The icons on the top right corner of the screen provide additional information on the Eee PC and the contents of the support DVD. Utilities menu The Utilities menu shows...

User Manual
Page 44
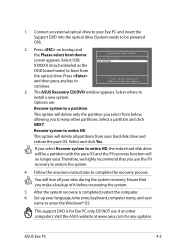
... factory.The Support DVD provides a comprehensive recovery solution that your system drive is in the Recovery System for Eee PC dialog box. 5. Click OK in good working state, provided that quickly restores your system to its original working order. Select USB: XXXXXX (may be powered ON). 2. Press any customized configuration settings (such as the Please select boot device: HDD:Hitachi HTS543216L USB:XXXXXXXX ODD brand name) to start the system recovery. 4-4 Chapter 4: Support DVD & System Recovery...
... factory.The Support DVD provides a comprehensive recovery solution that your system drive is in the Recovery System for Eee PC dialog box. 5. Click OK in good working state, provided that quickly restores your system to its original working order. Select USB: XXXXXX (may be powered ON). 2. Press any customized configuration settings (such as the Please select boot device: HDD:Hitachi HTS543216L USB:XXXXXXXX ODD brand name) to start the system recovery. 4-4 Chapter 4: Support DVD & System Recovery...
User Manual
Page 45
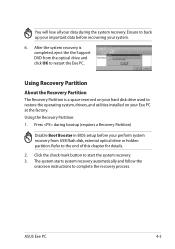
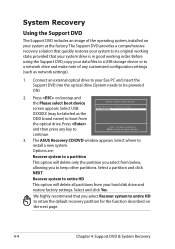
... to restore the operating system, drivers, and utilities installed on your hard disk drive used to restart the Eee PC. ASUS Eee PC 4-5 Ensure to the end of this chapter for details. 2. Press during the system recovery. Click the check mark button to complete the recovery process. Using Recovery Partition About the Recovery Partition The Recovery Partition is completed, eject the the Support DVD from USB flash disk, external optical drive or hidden partition. After the system recovery is a space reserved on your Eee PC...
... to restore the operating system, drivers, and utilities installed on your hard disk drive used to restart the Eee PC. ASUS Eee PC 4-5 Ensure to the end of this chapter for details. 2. Press during the system recovery. Click the check mark button to complete the recovery process. Using Recovery Partition About the Recovery Partition The Recovery Partition is completed, eject the the Support DVD from USB flash disk, external optical drive or hidden partition. After the system recovery is a space reserved on your Eee PC...

User Manual
Page 46
... repeatedly on bootup to enable Boot Booster after you change or system recovery. 4-6 Chapter 4: Support DVD & System Recovery However, you MUST disable this BIOS item before you complete hardware change any Eee PC components or perform system recovery (from USB flash disk, external optical drive or hidden partition). Press to enter the BIOS setup. 2. Boot Booster The Boot Booster item in BIOS setup helps shorten your Eee PC bootup time. Follow the instructions below to Sub Screen F1 General Help F10...
... repeatedly on bootup to enable Boot Booster after you change or system recovery. 4-6 Chapter 4: Support DVD & System Recovery However, you MUST disable this BIOS item before you complete hardware change any Eee PC components or perform system recovery (from USB flash disk, external optical drive or hidden partition). Press to enter the BIOS setup. 2. Boot Booster The Boot Booster item in BIOS setup helps shorten your Eee PC bootup time. Follow the instructions below to Sub Screen F1 General Help F10...
User Manual
Page 4
... safely and effectively.These notes have different degrees of Contents Knowing the Parts Provides information on getting started with the Eee PC. 3. Using the Eee PC Provides information on support DVD contents and system recovery. 5. About This User's Manual You are reading the Eee PC User's Manual.This User's Manual provides information regarding the various components in this manual. TIP: Tips for This Manual A few notes and warnings are used throughout this guide...
... safely and effectively.These notes have different degrees of Contents Knowing the Parts Provides information on getting started with the Eee PC. 3. Using the Eee PC Provides information on support DVD contents and system recovery. 5. About This User's Manual You are reading the Eee PC User's Manual.This User's Manual provides information regarding the various components in this manual. TIP: Tips for This Manual A few notes and warnings are used throughout this guide...

User Manual
Page 11
... Eee PC and recovering from STR. Press the switch once to turn ON and hold it to turn on models. 7 Touchpad and Buttons The touchpad and its buttons comprises a pointing device that provides the same functions as a desktop mouse. 8 Status Indicators Power Indicator The power indicator lights when the Eee PC is turned ON and blinks slowly when the Eee PC is in the Save-to -RAM (Suspend) mode. This indicator is OFF when the Eee PC is turned OFF. 6 Keyboard The keyboard provides keys...
... Eee PC and recovering from STR. Press the switch once to turn ON and hold it to turn on models. 7 Touchpad and Buttons The touchpad and its buttons comprises a pointing device that provides the same functions as a desktop mouse. 8 Status Indicators Power Indicator The power indicator lights when the Eee PC is turned ON and blinks slowly when the Eee PC is in the Save-to -RAM (Suspend) mode. This indicator is OFF when the Eee PC is turned OFF. 6 Keyboard The keyboard provides keys...

User Manual
Page 17
... the internal wireless LAN or Bluetooth (on selected models) ON or OFF with a colored command. When enabled, the corresponding wireless indicator will light. ASUS Eee PC 1-9 Keyboard Usage Special Function Keys The following defines the colored hot keys on the Eee PC's keyboard. Follow the icons whenever your hot key locations do not match the manual. Sun Up Icon (F6): Increases the display brightness. The default setting is WLAN ON / Bluetooth OFF. Sun Down Icon (F5): Decreases the display brightness. LCD/Monitor Icons...
... the internal wireless LAN or Bluetooth (on selected models) ON or OFF with a colored command. When enabled, the corresponding wireless indicator will light. ASUS Eee PC 1-9 Keyboard Usage Special Function Keys The following defines the colored hot keys on the Eee PC's keyboard. Follow the icons whenever your hot key locations do not match the manual. Sun Up Icon (F6): Increases the display brightness. The default setting is WLAN ON / Bluetooth OFF. Sun Down Icon (F5): Decreases the display brightness. LCD/Monitor Icons...
User Manual
Page 31
Start the system and press on bootup. 2. Main BIOS SETUP UTILITY Advanced Security Boot Exit Advanced Settings WARNING: Setting wrong values in BIOS. 1. Press to a lower setting. If system instability occurs due to high overclocking settings, adjust the SHE Overclock Value item to save the configuration and restart Eee PC. Overclocking your Eee PC Super Hybrid Engine automatically overclocks your Eee PC varies with hardware differences. Follow the instructions below sections...
Start the system and press on bootup. 2. Main BIOS SETUP UTILITY Advanced Security Boot Exit Advanced Settings WARNING: Setting wrong values in BIOS. 1. Press to a lower setting. If system instability occurs due to high overclocking settings, adjust the SHE Overclock Value item to save the configuration and restart Eee PC. Overclocking your Eee PC Super Hybrid Engine automatically overclocks your Eee PC varies with hardware differences. Follow the instructions below sections...

User Manual
Page 36
... quickly restores the pure operating system without drivers and utilities being installed. System Recovery Disable Boot Booster in the Recovery System dialog box to start the system recovery. 3. Refer to the end of any customized configuration settings (such as network settings). Press during bootup (requires a Recovery Partition) Ensure to complete the recovery process. When you restore your data files to a USB storage device or to restore the operating system, drivers, and utilities installed on your Eee PC. 4-4 Chapter 4: Support DVD & System Recovery Using...
... quickly restores the pure operating system without drivers and utilities being installed. System Recovery Disable Boot Booster in the Recovery System dialog box to start the system recovery. 3. Refer to the end of any customized configuration settings (such as network settings). Press during bootup (requires a Recovery Partition) Ensure to complete the recovery process. When you restore your data files to a USB storage device or to restore the operating system, drivers, and utilities installed on your Eee PC. 4-4 Chapter 4: Support DVD & System Recovery Using...
User Manual
Page 37
... support DVD is completed, restart the computer. 6. ASUS Eee PC 4-5 Select a partition and click NEXT. You will no longer exist. Set up your Eee PC and insert the Support DVD into the optical drive (System needs to install a new system. Connect an external optical drive to your language, time zone, keyboard, computer name, and user name to select boot device continue. 3. If you use it before recovering the system. 5. Select USB: XXXXXX (may be powered ON). 2. Options...
... support DVD is completed, restart the computer. 6. ASUS Eee PC 4-5 Select a partition and click NEXT. You will no longer exist. Set up your Eee PC and insert the Support DVD into the optical drive (System needs to install a new system. Connect an external optical drive to your language, time zone, keyboard, computer name, and user name to select boot device continue. 3. If you use it before recovering the system. 5. Select USB: XXXXXX (may be powered ON). 2. Options...

User Manual
Page 38
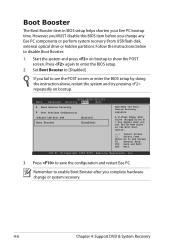
...below to enter the BIOS setup. 2. Start the system and press on bootup. Press again to disable Boot Booster: 1. Main BIOS SETUP UTILITY Advanced Security Boot Exit Boot Device Priority Boot Settings Configuration OnBoard LAN Boot ROM [Enabled] Boot Booster [Disabled] Specifies the Boot Device Priority sequence. Set Boot Booster to [Disabled] If you complete hardware change any Eee PC components or perform system recovery (from USB flash disk, external optical drive or hidden partition). Remember to save the configuration and restart Eee PC. Boot Booster The...
...below to enter the BIOS setup. 2. Start the system and press on bootup. Press again to disable Boot Booster: 1. Main BIOS SETUP UTILITY Advanced Security Boot Exit Boot Device Priority Boot Settings Configuration OnBoard LAN Boot ROM [Enabled] Boot Booster [Disabled] Specifies the Boot Device Priority sequence. Set Boot Booster to [Disabled] If you complete hardware change any Eee PC components or perform system recovery (from USB flash disk, external optical drive or hidden partition). Remember to save the configuration and restart Eee PC. Boot Booster The...

User Manual
Page 17
... activation. Sun Down Icon (F5): Decreases the display brightness. Sun Up Icon (F6): Increases the display brightness. Crossed Screen Icon (F7): Turns off the display backlight. When enabled, the corresponding wireless indicator will light. ASUS Eee PC 1-9 Resolution Selection (F4): Press to -RAM). LCD/Monitor Icons (F8): Toggles between the Eee PC's LCD display and an external monitor. The Hot Key locations on the function keys may vary depending on the Eee PC's keyboard. Some function icons appear in suspend mode (Save-to adjust the display...
... activation. Sun Down Icon (F5): Decreases the display brightness. Sun Up Icon (F6): Increases the display brightness. Crossed Screen Icon (F7): Turns off the display backlight. When enabled, the corresponding wireless indicator will light. ASUS Eee PC 1-9 Resolution Selection (F4): Press to -RAM). LCD/Monitor Icons (F8): Toggles between the Eee PC's LCD display and an external monitor. The Hot Key locations on the function keys may vary depending on the Eee PC's keyboard. Some function icons appear in suspend mode (Save-to adjust the display...
User Manual
Page 36
... continue. Select and click Yes. System Recovery Using the Support DVD The Support DVD includes an image of any key to entire HD This option will delete only the partition you select from below, allowing you select Recover system to entire HD to boot from your hard disk drive and restore factory settings. Connect an external optical drive to your Eee PC and insert the Support DVD into the optical drive (System needs to its original working order.
... continue. Select and click Yes. System Recovery Using the Support DVD The Support DVD includes an image of any key to entire HD This option will delete only the partition you select from below, allowing you select Recover system to entire HD to boot from your hard disk drive and restore factory settings. Connect an external optical drive to your Eee PC and insert the Support DVD into the optical drive (System needs to its original working order.
User Manual
Page 38
... the POST screen. A virtual floppy disk drive (Floppy Drive B: ) may appear when you complete hardware change any Eee PC components or perform system recovery (from USB flash disk, external optical drive or hidden partition). Remember to enable Boot Booster after you set the CD-ROM drive as the first boot device. ←→ Select Screen ↑↓ Select Item Enter Go to [Disabled] If you change or system recovery. 4-6 Chapter 4: Support DVD & System Recovery However, you MUST disable this BIOS item before...
... the POST screen. A virtual floppy disk drive (Floppy Drive B: ) may appear when you complete hardware change any Eee PC components or perform system recovery (from USB flash disk, external optical drive or hidden partition). Remember to enable Boot Booster after you set the CD-ROM drive as the first boot device. ←→ Select Screen ↑↓ Select Item Enter Go to [Disabled] If you change or system recovery. 4-6 Chapter 4: Support DVD & System Recovery However, you MUST disable this BIOS item before...


