
User Manual
Page 15
... microphone performance through Realtek HD Audio Manager: 1. When done, click OK. 4 LCD display (Touch-enabled function on selected models) The 21.6-inch LCD display, with Windows® Live Messenger or Skype™. EeeTop PC ET22 Series 15 English 3 Digital Microphone (Built-in) The built-in microphone can be used for details...
... microphone performance through Realtek HD Audio Manager: 1. When done, click OK. 4 LCD display (Touch-enabled function on selected models) The 21.6-inch LCD display, with Windows® Live Messenger or Skype™. EeeTop PC ET22 Series 15 English 3 Digital Microphone (Built-in) The built-in microphone can be used for details...
User Manual
Page 16
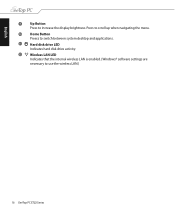
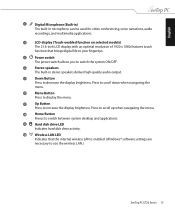
Wireless LAN LED Indicates that the internal wireless LAN is enabled. (Windows® software settings are necessary to scroll up when navigating the menu. Press to use the wireless LAN.) 16 EeeTop PC ET22 Series English 9 10 11 12 Up Button Press to switch between system desktop and applications. Hard disk drive LED Indicates hard disk drive activity. Home Button Preess to increase the display brightness.
Wireless LAN LED Indicates that the internal wireless LAN is enabled. (Windows® software settings are necessary to scroll up when navigating the menu. Press to use the wireless LAN.) 16 EeeTop PC ET22 Series English 9 10 11 12 Up Button Press to switch between system desktop and applications. Hard disk drive LED Indicates hard disk drive activity. Home Button Preess to increase the display brightness.
User Manual
Page 20
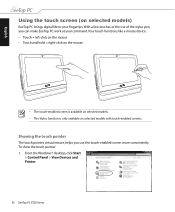
... the stylus pen, you use the touch-enabled screen more conveniently. English Using the touch screen (on selected models with touch-enabled screens. From the Windows® desktop, click Start > Control Panel > View Devices and Printer. 20 EeeTop PC ET22 Series Showing the touch pointer The touch pointer, virtual mouse, helps...
... the stylus pen, you use the touch-enabled screen more conveniently. English Using the touch screen (on selected models with touch-enabled screens. From the Windows® desktop, click Start > Control Panel > View Devices and Printer. 20 EeeTop PC ET22 Series Showing the touch pointer The touch pointer, virtual mouse, helps...

User Manual
Page 23
...+ F7: Toggles the LCD display ON and OFF. When enabled, the corresponding wireless LAN LED lights up. Windows® software settings are necessary to use the wireless LAN. Fn + V: Toggles the built-in Windows® OS). EeeTop PC ET22 Series 23 Fn + F10: Toggles the speakers ON and OFF (only in...; OS). Fn + F11: Decreases the speaker volume (only in suspend mode. Fn + F12: Increases the speaker volume (only in Windows® OS). English Function keys The following table defines the colored function keys on the keyboard. The actual colored function keys and supported ...
...+ F7: Toggles the LCD display ON and OFF. When enabled, the corresponding wireless LAN LED lights up. Windows® software settings are necessary to use the wireless LAN. Fn + V: Toggles the built-in Windows® OS). EeeTop PC ET22 Series 23 Fn + F10: Toggles the speakers ON and OFF (only in...; OS). Fn + F11: Decreases the speaker volume (only in suspend mode. Fn + F12: Increases the speaker volume (only in Windows® OS). English Function keys The following table defines the colored function keys on the keyboard. The actual colored function keys and supported ...

User Manual
Page 26
... switch again, click the mouse, touch the display, or press any key on the keyboard. • To shut down the system completely, follow the normal Windows shutdown process or press and hold the Power switch for five seconds. 26 EeeTop PC ET22 Series The • To put the system into suspend...
... switch again, click the mouse, touch the display, or press any key on the keyboard. • To shut down the system completely, follow the normal Windows shutdown process or press and hold the Power switch for five seconds. 26 EeeTop PC ET22 Series The • To put the system into suspend...
User Manual
Page 27
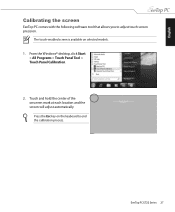
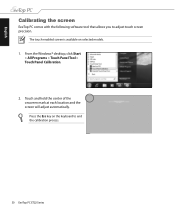
EeeTop PC ET22 Series 27 Touch and hold the center of the onscreen mark at each location and the screen will adjust automatically. Press the Esc key on selected models. 1. The touch-enabled screen is available on the keyboard to adjust touch screen precision. English Calibrating the screen EeeTop PC comes with the following software tool that allows you to end the calibration process. From the Windows® desktop, click Start > All Programs > Touch Panel Tool > Touch Panel Calibration. 2.
EeeTop PC ET22 Series 27 Touch and hold the center of the onscreen mark at each location and the screen will adjust automatically. Press the Esc key on selected models. 1. The touch-enabled screen is available on the keyboard to adjust touch screen precision. English Calibrating the screen EeeTop PC comes with the following software tool that allows you to end the calibration process. From the Windows® desktop, click Start > All Programs > Touch Panel Tool > Touch Panel Calibration. 2.

User Manual
Page 28
... has been established, the connection is shown on the upper right corner to a security-enabled network. 3. You can see the wireless network icon in the Windows® Notification area. 2. If you want to connect to from the list and click Connect to build the connection. Select the wireless access point you...
... has been established, the connection is shown on the upper right corner to a security-enabled network. 3. You can see the wireless network icon in the Windows® Notification area. 2. If you want to connect to from the list and click Connect to build the connection. Select the wireless access point you...

User Manual
Page 29
Click the network icon with a yellow warning triangle in the left pane. 3. Ensure that you have connected the LAN cable to the EeeTop PC. 2. Right-click Local Area Connection and select Properties. EeeTop PC ET22 Series 29 Click Change adapter settings in the Windows® Notification area and select Open Network and Sharing Center. English Configuring a wired connection Using a static IP 1.
Click the network icon with a yellow warning triangle in the left pane. 3. Ensure that you have connected the LAN cable to the EeeTop PC. 2. Right-click Local Area Connection and select Properties. EeeTop PC ET22 Series 29 Click Change adapter settings in the Windows® Notification area and select Open Network and Sharing Center. English Configuring a wired connection Using a static IP 1.
User Manual
Page 35
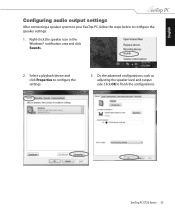
English Configuring audio output settings After connecting a speaker system to your EeeTop PC, follow the steps below to finish the configurations. Click OK to configure the speaker settings: 1. Right-click the speaker icon in the Windows® notification area and click Sounds. 2. EeeTop PC ET22 Series 35 Select a playback device and click Properties to configure the settings. 3. Do the advanced configurations, such as adjusting the speaker level and output rate.
English Configuring audio output settings After connecting a speaker system to your EeeTop PC, follow the steps below to finish the configurations. Click OK to configure the speaker settings: 1. Right-click the speaker icon in the Windows® notification area and click Sounds. 2. EeeTop PC ET22 Series 35 Select a playback device and click Properties to configure the settings. 3. Do the advanced configurations, such as adjusting the speaker level and output rate.

User Manual
Page 36
... recovery partition provides a comprehensive recovery solution that quickly restores your system's software to its original working order. Follow the onscreen instructions to a partition. 4. The ASUS Recovery CD/DVD window appears. Before using the recovery partition, copy your language, time zone, keyboard, computer name, and user name to a network drive and make a backup... make note of it before recovering the system. 5. Set up your data files (such as Outlook PST files) to a USB device or to enter the Windows® OS. 36 EeeTop PC ET22 Series
... recovery partition provides a comprehensive recovery solution that quickly restores your system's software to its original working order. Follow the onscreen instructions to a partition. 4. The ASUS Recovery CD/DVD window appears. Before using the recovery partition, copy your language, time zone, keyboard, computer name, and user name to a network drive and make a backup... make note of it before recovering the system. 5. Set up your data files (such as Outlook PST files) to a USB device or to enter the Windows® OS. 36 EeeTop PC ET22 Series

User Manual
Page 38
... Insert the support DVD into the optical drive and select the optical drive ("DVDROM: XXX") as the boot device. The ASUS Recovery CD/DVD window appears. After the system recovery is �i�t�t�h�e��A�S��U�S� website at www....asus.com for any key to complete the recovery process. Select and click Yes. You will delete only the ...
... Insert the support DVD into the optical drive and select the optical drive ("DVDROM: XXX") as the boot device. The ASUS Recovery CD/DVD window appears. After the system recovery is �i�t�t�h�e��A�S��U�S� website at www....asus.com for any key to complete the recovery process. Select and click Yes. You will delete only the ...

User Manual
Page 4
English Entering Red Flag Linux OS 26 EeeTop PC ET22 Red Flag Linux OS Limitation 27 Before Window OS installation 27 After Window OS installation 27 Installing Operating System 28 Preparing to install Windows® 7, Drivers and Utilities 28 Installing Windows® 7...28 Installing Drivers and Utilities...29 Calibrating the screen...31 Configuring a wireless connection 32 Configuring a wired connection 33 Using a static IP...33 Using a dynamic IP (PPPoE 35 Offer to Provide Source Code of Certain Software 38
English Entering Red Flag Linux OS 26 EeeTop PC ET22 Red Flag Linux OS Limitation 27 Before Window OS installation 27 After Window OS installation 27 Installing Operating System 28 Preparing to install Windows® 7, Drivers and Utilities 28 Installing Windows® 7...28 Installing Drivers and Utilities...29 Calibrating the screen...31 Configuring a wireless connection 32 Configuring a wired connection 33 Using a static IP...33 Using a dynamic IP (PPPoE 35 Offer to Provide Source Code of Certain Software 38
User Manual
Page 15
... on selected models) The 21.6-inch LCD display, with an optimal resolution of 1920 x 1080, features touch function that the internal wireless LAN is enabled. (Windows® software settings are necessary to use the wireless LAN.) EeeTop PC ET22 Series 15 Press to switch the system ON/OFF. Power switch The...
... on selected models) The 21.6-inch LCD display, with an optimal resolution of 1920 x 1080, features touch function that the internal wireless LAN is enabled. (Windows® software settings are necessary to use the wireless LAN.) EeeTop PC ET22 Series 15 Press to switch the system ON/OFF. Power switch The...

User Manual
Page 21
...pressing a key with models. Fn + F2: Toggles the internal wireless LAN ON or OFF. Fn + F12: Increases the speaker volume (only in Windows® OS). English Function keys The following table defines the colored function keys on the keyboard. Fn + F5: Decreases the display brightness. Fn + ...F7: Toggles the LCD display ON and OFF. When enabled, the corresponding wireless LAN LED lights up. Windows® software settings are necessary to use the wireless LAN. EeeTop PC ET22 Series 21 The actual colored function keys and supported commands may ...
...pressing a key with models. Fn + F2: Toggles the internal wireless LAN ON or OFF. Fn + F12: Increases the speaker volume (only in Windows® OS). English Function keys The following table defines the colored function keys on the keyboard. Fn + F5: Decreases the display brightness. Fn + ...F7: Toggles the LCD display ON and OFF. When enabled, the corresponding wireless LAN LED lights up. Windows® software settings are necessary to use the wireless LAN. EeeTop PC ET22 Series 21 The actual colored function keys and supported commands may ...

User Manual
Page 24
... switch again, click the mouse, touch the display, or press any key on the keyboard. • To shut down the system completely, follow the normal Windows shutdown process or press and hold the Power switch for five seconds. 24 EeeTop PC ET22 Series The colored key command is still running. The...
... switch again, click the mouse, touch the display, or press any key on the keyboard. • To shut down the system completely, follow the normal Windows shutdown process or press and hold the Power switch for five seconds. 24 EeeTop PC ET22 Series The colored key command is still running. The...
User Manual
Page 26
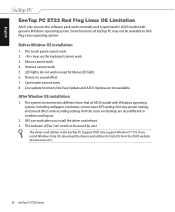
...to Red Flag Linux operating system. Some functions of ASUS model with genuine Windows operating system. Before Window OS installation 1. The touch panel cannot work . 3. LED lights do not work after you install Windows Vista OS, download the drivers and utilities for ...cannot work . 5. Mouse cannot work. 4. The drivers and utilities in numbers and layout. 2. The system environment is optimized in ASUS model with Windows operating system, including wallpaper, resolution, screen saver, DPI setting, font size, power setting, and sound effect and recording setting. There...
...to Red Flag Linux operating system. Some functions of ASUS model with genuine Windows operating system. Before Window OS installation 1. The touch panel cannot work . 3. LED lights do not work after you install Windows Vista OS, download the drivers and utilities for ...cannot work . 5. Mouse cannot work. 4. The drivers and utilities in numbers and layout. 2. The system environment is optimized in ASUS model with Windows operating system, including wallpaper, resolution, screen saver, DPI setting, font size, power setting, and sound effect and recording setting. There...

User Manual
Page 27
...name) to boot from Microsoft® • EeeTop PC Support DVD Installing Windows® 7 Follow the instructions below to install Windows® 7: 1. Click Install now to select boot device 4. Insert the Windows 7 disc to the optical drive of your EeeTop PC, you need the... the optical drive. Select the Language to complete the installation process. 7. English Installing Operating System Preparing to install Windows® 7, Drivers and Utilities Before installing Windows® 7 operating system to your EeeTop PC. 2. Start the system and press on bootup until Eee Top...
...name) to boot from Microsoft® • EeeTop PC Support DVD Installing Windows® 7 Follow the instructions below to install Windows® 7: 1. Click Install now to select boot device 4. Insert the Windows 7 disc to the optical drive of your EeeTop PC, you need the... the optical drive. Select the Language to complete the installation process. 7. English Installing Operating System Preparing to install Windows® 7, Drivers and Utilities Before installing Windows® 7 operating system to your EeeTop PC. 2. Start the system and press on bootup until Eee Top...

User Manual
Page 28
... at www.asus.com. English Installing Drivers and Utilities The drivers and utilities in your computer, browse the contents of the Support DVD to locate the file ASSETUP.EXE from the BIN folder. If you install Windows Vista OS, download the drivers and utilities for Vista OS from InstAll(...recommended) and click OK. 3. Insert the EeeTop PC Support DVD and the DVD automatically displays the Drivers menu if Autorun is NOT enabled in your computer. When all the drivers. 2. Click ASUS InstAll to ...
... at www.asus.com. English Installing Drivers and Utilities The drivers and utilities in your computer, browse the contents of the Support DVD to locate the file ASSETUP.EXE from the BIN folder. If you install Windows Vista OS, download the drivers and utilities for Vista OS from InstAll(...recommended) and click OK. 3. Insert the EeeTop PC Support DVD and the DVD automatically displays the Drivers menu if Autorun is NOT enabled in your computer. When all the drivers. 2. Click ASUS InstAll to ...
User Manual
Page 30
Press the Esc key on selected models. 1. Touch and hold the center of the onscreen mark at each location and the screen will adjust automatically. From the Windows® desktop, click Start > All Programs > Touch Panel Tool > Touch Panel Calibration. 2. The touch-enabled screen is available on the keyboard to adjust touch screen precision. English Calibrating the screen EeeTop PC comes with the following software tool that allows you to end the calibration process. 30 EeeTop PC ET22 Series
Press the Esc key on selected models. 1. Touch and hold the center of the onscreen mark at each location and the screen will adjust automatically. From the Windows® desktop, click Start > All Programs > Touch Panel Tool > Touch Panel Calibration. 2. The touch-enabled screen is available on the keyboard to adjust touch screen precision. English Calibrating the screen EeeTop PC comes with the following software tool that allows you to end the calibration process. 30 EeeTop PC ET22 Series

User Manual
Page 31
Click the wireless network icon with an orange star in the Notification area. You can see the wireless network icon in the Windows® Notification area. 2. After a connection has been established, the connection is shown on the upper right corner to a security-enabled network. 3. If you want to ...
Click the wireless network icon with an orange star in the Notification area. You can see the wireless network icon in the Windows® Notification area. 2. After a connection has been established, the connection is shown on the upper right corner to a security-enabled network. 3. If you want to ...


