
User Manual
Page 2
...the serial number of ASUSTeK Computer Inc. ("ASUS"). Product warranty or service will not be reproduced, transmitted, transcribed, stored in a retrieval system, or translated into any language in any form or by any means, except documentation kept by ASUS; ASUS ASSUMES NO RESPONSIBILITY OR LIABILITY ... CHANGE AT ANY TIME WITHOUT NOTICE, AND SHOULD NOT BE CONSTRUED AS A COMMITMENT BY ASUS. E7956 First Edition December 2012 Copyright © 2012 ASUSTeK Computer Inc. IN NO EVENT SHALL ASUS, ITS DIRECTORS, OFFICERS, EMPLOYEES OR AGENTS BE LIABLE FOR ANY INDIRECT, SPECIAL, INCIDENTAL,...
...the serial number of ASUSTeK Computer Inc. ("ASUS"). Product warranty or service will not be reproduced, transmitted, transcribed, stored in a retrieval system, or translated into any language in any form or by any means, except documentation kept by ASUS; ASUS ASSUMES NO RESPONSIBILITY OR LIABILITY ... CHANGE AT ANY TIME WITHOUT NOTICE, AND SHOULD NOT BE CONSTRUED AS A COMMITMENT BY ASUS. E7956 First Edition December 2012 Copyright © 2012 ASUSTeK Computer Inc. IN NO EVENT SHALL ASUS, ITS DIRECTORS, OFFICERS, EMPLOYEES OR AGENTS BE LIABLE FOR ANY INDIRECT, SPECIAL, INCIDENTAL,...
User Manual
Page 3
... this guide 9 Where to find more information 9 Package contents 10 Chapter 1: Getting started Welcome!...11 Getting to know your computer 11 Setting up your computer 21 Turning your computer ON 27 Chapter 2: Using Windows® 8 Starting for the first time 29 Using the Windows® UI 30 Working ...Desktop PC OFF 39 Putting your Desktop PC to sleep 39 Entering the BIOS Setup 40 Chapter 3: Connecting devices to your computer Connecting a USB storage device 41 Connecting microphone and speakers 43 Connecting multiple external displays 47 Connecting an HDTV 50 Chapter 4: Using your...
... this guide 9 Where to find more information 9 Package contents 10 Chapter 1: Getting started Welcome!...11 Getting to know your computer 11 Setting up your computer 21 Turning your computer ON 27 Chapter 2: Using Windows® 8 Starting for the first time 29 Using the Windows® UI 30 Working ...Desktop PC OFF 39 Putting your Desktop PC to sleep 39 Entering the BIOS Setup 40 Chapter 3: Connecting devices to your computer Connecting a USB storage device 41 Connecting microphone and speakers 43 Connecting multiple external displays 47 Connecting an HDTV 50 Chapter 4: Using your...

User Manual
Page 11
The ASUS Desktop PC provides cutting-edge performance, uncompromised reliability, and user-centric utilities. Getting to know your ASUS Desktop PC. All these values are for purchasing the ASUS Desktop PC! Read the ASUS Warranty Card before setting up your computer Illustrations are encapsulated in a stunningly futuristic and stylish system casing. ASUS CM6330, CM6730, CM6830, and M11AA 11 The ports and their locations, and the chassis color vary with different models. Thank you for reference only. Chapter 1 Getting started Welcome!
The ASUS Desktop PC provides cutting-edge performance, uncompromised reliability, and user-centric utilities. Getting to know your ASUS Desktop PC. All these values are for purchasing the ASUS Desktop PC! Read the ASUS Warranty Card before setting up your computer Illustrations are encapsulated in a stunningly futuristic and stylish system casing. ASUS CM6330, CM6730, CM6830, and M11AA 11 The ports and their locations, and the chassis color vary with different models. Thank you for reference only. Chapter 1 Getting started Welcome!
User Manual
Page 12
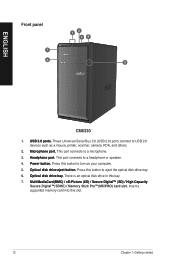
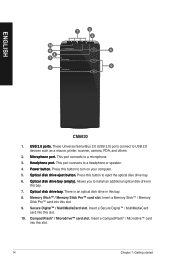
ENGLISH Front panel 12 34 7 6 5 CM6330 1. ���U�S��B�2�.�0�p��o�rt�s�. There is an optical disk drive in ... ���M�i�c�r�o�p�h�o�n�e��p�o�rt�. Press this button to turn on your computer. 5. ���O��p�t�ic�a�l��d�is ��k�d��ri�v�e��...
ENGLISH Front panel 12 34 7 6 5 CM6330 1. ���U�S��B�2�.�0�p��o�rt�s�. There is an optical disk drive in ... ���M�i�c�r�o�p�h�o�n�e��p�o�rt�. Press this button to turn on your computer. 5. ���O��p�t�ic�a�l��d�is ��k�d��ri�v�e��...
User Manual
Page 13
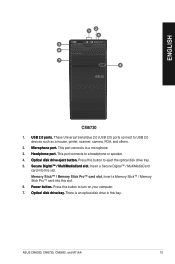
...;. Press this slot. Insert a Memory Stick™ / Memory Stick Pro™ card into this button to ��n�. ASUS CM6330, CM6730, CM6830, and M11AA 13 This port connects to a headphone or speaker. 4. ���O��p�t�ic...;k��d�r�i�v�e�e��j�e�c�t�b��u�t�to turn on your computer. 7. ���O��p�t�ic�a��l �d�is an optical disk drive...
...;. Press this slot. Insert a Memory Stick™ / Memory Stick Pro™ card into this button to ��n�. ASUS CM6330, CM6730, CM6830, and M11AA 13 This port connects to a headphone or speaker. 4. ���O��p�t�ic...;k��d�r�i�v�e�e��j�e�c�t�b��u�t�to turn on your computer. 7. ���O��p�t�ic�a��l �d�is an optical disk drive...
User Manual
Page 14
... port connects to install an additional optical disk drive in this slot. 9. There is an optical disk drive in this button to turn on your computer. 5. ���O��p�t�ic�a�l��d�is ��k�d��ri�v�e��b�...
... port connects to install an additional optical disk drive in this slot. 9. There is an optical disk drive in this button to turn on your computer. 5. ���O��p�t�ic�a�l��d�is ��k�d��ri�v�e��b�...

User Manual
Page 15
...;�M�i�c�r�o�p�h�o�n�e��p�o�rt�. ASUS CM6330, CM6730, CM6830, and M11AA 15 There is an optical disk drive in this button to turn on your computer. 6. ���O��p�t�ic�a��l �d�is �k�...
...;�M�i�c�r�o�p�h�o�n�e��p�o�rt�. ASUS CM6330, CM6730, CM6830, and M11AA 15 There is an optical disk drive in this button to turn on your computer. 6. ���O��p�t�ic�a��l �d�is �k�...

User Manual
Page 16
...ENGLISH Rear panel 1 2 3 5 4 7 6 8 9 10 11 13 12 16 DVI HDMI 18 20 19 14 15 17 CM6330/CM6730/M11AA 1. ���V��o�lt�a�g��e�s�e�l�e�c�t�o�r��s&#...65533;w�i�t�c�h�. This port is for your computer. 4. ���P�S��/2��K�e�y�b��o�a�rd�...
...ENGLISH Rear panel 1 2 3 5 4 7 6 8 9 10 11 13 12 16 DVI HDMI 18 20 19 14 15 17 CM6330/CM6730/M11AA 1. ���V��o�lt�a�g��e�s�e�l�e�c�t�o�r��s&#...65533;w�i�t�c�h�. This port is for your computer. 4. ���P�S��/2��K�e�y�b��o�a�rd�...
User Manual
Page 18
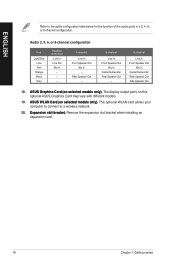
This optional WLAN card allows your computer to connect to the audio configuration table below for the function of the audio ports in a 2, 4, 6, or 8-channel configuration. The display output ports on this optional ASUS Graphics Card may vary with different models. 19. ��A�S��U�S��W��L�...
This optional WLAN card allows your computer to connect to the audio configuration table below for the function of the audio ports in a 2, 4, 6, or 8-channel configuration. The display output ports on this optional ASUS Graphics Card may vary with different models. 19. ��A�S��U�S��W��L�...

User Manual
Page 19
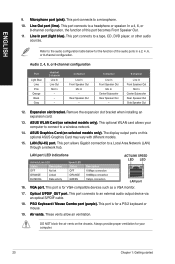
...;e��a�k�e�r�O��u�t�p�o��rt�(�g�r�a�y�)�. ASUS CM6330, CM6730, CM6830, and M11AA 19 This port connects to the side speakers in a 4, 6, and 8-channel audio configuration...USB 3.0 ports for faster and better performance for a High-Definition Multimedia Interface (HDMI) connector, and is for your computer. 3. ���U�S��B�2�.�0�p��o�rt�s�. Plug the ...
...;e��a�k�e�r�O��u�t�p�o��rt�(�g�r�a�y�)�. ASUS CM6330, CM6730, CM6830, and M11AA 19 This port connects to the side speakers in a 4, 6, and 8-channel audio configuration...USB 3.0 ports for faster and better performance for a High-Definition Multimedia Interface (HDMI) connector, and is for your computer. 3. ���U�S��B�2�.�0�p��o�rt�s�. Plug the ...
User Manual
Page 20
... or other audio sources. This port connects to a headphone or speaker. This port is for the function of this optional ASUS Graphics Card may vary with different models. 15. ��L�A�N��(R��J-�4��5�)�...a PS/2 keyboard or mouse. 19. ��A��ir��v�e�n�t�s�. This optional WLAN card allows your computer. 20 Chapter 1: Getting started In a 4, 6, or 8-channel configuration, the function of the audio ports in a 2, 4, 6, or 8-...
... or other audio sources. This port connects to a headphone or speaker. This port is for the function of this optional ASUS Graphics Card may vary with different models. 15. ��L�A�N��(R��J-�4��5�)�...a PS/2 keyboard or mouse. 19. ��A��ir��v�e�n�t�s�. This optional WLAN card allows your computer. 20 Chapter 1: Getting started In a 4, 6, or 8-channel configuration, the function of the audio ports in a 2, 4, 6, or 8-...
User Manual
Page 21
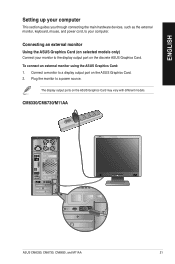
To connect an external monitor using the ASUS Graphics Card: 1. ENGLISH Setting up your computer This section guides you through connecting the main hardware devices, such as the external monitor, keyboard, mouse, and power cord, to a power source. CM6330/CM6730/M11AA DVI HDMI DVI HDMI ASUS CM6330, CM6730, CM6830, and M11AA 21 Connect a monitor to the...
To connect an external monitor using the ASUS Graphics Card: 1. ENGLISH Setting up your computer This section guides you through connecting the main hardware devices, such as the external monitor, keyboard, mouse, and power cord, to a power source. CM6330/CM6730/M11AA DVI HDMI DVI HDMI ASUS CM6330, CM6730, CM6830, and M11AA 21 Connect a monitor to the...
User Manual
Page 23
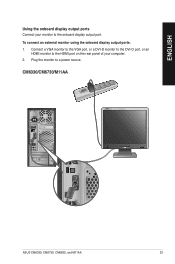
CM6330/CM6730/M11AA ASUS CM6330, CM6730, CM6830, and M11AA 23 To connect an external monitor using the onboard display output ports: 1. Plug the monitor to the onboard display output port. ENGLISH Using the onboard display output ports Connect your computer. 2. Connect a VGA monitor to the VGA port, or a DVI-D monitor to the DVI-D port, or an HDMI monitor to the HDMI port on the rear panel of your monitor to a power source.
CM6330/CM6730/M11AA ASUS CM6330, CM6730, CM6830, and M11AA 23 To connect an external monitor using the onboard display output ports: 1. Plug the monitor to the onboard display output port. ENGLISH Using the onboard display output ports Connect your computer. 2. Connect a VGA monitor to the VGA port, or a DVI-D monitor to the DVI-D port, or an HDMI monitor to the HDMI port on the rear panel of your monitor to a power source.
User Manual
Page 24
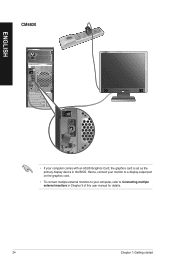
CM6830 ENGLISH • If your computer, refer to your computer comes with an ASUS Graphics Card, the graphics card is set as the primary display device in Chapter 3 of this user manual for details. 24 Chapter 1: Getting started Hence, connect your monitor to a display output port on the graphics card. • To connect multiple external monitors to Connecting multiple external monitors in the BIOS.
CM6830 ENGLISH • If your computer, refer to your computer comes with an ASUS Graphics Card, the graphics card is set as the primary display device in Chapter 3 of this user manual for details. 24 Chapter 1: Getting started Hence, connect your monitor to a display output port on the graphics card. • To connect multiple external monitors to Connecting multiple external monitors in the BIOS.
User Manual
Page 25
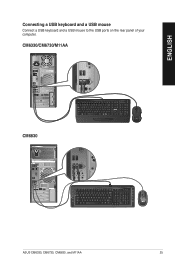
ENGLISH Connecting a USB keyboard and a USB mouse Connect a USB keyboard and a USB mouse to the USB ports on the rear panel of your computer. CM6330/CM6730/M11AA DVI HDMI CM6830 C ASUS CM6330, CM6730, CM6830, and M11AA 25
ENGLISH Connecting a USB keyboard and a USB mouse Connect a USB keyboard and a USB mouse to the USB ports on the rear panel of your computer. CM6330/CM6730/M11AA DVI HDMI CM6830 C ASUS CM6330, CM6730, CM6830, and M11AA 25
User Manual
Page 26
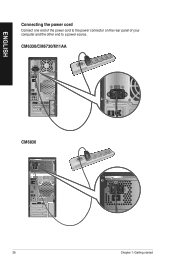
CM6330/CM6730/M11AA DVI HDMI CM6830 26 Chapter 1: Getting started ENGLISH Connecting the power cord Connect one end of the power cord to the power connector on the rear panel of your computer and the other end to a power source.
CM6330/CM6730/M11AA DVI HDMI CM6830 26 Chapter 1: Getting started ENGLISH Connecting the power cord Connect one end of the power cord to the power connector on the rear panel of your computer and the other end to a power source.
User Manual
Page 27
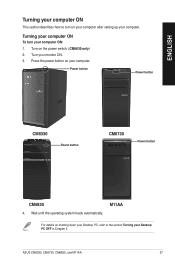
... 4. Wait until the operating system loads automatically. Press the power button on your computer after setting up your computer ON: 1. ASUS CM6330, CM6730, CM6830, and M11AA 27 Turn on shutting down your Desktop PC, refer to turn your computer. ENGLISH Turning your computer ON This section describes how to the section Turning your Desktop PC OFF...
... 4. Wait until the operating system loads automatically. Press the power button on your computer after setting up your computer ON: 1. ASUS CM6330, CM6730, CM6830, and M11AA 27 Turn on shutting down your Desktop PC, refer to turn your computer. ENGLISH Turning your computer ON This section describes how to the section Turning your Desktop PC OFF...
User Manual
Page 29
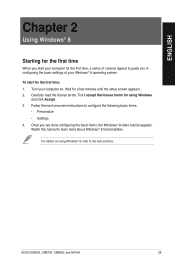
... done configuring the basic items, the Windows® 8 video tutorial appears. To start your computer for the first time, a series of your Windows® 8 operating system. Follow the next onscreen instructions to learn more about Windows® 8 functionalities. ASUS CM6330, CM6730, CM6830, and M11AA 29 Carefully read the license terms. Tick I accept the...
... done configuring the basic items, the Windows® 8 video tutorial appears. To start your computer for the first time, a series of your Windows® 8 operating system. Follow the next onscreen instructions to learn more about Windows® 8 functionalities. ASUS CM6330, CM6730, CM6830, and M11AA 29 Carefully read the license terms. Tick I accept the...
User Manual
Page 38
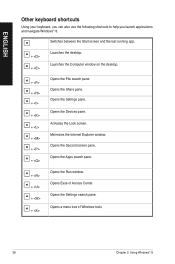
... the Run window. Opens Ease of Windows tools 38 Chapter 2: Using Windows® 8 Opens the Settings search pane. Opens the Second screen pane. Launches the Computer window on the desktop. + + + + + + + + Opens the File search pane. ENGLISH Other keyboard shortcuts Using your keyboard, you can also use the following shortcuts to help...
... the Run window. Opens Ease of Windows tools 38 Chapter 2: Using Windows® 8 Opens the Settings search pane. Opens the Second screen pane. Launches the Computer window on the desktop. + + + + + + + + Opens the File search pane. ENGLISH Other keyboard shortcuts Using your keyboard, you can also use the following shortcuts to help...
User Manual
Page 41
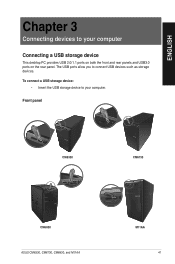
To connect a USB storage device: • Insert the USB storage device to your computer Connecting a USB storage device This desktop PC provides USB 2.0/1.1 ports on both the front and rear panels and USB3.0 ports on the rear panel. ENGLISH Chapter 3 Connecting devices to your computer. Front panel CM6330 CM6730 CM6830 ASUS CM6330, CM6730, CM6830, and M11AA M11AA 41 The USB ports allow you to connect USB devices such as storage devices.
To connect a USB storage device: • Insert the USB storage device to your computer Connecting a USB storage device This desktop PC provides USB 2.0/1.1 ports on both the front and rear panels and USB3.0 ports on the rear panel. ENGLISH Chapter 3 Connecting devices to your computer. Front panel CM6330 CM6730 CM6830 ASUS CM6330, CM6730, CM6830, and M11AA M11AA 41 The USB ports allow you to connect USB devices such as storage devices.


