

User Manual
Page 11
The ports and their locations, and the chassis color vary with different models. ASUS CM6330, CM6730, CM6830, and M11AA 11 The ASUS Desktop PC provides cutting-edge performance, uncompromised reliability, and user-centric utilities. Chapter 1 Getting started Welcome! All these values are for purchasing the ASUS Desktop PC! Read the ASUS Warranty Card before setting up your computer Illustrations are encapsulated in a stunningly futuristic and stylish system casing. Getting to know your ASUS Desktop PC. Thank you for reference only.
The ports and their locations, and the chassis color vary with different models. ASUS CM6330, CM6730, CM6830, and M11AA 11 The ASUS Desktop PC provides cutting-edge performance, uncompromised reliability, and user-centric utilities. Chapter 1 Getting started Welcome! All these values are for purchasing the ASUS Desktop PC! Read the ASUS Warranty Card before setting up your computer Illustrations are encapsulated in a stunningly futuristic and stylish system casing. Getting to know your ASUS Desktop PC. Thank you for reference only.
User Manual
Page 13
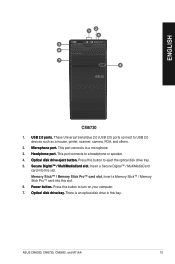
...;d��s�l�o�t�. Press this bay. Press this slot. There is an optical disk drive in this button to ��n�. ASUS CM6330, CM6730, CM6830, and M11AA 13 These Universal Serial Bus 2.0 (USB 2.0) ports connect to a microphone. 3. ���H�e�a�d�p�h�o�n�...
...;d��s�l�o�t�. Press this bay. Press this slot. There is an optical disk drive in this button to ��n�. ASUS CM6330, CM6730, CM6830, and M11AA 13 These Universal Serial Bus 2.0 (USB 2.0) ports connect to a microphone. 3. ���H�e�a�d�p�h�o�n�...

User Manual
Page 15
...;c�t�b��u�t�to a microphone. 4. ���H�e�a�d�p�h�o�n�e��p�o�rt�. ASUS CM6330, CM6730, CM6830, and M11AA 15 ENGLISH 1 2 34 5 6 7 M11AA 1. ���M��u�lt�iM��e�d�i�a�C�a�...
...;c�t�b��u�t�to a microphone. 4. ���H�e�a�d�p�h�o�n�e��p�o�rt�. ASUS CM6330, CM6730, CM6830, and M11AA 15 ENGLISH 1 2 34 5 6 7 M11AA 1. ���M��u�lt�iM��e�d�i�a�C�a�...
User Manual
Page 17
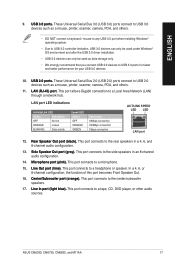
...;r/�S�u�b��w�o�o��fe�r��p�o�r�t�(�o�r�a�n�g�e�)�. ASUS CM6330, CM6730, CM6830, and M11AA 17 LAN port LED indications Activity/Link LED Status Description OFF No link ORANGE Linked BLINKING Data activity Speed LED Status...
...;r/�S�u�b��w�o�o��fe�r��p�o�r�t�(�o�r�a�n�g�e�)�. ASUS CM6330, CM6730, CM6830, and M11AA 17 LAN port LED indications Activity/Link LED Status Description OFF No link ORANGE Linked BLINKING Data activity Speed LED Status...

User Manual
Page 19
... of HD DVD, Blu-ray, and other protected content. 5. ���U��S�B��3�.0��p�o�r�t�s�. ASUS CM6330, CM6730, CM6830, and M11AA 19 ENGLISH 1 2 19 3 18 4 17 16 5 3 15 67 8 14 12 13 9 10 11 CM6830 1. ���P�o�w��...
... of HD DVD, Blu-ray, and other protected content. 5. ���U��S�B��3�.0��p�o�r�t�s�. ASUS CM6330, CM6730, CM6830, and M11AA 19 ENGLISH 1 2 19 3 18 4 17 16 5 3 15 67 8 14 12 13 9 10 11 CM6830 1. ���P�o�w��...
User Manual
Page 21
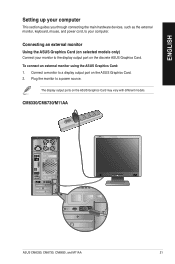
... monitor to a power source. CM6330/CM6730/M11AA DVI HDMI DVI HDMI ASUS CM6330, CM6730, CM6830, and M11AA 21 The display output ports on the ASUS Graphics Card. 2. Connecting an external monitor Using the ASUS Graphics Card (on selected models only) Connect your computer. Connect a monitor to a display output port on the ASUS Graphics Card may vary... the main hardware devices, such as the external monitor, keyboard, mouse, and power cord, to your monitor to the display output port on the discrete ASUS Graphics Card. To connect an external monitor using the...
... monitor to a power source. CM6330/CM6730/M11AA DVI HDMI DVI HDMI ASUS CM6330, CM6730, CM6830, and M11AA 21 The display output ports on the ASUS Graphics Card. 2. Connecting an external monitor Using the ASUS Graphics Card (on selected models only) Connect your computer. Connect a monitor to a display output port on the ASUS Graphics Card may vary... the main hardware devices, such as the external monitor, keyboard, mouse, and power cord, to your monitor to the display output port on the discrete ASUS Graphics Card. To connect an external monitor using the...
User Manual
Page 23
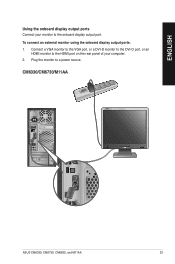
Plug the monitor to the onboard display output port. ENGLISH Using the onboard display output ports Connect your computer. 2. Connect a VGA monitor to the VGA port, or a DVI-D monitor to the DVI-D port, or an HDMI monitor to the HDMI port on the rear panel of your monitor to a power source. To connect an external monitor using the onboard display output ports: 1. CM6330/CM6730/M11AA ASUS CM6330, CM6730, CM6830, and M11AA 23
Plug the monitor to the onboard display output port. ENGLISH Using the onboard display output ports Connect your computer. 2. Connect a VGA monitor to the VGA port, or a DVI-D monitor to the DVI-D port, or an HDMI monitor to the HDMI port on the rear panel of your monitor to a power source. To connect an external monitor using the onboard display output ports: 1. CM6330/CM6730/M11AA ASUS CM6330, CM6730, CM6830, and M11AA 23
User Manual
Page 25
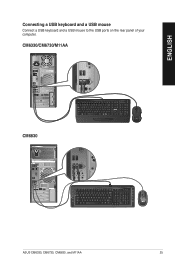
CM6330/CM6730/M11AA DVI HDMI CM6830 C ASUS CM6330, CM6730, CM6830, and M11AA 25 ENGLISH Connecting a USB keyboard and a USB mouse Connect a USB keyboard and a USB mouse to the USB ports on the rear panel of your computer.
CM6330/CM6730/M11AA DVI HDMI CM6830 C ASUS CM6330, CM6730, CM6830, and M11AA 25 ENGLISH Connecting a USB keyboard and a USB mouse Connect a USB keyboard and a USB mouse to the USB ports on the rear panel of your computer.
User Manual
Page 27
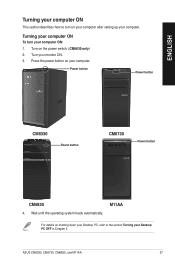
... button CM6730 Power button CM6830 4. M11AA For details on shutting down your Desktop PC, refer to turn your monitor ON. 3. ASUS CM6330, CM6730, CM6830, and M11AA 27 Press the power button on the power switch. (CM6830 only) 2. Turn on your computer. Wait until the operating system loads ...
... button CM6730 Power button CM6830 4. M11AA For details on shutting down your Desktop PC, refer to turn your monitor ON. 3. ASUS CM6330, CM6730, CM6830, and M11AA 27 Press the power button on the power switch. (CM6830 only) 2. Turn on your computer. Wait until the operating system loads ...
User Manual
Page 29
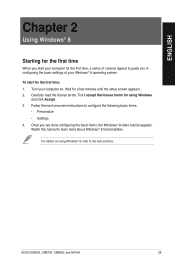
...; Personalize • Settings 4. ENGLISH Chapter 2 Using Windows® 8 Starting for the first time When you start for using Windows® 8, refer to the next sections. ASUS CM6330, CM6730, CM6830, and M11AA 29
...; Personalize • Settings 4. ENGLISH Chapter 2 Using Windows® 8 Starting for the first time When you start for using Windows® 8, refer to the next sections. ASUS CM6330, CM6730, CM6830, and M11AA 29
User Manual
Page 31
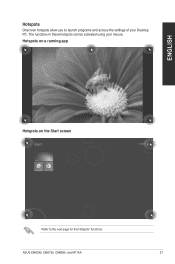
ASUS CM6330, CM6730, CM6830, and M11AA 31 The functions in these hotspots can be activated using your Desktop PC. ENGLISH Hotspots Onscreen hotspots allow you to the next page for the Hotspots' functions. Hotspots on a running app Hotspots on the Start screen Refer to launch programs and access the settings of your mouse.
ASUS CM6330, CM6730, CM6830, and M11AA 31 The functions in these hotspots can be activated using your Desktop PC. ENGLISH Hotspots Onscreen hotspots allow you to the next page for the Hotspots' functions. Hotspots on a running app Hotspots on the Start screen Refer to launch programs and access the settings of your mouse.
User Manual
Page 33
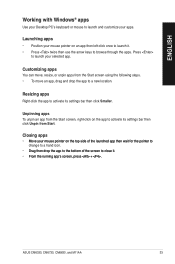
... it �f�o�r��th�e��p��o�in�t�e�r��to� change to a hand icon. ASUS CM6330, CM6730, CM6830, and M11AA 33 Press to launch your apps. Customizing apps You can move an app, drag and drop the app to a new location...
... it �f�o�r��th�e��p��o�in�t�e�r��to� change to a hand icon. ASUS CM6330, CM6730, CM6830, and M11AA 33 Press to launch your apps. Customizing apps You can move an app, drag and drop the app to a new location...
User Manual
Page 35
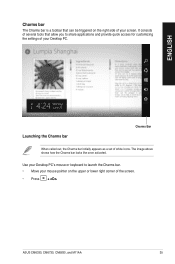
...; Press C�>��. Use your Desktop PC's mouse or keyboard to share applications and provide quick access for customizing the settings of white icons. ASUS CM6330, CM6730, CM6830, and M11AA 35 It consists of several tools that can be triggered on the upper or lower right corner of your Desktop PC...
...; Press C�>��. Use your Desktop PC's mouse or keyboard to share applications and provide quick access for customizing the settings of white icons. ASUS CM6330, CM6730, CM6830, and M11AA 35 It consists of several tools that can be triggered on the upper or lower right corner of your Desktop PC...
User Manual
Page 37
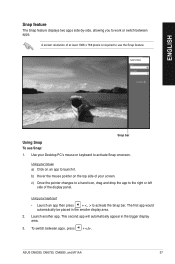
... • Launch an app then press + < . > to work or switch between apps, press + . The first app would automatically be placed in the bigger display area. 3. ASUS CM6330, CM6730, CM6830, and M11AA 37 Use your screen. b) Hover the mouse pointer on an app to the right or left side of the display panel...
... • Launch an app then press + < . > to work or switch between apps, press + . The first app would automatically be placed in the bigger display area. 3. ASUS CM6330, CM6730, CM6830, and M11AA 37 Use your screen. b) Hover the mouse pointer on an app to the right or left side of the display panel...
User Manual
Page 39
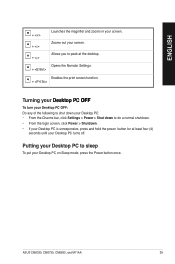
... your screen. Putting your Desktop PC to sleep To put your screen. Zooms out your Desktop PC on Sleep mode, press the Power button once. ASUS CM6330, CM6730, CM6830, and M11AA 39 ENGLISH Launches the magnifier and zooms in your Desktop PC is unresponsive, press and hold the power button for at...
... your screen. Putting your Desktop PC to sleep To put your screen. Zooms out your Desktop PC on Sleep mode, press the Power button once. ASUS CM6330, CM6730, CM6830, and M11AA 39 ENGLISH Launches the magnifier and zooms in your Desktop PC is unresponsive, press and hold the power button for at...
User Manual
Page 41
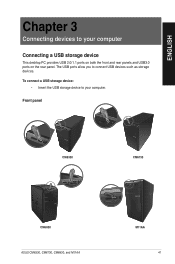
The USB ports allow you to your computer Connecting a USB storage device This desktop PC provides USB 2.0/1.1 ports on both the front and rear panels and USB3.0 ports on the rear panel. ENGLISH Chapter 3 Connecting devices to your computer. To connect a USB storage device: • Insert the USB storage device to connect USB devices such as storage devices. Front panel CM6330 CM6730 CM6830 ASUS CM6330, CM6730, CM6830, and M11AA M11AA 41
The USB ports allow you to your computer Connecting a USB storage device This desktop PC provides USB 2.0/1.1 ports on both the front and rear panels and USB3.0 ports on the rear panel. ENGLISH Chapter 3 Connecting devices to your computer. To connect a USB storage device: • Insert the USB storage device to connect USB devices such as storage devices. Front panel CM6330 CM6730 CM6830 ASUS CM6330, CM6730, CM6830, and M11AA M11AA 41
User Manual
Page 43
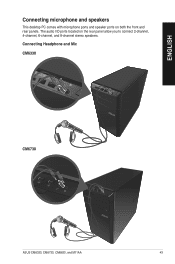
Connecting Headphone and Mic CM6330 CM6730 ASUS CM6330, CM6730, CM6830, and M11AA 43 The audio I/O ports located on both the front and rear panels. ENGLISH Connecting microphone and speakers This desktop PC comes with microphone ports and speaker ports on the rear panel allow you to connect 2-channel, 4-channel, 6-channel, and 8-channel stereo speakers.
Connecting Headphone and Mic CM6330 CM6730 ASUS CM6330, CM6730, CM6830, and M11AA 43 The audio I/O ports located on both the front and rear panels. ENGLISH Connecting microphone and speakers This desktop PC comes with microphone ports and speaker ports on the rear panel allow you to connect 2-channel, 4-channel, 6-channel, and 8-channel stereo speakers.

User Manual
Page 45
ENGLISH Connecting 2-channel Speakers Connecting 4-channel Speakers ASUS CM6330, CM6730, CM6830, and M11AA 45
ENGLISH Connecting 2-channel Speakers Connecting 4-channel Speakers ASUS CM6330, CM6730, CM6830, and M11AA 45
User Manual
Page 47
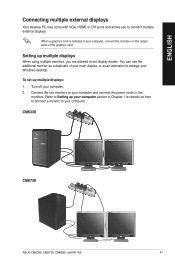
.... When a graphics card is installed in Chapter 1 for details on the output ports of your main display, or as a duplicate of the graphics card. CM6330 CM6730 ASUS CM6330, CM6730, CM6830, and M11AA 47 Refer to Setting up multiple displays: 1. ENGLISH Connecting multiple external displays Your desktop PC may come with VGA, HDMI, or...
.... When a graphics card is installed in Chapter 1 for details on the output ports of your main display, or as a duplicate of the graphics card. CM6330 CM6730 ASUS CM6330, CM6730, CM6830, and M11AA 47 Refer to Setting up multiple displays: 1. ENGLISH Connecting multiple external displays Your desktop PC may come with VGA, HDMI, or...
User Manual
Page 49
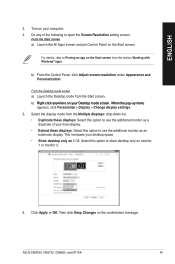
... on the Start screen from the Start screen. From the Desktop mode screen a) Launch the Desktop mode from the section Working with Windows® apps. ASUS CM6330, CM6730, CM6830, and M11AA 49 ENGLISH 3. b) From the Control Panel, click Adjust screen resolution under Appearance and Personalization. This increases your computer. 4. b) �R��...
... on the Start screen from the Start screen. From the Desktop mode screen a) Launch the Desktop mode from the section Working with Windows® apps. ASUS CM6330, CM6730, CM6830, and M11AA 49 ENGLISH 3. b) From the Control Panel, click Adjust screen resolution under Appearance and Personalization. This increases your computer. 4. b) �R��...


