User's Manual for English Edition
Page 3
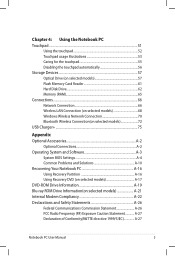
... Devices 57 Optical Drive (on selected models 57 Flash Memory Card Reader 61 Hard Disk Drive 62 Memory (RAM 65 Connections...66 Network Connection 66 Wireless LAN Connection (on selected models 68 Windows Wireless Network Connection 70 Bluetooth Wireless Connection(on selected models 72 USB Charger+...75 Appendix Optional Accessories A-2 Optional Connections A-2 Operating System and Software A-3 System BIOS Settings A-4 Common Problems and Solutions A-10 Recovering Your Notebook PC A-16 Using Recovery Partition A-16 Using Recovery DVD (on selected models A-17 DVD-ROM Drive...
... Devices 57 Optical Drive (on selected models 57 Flash Memory Card Reader 61 Hard Disk Drive 62 Memory (RAM 65 Connections...66 Network Connection 66 Wireless LAN Connection (on selected models 68 Windows Wireless Network Connection 70 Bluetooth Wireless Connection(on selected models 72 USB Charger+...75 Appendix Optional Accessories A-2 Optional Connections A-2 Operating System and Software A-3 System BIOS Settings A-4 Common Problems and Solutions A-10 Recovering Your Notebook PC A-16 Using Recovery Partition A-16 Using Recovery DVD (on selected models A-17 DVD-ROM Drive...
User's Manual for English Edition
Page 6
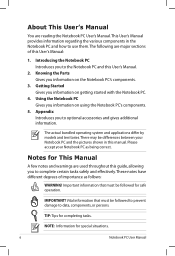
About This User's Manual You are used throughout this guide, allowing you to complete certain tasks safely and effectively.These notes have different degrees of this User's Manual: 1. Introducing the Notebook PC Introduces you to optional accessories and gives additional information. There may be followed for This Manual A few notes and warnings are reading the Notebook PC User's Manual.This User's Manual provides information regarding the...
About This User's Manual You are used throughout this guide, allowing you to complete certain tasks safely and effectively.These notes have different degrees of this User's Manual: 1. Introducing the Notebook PC Introduces you to optional accessories and gives additional information. There may be followed for This Manual A few notes and warnings are reading the Notebook PC User's Manual.This User's Manual provides information regarding the...

User's Manual for English Edition
Page 7
... a dry cloth. DO NOT disassemble the battery. Wipe the Notebook PC using a clean cellulose sponge or chamois cloth dampened with a solution of nonabrasive detergent and a few drops of warm water and remove any part of the Notebook PC. Battery safety warning: DO NOT throw the battery in this manual, refer all precautions and instructions. Follow all servicing to strong magnetic or electrical...
... a dry cloth. DO NOT disassemble the battery. Wipe the Notebook PC using a clean cellulose sponge or chamois cloth dampened with a solution of nonabrasive detergent and a few drops of warm water and remove any part of the Notebook PC. Battery safety warning: DO NOT throw the battery in this manual, refer all precautions and instructions. Follow all servicing to strong magnetic or electrical...

User's Manual for English Edition
Page 18
... in the system and configures CMOS accordingly during the POST (Power-On-Self-Test) process. There is used to the Notebook PC when AC power is installed. This allows use when moving temporarily between locations. Manual The manual battery lock is no hardware or software (including BIOS) setup required after inserting the battery pack. 4 Memory (RAM) Compartment The memory compartment provides expansion capabilities for additional memory. Spring The spring battery lock is inserted, it...
... in the system and configures CMOS accordingly during the POST (Power-On-Self-Test) process. There is used to the Notebook PC when AC power is installed. This allows use when moving temporarily between locations. Manual The manual battery lock is no hardware or software (including BIOS) setup required after inserting the battery pack. 4 Memory (RAM) Compartment The memory compartment provides expansion capabilities for additional memory. Spring The spring battery lock is inserted, it...
User's Manual for English Edition
Page 21
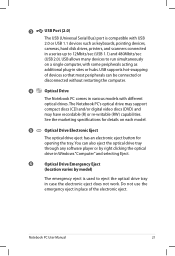
... be connected or disconnected without restarting the computer. 4 Optical Drive The Notebook PC comes in various models with different optical drives.The Notebook PC's optical drive may support compact discs (CD) and/or digital video discs (DVD) and may have recordable (R) or re-writable (RW) capabilities. See the marketing specifications for opening the tray. 3 USB Port (2.0) The USB (Universal Serial Bus) port is used to eject the optical drive tray in...
... be connected or disconnected without restarting the computer. 4 Optical Drive The Notebook PC comes in various models with different optical drives.The Notebook PC's optical drive may support compact discs (CD) and/or digital video discs (DVD) and may have recordable (R) or re-writable (RW) capabilities. See the marketing specifications for opening the tray. 3 USB Port (2.0) The USB (Universal Serial Bus) port is used to eject the optical drive tray in...
User's Manual for English Edition
Page 25
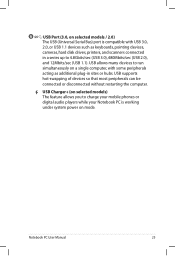
.../sec (USB 1.1). Notebook PC User Manual 25 6 USB Port (3.0, on selected models / 2.0) The USB (Universal Serial Bus) port is working under system power on mode. USB supports hot-swapping of devices so that most peripherals can be connected or disconnected without restarting the computer. USB allows many devices to run simultaneously on a single computer, with some peripherals acting as additional plug-in a series up to charge your mobile phones or digital audio players...
.../sec (USB 1.1). Notebook PC User Manual 25 6 USB Port (3.0, on selected models / 2.0) The USB (Universal Serial Bus) port is working under system power on mode. USB supports hot-swapping of devices so that most peripherals can be connected or disconnected without restarting the computer. USB allows many devices to run simultaneously on a single computer, with some peripherals acting as additional plug-in a series up to charge your mobile phones or digital audio players...
User's Manual for English Edition
Page 33
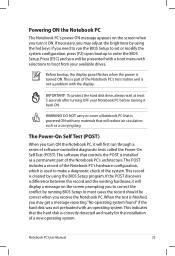
... test is created by running BIOS Setup. If necessary, you may adjust the brightness by using the BIOS Setup program. This indicates that the hard disk is correctly detected and ready for the installation of the Notebook PC's test routine and is part of a new operating system. To protect the hard disk drive, always wait at least 5 seconds after turning OFF your available drives. Before bootup, the display panel flashes when the power is turned ON...
... test is created by running BIOS Setup. If necessary, you may adjust the brightness by using the BIOS Setup program. This indicates that the hard disk is correctly detected and ready for the installation of the Notebook PC's test routine and is part of a new operating system. To protect the hard disk drive, always wait at least 5 seconds after turning OFF your available drives. Before bootup, the display panel flashes when the power is turned ON...

User's Manual for English Edition
Page 40
... this option. Recover by pressing any keyboard key except [Fn]. (NOTE: The power indicator will be periodically refreshed and power consumption is greatly reduced but not completely eliminated because certain wake-up components like LAN needs to remain powered. Sleep is the same as Suspend-to-Disk (STD) and stores your current data and status in RAM while many components are turned OFF. This function...
... this option. Recover by pressing any keyboard key except [Fn]. (NOTE: The power indicator will be periodically refreshed and power consumption is greatly reduced but not completely eliminated because certain wake-up components like LAN needs to remain powered. Sleep is the same as Suspend-to-Disk (STD) and stores your current data and status in RAM while many components are turned OFF. This function...
User's Manual for English Edition
Page 42
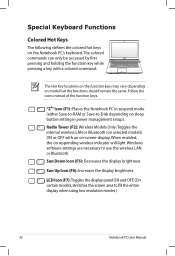
... function keys may vary depending on sleep button setting in power management setup). "ZZ" Icon (F1): Places the Notebook PC in suspend mode (either Save-to-RAM or Save-to-Disk depending on model but the functions should remain the same. Special Keyboard Functions Colored Hot Keys The following defines the colored hot keys on -screen-display. Windows software settings are necessary to fill the entire display when using low resolution modes.) 42 Notebook PC User Manual When enabled, the corresponding wireless indicator will light...
... function keys may vary depending on sleep button setting in power management setup). "ZZ" Icon (F1): Places the Notebook PC in suspend mode (either Save-to-RAM or Save-to-Disk depending on model but the functions should remain the same. Special Keyboard Functions Colored Hot Keys The following defines the colored hot keys on -screen-display. Windows software settings are necessary to fill the entire display when using low resolution modes.) 42 Notebook PC User Manual When enabled, the corresponding wireless indicator will light...

User's Manual for English Edition
Page 43
... current mode through the onscreen display (OSD). Crossed-out Touchpad (F9): Toggles the built-in Display Property Settings.) NOTE: Must connect an external monitor "before" booting up. LCD/Monitor Icons (F8): Toggles between the Notebook PC's LCD display and an external monitor in this series: LCD Only -> CRT Only (External Monitor) -> LCD + CRT Clone -> LCD + CRT Extend. (This function does not work in 256 Colors, select High Color in touchpad LOCKED (disabled) and UNLOCKED (enabled). NOTE: Selected models have an indicator...
... current mode through the onscreen display (OSD). Crossed-out Touchpad (F9): Toggles the built-in Display Property Settings.) NOTE: Must connect an external monitor "before" booting up. LCD/Monitor Icons (F8): Toggles between the Notebook PC's LCD display and an external monitor in this series: LCD Only -> CRT Only (External Monitor) -> LCD + CRT Clone -> LCD + CRT Extend. (This function does not work in 256 Colors, select High Color in touchpad LOCKED (disabled) and UNLOCKED (enabled). NOTE: Selected models have an indicator...
User's Manual for English Edition
Page 61
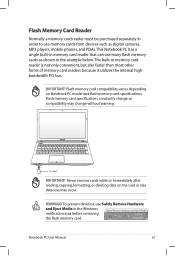
... reading, copying, formatting, or deleting data on Notebook PC model and flash memory card specifications. SD / MMC IMPORTANT! Notebook PC User Manual 61 WARNING! To prevent data loss, use Safely Remove Hardware and Eject Media in memory card reader is not only convenient, but also faster than most other forms of memory card readers because it utilizes the internal highbandwidth PCI bus. IMPORTANT! Flash Memory Card Reader Normally a memory card reader must be purchased separately in order to use memory cards from devices such as...
... reading, copying, formatting, or deleting data on Notebook PC model and flash memory card specifications. SD / MMC IMPORTANT! Notebook PC User Manual 61 WARNING! To prevent data loss, use Safely Remove Hardware and Eject Media in memory card reader is not only convenient, but also faster than most other forms of memory card readers because it utilizes the internal highbandwidth PCI bus. IMPORTANT! Flash Memory Card Reader Normally a memory card reader must be purchased separately in order to use memory cards from devices such as...
User's Manual for English Edition
Page 79
... pre-configured in good working order. Some of the factory pre-install. Notebook PC User Manual A-3 Operating System and Software This Notebook PC may offer (depending on territory) its original working state provided that your hard disk drive is in order to its customers the choice of a pre-installed Microsoft Windows operating system. The stability and compatibility of hardware and software support may not work until the device drivers and utilities are installed. The support disc contains all drivers, utilities and software...
... pre-configured in good working order. Some of the factory pre-install. Notebook PC User Manual A-3 Operating System and Software This Notebook PC may offer (depending on territory) its original working state provided that your hard disk drive is in order to its customers the choice of a pre-installed Microsoft Windows operating system. The stability and compatibility of hardware and software support may not work until the device drivers and utilities are installed. The support disc contains all drivers, utilities and software...
User's Manual for English Edition
Page 81
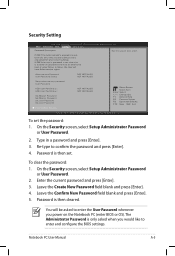
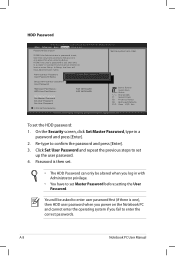
...Defaults F10: Save ESC: Exit Version 2.01.1208. Re-type to boot or enter Setup. Leave the Create New Password field blank and press [Enter]. 4. Password is then set , then this only limits access to enter the User Password whenever you would like to enter and configure the BIOS settings. On the Security screen, select Setup Administrator Password or User Password. 2. Administrator Password User Password Status NOT INSTALLED NOT INSTALLED Setup administrator password User Password HDD User Pwd Status : HDD User Pwd Status : Set Master Password Set Master Password Set User Password...
...Defaults F10: Save ESC: Exit Version 2.01.1208. Re-type to boot or enter Setup. Leave the Create New Password field blank and press [Enter]. 4. Password is then set , then this only limits access to enter the User Password whenever you would like to enter and configure the BIOS settings. On the Security screen, select Setup Administrator Password or User Password. 2. Administrator Password User Password Status NOT INSTALLED NOT INSTALLED Setup administrator password User Password HDD User Pwd Status : HDD User Pwd Status : Set Master Password Set Master Password Set User Password...
User's Manual for English Edition
Page 83
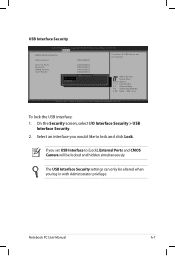
... Security USB Interface [UNLOCKED] If Locked, all USB device will be locked and hidden simultaneously. External Ports Bluetooth CMOS Camera Card Reader UNLOCKED LOCKED [UNLOCKED] [UNLOCKED] [UNLOCKED] [UNLOCKED] USB Interface : Select Screen : Select Item Enter: Select +/-: Change Opt. On the Security screen, select I/O Interface Security > USB Interface Security. 2. F1: General Help F9: Optimized Defaults F10: Save ESC: Exit Version 2.01.1208. Notebook PC User Manual A-7 To lock the USB interface: 1. If you would like to [Lock], External Ports and CMOS Camera will...
... Security USB Interface [UNLOCKED] If Locked, all USB device will be locked and hidden simultaneously. External Ports Bluetooth CMOS Camera Card Reader UNLOCKED LOCKED [UNLOCKED] [UNLOCKED] [UNLOCKED] [UNLOCKED] USB Interface : Select Screen : Select Item Enter: Select +/-: Change Opt. On the Security screen, select I/O Interface Security > USB Interface Security. 2. F1: General Help F9: Optimized Defaults F10: Save ESC: Exit Version 2.01.1208. Notebook PC User Manual A-7 To lock the USB interface: 1. If you would like to [Lock], External Ports and CMOS Camera will...
User's Manual for English Edition
Page 84
Administrator Password User Password Status NCrOeTatINe SNTeAwLLPEaDssword NOT INSTALLED Setup administrator password User Password HDD User Pwd Status : HDD User Pwd Status : Set Master Password Set Master Password Set User Password Set User Password I/O Interface Security NOT INSTALLED NOT INSTALLED : Select Screen : Select Item Enter: Select +/-: Change Opt. F1: General Help F2: Previous Values F9: Optimized Defaults F10: Save ESC: Exit Version 2.01.1204. Password is only asked to enter user password first (if there is a power on the Notebook PC and cannot enter the operating ...
Administrator Password User Password Status NCrOeTatINe SNTeAwLLPEaDssword NOT INSTALLED Setup administrator password User Password HDD User Pwd Status : HDD User Pwd Status : Set Master Password Set Master Password Set User Password Set User Password I/O Interface Security NOT INSTALLED NOT INSTALLED : Select Screen : Select Item Enter: Select +/-: Change Opt. F1: General Help F2: Previous Values F9: Optimized Defaults F10: Save ESC: Exit Version 2.01.1204. Password is only asked to enter user password first (if there is a power on the Notebook PC and cannot enter the operating ...
User's Manual for English Edition
Page 86
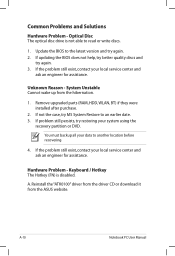
... recovery partition or DVD. Reinstall the "ATK0100" driver from the driver CD or download it from the hibernation. 1. Unknown Reason - Hardware Problem - If updating the BIOS does not help, try better quality discs and try restoring your data to the latest version and try MS System Restore to read or write discs. 1. System Unstable Cannot wake up from the ASUS website. Update the BIOS to another location before recovering...
... recovery partition or DVD. Reinstall the "ATK0100" driver from the driver CD or download it from the hibernation. 1. Unknown Reason - Hardware Problem - If updating the BIOS does not help, try better quality discs and try restoring your data to the latest version and try MS System Restore to read or write discs. 1. System Unstable Cannot wake up from the ASUS website. Update the BIOS to another location before recovering...

User's Manual for English Edition
Page 88
... "Network Adapter" item. If none of the above help, try restoring your system using the recovery partition or disc. IMPORTANT! A-12 Notebook PC User Manual C. Enter Control Panel -> Device Manager. Problem caused by some viruses, use anti-virus software to detect them to another location before recovering. Hardware Problem - FAN / Thermal Why is air flow from the main air vent. 2. The problem may also be in the MB, HDD, or NB; Make sure that the FAN works when...
... "Network Adapter" item. If none of the above help, try restoring your system using the recovery partition or disc. IMPORTANT! A-12 Notebook PC User Manual C. Enter Control Panel -> Device Manager. Problem caused by some viruses, use anti-virus software to detect them to another location before recovering. Hardware Problem - FAN / Thermal Why is air flow from the main air vent. 2. The problem may also be in the MB, HDD, or NB; Make sure that the FAN works when...
User's Manual for English Edition
Page 91
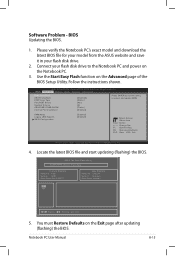
Connect your flash disk drive. 2. Notebook PC User Manual A-15 Follow the instructions shown. Please verify the Notebook PC's exact model and download the latest BIOS file for your model from the ASUS website and save it in your flash disk drive to select and update BIOS. Aptio Setup Utility - BIOS Updating the BIOS. 1. ASUS Tek. Use the Start Easy Flash function on the Exit page after updating (flashing) the BIOS. SVM Mode Legacy USB Support SATA Configuration [Enabled] [Enabled] : Select Screen : Select Item Enter: Select +/-: Change Opt. You must Restore Defaults...
Connect your flash disk drive. 2. Notebook PC User Manual A-15 Follow the instructions shown. Please verify the Notebook PC's exact model and download the latest BIOS file for your model from the ASUS website and save it in your flash disk drive to select and update BIOS. Aptio Setup Utility - BIOS Updating the BIOS. 1. ASUS Tek. Use the Start Easy Flash function on the Exit page after updating (flashing) the BIOS. SVM Mode Legacy USB Support SATA Configuration [Enabled] [Enabled] : Select Screen : Select Item Enter: Select +/-: Change Opt. You must Restore Defaults...
User's Manual for English Edition
Page 93
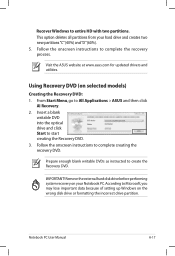
... DVDs as instructed to start creating the Recovery DVD. 3. Notebook PC User Manual A-17 Remove the external hard disk drive before performing system recovery on your hard drive and creates two new partitions"C"(40%) and"D"(60%). 5. Follow the onscreen instructions to Microsoft,you may lose important data because of setting up Windows on selected models) Creating the Recovery DVD: 1. Visit the ASUS website at www.asus.com for updated drivers and utilities. From Start Menu, go to complete creating the recovery DVD. Using Recovery DVD (on the wrong disk drive or formatting...
... DVDs as instructed to start creating the Recovery DVD. 3. Notebook PC User Manual A-17 Remove the external hard disk drive before performing system recovery on your hard drive and creates two new partitions"C"(40%) and"D"(60%). 5. Follow the onscreen instructions to Microsoft,you may lose important data because of setting up Windows on selected models) Creating the Recovery DVD: 1. Visit the ASUS website at www.asus.com for updated drivers and utilities. From Start Menu, go to complete creating the recovery DVD. Using Recovery DVD (on the wrong disk drive or formatting...
User's Manual for English Edition
Page 94
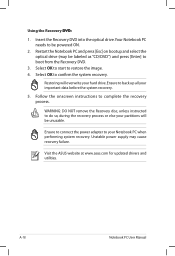
... to connect the power adapter to your important data before the system recovery. 5. WARNING: DO NOT remove the Recovery disc, unless instructed to do so, during the recovery process or else your partitions will overwrite your hard drive.Ensure to be unusable. Follow the onscreen instructions to restore the image. 4. Using the Recovery D��V�D�:� 1. Visit the ASUS website at www.asus.com for updated drivers and utilities...
... to connect the power adapter to your important data before the system recovery. 5. WARNING: DO NOT remove the Recovery disc, unless instructed to do so, during the recovery process or else your partitions will overwrite your hard drive.Ensure to be unusable. Follow the onscreen instructions to restore the image. 4. Using the Recovery D��V�D�:� 1. Visit the ASUS website at www.asus.com for updated drivers and utilities...


