User Manual
Page 2
......1-6 Right Side...1-7 Left Side...1-8 Keyboard Usage...1-9 Special Function Keys 1-9 Touchpad Usage...1-11 Multi-finger gesture input (on selected models 1-11 Chapter 2: Getting Started Powering on your Eee PC...2-2 First-time Startup...2-3 Desktop...2-5 Network Connection...2-6 Configuring a wireless network connection 2-6 Local Area Network 2-7 Browsing web pages 2-10 Chapter 3: Using the Eee PC ASUS Update...3-2 Updating the BIOS through...
......1-6 Right Side...1-7 Left Side...1-8 Keyboard Usage...1-9 Special Function Keys 1-9 Touchpad Usage...1-11 Multi-finger gesture input (on selected models 1-11 Chapter 2: Getting Started Powering on your Eee PC...2-2 First-time Startup...2-3 Desktop...2-5 Network Connection...2-6 Configuring a wireless network connection 2-6 Local Area Network 2-7 Browsing web pages 2-10 Chapter 3: Using the Eee PC ASUS Update...3-2 Updating the BIOS through...
User Manual
Page 6
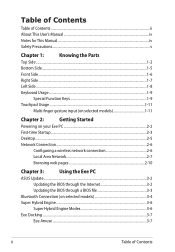
...symbol of the crossed out wheeled bin indicates that is easily dulled if not properly cared for transport, you should not transport your Eee PC in a carrying case for disposal of electronic products. Close the display panel to enable proper reuse of parts and recycling.The ...DO NOT carry or cover a Eee PC that the product (electrical, electronic equipment and mercury-containing button cell battery) should turn it OFF and disconnect all external peripherals to prevent damage to the connectors. This product has been designed to protect the keyboard and display panel. vi Table...
...symbol of the crossed out wheeled bin indicates that is easily dulled if not properly cared for transport, you should not transport your Eee PC in a carrying case for disposal of electronic products. Close the display panel to enable proper reuse of parts and recycling.The ...DO NOT carry or cover a Eee PC that the product (electrical, electronic equipment and mercury-containing button cell battery) should turn it OFF and disconnect all external peripherals to prevent damage to the connectors. This product has been designed to protect the keyboard and display panel. vi Table...
User Manual
Page 10
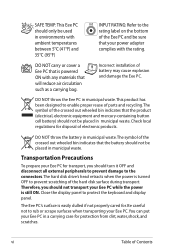
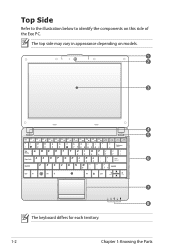
The top side may vary in appearance depending on this side of the Eee PC. Top Side Refer to the illustration below to identify the components on models. 1 2 3 4 5 6 7 8 The keyboard differs for each territory. 1-2 Chapter 1: Knowing the Parts
The top side may vary in appearance depending on this side of the Eee PC. Top Side Refer to the illustration below to identify the components on models. 1 2 3 4 5 6 7 8 The keyboard differs for each territory. 1-2 Chapter 1: Knowing the Parts

User Manual
Page 11
... the touchpad ON/OFF. Power Indicator The power indicator lights when the Eee PC is turned ON and blinks slowly when the Eee PC is turned OFF. 6 Keyboard The keyboard provides keys with comfortable travel (depth at which the keys can also turn OFF the Eee PC. ASUS Eee PC 1-3 1 Microphone (Built-in) 2 Built-in the Save-to -RAM (Suspend) mode...
... the touchpad ON/OFF. Power Indicator The power indicator lights when the Eee PC is turned ON and blinks slowly when the Eee PC is turned OFF. 6 Keyboard The keyboard provides keys with comfortable travel (depth at which the keys can also turn OFF the Eee PC. ASUS Eee PC 1-3 1 Microphone (Built-in) 2 Built-in the Save-to -RAM (Suspend) mode...

User Manual
Page 15
... 2.0 or USB 1.1 devices such as keyboards, pointing devices, cameras, and storage devices, connected in a series up to 12Mbits/sec (USB 1.1) and 480Mbits/sec (USB 2.0). The built-in memory card reader can read SD/SDHC/MMC cards. 2 Headphone Output Jack The 1/8" stereo headphone jack (3.5mm) connects the Eee PC's audio out signal to a local... simple audio recordings. 4 USB Port (2.0/1.1) The USB (Universal Serial Bus) port is designed to connect the microphone used for connection to amplified speakers or headphones. ASUS Eee PC 1-7
... 2.0 or USB 1.1 devices such as keyboards, pointing devices, cameras, and storage devices, connected in a series up to 12Mbits/sec (USB 1.1) and 480Mbits/sec (USB 2.0). The built-in memory card reader can read SD/SDHC/MMC cards. 2 Headphone Output Jack The 1/8" stereo headphone jack (3.5mm) connects the Eee PC's audio out signal to a local... simple audio recordings. 4 USB Port (2.0/1.1) The USB (Universal Serial Bus) port is designed to connect the microphone used for connection to amplified speakers or headphones. ASUS Eee PC 1-7
User Manual
Page 17
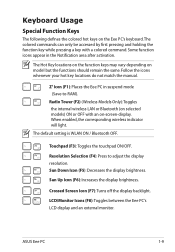
...display brightness. Crossed Screen Icon (F7): Turns off the display backlight. LCD/Monitor Icons (F8): Toggles between the Eee PC's LCD display and an external monitor. ASUS Eee PC 1-9 The Hot Key locations on the function keys may vary depending on -screen-display. The default setting is ... Selection (F4): Press to -RAM). Sun Down Icon (F5): Decreases the display brightness. Keyboard Usage Special Function Keys The following defines the colored hot keys on the Eee PC's keyboard. Some function icons appear in suspend mode (Save-to adjust the display resolution. When enabled,...
...display brightness. Crossed Screen Icon (F7): Turns off the display backlight. LCD/Monitor Icons (F8): Toggles between the Eee PC's LCD display and an external monitor. ASUS Eee PC 1-9 The Hot Key locations on the function keys may vary depending on -screen-display. The default setting is ... Selection (F4): Press to -RAM). Sun Down Icon (F5): Decreases the display brightness. Keyboard Usage Special Function Keys The following defines the colored hot keys on the Eee PC's keyboard. Some function icons appear in suspend mode (Save-to adjust the display resolution. When enabled,...

User Manual
Page 18
... display. End (→): Press to move the pointer to scroll down in documents or the web browser. Allows you to the end of the keyboard for number entering. Home (←): Press to move the pointer to use of a larger portion of the line. Scr Lk (Delete): Toggles the... "Scroll Lock" ON and OFF. Pg Dn (↓): Press to the beginning of the keyboard for cell navigation. Task Manager Icon (F9): Initiates the Task Manager to view the application process or terminates applications. Crossed Speaker Icon (F10): Mutes ...
... display. End (→): Press to move the pointer to scroll down in documents or the web browser. Allows you to the end of the keyboard for number entering. Home (←): Press to move the pointer to use of a larger portion of the line. Scr Lk (Delete): Toggles the... "Scroll Lock" ON and OFF. Pg Dn (↓): Press to the beginning of the keyboard for cell navigation. Task Manager Icon (F9): Initiates the Task Manager to view the application process or terminates applications. Crossed Speaker Icon (F10): Mutes ...
User Manual
Page 23
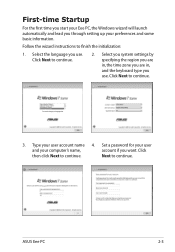
... and lead you through setting up your computer's name, account if you want. ASUS Eee PC 2-3 Select the language you use . Select you system settings by specifying the region you are in, the time zone you are in, and the keyboard type you use . Set a password for your user and your preferences and some...
... and lead you through setting up your computer's name, account if you want. ASUS Eee PC 2-3 Select the language you use . Select you system settings by specifying the region you are in, the time zone you are in, and the keyboard type you use . Set a password for your user and your preferences and some...
User Manual
Page 45
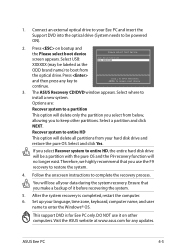
.... Visit the ASUS website at www.asus.com for Eee PC only. ASUS Eee PC 4-5 Select a partition and click NEXT. Set up your hard disk drive and restore the pure OS. If you to restore the system. 4. Connect an external optical drive to boot from your language, time zone, keyboard, computer name,... restart the computer. 6. Select USB: XXXXXX (may be a partition with the pure OS and the F9 recovery function will delete all your Eee PC and insert the Support DVD into the optical drive (System needs to be powered ON). 2. Options are: Recover system to a partition This ...
.... Visit the ASUS website at www.asus.com for Eee PC only. ASUS Eee PC 4-5 Select a partition and click NEXT. Set up your hard disk drive and restore the pure OS. If you to restore the system. 4. Connect an external optical drive to boot from your language, time zone, keyboard, computer name,... restart the computer. 6. Select USB: XXXXXX (may be a partition with the pure OS and the F9 recovery function will delete all your Eee PC and insert the Support DVD into the optical drive (System needs to be powered ON). 2. Options are: Recover system to a partition This ...


