Owners Manual
Page 5
.... Return it to use only the supplied connector cable with the unit. Installation Location Make sure the iDA-X100 will not be correctly displayed. 3-EN Correct performance using other USB products cannot... vibrations Protecting the USB connector • Only an iPod, USB memory or Portable audio player can be performed after coming to the product. Excessive volume levels that requires your prolonged ...function or some functions may result in a safe location before turning your Alpine dealer or the nearest Alpine Service Station for other injury. Doing so may result in injury or ...
.... Return it to use only the supplied connector cable with the unit. Installation Location Make sure the iDA-X100 will not be correctly displayed. 3-EN Correct performance using other USB products cannot... vibrations Protecting the USB connector • Only an iPod, USB memory or Portable audio player can be performed after coming to the product. Excessive volume levels that requires your prolonged ...function or some functions may result in a safe location before turning your Alpine dealer or the nearest Alpine Service Station for other injury. Doing so may result in injury or ...
Owners Manual
Page 43
... technical skill and experience. DO NOT INSTALL IN LOCATIONS WITH HIGH MOISTURE OR DUST. This will prevent crimping and damage to electrical shorts. When in compliance with the manual to do so may result in serious injury. If so, please contact your Alpine dealer. • The iDA-X100 uses female RCA-type jacks for...
... technical skill and experience. DO NOT INSTALL IN LOCATIONS WITH HIGH MOISTURE OR DUST. This will prevent crimping and damage to electrical shorts. When in compliance with the manual to do so may result in serious injury. If so, please contact your Alpine dealer. • The iDA-X100 uses female RCA-type jacks for...
Owners Manual
Page 44
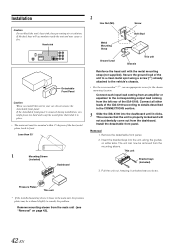
.... • For the screw marked "*2", use an appropriate screw for the chosen mounting location. Install the detachable front panel. The unit can now be mounted within 35 degrees of the iDA-X100 according to details described in the main unit, the pressure plates may cause a fire. Pull the...using a screw (*1) already attached to the corresponding output lead coming from the dashboard. Secure the ground lead of the iDA-X100. This ensures that holds it unlocked as you install this unit in place. • The main unit must be removed from the main unit (see "Removal" on either...
.... • For the screw marked "*2", use an appropriate screw for the chosen mounting location. Install the detachable front panel. The unit can now be mounted within 35 degrees of the iDA-X100 according to details described in the main unit, the pressure plates may cause a fire. Pull the...using a screw (*1) already attached to the corresponding output lead coming from the dashboard. Secure the ground lead of the iDA-X100. This ensures that holds it unlocked as you install this unit in place. • The main unit must be removed from the main unit (see "Removal" on either...


