
User Manual
Page 3
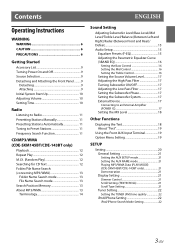
... Setting the Treble Control 16 Setting the Source Volume Level 17 Adjusting the High Pass Filter 17 Turning Subwoofer ON/OFF 17 Adjusting the Low Pass Filter 17 Setting the Subwoofer Phase 17 Setting the Subwoofer System 17 External Device 17 Connecting to an External Amplifier (POWER IC 17 Setting the MX Level 18 Other Functions Displaying the Text 18 About "Text 19 Using the Front AUX Input Terminal 19 Option Menu Setting 19 SETUP Setting 20 General Setting 21 Setting the AUX SETUP mode...
... Setting the Treble Control 16 Setting the Source Volume Level 17 Adjusting the High Pass Filter 17 Turning Subwoofer ON/OFF 17 Adjusting the Low Pass Filter 17 Setting the Subwoofer Phase 17 Setting the Subwoofer System 17 External Device 17 Connecting to an External Amplifier (POWER IC 17 Setting the MX Level 18 Other Functions Displaying the Text 18 About "Text 19 Using the Front AUX Input Terminal 19 Option Menu Setting 19 SETUP Setting 20 General Setting 21 Setting the AUX SETUP mode...

User Manual
Page 4
... Pairing 23 BLUETOOTH SETUP 23 Setting the BLUETOOTH Connection (BT IN 23 Setting the BLUETOOTH Device 23 Setting the Visible Mode 24 Setting the BLUETOOTH sound quality........ 24 Adjusting the volume (VOL LV ADJ 24 Sound Auto setting (TYPE SET 24 Setting the caller information display ON/OFF 24 Setting the Phone Book Update 24 Setting the Phone Book Auto Update ON/OFF (AUTO 24 Setting the Phone Book Manual Update ON/OFF (MANUAL 24 Changing the Phone book List Order........... 24 Setting the Received Calls automatically (Auto Answer 25 Selecting the output speaker 25 Displaying...
... Pairing 23 BLUETOOTH SETUP 23 Setting the BLUETOOTH Connection (BT IN 23 Setting the BLUETOOTH Device 23 Setting the Visible Mode 24 Setting the BLUETOOTH sound quality........ 24 Adjusting the volume (VOL LV ADJ 24 Sound Auto setting (TYPE SET 24 Setting the caller information display ON/OFF 24 Setting the Phone Book Update 24 Setting the Phone Book Auto Update ON/OFF (AUTO 24 Setting the Phone Book Manual Update ON/OFF (MANUAL 24 Changing the Phone book List Order........... 24 Setting the Received Calls automatically (Auto Answer 25 Selecting the output speaker 25 Displaying...
User Manual
Page 7
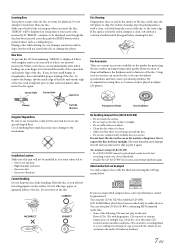
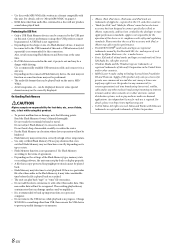
... incorrectly. Playing a disc while driving on the disc. New Discs To prevent the CD from the center of the disc. If you use commercially available disc accessories. Installation Location Make sure this could cause the CD player to direct sunlight. Do not write on a very bumpy road may result in a solution of the disc with a pointed object such as a ballpoint pen. To remove the bumps...
... incorrectly. Playing a disc while driving on the disc. New Discs To prevent the CD from the center of the disc. If you use commercially available disc accessories. Installation Location Make sure this could cause the CD player to direct sunlight. Do not write on a very bumpy road may result in a solution of the disc with a pointed object such as a ballpoint pen. To remove the bumps...
User Manual
Page 8
... USB, then remove the USB device to prevent possible damage to its compliance with iPod, or iPhone may contain noise that an electronic accessory has been designed to connect specifically to start playback. Please pay -audio or audio-on the connected Flash Memory device, the unit may not function or some functions may not be performed. • The audio file format that even certified Flash Memory, may take time to iPod, or iPhone...
... USB, then remove the USB device to prevent possible damage to its compliance with iPod, or iPhone may contain noise that an electronic accessory has been designed to connect specifically to start playback. Please pay -audio or audio-on the connected Flash Memory device, the unit may not function or some functions may not be performed. • The audio file format that even certified Flash Memory, may take time to iPod, or iPhone...
User Manual
Page 10
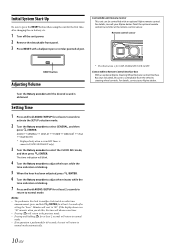
Remote control sensor RESET button Adjusting Volume Turn the Rotary encoder until the desired sound is connected.(CDE-SXM145BT only). 3 Turn the Rotary encoder to select the CLOCK ADJ mode, and then press ENTER. AUDIO GENERAL DISPLAY TUNER SIRIUSXM* iPod BLUETOOTH * Displayed only when a siriusXM Tuner is obtained. Notes • To synchronize the clock to another clock/watch or radio time announcement, press and hold ...
Remote control sensor RESET button Adjusting Volume Turn the Rotary encoder until the desired sound is connected.(CDE-SXM145BT only). 3 Turn the Rotary encoder to select the CLOCK ADJ mode, and then press ENTER. AUDIO GENERAL DISPLAY TUNER SIRIUSXM* iPod BLUETOOTH * Displayed only when a siriusXM Tuner is obtained. Notes • To synchronize the clock to another clock/watch or radio time announcement, press and hold ...
User Manual
Page 15
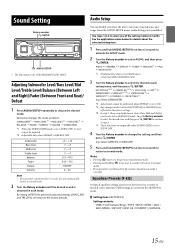
... change the setting, and then press ENTER. (e.g. Use steps 1 to 5 to select the desired sound setting menu, and then press ENTER. Equalizer Presets (F-EQ) 10 typical equalizer settings are inoperable when SUBWOOFER is connected.(CDE-SXM145BT only). 3 Turn the Rotary encoder to select one of musical source material. Adjusting Subwoofer Level/Bass Level/Mid Level/Treble Level/Balance (Between Left and Right)/Fader (Between Front and Rear)/ Defeat 1 Press AUDIOSETUP repeatedly to normal mode. Select SUBWOOFER) *2 Adjustment...
... change the setting, and then press ENTER. (e.g. Use steps 1 to 5 to select the desired sound setting menu, and then press ENTER. Equalizer Presets (F-EQ) 10 typical equalizer settings are inoperable when SUBWOOFER is connected.(CDE-SXM145BT only). 3 Turn the Rotary encoder to select one of musical source material. Adjusting Subwoofer Level/Bass Level/Mid Level/Treble Level/Balance (Between Left and Right)/Fader (Between Front and Rear)/ Defeat 1 Press AUDIOSETUP repeatedly to normal mode. Select SUBWOOFER) *2 Adjustment...
User Manual
Page 19
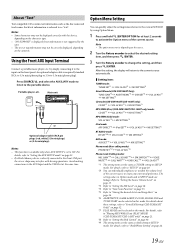
... "text". Main unit or Optional adapter cable (RCA pin plugs [red, white] 3.5ø miniplugs) or (3.5ø miniplugs). For details, refer to "Setting the AUX SETUP mode" on the contents. Option Menu Setting You can quickly adjust the setting items relevant to "SiriusXM Setting (CDE-SXM145BT Only)" on page 32. *7 PLAY MODE can be correctly displayed, depending on page 21. • If a Flash Memory device is set to the Front USB port, the...
... "text". Main unit or Optional adapter cable (RCA pin plugs [red, white] 3.5ø miniplugs) or (3.5ø miniplugs). For details, refer to "Setting the AUX SETUP mode" on the contents. Option Menu Setting You can quickly adjust the setting items relevant to "SiriusXM Setting (CDE-SXM145BT Only)" on page 32. *7 PLAY MODE can be correctly displayed, depending on page 21. • If a Flash Memory device is set to the Front USB port, the...
User Manual
Page 20
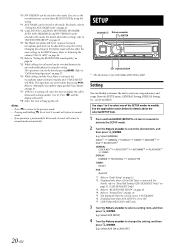
... be switched between the unit and mobile phone by using this item to "Audio Setup" on page 10. *5 Not displayed when the current source is AUXILIARY. *6 Displayed only when AUX SETUP is connected. Select GENERAL) AUDIO*1 GENERAL DISPLAY TUNER SIRIUSXM*2 iPod BLUETOOTH*3 GENERAL: CLOCK ADJ*4 AUX SETUP*5 AUX NAME*6 PLAY MODE*7 DEMO DISPLAY: DIMMER TEXTSCROLL SCROLLTYPE TUNER: FM SET iPod: iPod LIST *1 Refer to display the caller's Name and waiting number (1 or...
... be switched between the unit and mobile phone by using this item to "Audio Setup" on page 10. *5 Not displayed when the current source is AUXILIARY. *6 Displayed only when AUX SETUP is connected. Select GENERAL) AUDIO*1 GENERAL DISPLAY TUNER SIRIUSXM*2 iPod BLUETOOTH*3 GENERAL: CLOCK ADJ*4 AUX SETUP*5 AUX NAME*6 PLAY MODE*7 DEMO DISPLAY: DIMMER TEXTSCROLL SCROLLTYPE TUNER: FM SET iPod: iPod LIST *1 Refer to display the caller's Name and waiting number (1 or...
User Manual
Page 21
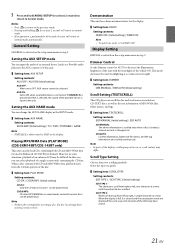
...; Setting item: TEXTSCROLL Setting contents: SCR MANUAL (Initial setting) / SCR AUTO SCR MANUAL: The above information is scrolled only when a disc is loaded, a channel or track is selected on CD-TEXT discs, as well as a Portable audio player) to the AUX connector of the display, scrolling may not occur, or scroll content may be played back. Display Setting DISPLAY is changed, etc. This mode decreases the unit's backlighting at a certain extent at a time...
...; Setting item: TEXTSCROLL Setting contents: SCR MANUAL (Initial setting) / SCR AUTO SCR MANUAL: The above information is scrolled only when a disc is loaded, a channel or track is selected on CD-TEXT discs, as well as a Portable audio player) to the AUX connector of the display, scrolling may not occur, or scroll content may be played back. Display Setting DISPLAY is changed, etc. This mode decreases the unit's backlighting at a certain extent at a time...
User Manual
Page 23
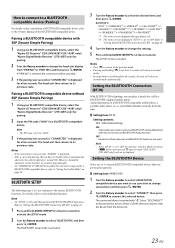
... the BLUETOOTH compatible device. BLUETOOTH: BT IN*1 PAIRED DEV*2 VISIBLE M*2 CALL SOUND*2 CALLER ID*2 PB UPDATE*1/*2 PB ORDER*2 AUTO ANS*2 SPEAKER SL*2 FW VERSION*2 FW UPDATE*1 *1 The items are not used. Refer to "Setting the BLUETOOTH Connection (BT IN)" on page 23. 1 Press and hold AUDIOSETUP for pairing. 2 Input the PIN code ("0000") in a BLUETOOTH compatible device. Setting the BLUETOOTH Device Select one of 5 connected BLUETOOTH compatible devices that...
... the BLUETOOTH compatible device. BLUETOOTH: BT IN*1 PAIRED DEV*2 VISIBLE M*2 CALL SOUND*2 CALLER ID*2 PB UPDATE*1/*2 PB ORDER*2 AUTO ANS*2 SPEAKER SL*2 FW VERSION*2 FW UPDATE*1 *1 The items are not used. Refer to "Setting the BLUETOOTH Connection (BT IN)" on page 23. 1 Press and hold AUDIOSETUP for pairing. 2 Input the PIN code ("0000") in a BLUETOOTH compatible device. Setting the BLUETOOTH Device Select one of 5 connected BLUETOOTH compatible devices that...
User Manual
Page 24
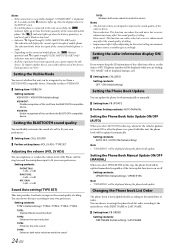
..., you need to delete one of calling. Echo-cancel: This function can update the phone book automatically or manually. Setting item: PB UPDATE Further Setting contents: AUTO/MANUAL Setting the Phone Book Auto Update ON/OFF (AUTO) When you select AUTO ON in low level. • Indicator i (Signal Strength) (CDE-143BT/UTE-42BT only): The indicator will be displayed while you select UPDATE YES in this unit from a BLUETOOTH compatible device. Setting the Visible Mode You can set whether this...
..., you need to delete one of calling. Echo-cancel: This function can update the phone book automatically or manually. Setting item: PB UPDATE Further Setting contents: AUTO/MANUAL Setting the Phone Book Auto Update ON/OFF (AUTO) When you select AUTO ON in low level. • Indicator i (Signal Strength) (CDE-143BT/UTE-42BT only): The indicator will be displayed while you select UPDATE YES in this unit from a BLUETOOTH compatible device. Setting the Visible Mode You can set whether this...
User Manual
Page 26
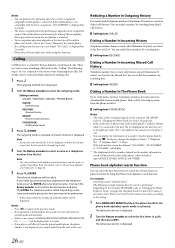
... outgoing mode is activated, and each individual category for 60 seconds, the unit will be called . The letter selection list is displayed for received calls that you place a call . • You can select the first three letters to the various ways of making calls based on the recognition range of the mobile phone and mounting location of making these numbers by using this function may...
... outgoing mode is activated, and each individual category for 60 seconds, the unit will be called . The letter selection list is displayed for received calls that you place a call . • You can select the first three letters to the various ways of making calls based on the recognition range of the mobile phone and mounting location of making these numbers by using this function may...
User Manual
Page 27
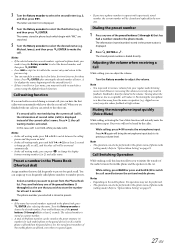
... using the Alphabet Search function. Turn the Rotary encoder to search for a name by the caller. Adjusting the volume when receiving a Call While calling, you to increase volume from the main car speakers (e.g. Turn the Rotary encoder to "Option Menu Setting" on page 19. Muting the microphone input quickly (Voice Mute) While calling, activating the Voice Mute function will not be stored in the preset memory ( 6 numbers for each mobile phone in...
... using the Alphabet Search function. Turn the Rotary encoder to search for a name by the caller. Adjusting the volume when receiving a Call While calling, you to increase volume from the main car speakers (e.g. Turn the Rotary encoder to "Option Menu Setting" on page 19. Muting the microphone input quickly (Voice Mute) While calling, activating the Voice Mute function will not be stored in the preset memory ( 6 numbers for each mobile phone in...
User Manual
Page 29
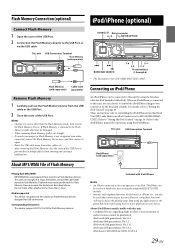
... sound is not output or Flash Memory is connected to this unit • Confirmed devices regarding Made for Flash Memory devices. Refer to control the iPod/iPhone using its own controls or by using the Interface cable for iPod (included with this unit, you can choose to the iPod/iPhone manual for USB connection. This unit USB Connection Terminal iPod/iPhone (sold separately) separately) Remove Flash Memory 1 Carefully, pull out the Flash Memory Device from this unit operates as a hands-free device using the integrated BLUETOOTH module. • Internet and telephone functions...
... sound is not output or Flash Memory is connected to this unit • Confirmed devices regarding Made for Flash Memory devices. Refer to control the iPod/iPhone using its own controls or by using the Interface cable for iPod (included with this unit, you can choose to the iPod/iPhone manual for USB connection. This unit USB Connection Terminal iPod/iPhone (sold separately) separately) Remove Flash Memory 1 Carefully, pull out the Flash Memory Device from this unit operates as a hands-free device using the integrated BLUETOOTH module. • Internet and telephone functions...
User Manual
Page 34
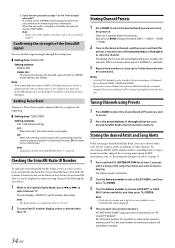
The unit displays "RADIO ID" and ID number alternately. Storing Channel Presets 1 Press BAND to select the desired band you want to store is a music channel will return to the southern sky, then your favorite songs or artists are 3 Satellite Radio Preset bands. An interruption ALERT will be cleared and replaced with no obstructions to live satellite radio. The Option mode is connected. XX is the total number of...
The unit displays "RADIO ID" and ID number alternately. Storing Channel Presets 1 Press BAND to select the desired band you want to store is a music channel will return to the southern sky, then your favorite songs or artists are 3 Satellite Radio Preset bands. An interruption ALERT will be cleared and replaced with no obstructions to live satellite radio. The Option mode is connected. XX is the total number of...
User Manual
Page 37
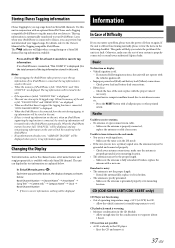
... an iPod/iPhone supporting the tag function is disconnected from the unit during tagging, its tag information. The unit can preview, buy and download your antenna connections; If connected following checklist. When the memory of operating temperature range +50°C (+120°F) for at its mounting location. • The antenna may not be transferred to . Use this button, the display changes as the channel name, artist name/feature and song/program...
... an iPod/iPhone supporting the tag function is disconnected from the unit during tagging, its tag information. The unit can preview, buy and download your antenna connections; If connected following checklist. When the memory of operating temperature range +50°C (+120°F) for at its mounting location. • The antenna may not be transferred to . Use this button, the display changes as the channel name, artist name/feature and song/program...
User Manual
Page 38
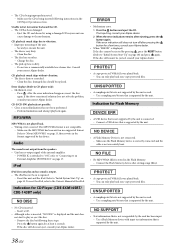
... Alpine dealer. • When "ERROR" is displayed: If the disc cannot be ejected by the unit has been input. - To reset the iPod, refer to the Owner's Manual of the internal amplifier. - If the error indication still does not turn off after pressing the button for a few times, consult your unit can only play or eject the disc. - If the disc still cannot be replaced. Make sure the Flash Memory device is correctly connected and the cable...
... Alpine dealer. • When "ERROR" is displayed: If the disc cannot be ejected by the unit has been input. - To reset the iPod, refer to the Owner's Manual of the internal amplifier. - If the error indication still does not turn off after pressing the button for a few times, consult your unit can only play or eject the disc. - If the disc still cannot be replaced. Make sure the Flash Memory device is correctly connected and the cable...
User Manual
Page 42
...-EN USE SPECIFIED ACCESSORY PARTS AND INSTALL THEM SECURELY. If wiring passes through a hole in fire or product damage. Incorrect connections may result in locations with the manual to prevent obstructions when driving. When connecting the CDE-SXM145BT/CDE-143BT/UTE-42BT to the fuse box, make the proper connections may result in case of a short-circuit. • Be sure to connect the color coded leads according...
...-EN USE SPECIFIED ACCESSORY PARTS AND INSTALL THEM SECURELY. If wiring passes through a hole in fire or product damage. Incorrect connections may result in locations with the manual to prevent obstructions when driving. When connecting the CDE-SXM145BT/CDE-143BT/UTE-42BT to the fuse box, make the proper connections may result in case of a short-circuit. • Be sure to connect the color coded leads according...
User Manual
Page 43
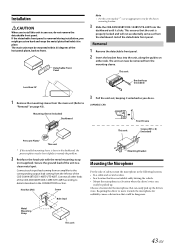
... the microphone for the chosen mounting location. 3 Slide the CDE-SXM145BT/CDE-143BT/UTE-42BT into the unit, along the guides on page 43). Removal 1 Remove the detachable front panel. 2 Insert the bracket keys into the dashboard until it in the CONNECTIONS section. Metal Mounting Strap This unit 43-EN Hex Nut (M5) Screw * Bolt Stud Mounting Bracket Mounting the Microphone For the sake...
... the microphone for the chosen mounting location. 3 Slide the CDE-SXM145BT/CDE-143BT/UTE-42BT into the unit, along the guides on page 43). Removal 1 Remove the detachable front panel. 2 Insert the bracket keys into the dashboard until it in the CONNECTIONS section. Metal Mounting Strap This unit 43-EN Hex Nut (M5) Screw * Bolt Stud Mounting Bracket Mounting the Microphone For the sake...
User Manual
Page 45
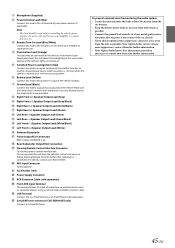
...; Rear/Subwoofer Output RCA Connectors Steering Remote Control Interface Connector To steering remote control interface box. This will allow the backlighting of this unit to dim whenever the vehicle's lights are turned on. Switched Power Lead (Ignition) (Red) Connect this lead to a SiriusXM Tuner. For details, contact your power antenna, if applicable. Note • This lead should be connected to a Flash Memory or an iPod/iPhone (sold separately) Front AUX Input Terminal...
...; Rear/Subwoofer Output RCA Connectors Steering Remote Control Interface Connector To steering remote control interface box. This will allow the backlighting of this unit to dim whenever the vehicle's lights are turned on. Switched Power Lead (Ignition) (Red) Connect this lead to a SiriusXM Tuner. For details, contact your power antenna, if applicable. Note • This lead should be connected to a Flash Memory or an iPod/iPhone (sold separately) Front AUX Input Terminal...


