Owners Manual
Page 5
... the Monitor Opening Angle ...40 Adjusting the Monitor Viewing Angle ...40 Sound (Beep) Guide Function ...41 Changing Lighting Color ...41 Navigation Interruption ...41 Navigation Audio Interruption Volume Adjustment ...42 Head Unit Linked Functions ...42 AUX IN/S-IN SETUP ...43 Setting the AUX Mode ...44 Name External Equipment to Be Displayed (AUX) ...45 External Input Audio Level Adjustment ...45 Setting the S-IN Mode ...45 Name the S Video Input to Be Displayed (S-IN) ...45 Getting Started About the Remote Control ...6 About the indicators and the microphone ...7 Using the TMI-M990 with...
... the Monitor Opening Angle ...40 Adjusting the Monitor Viewing Angle ...40 Sound (Beep) Guide Function ...41 Changing Lighting Color ...41 Navigation Interruption ...41 Navigation Audio Interruption Volume Adjustment ...42 Head Unit Linked Functions ...42 AUX IN/S-IN SETUP ...43 Setting the AUX Mode ...44 Name External Equipment to Be Displayed (AUX) ...45 External Input Audio Level Adjustment ...45 Setting the S-IN Mode ...45 Name the S Video Input to Be Displayed (S-IN) ...45 Getting Started About the Remote Control ...6 About the indicators and the microphone ...7 Using the TMI-M990 with...
Owners Manual
Page 9
This prevents the cover from the player and Manual to place these functions into a special screen. Operation of some of the functions of this the procedure described in the Owner's Manual. displayed if any attempts are made as when selecting Maintenance sources using the remote control. Installation Location Make sure the TMI-M990 will remain temporarily. After a short warm-up period, it was deemed necessary to be evaporate. For...
This prevents the cover from the player and Manual to place these functions into a special screen. Operation of some of the functions of this the procedure described in the Owner's Manual. displayed if any attempts are made as when selecting Maintenance sources using the remote control. Installation Location Make sure the TMI-M990 will remain temporarily. After a short warm-up period, it was deemed necessary to be evaporate. For...

Owners Manual
Page 17
... Monitor Viewing Angle" (page 14). ○ ○ ○ ○ ○ ○ ○ ○ ○ 13-EN The display can slide about 1 cm back and forwards. 4 When you move to the next item, press VISUAL EQ to move , then contact your TMI-M990. • The display activates using the values stored for supplementary information. Adjusting the Display Back and Forwards The monitor opening...
... Monitor Viewing Angle" (page 14). ○ ○ ○ ○ ○ ○ ○ ○ ○ 13-EN The display can slide about 1 cm back and forwards. 4 When you move to the next item, press VISUAL EQ to move , then contact your TMI-M990. • The display activates using the values stored for supplementary information. Adjusting the Display Back and Forwards The monitor opening...

Owners Manual
Page 18
... the Setup operation "Adjusting the Monitor Viewing Angle" on page 40. • The adjustment angle is stored, but depending on the motion, the position can also adjust the display angle by selecting from the original position. Basic Operation /VOLUME /VOLUME /FLAT /TILT /TILT /TILT /TILT Adjusting the Monitor Viewing Angle Adjust the monitor's angle for better visibility. 1 Press / TILT and / TILT to adjust the monitor's angle so the screen...
... the Setup operation "Adjusting the Monitor Viewing Angle" on page 40. • The adjustment angle is stored, but depending on the motion, the position can also adjust the display angle by selecting from the original position. Basic Operation /VOLUME /VOLUME /FLAT /TILT /TILT /TILT /TILT Adjusting the Monitor Viewing Angle Adjust the monitor's angle for better visibility. 1 Press / TILT and / TILT to adjust the monitor's angle so the screen...

Owners Manual
Page 23
... remote control, you can change between AUX-1, 2, 3. In the navigation screen, the display mode is also allowed to the original display mode. Page17 Page17 19-EN TITLE Adjusting the Monitor Viewing Angle Description If the monitor touches an obstacle while the angle is minimum. Should this happen, remove the obstacle and press / TILT or / TILT again. After exiting from the setup operation, the display mode returns to adjust while turning power off. Adjust the screen...
... remote control, you can change between AUX-1, 2, 3. In the navigation screen, the display mode is also allowed to the original display mode. Page17 Page17 19-EN TITLE Adjusting the Monitor Viewing Angle Description If the monitor touches an obstacle while the angle is minimum. Should this happen, remove the obstacle and press / TILT or / TILT again. After exiting from the setup operation, the display mode returns to adjust while turning power off. Adjust the screen...

Owners Manual
Page 26
...the screen contrast. The screen returns to display "FLAT". 2 Press and hold VISUAL EQ for at least 2 seconds. Suitable for new movies. SHARP: Sharpens the picture. Suitable for movies with either / TILT or / TILT. USER 1/2: Accesses the adjustment value stored in RGB navigation mode, backup camera interruption mode.) ...displayed. (See page 20) • "OFF" is set in "Adjusting and Storing VISUAL EQTM" (Page 23). Press VISUAL EQ to normal mode. • You can set VISUAL EQ for each picture source such as DVD. (VISUAL EQ cannot be set on this unit when the power is first turned...
...the screen contrast. The screen returns to display "FLAT". 2 Press and hold VISUAL EQ for at least 2 seconds. Suitable for new movies. SHARP: Sharpens the picture. Suitable for movies with either / TILT or / TILT. USER 1/2: Accesses the adjustment value stored in RGB navigation mode, backup camera interruption mode.) ...displayed. (See page 20) • "OFF" is set in "Adjusting and Storing VISUAL EQTM" (Page 23). Press VISUAL EQ to normal mode. • You can set VISUAL EQ for each picture source such as DVD. (VISUAL EQ cannot be set on this unit when the power is first turned...

Owners Manual
Page 37
... tint adjustment*1 Display contrast adjustment Picture sharpness adjustment*1 Store the image adjustments Illumination brightness setting Illumination level setting Display brightness adjustment Automatic display opening/closing Adjusting the display back and forwards Adjusting the display angle External input setting AUX 1,2,3 display change setting External input audio level setting*5 S video input setting S-IN display change setting Operation sound setting Illumination color setting Navigation interruption mode setting Navigation voice interrupt volume adjustment*7 Head unit link function...
... tint adjustment*1 Display contrast adjustment Picture sharpness adjustment*1 Store the image adjustments Illumination brightness setting Illumination level setting Display brightness adjustment Automatic display opening/closing Adjusting the display back and forwards Adjusting the display angle External input setting AUX 1,2,3 display change setting External input audio level setting*5 S video input setting S-IN display change setting Operation sound setting Illumination color setting Navigation interruption mode setting Navigation voice interrupt volume adjustment*7 Head unit link function...
Owners Manual
Page 43
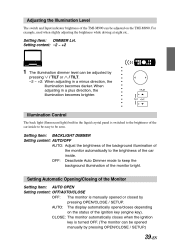
... darker. AUTO: The display automatically opens/closes depending on the TMI-M990. Adjusting the Illumination Level The switch and Input indicator brightness of the monitor bright. OFF: Deactivate Auto Dimmer mode to keep the background illumination of the TMI-M990 can be adjusted on the status of the car inside to be easy to the brightness of the ignition key (engine key). For example, used when slighly adjusting the brightness while driving...
... darker. AUTO: The display automatically opens/closes depending on the TMI-M990. Adjusting the Illumination Level The switch and Input indicator brightness of the monitor bright. OFF: Deactivate Auto Dimmer mode to keep the background illumination of the TMI-M990 can be adjusted on the status of the car inside to be easy to the brightness of the ignition key (engine key). For example, used when slighly adjusting the brightness while driving...

Owners Manual
Page 44
...; ○ Press / TILT or / TILT and adjust to an angle (10 levels) that is easily viewable. ○ ○ ○ Adjusting the Monitor Viewing Angle Setting item: TILT Setting content: 1 ~ 10 1 • The display angle can be adjusted by pushing the main unit switches / TILT or / TILT, or the remote control switches / TILT or / TILT. For details, see "Adjusting the Display Back and Forwards", page 13.
...; ○ Press / TILT or / TILT and adjust to an angle (10 levels) that is easily viewable. ○ ○ ○ Adjusting the Monitor Viewing Angle Setting item: TILT Setting content: 1 ~ 10 1 • The display angle can be adjusted by pushing the main unit switches / TILT or / TILT, or the remote control switches / TILT or / TILT. For details, see "Adjusting the Display Back and Forwards", page 13.
Owners Manual
Page 45
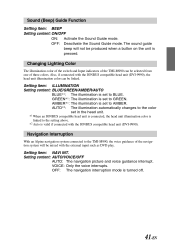
... Alpine navigation system connected to BLUE. AMBER*1: The illumination is set in the head unit. *1 When an IONBUS compatible head unit is connected, the head unit illumination color is pressed. Sound (Beep) Guide Function Setting item: BEEP Setting content: ON/OFF ON: Activate the Sound Guide mode. AUTO*2: The illumination automatically changes to the color set to the setting above. *2 Auto is turned off. 41-EN Setting content: AUTO/VOICE/OFF AUTO: The navigation picture and voice guidance interrupt. OFF: The navigation interruption mode...
... Alpine navigation system connected to BLUE. AMBER*1: The illumination is set in the head unit. *1 When an IONBUS compatible head unit is connected, the head unit illumination color is pressed. Sound (Beep) Guide Function Setting item: BEEP Setting content: ON/OFF ON: Activate the Sound Guide mode. AUTO*2: The illumination automatically changes to the color set to the setting above. *2 Auto is turned off. 41-EN Setting content: AUTO/VOICE/OFF AUTO: The navigation picture and voice guidance interrupt. OFF: The navigation interruption mode...

Owners Manual
Page 49
... switch is set "Changing Video Output" on the remote control. 45-EN Setting item: NAME Setting content: AUX/DVD/VCR/GAME/TV • Only valid when S-IN SIG. For details, refer to high. Setting content: ON/OFF ON: Display S video output compatible ALPINE head unit source. You can attach a display name you like . Name External Equipment to Be Displayed (AUX) When at least one external device is connected, you can name each as you like . External Input Audio Level Adjustment Setting...
... switch is set "Changing Video Output" on the remote control. 45-EN Setting item: NAME Setting content: AUX/DVD/VCR/GAME/TV • Only valid when S-IN SIG. For details, refer to high. Setting content: ON/OFF ON: Display S video output compatible ALPINE head unit source. You can attach a display name you like . Name External Equipment to Be Displayed (AUX) When at least one external device is connected, you can name each as you like . External Input Audio Level Adjustment Setting...

Owners Manual
Page 52
... SETUP screen. Auto memory Switch display mode Press and hold to access/exit the REAR SELECTOR screen. Display angle DOWN Press and hold to adjust the item and/or change the setting. Display angle UP Press and hold to "TV.MONI" and operate. 48-EN Video source, display mode, etc. Tuning stations directly. Adjusting the display back and forwards * MENU/SETUP TOP.M/DISP DEL.* ten key * +10 AUDIO ANGLE SUBT. * Valid when connected with the head unit. • Remote control operation...
... SETUP screen. Auto memory Switch display mode Press and hold to access/exit the REAR SELECTOR screen. Display angle DOWN Press and hold to adjust the item and/or change the setting. Display angle UP Press and hold to "TV.MONI" and operate. 48-EN Video source, display mode, etc. Tuning stations directly. Adjusting the display back and forwards * MENU/SETUP TOP.M/DISP DEL.* ten key * +10 AUDIO ANGLE SUBT. * Valid when connected with the head unit. • Remote control operation...

Owners Manual
Page 53
... due to the instructions, the unit will help you encounter a problem, please turn the power ON again. No function or display. • Vehicle's ignition is at the minimum position. - Movement of displayed picture is abnormal. • Temperature in the vehicle is exhausted. - No sound or unnatural sound. • Incorrect setting of your authorized Alpine dealer. Unclear picture display. • Fluorescent tube is too high. - replace with the...
... due to the instructions, the unit will help you encounter a problem, please turn the power ON again. No function or display. • Vehicle's ignition is at the minimum position. - Movement of displayed picture is abnormal. • Temperature in the vehicle is exhausted. - No sound or unnatural sound. • Incorrect setting of your authorized Alpine dealer. Unclear picture display. • Fluorescent tube is too high. - replace with the...

Owners Manual
Page 54
...-INTERFACE UNIT SECTION S/N Ratio Video 40dB Audio 50dB Input Level Video 1 Vp-p (75Ω UNBALANCED) Audio 1200mV (RMS) Output Level Video 1 Vp-p (75Ω UNBALANCED) Audio* 425mV (RMS) (AUX1 when the system switch is set to STANDALONE (VOL MAX)) 1200mV (RMS) (AUX1, AUX2 when the system switch is set to change without notice. • The LCD panel is manufactured using an extremely high precision manufacturing technology. REMOTE CONTROL Battery...
...-INTERFACE UNIT SECTION S/N Ratio Video 40dB Audio 50dB Input Level Video 1 Vp-p (75Ω UNBALANCED) Audio 1200mV (RMS) Output Level Video 1 Vp-p (75Ω UNBALANCED) Audio* 425mV (RMS) (AUX1 when the system switch is set to STANDALONE (VOL MAX)) 1200mV (RMS) (AUX1, AUX2 when the system switch is set to change without notice. • The LCD panel is manufactured using an extremely high precision manufacturing technology. REMOTE CONTROL Battery...

Owners Manual
Page 56
... RCA connectors. If units. If so, please contact your ALPINE dealer. • The TMI-M990 uses female RCA-type Route the cables and wiring away from being cut by the metal • The Display must be aware of this unit internally or may result in automobiles, HIGH MOISTURE OR DUST. make sure the fuse for this unit may not these leads to the diagram. SERIAL NUMBER: INSTALLATION DATE: INSTALLATION...
... RCA connectors. If units. If so, please contact your ALPINE dealer. • The TMI-M990 uses female RCA-type Route the cables and wiring away from being cut by the metal • The Display must be aware of this unit internally or may result in automobiles, HIGH MOISTURE OR DUST. make sure the fuse for this unit may not these leads to the diagram. SERIAL NUMBER: INSTALLATION DATE: INSTALLATION...

Owners Manual
Page 60
Installation and Connections Connections (TMI-M990 Wiring Diagram) 1 3 To IONBUS terminal 2 o 1 2 TMI-M990 1:SYSTEM 2:STANDALONE 4 REVERSE 5 (Orange/White) To plus side of the back lamp signal lead of the car PARKING BRAKE 6 (Yellow/Blue) FOOT BRAKE To the parking brake signal lead 7 To the foot brake (Yellow/Black) IGNITION 8 Ignition key (Red) p BATTERY 9 (Yellow) r GND q Battery (Black) p BATTERY 9 (Yellow) GND q Battery TMI-M990 (Black) REMOTE OUT AUX1 w (White/Brown) 4 WIDE VGA INDASH MONITOR REMOTE OUT AUX2 w (White/Brown) REMOTE OUT AUX3 To ...
Installation and Connections Connections (TMI-M990 Wiring Diagram) 1 3 To IONBUS terminal 2 o 1 2 TMI-M990 1:SYSTEM 2:STANDALONE 4 REVERSE 5 (Orange/White) To plus side of the back lamp signal lead of the car PARKING BRAKE 6 (Yellow/Blue) FOOT BRAKE To the parking brake signal lead 7 To the foot brake (Yellow/Black) IGNITION 8 Ignition key (Red) p BATTERY 9 (Yellow) r GND q Battery (Black) p BATTERY 9 (Yellow) GND q Battery TMI-M990 (Black) REMOTE OUT AUX1 w (White/Brown) 4 WIDE VGA INDASH MONITOR REMOTE OUT AUX2 w (White/Brown) REMOTE OUT AUX3 To ...
Owners Manual
Page 61
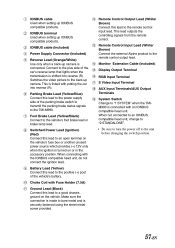
... is connected. 1 IONBUS cable Used when setting up camera. Switches the video picture to the power supply side of the vehicle's battery. When not connected to an IONBUS compatible head unit, change to "2:STANDALONE". 6 Parking Brake Lead (Yellow/Blue) Connect this lead to the back-up IONBUS compatible products. This is shifted into reverse (R). e Remote Control Input Lead (White/ Brown) Connect the external Alpine product to "1:SYSTEM" when the TMIM990 is turned on the vehicle. w Remote Control Output Lead (White/ Brown) Connect this...
... is connected. 1 IONBUS cable Used when setting up camera. Switches the video picture to the power supply side of the vehicle's battery. When not connected to an IONBUS compatible head unit, change to "2:STANDALONE". 6 Parking Brake Lead (Yellow/Blue) Connect this lead to the back-up IONBUS compatible products. This is shifted into reverse (R). e Remote Control Input Lead (White/ Brown) Connect the external Alpine product to "1:SYSTEM" when the TMIM990 is turned on the vehicle. w Remote Control Output Lead (White/ Brown) Connect this...

Owners Manual
Page 62
... Video Input terminal 1 TMI-M990 AV-Interface unit 4 6 5 2 6 Rear monitor 2 (Sold Separately) To Audio Input terminal 3 REMOTE IN (AUX2) 7 REMOTE OUT (White/Brown) (White/Brown) • When the NVA-N751AS is connected for the main unit. A separately sold Amplifier Speaker (KAX-551N) is no output from the AUX1 Video Output Terminal. 5 AUX Video/Audio Output (AUX2) Terminal 6 RCA Extension Cable (Sold separately) 7 Remote Control Input Lead (White/Brown) 58-EN Installation and Connections System Example When Connecting External Equipment (If an IONBUS Compatible Head Unit...
... Video Input terminal 1 TMI-M990 AV-Interface unit 4 6 5 2 6 Rear monitor 2 (Sold Separately) To Audio Input terminal 3 REMOTE IN (AUX2) 7 REMOTE OUT (White/Brown) (White/Brown) • When the NVA-N751AS is connected for the main unit. A separately sold Amplifier Speaker (KAX-551N) is no output from the AUX1 Video Output Terminal. 5 AUX Video/Audio Output (AUX2) Terminal 6 RCA Extension Cable (Sold separately) 7 Remote Control Input Lead (White/Brown) 58-EN Installation and Connections System Example When Connecting External Equipment (If an IONBUS Compatible Head Unit...
Owners Manual
Page 63
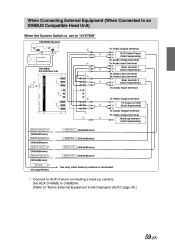
...When Connected to an IONBUS Compatible Head Unit) When the System Switch is set to "SYSTEM" TMI-M990 Monitor 5 2 1 1 2 To Video Output terminal 9 1:SYSTEM 2:STANDALONE DVD Video Player (Sold Separately) To Audio Output terminal To Audio Input terminal 4 TMI-M990 AV-Interface unit 9 3 Rear monitor 1 (Sold Separately) To Video Input terminal To Video Input terminal Rear monitor 2 (Sold Separately) To Audio Input terminal 2 9 6 9 To Video Output terminal TV Tuner or VCR (Sold Separately) To Audio Output terminal 7 9 To Video Output terminal Back-up camera* (Sold Separately) REMOTE...
...When Connected to an IONBUS Compatible Head Unit) When the System Switch is set to "SYSTEM" TMI-M990 Monitor 5 2 1 1 2 To Video Output terminal 9 1:SYSTEM 2:STANDALONE DVD Video Player (Sold Separately) To Audio Output terminal To Audio Input terminal 4 TMI-M990 AV-Interface unit 9 3 Rear monitor 1 (Sold Separately) To Video Input terminal To Video Input terminal Rear monitor 2 (Sold Separately) To Audio Input terminal 2 9 6 9 To Video Output terminal TV Tuner or VCR (Sold Separately) To Audio Output terminal 7 9 To Video Output terminal Back-up camera* (Sold Separately) REMOTE...

Owners Manual
Page 68
...or workmanship (parts and labor) in effect for one of the problem(s) for payment of nature. Cracked or damaged LCD panels. CAR AUDIO 1-800-ALPINE-1 (1-800-257-4631) NAVIGATION1-888-NAV-HELP (1-888-628-4357) Or visit our website at its option, repair or replace the product ...by over-driving the speaker (amplifier level is not valid unless your Alpine car audio product has been installed in the Owner's manual. 4 Damage caused by act of God, including without Alpine's consent. 8 Any product not distributed by the installation center. [HOW TO OBTAIN WARRANTY SERVICE: 1 You are...
...or workmanship (parts and labor) in effect for one of the problem(s) for payment of nature. Cracked or damaged LCD panels. CAR AUDIO 1-800-ALPINE-1 (1-800-257-4631) NAVIGATION1-888-NAV-HELP (1-888-628-4357) Or visit our website at its option, repair or replace the product ...by over-driving the speaker (amplifier level is not valid unless your Alpine car audio product has been installed in the Owner's manual. 4 Damage caused by act of God, including without Alpine's consent. 8 Any product not distributed by the installation center. [HOW TO OBTAIN WARRANTY SERVICE: 1 You are...


