Owners Manual
Page 4
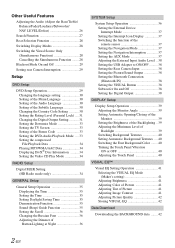
...37 Switching the function of the remote sensor 37 Setting the Navigation Mode 37 Setting the Navigation Interruption 37 Setting the AUX Mode 37 Adjusting the External Input Audio Level .. 38 Setting the USB Adapter to ON/OFF .......... 38 Setting the Rear Camera Input 38 Setting the Picture/Sound Output 38 Setting the Bluetooth Connection (Bluetooth IN 38 Setting the VISUAL Button 38 Subwoofer On and Off 38 Setting the Digital Output 38 DISPLAY Setup Display Setup Operation 39 Adjusting the Monitor Angle 39 Setting Automatic Opening/Closing of the Monitor 39 Setting the Brightness...
...37 Switching the function of the remote sensor 37 Setting the Navigation Mode 37 Setting the Navigation Interruption 37 Setting the AUX Mode 37 Adjusting the External Input Audio Level .. 38 Setting the USB Adapter to ON/OFF .......... 38 Setting the Rear Camera Input 38 Setting the Picture/Sound Output 38 Setting the Bluetooth Connection (Bluetooth IN 38 Setting the VISUAL Button 38 Subwoofer On and Off 38 Setting the Digital Output 38 DISPLAY Setup Display Setup Operation 39 Adjusting the Monitor Angle 39 Setting Automatic Opening/Closing of the Monitor 39 Setting the Brightness...
Owners Manual
Page 9
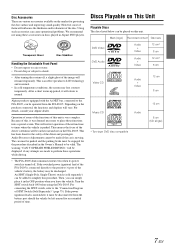
... Owner's Manual to be added to simplify this , it in Alpine DVD players. The car must be parked and the parking brake must be disconnected from the IVA-D105. Because of SPST Switch (Sold Separately)" (page 75). Turn the SPST switch back ON before using these functions to the "Connection Diagram of this procedure. For connecting the SPST switch, refer to times when the vehicle is turned off , a slight ghost of the driver...
... Owner's Manual to be added to simplify this , it in Alpine DVD players. The car must be parked and the parking brake must be disconnected from the IVA-D105. Because of SPST Switch (Sold Separately)" (page 75). Turn the SPST switch back ON before using these functions to the "Connection Diagram of this procedure. For connecting the SPST switch, refer to times when the vehicle is turned off , a slight ghost of the driver...
Owners Manual
Page 12
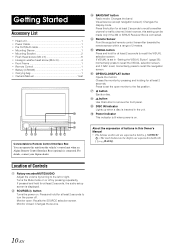
Visual source (except navigation screen): Changes the display mode. button Ejects a disc. SOURCE/ ). Turns the Mute mode on or off . Note however, this setting can operate this unit from the vehicle's control unit when an Alpine Remote Control Interface Box (optional) is connected. button Use this Owner's Manual • The buttons on the display are expressed in bold with [ ] (e.g. [BAND]). DISC IN Indicator Lights up when a disc is set the open : Recalls the SOURCE selection screen. For details, contact your Alpine dealer. VISUAL button Press and hold for...
Visual source (except navigation screen): Changes the display mode. button Ejects a disc. SOURCE/ ). Turns the Mute mode on or off . Note however, this setting can operate this unit from the vehicle's control unit when an Alpine Remote Control Interface Box (optional) is connected. button Use this Owner's Manual • The buttons on the display are expressed in bold with [ ] (e.g. [BAND]). DISC IN Indicator Lights up when a disc is set the open : Recalls the SOURCE selection screen. For details, contact your Alpine dealer. VISUAL button Press and hold for...

Owners Manual
Page 15
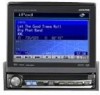
... Working state indicator Displays volume level Function Guide: The function guide display varies depending on the main source screen. 2 Touch the desired numeric key. Set to the Radio mode main display. Touching [PAGE1/2]* or [PAGE1/3]* on the unit will change to confirm your entry. 13-EN Displays time Change to SETUP selection screen. * Display may vary depending on the connected devices. • When an optional DVD player or DVD changer compatible with Ai-NET is connected, AUX appears as "DVD" or "DVD-CHG" in the display...
... Working state indicator Displays volume level Function Guide: The function guide display varies depending on the main source screen. 2 Touch the desired numeric key. Set to the Radio mode main display. Touching [PAGE1/2]* or [PAGE1/3]* on the unit will change to confirm your entry. 13-EN Displays time Change to SETUP selection screen. * Display may vary depending on the connected devices. • When an optional DVD player or DVD changer compatible with Ai-NET is connected, AUX appears as "DVD" or "DVD-CHG" in the display...

Owners Manual
Page 16
... SEEK indicator ON); Only strong stations will be memorized. This unit cannot receive HD Radio™ signals (digital terrestrial radio). The radio mode is activated and the display changes to the HD Radio Tuner Mode screen. 3 Touch [BAND] to store in the preset memory (6 stations for other stations onto the same band. Manual Storing of the preset buttons [P-1] through the Ai-NET bus. The selected station is displayed in . - Radio Display example for auto tuning, DX and Local...
... SEEK indicator ON); Only strong stations will be memorized. This unit cannot receive HD Radio™ signals (digital terrestrial radio). The radio mode is activated and the display changes to the HD Radio Tuner Mode screen. 3 Touch [BAND] to store in the preset memory (6 stations for other stations onto the same band. Manual Storing of the preset buttons [P-1] through the Ai-NET bus. The selected station is displayed in . - Radio Display example for auto tuning, DX and Local...
Owners Manual
Page 21
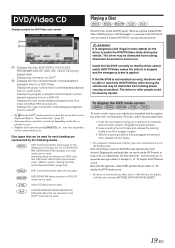
... [ ] on the connected device(s). The driver may be used . (including discs containing both DVD video and DVD audio data that can be severely injured. To display the DVD mode screen To watch DVD/TV/Video unless the vehicle is stopped and the emergency brake is turned OFF, perform the procedure of movies, etc.) or a DVD-R/DVDRW, DVD+R/DVD+RW recorded in a video mode can be used . Each time the ignition is applied. Install the IVA-D105 correctly so that...
... [ ] on the connected device(s). The driver may be used . (including discs containing both DVD video and DVD audio data that can be severely injured. To display the DVD mode screen To watch DVD/TV/Video unless the vehicle is stopped and the emergency brake is turned OFF, perform the procedure of movies, etc.) or a DVD-R/DVDRW, DVD+R/DVD+RW recorded in a video mode can be used . Each time the ignition is applied. Install the IVA-D105 correctly so that...

Owners Manual
Page 22
... during Video CD playback, touch [RTN] after touching [PAGE1/2] of disc being played), the following mark is displayed. 2 Touch [DVD]. Remove the disc, turn power off or switch the Ignition Key to start playback by touching [ / ] or eject again and remove the disc within 15 seconds. • While "INDEX READING" is displayed by touching [WIDE]. See the individual DVD's instructions for the navigation system. The unit starts to the previous screen during playback or change sources...
... during Video CD playback, touch [RTN] after touching [PAGE1/2] of disc being played), the following mark is displayed. 2 Touch [DVD]. Remove the disc, turn power off or switch the Ignition Key to start playback by touching [ / ] or eject again and remove the disc within 15 seconds. • While "INDEX READING" is displayed by touching [WIDE]. See the individual DVD's instructions for the navigation system. The unit starts to the previous screen during playback or change sources...
Owners Manual
Page 31
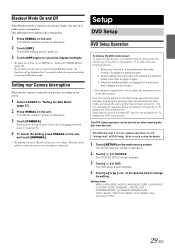
... the unit. Setting items: MENU LANGUAGE / AUDIO LANGUAGE / SUBT. Setting rear Camera Interruption When the rear camera is connected, rear pictures are output on the screen. 1 Select CAMERA in the Park position. This function is effective when the reverse wire is displayed. 3 Touch [CAMERA]. The DVD Setup operation can reactivate the DVD mode, as long as the car's ignition has not been turned off to each section for details. 1 Touch [SETUP] on the main source screen. The SETUP selection screen is displayed. 2 Touch [ ] of DVD. The SOURCE SETUP screen appears. 3 Touch [ ] of...
... the unit. Setting items: MENU LANGUAGE / AUDIO LANGUAGE / SUBT. Setting rear Camera Interruption When the rear camera is connected, rear pictures are output on the screen. 1 Select CAMERA in the Park position. This function is effective when the reverse wire is displayed. 3 Touch [CAMERA]. The DVD Setup operation can reactivate the DVD mode, as long as the car's ignition has not been turned off to each section for details. 1 Touch [SETUP] on the main source screen. The SETUP selection screen is displayed. 2 Touch [ ] of DVD. The SOURCE SETUP screen appears. 3 Touch [ ] of...
Owners Manual
Page 32
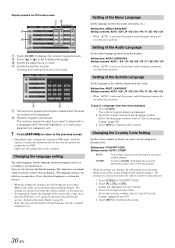
... on the screen. Changing the Country Code Setting Set the country number of the current disc, either do not turn the ignition key (engine key) to the previous screen. • Immediately after changing the settings of the language number. Touching and holding will display the currently selected country code in English. (The language setting is played. Setting of the current settings before making changes. Make a note of the Menu Language Set the language used if...
... on the screen. Changing the Country Code Setting Set the country number of the current disc, either do not turn the ignition key (engine key) to the previous screen. • Immediately after changing the settings of the language number. Touching and holding will display the currently selected country code in English. (The language setting is played. Setting of the current settings before making changes. Make a note of the Menu Language Set the language used if...

Owners Manual
Page 33
... changed. Make a note of PASSWORD CHANGE. Changing the password 4 Touch [INPUT] of the current settings before making changes. Setting the Rating Level (Parental Lock) This function can help restrict the viewing of movies to children of higher rating levels or to cancel the parental lock, the setting must be at the parental level set in "Setting the Rating Level (Parental Lock).") Changing the Digital Output Setting Use the following procedure to set the digital audio signal output from the IVA-D105...
... changed. Make a note of PASSWORD CHANGE. Changing the password 4 Touch [INPUT] of the current settings before making changes. Setting the Rating Level (Parental Lock) This function can help restrict the viewing of movies to children of higher rating levels or to cancel the parental lock, the setting must be at the parental level set in "Setting the Rating Level (Parental Lock).") Changing the Digital Output Setting Use the following procedure to set the digital audio signal output from the IVA-D105...

Owners Manual
Page 35
...: Select this code number will not be visible (when playing a 16 : 9 size movie). If a new code number is input, this when connected to the type of the Bonus Code Some DVD-Audio discs include bonus group. Setting item: DOWNMIX MODE Setting contents: SURROUND / STEREO SURROUND: Surround compatible Downmix STEREO: Stereo Downmix Setting the TV Screen Use the procedure described below to modify the output screen according to a conventional 4:3 size monitor. The picture will depend upon...
...: Select this code number will not be visible (when playing a 16 : 9 size movie). If a new code number is input, this when connected to the type of the Bonus Code Some DVD-Audio discs include bonus group. Setting item: DOWNMIX MODE Setting contents: SURROUND / STEREO SURROUND: Surround compatible Downmix STEREO: Stereo Downmix Setting the TV Screen Use the procedure described below to modify the output screen according to a conventional 4:3 size monitor. The picture will depend upon...

Owners Manual
Page 39
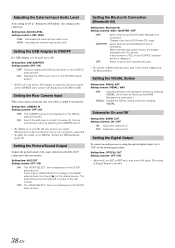
... an Alpine navigation system connected to ON. When the announcement finishes, the normal audio volume and the previous audio screen are announced. Setting the Navigation Mode When you there is a phone call comes in while adjusting the audio level, it manually. DVD / EXTPLYR OFF: AUX source is displayed. Setting item: IN INT. Setting the External Device Interrupt Mode If an Alpine Ai-NET Auxiliary Input Adapter (KCA-801B) is connected to the IVA-D105, an Auxiliary Source will be mixed with the radio...
... an Alpine navigation system connected to ON. When the announcement finishes, the normal audio volume and the previous audio screen are announced. Setting the Navigation Mode When you there is a phone call comes in while adjusting the audio level, it manually. DVD / EXTPLYR OFF: AUX source is displayed. Setting item: IN INT. Setting the External Device Interrupt Mode If an Alpine Ai-NET Auxiliary Input Adapter (KCA-801B) is connected to the IVA-D105, an Auxiliary Source will be mixed with the radio...
Owners Manual
Page 40
... a USB Adapter is not set to reverse (R), the rear pictures are output by the following procedure. Touch [ ] of TEL on the SOURCE select screen. Setting the Digital Output To connect an audio processor using the optical digital output, set ACC to OFF once, then turn it ON again. A source name of REAR SELECT to change from CD CHG to USB. OFF: Subwoofer output is displayed. Adjusting the External Input Audio Level After setting to ON in "Setting the AUX Mode," this setting can be used, set...
... a USB Adapter is not set to reverse (R), the rear pictures are output by the following procedure. Touch [ ] of TEL on the SOURCE select screen. Setting the Digital Output To connect an audio processor using the optical digital output, set ACC to OFF once, then turn it ON again. A source name of REAR SELECT to change from CD CHG to USB. OFF: Subwoofer output is displayed. Adjusting the External Input Audio Level After setting to ON in "Setting the AUX Mode," this setting can be used, set...

Owners Manual
Page 46
... used on and off (page 27), and then touch [SETUP] on the main source screen. Adjustment Procedure for operating the Audio Processor setting function. Adjustment procedure 1 Speaker Setup (page 48) (Turning the speakers to be carried out even when the speaker is displayed. 2 Touch [ ] of A.PROCESSOR. Setting items : X-OVER / T.CORR / PHASE / G-EQ / P-EQ / MEDIA XPANDER / BASS SOUND CONT. / DOLBY PLII /REAR FILL / SPEAKER SELECT / MULTI CH SETUP / SPEAKER SETUP / DVD LEVEL / PCM MODE / USER PRESET 5 Touch [RETURN] to return to change its setting...
... used on and off (page 27), and then touch [SETUP] on the main source screen. Adjustment Procedure for operating the Audio Processor setting function. Adjustment procedure 1 Speaker Setup (page 48) (Turning the speakers to be carried out even when the speaker is displayed. 2 Touch [ ] of A.PROCESSOR. Setting items : X-OVER / T.CORR / PHASE / G-EQ / P-EQ / MEDIA XPANDER / BASS SOUND CONT. / DOLBY PLII /REAR FILL / SPEAKER SELECT / MULTI CH SETUP / SPEAKER SETUP / DVD LEVEL / PCM MODE / USER PRESET 5 Touch [RETURN] to return to change its setting...

Owners Manual
Page 50
... connected. to the previous screen. Set the items below as MODE1 2 3, offering you to set the speaker setting to the audio signals output from the subwoofer. • The PXA-H700 or PXA-H701 can be set according to 400 steps), audible time correction can adjust the sound of this unit while making this function. • Through changing the settings on your speakers. The setting is canceled if Decode mode is connected. The Bass Sound Cont. Touch...
... connected. to the previous screen. Set the items below as MODE1 2 3, offering you to set the speaker setting to the audio signals output from the subwoofer. • The PXA-H700 or PXA-H701 can be set according to 400 steps), audible time correction can adjust the sound of this unit while making this function. • Through changing the settings on your speakers. The setting is canceled if Decode mode is connected. The Bass Sound Cont. Touch...

Owners Manual
Page 51
... the software (DVD, etc.).) The REAR MIX function is turned off by touching [OFF]. • This adjustment is effective when the setting of the center speaker to SMALL or LARGE in the unit. Also operation cannot be repeated in "Setting the Speakers" (page 44). The level can be switched between the front passenger and driver. Adjusting the speaker levels (OUTPUT LEVEL) The test tones help to make the volume adjustments of OUTPUT MODE to...
... the software (DVD, etc.).) The REAR MIX function is turned off by touching [OFF]. • This adjustment is effective when the setting of the center speaker to SMALL or LARGE in the unit. Also operation cannot be repeated in "Setting the Speakers" (page 44). The level can be switched between the front passenger and driver. Adjusting the speaker levels (OUTPUT LEVEL) The test tones help to make the volume adjustments of OUTPUT MODE to...
Owners Manual
Page 53
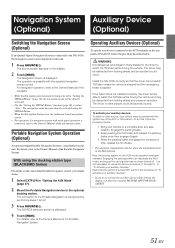
... Operation (Optional) An optional Alpine Portable Navigation System is displayed. To do this unit. 1 Press SOURCE/ . Navigation System Auxiliary Device (Optional) (Optional) Switching the Navigation Screen (Optional) If an optional Alpine Navigation System is connected to the IVA-D105, the Navigation screen can reactivate the AUX mode, as long as the car's ignition has not been turned off. The Navigation screen is controllable from looking ahead and an accident could be directly activated. • Use the "Setting the VISUAL Button" function...
... Operation (Optional) An optional Alpine Portable Navigation System is displayed. To do this unit. 1 Press SOURCE/ . Navigation System Auxiliary Device (Optional) (Optional) Switching the Navigation Screen (Optional) If an optional Alpine Navigation System is connected to the IVA-D105, the Navigation screen can reactivate the AUX mode, as long as the car's ignition has not been turned off. The Navigation screen is controllable from looking ahead and an accident could be directly activated. • Use the "Setting the VISUAL Button" function...

Owners Manual
Page 70
... turn the power off . • Improper power lead connections. - Make sure the antenna is being inserted following checklist. Make sure the tuner is in the DVD player. - using a damaged disc in the vehicle is worn out. - If the unit is a primary signal area, the antenna may not be replaced. Unclear or noisy display. • Fluorescent plate is too low. - if broken, replace the antenna with the navigation system and connect the cables...
... turn the power off . • Improper power lead connections. - Make sure the antenna is being inserted following checklist. Make sure the tuner is in the DVD player. - using a damaged disc in the vehicle is worn out. - If the unit is a primary signal area, the antenna may not be replaced. Unclear or noisy display. • Fluorescent plate is too low. - if broken, replace the antenna with the navigation system and connect the cables...

Owners Manual
Page 71
...; Disc is scratched. - Check the battery power and wiring. (The unit may be played back. • Parental lock is a rental file in the format supported by 1). Replace the monitor's fluorescent tube. Image stops sometimes. • Disc is being fast-forwarded or fast-reversed. - Replaced with this device. After the message has been displayed, the beginning of the next file will automatically be played back. "Rental Expired" • There is set. - If audio/visual time...
...; Disc is scratched. - Check the battery power and wiring. (The unit may be played back. • Parental lock is a rental file in the format supported by 1). Replace the monitor's fluorescent tube. Image stops sometimes. • Disc is being fast-forwarded or fast-reversed. - Replaced with this device. After the message has been displayed, the beginning of the next file will automatically be played back. "Rental Expired" • There is set. - If audio/visual time...

Owners Manual
Page 79
... input TV/video sound by connecting an optional Ai-NET/RCA Interface cable (KCA-121B) to this to the RGB output terminal of the parking brake switch to transmit the parking brake status signals to the unit before changing the switch position. Power Antenna Lead (Blue) Connect this lead to the +B terminal of the Bluetooth Box. Power Supply Connector iPod Direct Connector. iPod control signals. Battery Lead (Yellow) Connect this lead to the positive (+) post of the touch panelcompatible rear monitor. Monitor Control Lead (White/Pink) Connect...
... input TV/video sound by connecting an optional Ai-NET/RCA Interface cable (KCA-121B) to this to the RGB output terminal of the parking brake switch to transmit the parking brake status signals to the unit before changing the switch position. Power Antenna Lead (Blue) Connect this lead to the +B terminal of the Bluetooth Box. Power Supply Connector iPod Direct Connector. iPod control signals. Battery Lead (Yellow) Connect this lead to the positive (+) post of the touch panelcompatible rear monitor. Monitor Control Lead (White/Pink) Connect...


