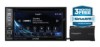

Owner s Manual english
Page 3
... a Disc 15 Inserting the Disc 15 Removing the Disc 15 Adjusting the Volume 15 Lowering Volume Quickly 15 Top banner and Bottom banner Fade Out Setting 16 Switching Sources 16 Screen Off Function 16 About Sound Menu button 16 Touch Operation 17 Selecting an Item in a List 17 About the Indicator...
... a Disc 15 Inserting the Disc 15 Removing the Disc 15 Adjusting the Volume 15 Lowering Volume Quickly 15 Top banner and Bottom banner Fade Out Setting 16 Switching Sources 16 Screen Off Function 16 About Sound Menu button 16 Touch Operation 17 Selecting an Item in a List 17 About the Indicator...

Owner s Manual english
Page 4
... 42 Changing the Language Setting 42 Changing the Country Code Setting 42 Setting the Rating Level (Parental Lock) .... 42 Setting the TV Screen Mode 43 Radio Setting 43 Setting the TUNER (FM) Tone Quality (Tuner Condition 43 AUX Setting 44 Setting the AUX Mode 44 Setting the Primary AUX Name (AUX Setup 44 SiriusXM Setting (INE-W960/INE-NAV-60 only 44...
... 42 Changing the Language Setting 42 Changing the Country Code Setting 42 Setting the Rating Level (Parental Lock) .... 42 Setting the TV Screen Mode 43 Radio Setting 43 Setting the TUNER (FM) Tone Quality (Tuner Condition 43 AUX Setting 44 Setting the AUX Mode 44 Setting the Primary AUX Name (AUX Setup 44 SiriusXM Setting (INE-W960/INE-NAV-60 only 44...

Owner s Manual english
Page 5
... Volume 48 Deleting All the Histories 48 Changing the Phone book List Order 48 Camera Setup Camera Setup Operation 49 AUX Camera Setting 49 Setting the Camera Input 49 Camera Interrupt Setting (Power OFF Mode 50 About the Rear Camera Guide 50 BLUETOOTH Operation Setup Before Using 52 About BLUETOOTH 52 About the...
... Volume 48 Deleting All the Histories 48 Changing the Phone book List Order 48 Camera Setup Camera Setup Operation 49 AUX Camera Setting 49 Setting the Camera Input 49 Camera Interrupt Setting (Power OFF Mode 50 About the Rear Camera Guide 50 BLUETOOTH Operation Setup Before Using 52 About BLUETOOTH 52 About the...
Owner s Manual english
Page 7
... operation. • Make certain that interference will not occur in streets and neighborhoods, there may be situations where the navigation system is set to a level which may not cause harmful interference, and (2) this disc and the system components. Pull over in order to use your...places you in a safe and legal manner and location. • Do not input destinations, change settings, or access any local traffic regulations or your local Alpine authorized navigation dealer or Alpine at the screen only when necessary and safe to do so. Not all persons using the navigation ...
... operation. • Make certain that interference will not occur in streets and neighborhoods, there may be situations where the navigation system is set to a level which may not cause harmful interference, and (2) this disc and the system components. Pull over in order to use your...places you in a safe and legal manner and location. • Do not input destinations, change settings, or access any local traffic regulations or your local Alpine authorized navigation dealer or Alpine at the screen only when necessary and safe to do so. Not all persons using the navigation ...

Owner s Manual english
Page 12
.../DVD-RWs/DVD+Rs/DVD+RWs • This unit is compatible with discs recorded in a location where driver operation will not be recognized. CAUTION Alpine accepts no responsibility for the DVD, these are MP3, WMA and AAC. • USB memory function is recommended to back up important data on... and disc format. • Discs or files utilizing copy protection, may also be sure to its type or state. • Depending on the settings of agreement. If there is played back or searched. • The unit can be connected to something other files with some functions may take time...
.../DVD-RWs/DVD+Rs/DVD+RWs • This unit is compatible with discs recorded in a location where driver operation will not be recognized. CAUTION Alpine accepts no responsibility for the DVD, these are MP3, WMA and AAC. • USB memory function is recommended to back up important data on... and disc format. • Discs or files utilizing copy protection, may also be sure to its type or state. • Depending on the settings of agreement. If there is played back or searched. • The unit can be connected to something other files with some functions may take time...

Owner s Manual english
Page 16
... the Top banner and Bottom banner on the screen to change the screen to the desired source. W960/INE-NAV-60 only). *4 When AUX In is set to "Off," this option is not available (INE- About Sound Menu button Touch [Sound] icon on the Audio/Visual Playback screen fade out after 5 seconds... if no USB memory/iPod is connected, this option is not available. *2 INE-W960/INE-NAV-60 only. *3 If the SiriusXM...
... the Top banner and Bottom banner on the screen to change the screen to the desired source. W960/INE-NAV-60 only). *4 When AUX In is set to "Off," this option is not available (INE- About Sound Menu button Touch [Sound] icon on the Audio/Visual Playback screen fade out after 5 seconds... if no USB memory/iPod is connected, this option is not available. *2 INE-W960/INE-NAV-60 only. *3 If the SiriusXM...

Owner s Manual english
Page 17
...No Battery Level 1 Level 2 Level 3 This may cancel the operations performed on the screen. [ ]: Closes the window. Displayed when BLUETOOTH setting is no reaction, remove your finger away from the display once, and try again. • Onscreen buttons that item will be displayed depending ...screen and slide your finger up when connected to a BLUETOOTH compatible device. : BLUETOOTH connection to audio device : BLUETOOTH connection to "Clock Display Setting" (page 31). 17-EN For details, refer to OFF. Depending on the function, this button may not be selected. Does not display...
...No Battery Level 1 Level 2 Level 3 This may cancel the operations performed on the screen. [ ]: Closes the window. Displayed when BLUETOOTH setting is no reaction, remove your finger away from the display once, and try again. • Onscreen buttons that item will be displayed depending ...screen and slide your finger up when connected to a BLUETOOTH compatible device. : BLUETOOTH connection to audio device : BLUETOOTH connection to "Clock Display Setting" (page 31). 17-EN For details, refer to OFF. Depending on the function, this button may not be selected. Does not display...
Owner s Manual english
Page 19
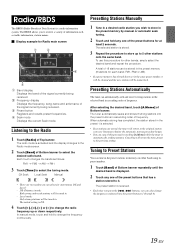
... down respectively. FM1, FM2 or AM). • If a preset memory has already been set in ascending order of the preset buttons that has a station stored to the previous setting. Preset button Registers and recalls preset frequencies. The initial setting is displayed. 2 Touch any one of frequency. The tuner automatically seeks and stores 6 strong...
... down respectively. FM1, FM2 or AM). • If a preset memory has already been set in ascending order of the preset buttons that has a station stored to the previous setting. Preset button Registers and recalls preset frequencies. The initial setting is displayed. 2 Touch any one of frequency. The tuner automatically seeks and stores 6 strong...

Owner s Manual english
Page 25
...displayed on the monitor screen: • Play Position Memory Function Even if you turn it over, and reinsert it. • Refer also to "Disc Setting" (page 42). • While reading a DivX® file, the fast-forwarding/fast-reversing and repeat functions, etc. Clean the disc if necessary....[ ] [ ] to watch DVD/TV/Video unless the vehicle is stopped and the emergency brake is turned ON again. Install the INE-W960/INE-NAV-60/INE-W960S correctly so that exceeds 4GB cannot be severely injured. If a Menu Screen Appears On DVD mode, menu screens may be played ...
...displayed on the monitor screen: • Play Position Memory Function Even if you turn it over, and reinsert it. • Refer also to "Disc Setting" (page 42). • While reading a DivX® file, the fast-forwarding/fast-reversing and repeat functions, etc. Clean the disc if necessary....[ ] [ ] to watch DVD/TV/Video unless the vehicle is stopped and the emergency brake is turned ON again. Install the INE-W960/INE-NAV-60/INE-W960S correctly so that exceeds 4GB cannot be severely injured. If a Menu Screen Appears On DVD mode, menu screens may be played ...

Owner s Manual english
Page 27
... Still Frames (Pausing) Repeat Playback 1 During playback, Touch [ / ] of Bottom banner. 2 Touch [ / ] or [ ] in the pause mode, the 1/16th speed slow motion playback mode is set. Touch [ ] of Bottom banner. The repeat mode switches every time the button is played repeatedly.
... Still Frames (Pausing) Repeat Playback 1 During playback, Touch [ / ] of Bottom banner. 2 Touch [ / ] or [ ] in the pause mode, the 1/16th speed slow motion playback mode is set. Touch [ ] of Bottom banner. The repeat mode switches every time the button is played repeatedly.

Owner s Manual english
Page 28
If [10Key] is paused. 1 Touch [10Key] of the chapters on the disc. The numeric keypad input mode screen will appear. Searching Directly by Chapter Number Use this function to easily move to the beginnings of Bottom banner. Perform operations during playback, during PRE-STOP or while playback is not displayed, touch [
If [10Key] is paused. 1 Touch [10Key] of the chapters on the disc. The numeric keypad input mode screen will appear. Searching Directly by Chapter Number Use this function to easily move to the beginnings of Bottom banner. Perform operations during playback, during PRE-STOP or while playback is not displayed, touch [

Owner s Manual english
Page 30
..., place the transmission lever in the Park position. The following steps 1 to 5 are common operations to "General Setup Operation" (page 30). Setting the Scroll Scroll display is available if CD text, folder name, file name or tag information is turned OFF, perform the procedure of "To display... the General mode screen." On: Turns on the Auto scroll mode. The Setup main screen is turned on. 30-EN Setting items: Text Display / Clock Display / Top/Bottom Banner Fade Out / Screen/LED Customize / Visual / About / Installation / Demo mode • Depending on...
..., place the transmission lever in the Park position. The following steps 1 to 5 are common operations to "General Setup Operation" (page 30). Setting the Scroll Scroll display is available if CD text, folder name, file name or tag information is turned OFF, perform the procedure of "To display... the General mode screen." On: Turns on the Auto scroll mode. The Setup main screen is turned on. 30-EN Setting items: Text Display / Clock Display / Top/Bottom Banner Fade Out / Screen/LED Customize / Visual / About / Installation / Demo mode • Depending on...

Owner s Manual english
Page 31
... Off: Deactivate Auto Dimmer mode to keep the background illumination of the monitor bright. • When "Auto" or "On" is set, the setting is always displayed in "Adjusting the Dimmer of Backlight You can be changed to the brightness of the screen. This function could be... Type B: The clock indication is also applied for the button lighting in the bottom right corner of the car interior. Setting item: Dimmer Setting contents: Auto (Initial setting) / On / Off Auto: Adjust the brightness of the background illumination of the monitor automatically to appear in the specified ...
... Off: Deactivate Auto Dimmer mode to keep the background illumination of the monitor bright. • When "Auto" or "On" is set, the setting is always displayed in "Adjusting the Dimmer of Backlight You can be changed to the brightness of the screen. This function could be... Type B: The clock indication is also applied for the button lighting in the bottom right corner of the car interior. Setting item: Dimmer Setting contents: Auto (Initial setting) / On / Off Auto: Adjust the brightness of the background illumination of the monitor automatically to appear in the specified ...

Owner s Manual english
Page 32
... ] to return to the previous screen. • Immediately after changing the settings of Display Setup (While the system is playing. • "Camera" can change the color of the desired item. The selected file is "Alpine BG." Adjusting the Dimmer of Button Lighting at Night You can adjust the ...brightness of the button lighting at each side. 32-EN Display example for Background Setting main screen • "Current Source" can be setting while a video is writing data ...
... ] to return to the previous screen. • Immediately after changing the settings of Display Setup (While the system is playing. • "Camera" can change the color of the desired item. The selected file is "Alpine BG." Adjusting the Dimmer of Button Lighting at Night You can adjust the ...brightness of the button lighting at each side. 32-EN Display example for Background Setting main screen • "Current Source" can be setting while a video is writing data ...

Owner s Manual english
Page 33
... message appears, touch [OK]. About INE-W960/INE-NAV-60/INE-W960S [About] is completed. 33-EN Make note of this information and refer to it reaches the minimum or maximum point, the display shows "MIN" or "MAX" respectively. If you contact Alpine Tech Support or an Alpine-authorized dealer. Setting item: Warranty/Copyright Info. Initializing...
... message appears, touch [OK]. About INE-W960/INE-NAV-60/INE-W960S [About] is completed. 33-EN Make note of this information and refer to it reaches the minimum or maximum point, the display shows "MIN" or "MAX" respectively. If you contact Alpine Tech Support or an Alpine-authorized dealer. Setting item: Warranty/Copyright Info. Initializing...

Owner s Manual english
Page 34
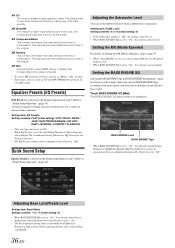
... display the Sound mode screen." Now, the locking system for the display. Please check Sound APP connection and BASS ENGINE SQ settings." This setting cannot be used now. Sound Setup Sound Setup Operation To display the Sound Setup Menu screen: Your vehicle must be displayed. To... time, the unit will be parked with the ignition key in the Park position. The Sound Menu screen appears. 3 Select the desired item. 34-EN Setting items: Car Specific Sound Setup* / Media Xpander* / EQ Presets* / Quick Sound / TCR (Time Correction) / X-Over* / Parametric EQ* / Other / Defeat...
... display the Sound mode screen." Now, the locking system for the display. Please check Sound APP connection and BASS ENGINE SQ settings." This setting cannot be used now. Sound Setup Sound Setup Operation To display the Sound Setup Menu screen: Your vehicle must be displayed. To... time, the unit will be parked with the ignition key in the Park position. The Sound Menu screen appears. 3 Select the desired item. 34-EN Setting items: Car Specific Sound Setup* / Media Xpander* / EQ Presets* / Quick Sound / TCR (Time Correction) / X-Over* / Parametric EQ* / Other / Defeat...

Owner s Manual english
Page 35
...installation position of the music source. Level Media Off 1 2 3 Radio (FM) DVD CD Compressed Media (CMPM) Pandora AUX SiriusXM • The MX setting can set and reproduce the best audio environment for the environment in your car. 1 Touch the relevant Vehicle type. Adjusting the Time Correction (TCR) - If you ... speaker in Fader/Time Correction/X-Over in all the bands. MX FM The medium to "Sound Setup Operation" (page 34). Otherwise, the settings may not be able to OFF. MX DVD (Movie) The dialog portion of data such as music clip. Refer to high frequencies become ...
...installation position of the music source. Level Media Off 1 2 3 Radio (FM) DVD CD Compressed Media (CMPM) Pandora AUX SiriusXM • The MX setting can set and reproduce the best audio environment for the environment in your car. 1 Touch the relevant Vehicle type. Adjusting the Time Correction (TCR) - If you ... speaker in Fader/Time Correction/X-Over in all the bands. MX FM The medium to "Sound Setup Operation" (page 34). Otherwise, the settings may not be able to OFF. MX DVD (Movie) The dialog portion of data such as music clip. Refer to high frequencies become ...
Owner s Manual english
Page 36
...the time of compression. MX Pandora This corrects information that was omitted at the time of Parametric EQ, and the Treble adjusted setting value is set to reproduce the sound cleanly by making use of data. MX AUX Choose the MX mode (CMPM, Movie, or Music) that...), refer to page 35. • When "ALL MX Off" is connected. Level Setting contents: 0 to 15 (Initial setting: 0) • If the Subwoofer setting is "Off," the setting cannot be set. • When BASS ENGINE SQ is set to high frequencies become more clear, and produces well balanced sound in advance. •...
...the time of compression. MX Pandora This corrects information that was omitted at the time of Parametric EQ, and the Treble adjusted setting value is set to reproduce the sound cleanly by making use of data. MX AUX Choose the MX mode (CMPM, Movie, or Music) that...), refer to page 35. • When "ALL MX Off" is connected. Level Setting contents: 0 to 15 (Initial setting: 0) • If the Subwoofer setting is "Off," the setting cannot be set. • When BASS ENGINE SQ is set to high frequencies become more clear, and produces well balanced sound in advance. •...

Owner s Manual english
Page 37
... the Time Correction (TCR) [TCR] is displayed. Refer to select mode for at least 2 seconds. • Touch [Flat] to set all the types. Reproduces low-pass with deep feeling. • The function is disabled when BASS ENGINE SQ is "Off," the Subwoofer... is selected on the time correction screen. Calling the Time Correction Value Calling the pre-set your favorite BASS ENGINE type. Setting the BASS ENGINE Type You can set time correction value. Setting contents: Standard (Initial setting) / Punch / Rich / Mid Bass / Low Bass Standard: Natural low-pitched sound located in ...
... the Time Correction (TCR) [TCR] is displayed. Refer to select mode for at least 2 seconds. • Touch [Flat] to set all the types. Reproduces low-pass with deep feeling. • The function is disabled when BASS ENGINE SQ is "Off," the Subwoofer... is selected on the time correction screen. Calling the Time Correction Value Calling the pre-set your favorite BASS ENGINE type. Setting the BASS ENGINE Type You can set time correction value. Setting contents: Standard (Initial setting) / Punch / Rich / Mid Bass / Low Bass Standard: Natural low-pitched sound located in ...

Owner s Manual english
Page 38
...directly by touching the screen. Selecting the Cut-Off Frequency Touch [ ] or [ ] of "Q Adjust" to select the bandwidth. The setting stored in step 3. Setting item: Parametric EQ 1 Adjust the Parametric EQ to your preference. to adjust the frequency of "Level", then adjust the HPF or LPF level... Band Touch [Band] to select the band to be edited (Refer to page 39). • While adjusting the X-Over you touch, the channel switches. Setting contents: 0 (Initial setting) / 6 / 12 / 18 / 24 dB/oct Adjusting the Level Touch [ ] or [ ] of the selected band. Touch [Preset1], [Preset2],...
...directly by touching the screen. Selecting the Cut-Off Frequency Touch [ ] or [ ] of "Q Adjust" to select the bandwidth. The setting stored in step 3. Setting item: Parametric EQ 1 Adjust the Parametric EQ to your preference. to adjust the frequency of "Level", then adjust the HPF or LPF level... Band Touch [Band] to select the band to be edited (Refer to page 39). • While adjusting the X-Over you touch, the channel switches. Setting contents: 0 (Initial setting) / 6 / 12 / 18 / 24 dB/oct Adjusting the Level Touch [ ] or [ ] of the selected band. Touch [Preset1], [Preset2],...


