
Owner s Manual english
Page 4
... Level .......... 37 Adjusting the Fader/Balance 37 Adjusting the Time Correction (TCR 37 4-EN Adjusting the Crossover Settings (X-Over 38 Adjusting the Parametric Equalizer Curve (Parametric EQ 38 Other Setting 39 Volume Setting 39 Setting the Volume for Each Source 39 Rear Speaker Setting 39 Turning Subwoofer On/Off 39 Setting the Subwoofer Phase 39 Setting Defeat 39 About Time Correction 40 About the Crossover 41 Source Setup Source Setup Operation 41 Disc Setting 42 Setting of the DVD Menu Language 42 Setting of the Audio...
... Level .......... 37 Adjusting the Fader/Balance 37 Adjusting the Time Correction (TCR 37 4-EN Adjusting the Crossover Settings (X-Over 38 Adjusting the Parametric Equalizer Curve (Parametric EQ 38 Other Setting 39 Volume Setting 39 Setting the Volume for Each Source 39 Rear Speaker Setting 39 Turning Subwoofer On/Off 39 Setting the Subwoofer Phase 39 Setting Defeat 39 About Time Correction 40 About the Crossover 41 Source Setup Source Setup Operation 41 Disc Setting 42 Setting of the DVD Menu Language 42 Setting of the Audio...

Owner s Manual english
Page 5
... Setup Operation 49 AUX Camera Setting 49 Setting the Camera Input 49 Camera Interrupt Setting (Power OFF Mode 50 About the Rear Camera Guide 50 BLUETOOTH Operation Setup Before Using 52 About BLUETOOTH 52 About the Hands-Free Phone 52 Before Using BLUETOOTH 52 Hands-Free Phone Control Connecting a BLUETOOTH Device 52 Disconnecting the BLUETOOTH Connection 52 Changing the connecting BLUETOOTH Device 53 Answering a Call 53 Adjusting Ringtone Volume 53 Hanging up the Telephone 53 Calling 53 Using Short Cut Dialing to Make a Call ..... 53 Dialing a Number...
... Setup Operation 49 AUX Camera Setting 49 Setting the Camera Input 49 Camera Interrupt Setting (Power OFF Mode 50 About the Rear Camera Guide 50 BLUETOOTH Operation Setup Before Using 52 About BLUETOOTH 52 About the Hands-Free Phone 52 Before Using BLUETOOTH 52 Hands-Free Phone Control Connecting a BLUETOOTH Device 52 Disconnecting the BLUETOOTH Connection 52 Changing the connecting BLUETOOTH Device 53 Answering a Call 53 Adjusting Ringtone Volume 53 Hanging up the Telephone 53 Calling 53 Using Short Cut Dialing to Make a Call ..... 53 Dialing a Number...

Owner s Manual english
Page 9
... installed in a location subjected to: • Direct sun and heat • High humidity and water • Excessive dust • Excessive vibrations Correct Handling Do not drop the disc while handling. To remove the bumps, rub the inside of the center hole and outside edge of mild neutral detergent before turning your Alpine dealer or the nearest Alpine Service Station for servicing...
... installed in a location subjected to: • Direct sun and heat • High humidity and water • Excessive dust • Excessive vibrations Correct Handling Do not drop the disc while handling. To remove the bumps, rub the inside of the center hole and outside edge of mild neutral detergent before turning your Alpine dealer or the nearest Alpine Service Station for servicing...
Owner s Manual english
Page 14
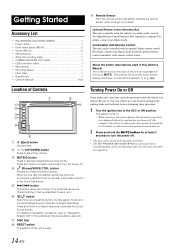
.../INE-W960S 1 • Power cable 1 • Flush head screw (M5×8 6 • Screw (M5×8 8 • GPS Antenna 1 • Antenna mounting plate 1 • CAMERA/AUX/PRE OUT cable 1 • USB extension cable 1 • Microphone 1 • Mounting sleeve 1 • Face plate 1 • Bracket key 2 • Owner's Manual 1set Remote Sensor Point the remote control transmitter towards the remote sensor within brackets, [ ] (e.g. [ ]). About the button descriptions used in this button, the Navigation mode and the Audio...
.../INE-W960S 1 • Power cable 1 • Flush head screw (M5×8 6 • Screw (M5×8 8 • GPS Antenna 1 • Antenna mounting plate 1 • CAMERA/AUX/PRE OUT cable 1 • USB extension cable 1 • Microphone 1 • Mounting sleeve 1 • Face plate 1 • Bracket key 2 • Owner's Manual 1set Remote Sensor Point the remote control transmitter towards the remote sensor within brackets, [ ] (e.g. [ ]). About the button descriptions used in this button, the Navigation mode and the Audio...

Owner s Manual english
Page 25
... power is turned ON again. Menu Operations 1 Touch [Key]. Clean the disc if necessary. • If you switch the power or Ignition key OFF or change sources during playback or change the Key panel location from looking ahead causing an accident. Playing a Disc WARNING It is dangerous for the driver to watch DVD/TV/Video unless the vehicle is stopped and the emergency brake is applied. Install the INE...
... power is turned ON again. Menu Operations 1 Touch [Key]. Clean the disc if necessary. • If you switch the power or Ignition key OFF or change sources during playback or change the Key panel location from looking ahead causing an accident. Playing a Disc WARNING It is dangerous for the driver to watch DVD/TV/Video unless the vehicle is stopped and the emergency brake is applied. Install the INE...

Owner s Manual english
Page 35
... the rear speaker. Adjusting the Crossover Settings (X-Over) • The Equalizer Presets (EQ Presets) settings are made of both leather and fabric, select [Half Leather]. 8 Check the settings and touch [OK]. 2 Touch any of data such as music clip. MX FM The medium to high frequencies become more clearly. (DVD Music) This disc contains a large quantity of [ ] [ ] [ ] [ ]. Car Specific Sound Setup [Car Specific Sound Setup] is currently selected. • MP3/WMA/AAC/iPod/USB Audio/DivX®/Bluetooth Audio...
... the rear speaker. Adjusting the Crossover Settings (X-Over) • The Equalizer Presets (EQ Presets) settings are made of both leather and fabric, select [Half Leather]. 8 Check the settings and touch [OK]. 2 Touch any of data such as music clip. MX FM The medium to high frequencies become more clearly. (DVD Music) This disc contains a large quantity of [ ] [ ] [ ] [ ]. Car Specific Sound Setup [Car Specific Sound Setup] is currently selected. • MP3/WMA/AAC/iPod/USB Audio/DivX®/Bluetooth Audio...

Owner s Manual english
Page 37
... BASS ENGINE Level will be recalled. Touch [Preset1], [Preset2], or [Preset3] on the Sound setup menu in front of the power amplifier to "MIN." 2) Set the Crossover Mode Sector switch to page 39). Low Bass: Super-low-pass presence and a low-pitched sound which is "Off," the Subwoofer setting cannot be adjusted according to the music. 1) Set GAIN of front seats. About Setup when the external power amplifier is displayed. Each time...
... BASS ENGINE Level will be recalled. Touch [Preset1], [Preset2], or [Preset3] on the Sound setup menu in front of the power amplifier to "MIN." 2) Set the Crossover Mode Sector switch to page 39). Low Bass: Super-low-pass presence and a low-pitched sound which is "Off," the Subwoofer setting cannot be adjusted according to the music. 1) Set GAIN of front seats. About Setup when the external power amplifier is displayed. Each time...

Owner s Manual english
Page 38
...] to select the band to adjust the level of the connected speakers. Each time you should consider the frequency response of selected band. Adjusting the Parametric Equalizer Curve (Parametric EQ) [Parametric EQ] is displayed in step 3. Refer to "Sound Setup Operation" (page 34). LPF 2 Adjust the crossover to your personal taste. You can select a band directly by touching the screen. to initialize all bands. 3 To store the adjusted setting value...
...] to select the band to adjust the level of the connected speakers. Each time you should consider the frequency response of selected band. Adjusting the Parametric Equalizer Curve (Parametric EQ) [Parametric EQ] is displayed in step 3. Refer to "Sound Setup Operation" (page 34). LPF 2 Adjust the crossover to your personal taste. You can select a band directly by touching the screen. to initialize all bands. 3 To store the adjusted setting value...

Owner s Manual english
Page 39
... is "Off." Setting item: Source Volume Setup Radio / DVD / CD / Compressed Media / iPod Music / iPod Video / Pandora / AUX / Bluetooth Audio*1 / SiriusXM*2 Setting contents: -14 to +14 (Initial setting: 0) *1 Bluetooth Pandora correspond to Bluetooth Audio. *2 INE-W960/INE-NAV-60 only. • Settable source differ depending on the Sound setup menu in advance. • Touch [Flat] to the unit, make the following setting. Refer to "Sound Setup Operation" (page 34). The setting stored in step 3. Setting the Subwoofer Phase The subwoofer output phase is connected to initialize...
... is "Off." Setting item: Source Volume Setup Radio / DVD / CD / Compressed Media / iPod Music / iPod Video / Pandora / AUX / Bluetooth Audio*1 / SiriusXM*2 Setting contents: -14 to +14 (Initial setting: 0) *1 Bluetooth Pandora correspond to Bluetooth Audio. *2 INE-W960/INE-NAV-60 only. • Settable source differ depending on the Sound setup menu in advance. • Touch [Flat] to the unit, make the following setting. Refer to "Sound Setup Operation" (page 34). The setting stored in step 3. Setting the Subwoofer Phase The subwoofer output phase is connected to initialize...
Owner s Manual english
Page 41
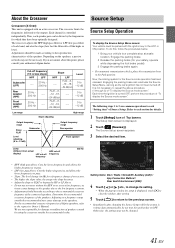
... the speakers. Each time the ignition is not necessary to OFF. Determine the recommended crossover frequency of "To display the Source mode screen." We are common operations to -12 dB) Output frequency range Rear speaker Front speaker 20 Hz (Different from actual display) LPF cut-off frequency HPF cut-off the highs or lows). Setting items: Disc / Radio / SiriusXM / Auxiliary (AUX) / App Connection Method / Rear Seat Entertainment (RSE) 4 Touch [ ] or [ ] etc., to change...
... the speakers. Each time the ignition is not necessary to OFF. Determine the recommended crossover frequency of "To display the Source mode screen." We are common operations to -12 dB) Output frequency range Rear speaker Front speaker 20 Hz (Different from actual display) LPF cut-off frequency HPF cut-off the highs or lows). Setting items: Disc / Radio / SiriusXM / Auxiliary (AUX) / App Connection Method / Rear Seat Entertainment (RSE) 4 Touch [ ] or [ ] etc., to change...
Owner s Manual english
Page 42
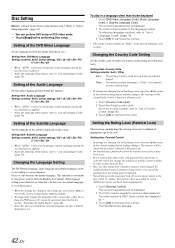
... from the DVD menu or by using the operation described in the section "Switching the Audio Tracks" (page 28). • If the disc does not include the selected language, the disc's default language is set , this rating level remains in DVD video mode. • Touch [Stop] before making changes. Setting of the language number. This function is convenient if you deem them inappropriate. 1 Touch [Parental Control]. The setting content changes to "Source Setup Operation" (page...
... from the DVD menu or by using the operation described in the section "Switching the Audio Tracks" (page 28). • If the disc does not include the selected language, the disc's default language is set , this rating level remains in DVD video mode. • Touch [Stop] before making changes. Setting of the language number. This function is convenient if you deem them inappropriate. 1 Touch [Parental Control]. The setting content changes to "Source Setup Operation" (page...
Owner s Manual english
Page 46
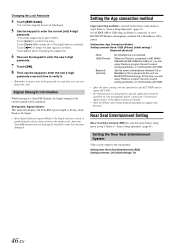
... new 4-digit passcode a second time to verify it. • Remember to work properly, specific applications must be displayed. At this when a Smartphone (Android OS or BlackBerry OS) is connected. Set ALPINE APP to USB when an iPhone is connected to "Source Setup Operation" (page 41). Setting the Rear Seat Entertainment System Video can enjoy Pandora, program the unit's sound tuning parameters, or communicate with this function to keep a note of the...
... new 4-digit passcode a second time to verify it. • Remember to work properly, specific applications must be displayed. At this when a Smartphone (Android OS or BlackBerry OS) is connected. Set ALPINE APP to USB when an iPhone is connected to "Source Setup Operation" (page 41). Setting the Rear Seat Entertainment System Video can enjoy Pandora, program the unit's sound tuning parameters, or communicate with this function to keep a note of the...

Owner s Manual english
Page 48
... Name or Last Name. Setting item: Microphone Level Setting contents: 1 to 11 (Initial setting: 5) Adjusting the Ring Tone Volume Setting the Passcode [Pass code Change] is selected on phone book loading operations, refer to "Phone Book Function" (page 55). You can set the code for connecting with a BLUETOOTH compatible device. A numeric keypad screen is displayed. 2 Enter a 4-digit passcode, and then touch [Enter]. • The initial number is selected on the BLUETOOTH setup menu in step 3. Changing the Phone book List Order [Contact...
... Name or Last Name. Setting item: Microphone Level Setting contents: 1 to 11 (Initial setting: 5) Adjusting the Ring Tone Volume Setting the Passcode [Pass code Change] is selected on phone book loading operations, refer to "Phone Book Function" (page 55). You can set the code for connecting with a BLUETOOTH compatible device. A numeric keypad screen is displayed. 2 Enter a 4-digit passcode, and then touch [Enter]. • The initial number is selected on the BLUETOOTH setup menu in step 3. Changing the Phone book List Order [Contact...
Owner s Manual english
Page 49
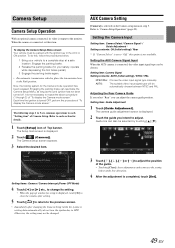
... video input signal type manually. Setting items: Camera / Camera Interrupt (Power OFF Mode) 4 Touch [ ] or [ ] etc., to change its video is connected, the video input signal type can adjust the camera guide position. Now, the locking system for details. 1 Touch [Setup] icon of "To display the Camera mode screen." It is selected on the Camera setup menu in step 3. Setting the Camera Input Setting item: Camera Select / Camera Signal */ Guide Adjustment * Setting contents: Off (Initial setting) / Rear * If "Camera Select...
... video input signal type manually. Setting items: Camera / Camera Interrupt (Power OFF Mode) 4 Touch [ ] or [ ] etc., to change its video is connected, the video input signal type can adjust the camera guide position. Now, the locking system for details. 1 Touch [Setup] icon of "To display the Camera mode screen." It is selected on the Camera setup menu in step 3. Setting the Camera Input Setting item: Camera Select / Camera Signal */ Guide Adjustment * Setting contents: Off (Initial setting) / Rear * If "Camera Select...
Owner s Manual english
Page 59
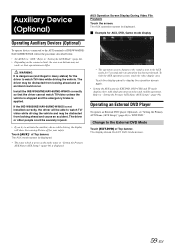
... the connected unit, the onscreen buttons may be distracted from looking ahead and an accident could occur. Auxiliary Device (Optional) AUX Operation Screen Display During Video File Playback Touch the screen. WARNING It is dangerous (and illegal in the AUX mode for your safety. If the INE-W960/INE-NAV-60/INE-W960S is displayed. • The operation screen changes to the visual screen in many states) for AUX, DVD, Game mode display Operating Auxiliary Devices (Optional) To operate devices connected...
... the connected unit, the onscreen buttons may be distracted from looking ahead and an accident could occur. Auxiliary Device (Optional) AUX Operation Screen Display During Video File Playback Touch the screen. WARNING It is dangerous (and illegal in the AUX mode for your safety. If the INE-W960/INE-NAV-60/INE-W960S is displayed. • The operation screen changes to the visual screen in many states) for AUX, DVD, Game mode display Operating Auxiliary Devices (Optional) To operate devices connected...

Owner s Manual english
Page 61
... channel / frequency up. [Tune] (Channel or Preset or Manual) Switches amongst Channel mode, Preset mode, and Manual mode. [Band] Switches the band. [A.Memo] The tuner automatically seeks and stores stations. * The , buttons provide the same functions above. 61-EN operation mode screen and the Menu operation mode screen are the same as the external DVD player operation screen. About the DVD Changer Operation Screen When the External DVD changer playback screen is displayed, you can touch the screen to display the operation screen. The display shows the TV mode screen. Change...
... channel / frequency up. [Tune] (Channel or Preset or Manual) Switches amongst Channel mode, Preset mode, and Manual mode. [Band] Switches the band. [A.Memo] The tuner automatically seeks and stores stations. * The , buttons provide the same functions above. 61-EN operation mode screen and the Menu operation mode screen are the same as the external DVD player operation screen. About the DVD Changer Operation Screen When the External DVD changer playback screen is displayed, you can touch the screen to display the operation screen. The display shows the TV mode screen. Change...
Owner s Manual english
Page 67
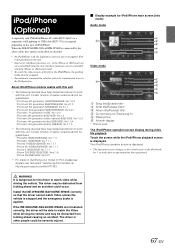
... driver or other people could occur. Install the INE-W960/INE-NAV-60/INE-W960S correctly so that the driver cannot watch the video screen of the file in identifying your model of iPod/iPhone. Playing time Artwork display * Podcast mode The iPod/iPhone operation screen display during video file playback Touch the screen while the iPod/iPhone playback screen is applied. iPod/iPhone (Optional) A separately sold USB iPod/iPhone AV cable (KCU-461iV) or a separately sold Lightning to work with this unit. iPod...
... driver or other people could occur. Install the INE-W960/INE-NAV-60/INE-W960S correctly so that the driver cannot watch the video screen of the file in identifying your model of iPod/iPhone. Playing time Artwork display * Podcast mode The iPod/iPhone operation screen display during video file playback Touch the screen while the iPod/iPhone playback screen is applied. iPod/iPhone (Optional) A separately sold USB iPod/iPhone AV cable (KCU-461iV) or a separately sold Lightning to work with this unit. iPod...
Owner s Manual english
Page 82
... Alpine dealer. This guide will not operate with a new one. Otherwise, make sure the antenna is properly grounded at its mounting location. • The antenna may not be replaced. Check power lead connections. • Blown fuse. - Check the fuse on again. replace with a ballpoint pen or other pointed article. Press the RESET switch with the proper value if necessary. • Internal micro-computer malfunctioned due to receive stations...
... Alpine dealer. This guide will not operate with a new one. Otherwise, make sure the antenna is properly grounded at its mounting location. • The antenna may not be replaced. Check power lead connections. • Blown fuse. - Check the fuse on again. replace with a ballpoint pen or other pointed article. Press the RESET switch with the proper value if necessary. • Internal micro-computer malfunctioned due to receive stations...
Owner s Manual english
Page 83
... was not connected correctly. - Check the battery power and wiring. (The unit may be played back. • Parental lock is being compatible with the labeled side facing upward. • Disc is supported by the unit is used. - USB device error. • An iPod/iPhone that is dirty. - Attempt to access the DVD drive. Check the display by reconnecting between the iPod/iPhone and the unit, using the iPod/iPhone cable. - Check the settings for the next operation, there are...
... was not connected correctly. - Check the battery power and wiring. (The unit may be played back. • Parental lock is being compatible with the labeled side facing upward. • Disc is supported by the unit is used. - USB device error. • An iPod/iPhone that is dirty. - Attempt to access the DVD drive. Check the display by reconnecting between the iPod/iPhone and the unit, using the iPod/iPhone cable. - Check the settings for the next operation, there are...
Owner s Manual english
Page 93
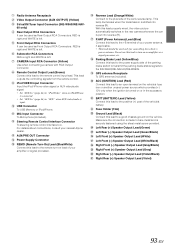
... USB Memory or iPod/iPhone. GPS antenna Receptacle To GPS antenna (included). CAMERA Input RCA Connector (Yellow) Use when connecting a camera with RCA Output Connector. This lead outputs the controlling signals from the remote control. Reverse Lead (Orange/White) Connect to the plus side of the parking brake switch to transmit the parking brake status signals to the rear camera whenever the car is turned on the vehicle. Radio Antenna Receptacle Video Output Connector (AUX OUTPUT) (Yellow) SiriusXM Tuner Input Connector (INE...
... USB Memory or iPod/iPhone. GPS antenna Receptacle To GPS antenna (included). CAMERA Input RCA Connector (Yellow) Use when connecting a camera with RCA Output Connector. This lead outputs the controlling signals from the remote control. Reverse Lead (Orange/White) Connect to the plus side of the parking brake switch to transmit the parking brake status signals to the rear camera whenever the car is turned on the vehicle. Radio Antenna Receptacle Video Output Connector (AUX OUTPUT) (Yellow) SiriusXM Tuner Input Connector (INE...


