
Owner's Manual (english)
Page 12
... repair the unit yourself. CORRECT Inserting Discs Your player accepts only one disc. Playing a disc while driving on your Alpine dealer or the nearest Alpine Service Station for servicing. For routine cleaning, wipe the playing surface with a ballpoint pen or other such instrument, then...disc. Center Hole Center Hole New Disc Bumps Outside (Bumps) Installation Location Make sure the INA-W910 will be displayed even though the disc has been inserted correctly, push the RESET switch with irregular surfaces are inserted or if discs are inserted incorrectly. "Disc Error" ...
... repair the unit yourself. CORRECT Inserting Discs Your player accepts only one disc. Playing a disc while driving on your Alpine dealer or the nearest Alpine Service Station for servicing. For routine cleaning, wipe the playing surface with a ballpoint pen or other such instrument, then...disc. Center Hole Center Hole New Disc Bumps Outside (Bumps) Installation Location Make sure the INA-W910 will be displayed even though the disc has been inserted correctly, push the RESET switch with irregular surfaces are inserted or if discs are inserted incorrectly. "Disc Error" ...
Owner's Manual (english)
Page 17
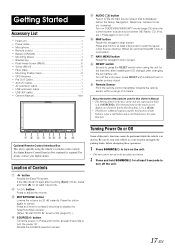
...screen that is operable using the unit for at least 3 seconds to turn it off the unit power, press RESET with a ballpoint pen or similar pointed object. Be sure to stop your Alpine dealer. Remote Sensor Point the remote control transmitter towards the remote sensor within brackets, [ ] (e.g. [Exit])....1 • USB 30P cable 1 • Owner's Manual 1 set to ON (page 67). ) SOURCE/ button Turns the power on. Turn off . An Alpine Remote Control Interface Box (optional) is started. Press again to turn the power off the unit. 17-EN SOURCE/ ). Turn on GUIDEVIEW WINDOW™ mode...
...screen that is operable using the unit for at least 3 seconds to turn it off the unit power, press RESET with a ballpoint pen or similar pointed object. Be sure to stop your Alpine dealer. Remote Sensor Point the remote control transmitter towards the remote sensor within brackets, [ ] (e.g. [Exit])....1 • USB 30P cable 1 • Owner's Manual 1 set to ON (page 67). ) SOURCE/ button Turns the power on. Turn off . An Alpine Remote Control Interface Box (optional) is started. Press again to turn the power off the unit. 17-EN SOURCE/ ). Turn on GUIDEVIEW WINDOW™ mode...
Owner's Manual (english)
Page 62
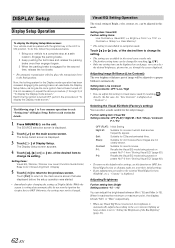
... operations to repeat the above procedure (1 through the screen displayed. It is writing data automatically) do this mode. The following steps 1 to 5 are made are reset their initial settings. • If any Visual EQ Preset is selected, the brightness is displayed as "Contrast".) Selecting the Visual EQ Mode (Factory's setting) You...
... operations to repeat the above procedure (1 through the screen displayed. It is writing data automatically) do this mode. The following steps 1 to 5 are made are reset their initial settings. • If any Visual EQ Preset is selected, the brightness is displayed as "Contrast".) Selecting the Visual EQ Mode (Factory's setting) You...
Owner's Manual (english)
Page 64
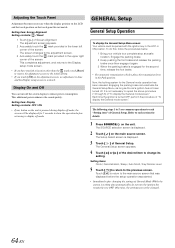
... the touch panel do not match. The General Setup screen appears. 4 Touch [ ] or [ ] of Screen Alignment. Setting item: Screen Alignment Setting contents: / Reset 1 Touch [ ] of the desired item to a complete stop at a safe location. This completes adjustment, and returns to the Display setup mode screen. • ...If you have touched a location other than the mark, touch [Reset] to restore the adjustment screen to the initial setting. • If you touch [ ] on the adjustment screen, no adjustment is done ...
... the touch panel do not match. The General Setup screen appears. 4 Touch [ ] or [ ] of Screen Alignment. Setting item: Screen Alignment Setting contents: / Reset 1 Touch [ ] of the desired item to a complete stop at a safe location. This completes adjustment, and returns to the Display setup mode screen. • ...If you have touched a location other than the mark, touch [Reset] to restore the adjustment screen to the initial setting. • If you touch [ ] on the adjustment screen, no adjustment is done ...

Owner's Manual (english)
Page 66
...default adjustment. Further Setting item: Guide Line Setting contents: OFF / ON Adjusting the Rear Camera Guide line You can touch [Reset] during adjustment to return to Front. Setting item: Camera Select Setting contents: Topview*1 / Front / Rear About the setting information of the ...the position of the guide. The guide line adjustment screen is connected. This function is effective when the reverse wire is prepared for the Alpine Topview camera. Selecting the camera Depending on the connected camera, set this item to "Topview", "Front" or "Rear". Rear HCE-C300R...
...default adjustment. Further Setting item: Guide Line Setting contents: OFF / ON Adjusting the Rear Camera Guide line You can touch [Reset] during adjustment to return to Front. Setting item: Camera Select Setting contents: Topview*1 / Front / Rear About the setting information of the ...the position of the guide. The guide line adjustment screen is connected. This function is effective when the reverse wire is prepared for the Alpine Topview camera. Selecting the camera Depending on the connected camera, set this item to "Topview", "Front" or "Rear". Rear HCE-C300R...
Owner's Manual (english)
Page 84
.... • The setting cannot be adjusted during a phone call will cancel the setting. • The registration number 5 is on the BLUETOOTH compatible device exceeds 4 digits, reset the passcode and make the pairing.
.... • The setting cannot be adjusted during a phone call will cancel the setting. • The registration number 5 is on the BLUETOOTH compatible device exceeds 4 digits, reset the passcode and make the pairing.
Owner's Manual (english)
Page 114
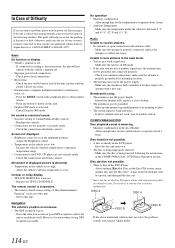
... too high. - Check the fuse on this unit. • Display OFF mode is properly connected, or then consult your authorized Alpine dealer or Alpine directly at fault. Cancel Display OFF mode. Movement of displayed picture is abnormal. • Temperature in the DVD player. - Drive...connections; Do not force it is broken. • The antenna is wavering. • Moisture condensation in a weak signal area. - Press the RESET switch with a new one. Increase the vehicle's interior temperature to operation temperature range. • Connections to evaporate (about 1 hour). • ...
... too high. - Check the fuse on this unit. • Display OFF mode is properly connected, or then consult your authorized Alpine dealer or Alpine directly at fault. Cancel Display OFF mode. Movement of displayed picture is abnormal. • Temperature in the DVD player. - Drive...connections; Do not force it is broken. • The antenna is wavering. • Moisture condensation in a weak signal area. - Press the RESET switch with a new one. Increase the vehicle's interior temperature to operation temperature range. • Connections to evaporate (about 1 hour). • ...

Owner's Manual (english)
Page 117
... is not kinked or otherwise damaged. Replace the antenna if necessary. • Buffer for Replay will revert to the previous channel or to the INA-W910. • Database error or decoder error. - Move the vehicle to the SiriusXM Tuner and check that the SiriusXM antenna cable is connected to... with a clear view of the unit. • A locked channel is selected. - Visit www.siriusxm.com for storing Alert items is not connected. - Reset the iPod. • An iPod/iPhone is full. NOTE • The unit will be displayed while operating the unit in the iPod/iPhone. - Download...
... is not kinked or otherwise damaged. Replace the antenna if necessary. • Buffer for Replay will revert to the previous channel or to the INA-W910. • Database error or decoder error. - Move the vehicle to the SiriusXM Tuner and check that the SiriusXM antenna cable is connected to... with a clear view of the unit. • A locked channel is selected. - Visit www.siriusxm.com for storing Alert items is not connected. - Reset the iPod. • An iPod/iPhone is full. NOTE • The unit will be displayed while operating the unit in the iPod/iPhone. - Download...


