
Owner's Manual (English)
Page 3
... WINDOW™ Function 29 Turn on the GUIDEVIEW WINDOW™ Mode 29 GUIDEVIEW WINDOW™ Display ..........29 Settings 30 Settings Menu 30 Customizing Display 31 Customizing Map 31 Customizing Navigation Tool 32 Setting Audio 32 Regional Settings 32 Information 33 Information Menu 33 Viewing Dashboard 33 Viewing GPS Status 33 Viewing System Information 34...
... WINDOW™ Function 29 Turn on the GUIDEVIEW WINDOW™ Mode 29 GUIDEVIEW WINDOW™ Display ..........29 Settings 30 Settings Menu 30 Customizing Display 31 Customizing Map 31 Customizing Navigation Tool 32 Setting Audio 32 Regional Settings 32 Information 33 Information Menu 33 Viewing Dashboard 33 Viewing GPS Status 33 Viewing System Information 34...
Owner's Manual (English)
Page 4
... Setup Operation 47 Changing the language setting 47 Setting of the Menu Language 48 Setting of the Audio Language 48 Setting of the Subtitle Language 48 Changing the Country Code Setting 48 Setting the Rating Level (Parental Lock 48 Setting the Downmix Mode 49 Setting the TV Screen Mode 49 Playing... Radio™ mode only 50 DISPLAY Setup Display Setup Operation 50 Visual EQ Setting Operation 51 Setting the Brightness of the Backlighting 51 Adjusting the Minimum Level of Backlight 52 Setting the Function Guide display ON/OFF 52 Switching the Font Back Display Color ...... 52 ...
... Setup Operation 47 Changing the language setting 47 Setting of the Menu Language 48 Setting of the Audio Language 48 Setting of the Subtitle Language 48 Changing the Country Code Setting 48 Setting the Rating Level (Parental Lock 48 Setting the Downmix Mode 49 Setting the TV Screen Mode 49 Playing... Radio™ mode only 50 DISPLAY Setup Display Setup Operation 50 Visual EQ Setting Operation 51 Setting the Brightness of the Backlighting 51 Adjusting the Minimum Level of Backlight 52 Setting the Function Guide display ON/OFF 52 Switching the Font Back Display Color ...... 52 ...
Owner's Manual (English)
Page 5
...Input Audio Level 55 Switching the Visual Input Signal System 55 Setting the Picture Output 55 Setting the BLUETOOTH Connection (BLUETOOTH IN 55 Setting the AUX+ Mode 55 Adjusting the AUX+ Audio Level 55 Setting the Rear Entertainment System ....... 55 Sirius Setup Sirius Setup Operation... of Channels 56 Clearing the Setting of Hidden Channels ....... 56 Setting the Favorite Sports Team announcement 56 Setting the Sirius Seek (S-Seek) Alert 57 IMPRINT Operation (Optional) Changing MultEQ mode 58 Adjusting Sound Setting in Manual Mode ..... 58 Storing Settings in the Memory 61 Calling ...
...Input Audio Level 55 Switching the Visual Input Signal System 55 Setting the Picture Output 55 Setting the BLUETOOTH Connection (BLUETOOTH IN 55 Setting the AUX+ Mode 55 Adjusting the AUX+ Audio Level 55 Setting the Rear Entertainment System ....... 55 Sirius Setup Sirius Setup Operation... of Channels 56 Clearing the Setting of Hidden Channels ....... 56 Setting the Favorite Sports Team announcement 56 Setting the Sirius Seek (S-Seek) Alert 57 IMPRINT Operation (Optional) Changing MultEQ mode 58 Adjusting Sound Setting in Manual Mode ..... 58 Storing Settings in the Memory 61 Calling ...
Owner's Manual (English)
Page 7
... this is necessary, pull over in a safe and legal manner and location. • Do not input destinations, change settings, or access any local traffic regulations or your local Alpine authorized navigation dealer or Alpine at the screen only when necessary and safe to do so. However, there may never supersede any functions requiring...
... this is necessary, pull over in a safe and legal manner and location. • Do not input destinations, change settings, or access any local traffic regulations or your local Alpine authorized navigation dealer or Alpine at the screen only when necessary and safe to do so. However, there may never supersede any functions requiring...
Owner's Manual (English)
Page 8
...user and to as associated media, printed materials, and "online" or electronic documentation ("SOFTWARE") are bound by the terms and conditions set forth below. GRANT OF SOFTWARE LICENSE, This EULA grants you the following provisions. TWO HUNDRED FIFTY DOLLARS (U.S. $250.00). You ... The Queen in multiple systems. The System is intended solely for any loss, injury or damages, direct or indirect, which includes Alpine Electronics, Inc. ("Alpine") Specifications, Space Machine, Inc. ("Space Machine") Software and NAVTEQ North America, LLC. ("NAVTEQ") Database, you are protected by...
...user and to as associated media, printed materials, and "online" or electronic documentation ("SOFTWARE") are bound by the terms and conditions set forth below. GRANT OF SOFTWARE LICENSE, This EULA grants you the following provisions. TWO HUNDRED FIFTY DOLLARS (U.S. $250.00). You ... The Queen in multiple systems. The System is intended solely for any loss, injury or damages, direct or indirect, which includes Alpine Electronics, Inc. ("Alpine") Specifications, Space Machine, Inc. ("Space Machine") Software and NAVTEQ North America, LLC. ("NAVTEQ") Database, you are protected by...
Owner's Manual (English)
Page 14
...cable with the unit. Protecting the USB connector • Only an iPhone/iPod, USB memory or Portable audio player can be displayed. CAUTION Alpine accepts no responsibility for the DVD, these are the largest units of division of the information recorded on the disc. Use USB memory according ... SOURCE to something other than USB, then remove the USB device to prevent possible damage to its type or state. • Depending on the settings of the USB memory type, memory state or encoding software, the unit may not play back or display properly. • Files protected by DRM...
...cable with the unit. Protecting the USB connector • Only an iPhone/iPod, USB memory or Portable audio player can be displayed. CAUTION Alpine accepts no responsibility for the DVD, these are the largest units of division of the information recorded on the disc. Use USB memory according ... SOURCE to something other than USB, then remove the USB device to prevent possible damage to its type or state. • Depending on the settings of the USB memory type, memory state or encoding software, the unit may not play back or display properly. • Files protected by DRM...

Owner's Manual (English)
Page 15
... not guaranteed. Portions ©2009, Microsoft Corporation. The "mp3" or "wma" extensions are playable. • If data is not synchronized by Alpine Electronics, Inc. Use of this product only conveys a license for private, noncommercial use and does not convey a license nor imply any right to ...the unit may not be able to correctly play back or display properly. • If the Portable audio player has an MSC/MTP setting, set to meet Apple performance standards. • Apple is not responsible for iPod" means that an electronic accessory has been designed to connect ...
... not guaranteed. Portions ©2009, Microsoft Corporation. The "mp3" or "wma" extensions are playable. • If data is not synchronized by Alpine Electronics, Inc. Use of this product only conveys a license for private, noncommercial use and does not convey a license nor imply any right to ...the unit may not be able to correctly play back or display properly. • If the Portable audio player has an MSC/MTP setting, set to meet Apple performance standards. • Apple is not responsible for iPod" means that an electronic accessory has been designed to connect ...
Owner's Manual (English)
Page 16
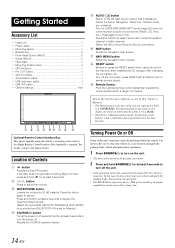
...Pre OUT Cable 1 • AUX I/O Cable 1 • AV extension cable 1 • USB extension cable 1 • USB 30P cable 1 • Owner's Manual 1 set to turn if off the unit. • Some operation of the unit cannot be turned on the touch-screen display are expressed in bold within...parking brake, then perform the operation. • The INA-W900 is displayed before attempting these operations. 1 Press SOURCE/ to Adapter.) SOURCE/ button Turns the power on the face of the unit are shown in bold (e.g. An Alpine Remote Control Interface Box (optional) is started. With ...
...Pre OUT Cable 1 • AUX I/O Cable 1 • AV extension cable 1 • USB extension cable 1 • USB 30P cable 1 • Owner's Manual 1 set to turn if off the unit. • Some operation of the unit cannot be turned on the touch-screen display are expressed in bold within...parking brake, then perform the operation. • The INA-W900 is displayed before attempting these operations. 1 Press SOURCE/ to Adapter.) SOURCE/ button Turns the power on the face of the unit are shown in bold (e.g. An Alpine Remote Control Interface Box (optional) is started. With ...

Owner's Manual (English)
Page 17
... the Volume Adjust the volume by about 20 dB. Pressing MUTE again will decrease by pressing or . The brightness will vary when viewed at the set tilt angle when closing to the movable monitor when it may result in 5 stages. 3 Touch [Exit] to return to the Eject/Tilt screen. 2 Touch [ ] or...
... the Volume Adjust the volume by about 20 dB. Pressing MUTE again will decrease by pressing or . The brightness will vary when viewed at the set tilt angle when closing to the movable monitor when it may result in 5 stages. 3 Touch [Exit] to return to the Eject/Tilt screen. 2 Touch [ ] or...

Owner's Manual (English)
Page 18
...explanations in the display, are displayed varies depending on the display to protect the display. • If you touch a button and there is set to ON). Changes to the Bass*1, Treble*1 and Subwoofer*2 Level adjustment screen directly. About the button descriptions used in this Owner's Manual •...; Soft buttons, ones found in this area. *1 Adjustment cannot be performed when DEFEAT is set to ON. *2 Adjustment cannot be performed when SUBWOOFER is connected, Defeat and MultEQ must be displayed (Only for USB Audio and iPod mode...
...explanations in the display, are displayed varies depending on the display to protect the display. • If you touch a button and there is set to ON). Changes to the Bass*1, Treble*1 and Subwoofer*2 Level adjustment screen directly. About the button descriptions used in this Owner's Manual •...; Soft buttons, ones found in this area. *1 Adjustment cannot be performed when DEFEAT is set to ON. *2 Adjustment cannot be performed when SUBWOOFER is connected, Defeat and MultEQ must be displayed (Only for USB Audio and iPod mode...

Owner's Manual (English)
Page 20
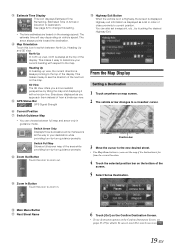
Map Button Touch this to go to the map. Map Functions Home Button Press this to go to a saved home location. Navigation Main Menu Settings Button Press this icon and it will take you to the route menu. • When not in the guidance mode, only the current position can ... information such as Next Maneuver Arrow) Route Button Touch this to start entering a destination. See pages 20-25. Info Button Touch this to change system settings.
Map Button Touch this to go to the map. Map Functions Home Button Press this to go to a saved home location. Navigation Main Menu Settings Button Press this icon and it will take you to the route menu. • When not in the guidance mode, only the current position can ... information such as Next Maneuver Arrow) Route Button Touch this to start entering a destination. See pages 20-25. Info Button Touch this to change system settings.
Owner's Manual (English)
Page 21
... determine your destination while providing turn-by -turn guidance prompts. Zoom Out Button Touch this icon to a crosshair cursor. From the Map Display Setting a Destination 1 Touch anywhere on the Confirm Destination Screen, see the direction of the display. Main Menu Button Next Street Name 6 Touch [Go... zoom out. Heading Up In heading-up view, north is displayed. Switch Full Map Shows a full-screen map of the screen. 5 Select Set as Destination. Position bar 3 Move the cursor to the new desired street. • Use Map Zoom button to your current heading with a horizon...
... determine your destination while providing turn-by -turn guidance prompts. Zoom Out Button Touch this icon to a crosshair cursor. From the Map Display Setting a Destination 1 Touch anywhere on the Confirm Destination Screen, see the direction of the display. Main Menu Button Next Street Name 6 Touch [Go... zoom out. Heading Up In heading-up view, north is displayed. Switch Full Map Shows a full-screen map of the screen. 5 Select Set as Destination. Position bar 3 Move the cursor to the new desired street. • Use Map Zoom button to your current heading with a horizon...

Owner's Manual (English)
Page 22
The vehicle arrow changes to a crosshair cursor. 2 Touch the selected position bar on the bottom of the screen. 5 Select Set as Waypoint and the destination will automatically be added to the Waypoint List. Address Button Search by typing an address. History Button Select... from this list. See page 23. 6 Touch [Go!]. • To add another waypoint, see pages 25-27 for finding places though Places menu. Setting Waypoints 1 Touch anywhere on map screen. 2 The vehicle arrow changes to a crosshair cursor. 3 Move the cursor to 5 Touch [Go!] on the Confirm Destination Screen...
The vehicle arrow changes to a crosshair cursor. 2 Touch the selected position bar on the bottom of the screen. 5 Select Set as Waypoint and the destination will automatically be added to the Waypoint List. Address Button Search by typing an address. History Button Select... from this list. See page 23. 6 Touch [Go!]. • To add another waypoint, see pages 25-27 for finding places though Places menu. Setting Waypoints 1 Touch anywhere on map screen. 2 The vehicle arrow changes to a crosshair cursor. 3 Move the cursor to 5 Touch [Go!] on the Confirm Destination Screen...

Owner's Manual (English)
Page 23
...(page 19) or select Go to the map. Page List Up 21-EN Go to Main Menu Go to the previous screen. Intersection Button Set destination by Address There are stored in memory. See page 24. The list of the street are multiple matches, the system automatically displays a ...short list of the street. Coordinates Button Set destination using geographic coordinates. Prefix and suffix of applicable street names appears. 3 Select the desired street name from the main menu. See pages 22...
...(page 19) or select Go to the map. Page List Up 21-EN Go to Main Menu Go to the previous screen. Intersection Button Set destination by Address There are stored in memory. See page 24. The list of the street are multiple matches, the system automatically displays a ...short list of the street. Coordinates Button Set destination using geographic coordinates. Prefix and suffix of applicable street names appears. 3 Select the desired street name from the main menu. See pages 22...

Owner's Manual (English)
Page 24
... Screen appears. By Name 1 Select by City. 2 Type the city name and touch [OK]. Set a Destination by Place You can select from the last 4 places/types you have previously entered. • If you find a place near your INA-W900 GPS Navigation System. A list of applicable street names appears. If there are multiple matches...
... Screen appears. By Name 1 Select by City. 2 Type the city name and touch [OK]. Set a Destination by Place You can select from the last 4 places/types you have previously entered. • If you find a place near your INA-W900 GPS Navigation System. A list of applicable street names appears. If there are multiple matches...

Owner's Manual (English)
Page 25
... place types. 3 Use the arrow to the right of the list to calculate a route. You can choose by Name or by Type" on page 22. Set a Destination by City. Touch [OK]. • Highlighted button means it is selected. Touch [Go!] to scroll up and down the list. 4 Select the desired place...
... place types. 3 Use the arrow to the right of the list to calculate a route. You can choose by Name or by Type" on page 22. Set a Destination by City. Touch [OK]. • Highlighted button means it is selected. Touch [Go!] to scroll up and down the list. 4 Select the desired place...

Owner's Manual (English)
Page 26
... with the ignition key in the first street name. Select the desired street and input the address number. 3 Input the second street name. Set a Destination from the Address Book Go to Main Menu Go to calculate the route. To do this, follow the procedures below. 1 Bring .... 2 Type in the ACC or ON position. Touch [OK]. 2 The Confirm Destination Screen appears. Touch [OK]. If there is engaged for details. Set a Destination by Coordinates Go to Main Menu Go to Coordinates 1 Enter the Latitude of applicable street names appears. To edit address book, your entry. 3...
... with the ignition key in the first street name. Select the desired street and input the address number. 3 Input the second street name. Set a Destination from the Address Book Go to Main Menu Go to calculate the route. To do this, follow the procedures below. 1 Bring .... 2 Type in the ACC or ON position. Touch [OK]. 2 The Confirm Destination Screen appears. Touch [OK]. If there is engaged for details. Set a Destination by Coordinates Go to Main Menu Go to Coordinates 1 Enter the Latitude of applicable street names appears. To edit address book, your entry. 3...

Owner's Manual (English)
Page 27
.... Select Options. Destination Options • To use other functions on pages 20-25 in the address book, and create waypoints. To get to your destination, set a destination as your desired destination by City. 2 Type the city name, then select the city from the map, go to the Destination Options Menu, enter...
.... Select Options. Destination Options • To use other functions on pages 20-25 in the address book, and create waypoints. To get to your destination, set a destination as your desired destination by City. 2 Type the city name, then select the city from the map, go to the Destination Options Menu, enter...

Owner's Manual (English)
Page 28
... Waypoint] and the destination is no desired icon, touch [No Icon]. 4 Touch [OK]. Setting Waypoints You can set before entering any waypoints. Adding a Waypoint 1 Touch [Set as Home]. 2 Touch [OK] or type desired name and touch [OK]. 2 Type in desired name. If there is ... no desired icon, touch [No Icon]. 2 Touch [Go!] to Address Book]. Touch [OK]. 3 Select an icon. The final destination must be set up to the Destination 1 Touch [Change Method]. 2 Select a method below. Finding Alternative Routes to 3 waypoints between you current location and your destination...
... Waypoint] and the destination is no desired icon, touch [No Icon]. 4 Touch [OK]. Setting Waypoints You can set before entering any waypoints. Adding a Waypoint 1 Touch [Set as Home]. 2 Touch [OK] or type desired name and touch [OK]. 2 Type in desired name. If there is ... no desired icon, touch [No Icon]. 2 Touch [Go!] to Address Book]. Touch [OK]. 3 Select an icon. The final destination must be set up to the Destination 1 Touch [Change Method]. 2 Select a method below. Finding Alternative Routes to 3 waypoints between you current location and your destination...

Owner's Manual (English)
Page 29
...Waypoint List screen, touch [+ Add Waypoint]. 2 Enter the waypoint with optimal route. Deleting All Waypoints 1 Touch [Options]. 2 Touch [Delete All Waypoints]. Setting a Waypoint Directly from the Map Route Button Edit Waypoint 2 At the Waypoint List Screen, select the desired waypoint to edit. 3 Touch [Edit Order]....to the waypoint list. Touch [Go!] to calculate the route. Touch [Go!] to calculate the new route. Optimizing Your Route 1 Touch [Set as Waypoint] to confirm. 4 The system returns to the Waypoint List screen. Adding another Waypoint 1 Before you back to the Waypoint List ...
...Waypoint List screen, touch [+ Add Waypoint]. 2 Enter the waypoint with optimal route. Deleting All Waypoints 1 Touch [Options]. 2 Touch [Delete All Waypoints]. Setting a Waypoint Directly from the Map Route Button Edit Waypoint 2 At the Waypoint List Screen, select the desired waypoint to edit. 3 Touch [Edit Order]....to the waypoint list. Touch [Go!] to calculate the route. Touch [Go!] to calculate the new route. Optimizing Your Route 1 Touch [Set as Waypoint] to confirm. 4 The system returns to the Waypoint List screen. Adding another Waypoint 1 Before you back to the Waypoint List ...


