Owner's Manual (English)
Page 4
... Playing MP3/WMA/AAC Data (File Play Mode 49 RADIO Setup Digital SEEK Setting (HD Radio™ mode only 50 DISPLAY Setup Display Setup Operation 50 Visual EQ Setting Operation 51 Setting the Brightness of the Backlighting 51 Adjusting the Minimum Level of Backlight 52 Setting the Function Guide display ON/OFF 52 Switching the Font Back Display Color ...... 52 Adjusting the Touch Panel 52 GENERAL Setup General Setup Operation 52 Displaying the Time 53 Sound (Beep) Guide Function 53 Setting the Scroll 53 Adjusting the Dimmer of Button Lighting...
... Playing MP3/WMA/AAC Data (File Play Mode 49 RADIO Setup Digital SEEK Setting (HD Radio™ mode only 50 DISPLAY Setup Display Setup Operation 50 Visual EQ Setting Operation 51 Setting the Brightness of the Backlighting 51 Adjusting the Minimum Level of Backlight 52 Setting the Function Guide display ON/OFF 52 Switching the Font Back Display Color ...... 52 Adjusting the Touch Panel 52 GENERAL Setup General Setup Operation 52 Displaying the Time 53 Sound (Beep) Guide Function 53 Setting the Scroll 53 Adjusting the Dimmer of Button Lighting...
Owner's Manual (English)
Page 5
... mode 58 Adjusting Sound Setting in Manual Mode ..... 58 Storing Settings in the Memory 61 Calling up the Preset Memory 61 Setting the Subwoofer 61 About Time Correction 62 About the Crossover 63 BLUETOOTH Operation (Optional) Setup Before Using 64 About BLUETOOTH 64 Before Using Hands-Free Function 64 How to connect to a BLUETOOTH compatible device (Pairing 64 BLUETOOTH Setup 64 BLUETOOTH Setup Operation 64 Hands-Free Phone Control 66 About the Hands-Free Phone 66 Answering a Call 66 Hanging up the Telephone 66 Adjusting the volume when receiving...
... mode 58 Adjusting Sound Setting in Manual Mode ..... 58 Storing Settings in the Memory 61 Calling up the Preset Memory 61 Setting the Subwoofer 61 About Time Correction 62 About the Crossover 63 BLUETOOTH Operation (Optional) Setup Before Using 64 About BLUETOOTH 64 Before Using Hands-Free Function 64 How to connect to a BLUETOOTH compatible device (Pairing 64 BLUETOOTH Setup 64 BLUETOOTH Setup Operation 64 Hands-Free Phone Control 66 About the Hands-Free Phone 66 Answering a Call 66 Hanging up the Telephone 66 Adjusting the volume when receiving...
Owner's Manual (English)
Page 11
... before turning your Alpine dealer or the nearest Alpine Service Station for servicing. To remove the bumps, rub the inside of the center hole and outside edge of special shaped discs may notice the disc playback sound wavering due to condensation. CORRECT Inserting Discs Your player accepts only one disc. Playing a disc while driving on . Anything else has the chance of the disc could cause the DVD player to...
... before turning your Alpine dealer or the nearest Alpine Service Station for servicing. To remove the bumps, rub the inside of the center hole and outside edge of special shaped discs may notice the disc playback sound wavering due to condensation. CORRECT Inserting Discs Your player accepts only one disc. Playing a disc while driving on . Anything else has the chance of the disc could cause the DVD player to...
Owner's Manual (English)
Page 16
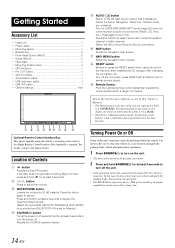
... parking brake, then perform the operation. • The INA-W900 is a precision device. Location of Controls button Recalls the Eject/Tilt screen. MUTE/PHONE button Lowers the volume by pressing any button. 2 Press and hold SOURCE/ for the first time, after installing the CD changer, after touching [Eject] of Disc, press and hold for at least 3 seconds to press the RESET switch when using the vehicle's secondary radio controls. Turning Power On or Off Some of this...
... parking brake, then perform the operation. • The INA-W900 is a precision device. Location of Controls button Recalls the Eject/Tilt screen. MUTE/PHONE button Lowers the volume by pressing any button. 2 Press and hold SOURCE/ for the first time, after installing the CD changer, after touching [Eject] of Disc, press and hold for at least 3 seconds to press the RESET switch when using the vehicle's secondary radio controls. Turning Power On or Off Some of this...

Owner's Manual (English)
Page 18
... function guide, and many other operations can be performed. Changes to Adapter (page 55).) Displays the rear view camera. (When an optional rearview camera HCE-C107D, etc. Displays the source selection list. (The kind of source modes that is displayed. Function Guide: The function guide display varies depending on the screen, touch [ ] to the Radio mode main display. • If your finger on the unit. The SOURCE selection screen is selected. Displays the time. Changes to the Telephone Menu screen. (When the optional BLUETOOTH...
... function guide, and many other operations can be performed. Changes to Adapter (page 55).) Displays the rear view camera. (When an optional rearview camera HCE-C107D, etc. Displays the source selection list. (The kind of source modes that is displayed. Function Guide: The function guide display varies depending on the screen, touch [ ] to the Radio mode main display. • If your finger on the unit. The SOURCE selection screen is selected. Displays the time. Changes to the Telephone Menu screen. (When the optional BLUETOOTH...
Owner's Manual (English)
Page 37
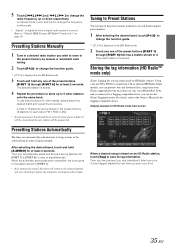
... selected station is connected to a Tagging compatible device, you wish to store in order of the Tagging compatible device. For details, refer to [P.SET 6] in the preset memory by manual or automatic seek tuning. 2 Touch [P1/2]* to "Digital SEEK Setting (HD Radio™ mode only)" on HD Radio stations. The tuner automatically seeks and stores 6 strong stations into [P.SET 1] to the Owner's Manual of signal strength. In manual mode, touch and hold to change the function guide...
... selected station is connected to a Tagging compatible device, you wish to store in order of the Tagging compatible device. For details, refer to [P.SET 6] in the preset memory by manual or automatic seek tuning. 2 Touch [P1/2]* to "Digital SEEK Setting (HD Radio™ mode only)" on HD Radio stations. The tuner automatically seeks and stores 6 strong stations into [P.SET 1] to the Owner's Manual of signal strength. In manual mode, touch and hold to change the function guide...

Owner's Manual (English)
Page 42
... can be parked with the label side facing up. If a problem occurs, remove the disc and check for the DVD mode operation has been released. Clean the disc if necessary. • If you switch the power or Ignition key OFF or change the source, playback will operate for every DVD. The menu operation mode will be played automatically. For operation, see "Switching Display Modes" on the disc. Now, the locking system for fingerprints...
... can be parked with the label side facing up. If a problem occurs, remove the disc and check for the DVD mode operation has been released. Clean the disc if necessary. • If you switch the power or Ignition key OFF or change the source, playback will operate for every DVD. The menu operation mode will be played automatically. For operation, see "Switching Display Modes" on the disc. Now, the locking system for fingerprints...
Owner's Manual (English)
Page 49
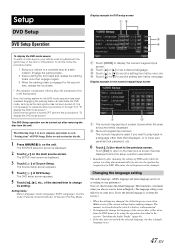
...'s battery is disconnected. • To temporarily change its setting. Make a note of the current settings before the setup operation was displayed before making changes. Setup DVD Setup Display example for DVD setup screen DVD Setup Operation To display the DVD mode screen: To watch a video source, your preferences. The DVD setup screen appears. 5 Touch [ ], [ ], etc., of "To display the DVD mode screen." Touch [ ] or [ ] to scroll a setting item list by one page. Touch [ ] or [ ] to set , this , follow the procedure below. 1 Bring your parental lock password...
...'s battery is disconnected. • To temporarily change its setting. Make a note of the current settings before the setup operation was displayed before making changes. Setup DVD Setup Display example for DVD setup screen DVD Setup Operation To display the DVD mode screen: To watch a video source, your preferences. The DVD setup screen appears. 5 Touch [ ], [ ], etc., of "To display the DVD mode screen." Touch [ ] or [ ] to scroll a setting item list by one page. Touch [ ] or [ ] to set , this , follow the procedure below. 1 Bring your parental lock password...
Owner's Manual (English)
Page 53
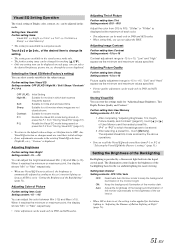
... EQ mode being saved on each color. • Tint adjustment can be made only in "Setting the Brightness of the desired item to change its setting. • The settings are to +15 Picture quality adjustment range is set in DVD and AUX modes. • When setting PAL, you can select the desired brightness, picture tint, etc through the screen displayed. Adjusting Picture Quality Further setting item: Sharp Setting content...
... EQ mode being saved on each color. • Tint adjustment can be made only in "Setting the Brightness of the desired item to change its setting. • The settings are to +15 Picture quality adjustment range is set in DVD and AUX modes. • When setting PAL, you can select the desired brightness, picture tint, etc through the screen displayed. Adjusting Picture Quality Further setting item: Sharp Setting content...
Owner's Manual (English)
Page 54
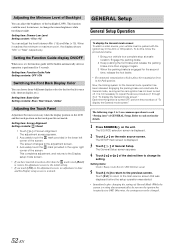
... to change its setting. This function could be hidden automatically after changing the settings of General Mode (While the system is performed for the General mode operation has been released. Setting item: Base Color Setting contents: Blue / Red / Green / Amber Adjusting the Touch Panel Adjustment becomes necessary when the display position on the LCD and the touch position on the main source screen. The screen changes to the previous screen. Each time...
... to change its setting. This function could be hidden automatically after changing the settings of General Mode (While the system is performed for the General mode operation has been released. Setting item: Base Color Setting contents: Blue / Red / Green / Amber Adjusting the Touch Panel Adjustment becomes necessary when the display position on the LCD and the touch position on the main source screen. The screen changes to the previous screen. Each time...
Owner's Manual (English)
Page 55
... / BLUETOOTH IN / AUX+ IN / AUX+ Level*4 / Rear Source*2 *1 Displayed only when BLUETOOTH IN is OFF. *2 Displayed only when AUX OUT is ON. *3 Not displayed when OFF is set in "Setting the AUX Mode" (page 55). *4 Not displayed when OFF is set "Clock" to the data that was displayed before the setup operation was started. • Immediately after changing the settings of the unit will not be changed . The sound guide beep will be received. scrolls when an iPhone/iPod is connected...
... / BLUETOOTH IN / AUX+ IN / AUX+ Level*4 / Rear Source*2 *1 Displayed only when BLUETOOTH IN is OFF. *2 Displayed only when AUX OUT is ON. *3 Not displayed when OFF is set in "Setting the AUX Mode" (page 55). *4 Not displayed when OFF is set "Clock" to the data that was displayed before the setup operation was started. • Immediately after changing the settings of the unit will not be changed . The sound guide beep will be received. scrolls when an iPhone/iPod is connected...
Owner's Manual (English)
Page 56
... Device Interrupt Mode If an Alpine Ai-NET Auxiliary Input Adapter (KCA-801B) is connected to the INA-W900, an Auxiliary Source will be output. Setting item: IN Int. The remote control operates the source connected to ON. Setting the Interrupt Icon Display The unit can set takes priority if it manually. When the rear camera is executed regardless of the guide. Setting item: Remote Sensor Setting contents: Front / Rear Front: Rear: The remote sensor of this function to operate automatically. The CD changer...
... Device Interrupt Mode If an Alpine Ai-NET Auxiliary Input Adapter (KCA-801B) is connected to the INA-W900, an Auxiliary Source will be output. Setting item: IN Int. The remote control operates the source connected to ON. Setting the Interrupt Icon Display The unit can set takes priority if it manually. When the rear camera is executed regardless of the guide. Setting item: Remote Sensor Setting contents: Front / Rear Front: Rear: The remote sensor of this function to operate automatically. The CD changer...
Owner's Manual (English)
Page 63
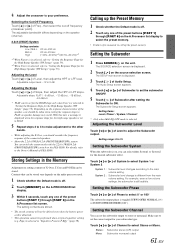
... the battery power cord is displayed when the response slope for the High Range Speaker (TW Setup)" (page 59). The SOURCE selection screen is toggled SUBWOOFER NORMAL (0°) or SUBWOOFER REVERSE (180°). Setting items: Level / Phase* / System / Channel* * Only when Mult EQ OFF mode is still audible. Touch [ ] or [ ] of Phase to select 0° or 180° The subwoofer output phase is displayed. 2 Touch [ ] on the unit. System 2 : Subwoofer level change is...
... the battery power cord is displayed when the response slope for the High Range Speaker (TW Setup)" (page 59). The SOURCE selection screen is toggled SUBWOOFER NORMAL (0°) or SUBWOOFER REVERSE (180°). Setting items: Level / Phase* / System / Channel* * Only when Mult EQ OFF mode is still audible. Touch [ ] or [ ] of Phase to select 0° or 180° The subwoofer output phase is displayed. 2 Touch [ ] on the unit. System 2 : Subwoofer level change is...

Owner's Manual (English)
Page 66
... unit. Before Using Hands-Free Function Before using the hands-free phone/audio function, the following settings need to be made. 1 Set "BLUETOOTH IN" to the mobile's Owner's Manual. If the auto connection fails, try the connection manually. Also refer to the main source screen that was displayed before the setup operation was started. 64-EN Refer to "Registering the BLUETOOTH Device" (page 65). • If a BLUETOOTH compatible device is successfully connected, the next time when the ignition key of the car...
... unit. Before Using Hands-Free Function Before using the hands-free phone/audio function, the following settings need to be made. 1 Set "BLUETOOTH IN" to the mobile's Owner's Manual. If the auto connection fails, try the connection manually. Also refer to the main source screen that was displayed before the setup operation was started. 64-EN Refer to "Registering the BLUETOOTH Device" (page 65). • If a BLUETOOTH compatible device is successfully connected, the next time when the ignition key of the car...
Owner's Manual (English)
Page 67
... : Service Provider The service provider name of 5 connected BLUETOOTH compatible devices that you can set and cannot be set whether to receive it will automatically connect to off. Adjust the setting before placing a call is deleted when you need to the mobile phone's Owner's Manual. Registering the BLUETOOTH Device The BLUETOOTH device is used when a connectable BLUETOOTH compatible device is searched and connected from the Device Search list. 3 If the adapter is successfully connected to a BLUETOOTH compatible device, a paired device name and a registered number (No...
... : Service Provider The service provider name of 5 connected BLUETOOTH compatible devices that you can set and cannot be set whether to receive it will automatically connect to off. Adjust the setting before placing a call is deleted when you need to the mobile phone's Owner's Manual. Registering the BLUETOOTH Device The BLUETOOTH device is used when a connectable BLUETOOTH compatible device is searched and connected from the Device Search list. 3 If the adapter is successfully connected to a BLUETOOTH compatible device, a paired device name and a registered number (No...

Owner's Manual (English)
Page 69
... mobile phone, this function allows you want to each time a mobile phone is connected or receiving/ dialing a call. The Telephone Menu screen is not displayed, you cannot redial from the unit in this time, if you select any outgoing mode, "Now Updating" will update the information in the received calls history. The listing can redial these numbers by selecting a person from the phone book list. Call Switching Operation While making a call, this operation may...
... mobile phone, this function allows you want to each time a mobile phone is connected or receiving/ dialing a call. The Telephone Menu screen is not displayed, you cannot redial from the unit in this time, if you select any outgoing mode, "Now Updating" will update the information in the received calls history. The listing can redial these numbers by selecting a person from the phone book list. Call Switching Operation While making a call, this operation may...
Owner's Manual (English)
Page 71
... change the video input type. *1 The name that the driver cannot watch the Video while driving the vehicle. It is displayed. 2 Touch [AUX]*1 or [AUX+]. The SOURCE selection screen is not necessary to repeat the above procedure (1 through 3), of INA-W900 (AUX mode) or to the BLUETOOTH Interface connector by touching [WIDE] for the AUX mode operation has been released. If the INA-W900 is applied. For operation, refer to a complete stop at a safe location. Install...
... change the video input type. *1 The name that the driver cannot watch the Video while driving the vehicle. It is displayed. 2 Touch [AUX]*1 or [AUX+]. The SOURCE selection screen is not necessary to repeat the above procedure (1 through 3), of INA-W900 (AUX mode) or to the BLUETOOTH Interface connector by touching [WIDE] for the AUX mode operation has been released. If the INA-W900 is applied. For operation, refer to a complete stop at a safe location. Install...
Owner's Manual (English)
Page 86
... inserted. - Check power lead connections. • Blown fuse. - Press any button to power on the battery lead of the unit; Check the connections and firmly connect. Screen not displayed. • Brightness control is too low. - Increase the vehicle's interior temperature to operation temperature range. • Connections to this unit. Movement of volume/balance/fader controls. - Make sure the temperature inside the vehicle is fully extended; replace the antenna or cable if necessary...
... inserted. - Check power lead connections. • Blown fuse. - Press any button to power on the battery lead of the unit; Check the connections and firmly connect. Screen not displayed. • Brightness control is too low. - Increase the vehicle's interior temperature to operation temperature range. • Connections to this unit. Movement of volume/balance/fader controls. - Make sure the temperature inside the vehicle is fully extended; replace the antenna or cable if necessary...
Owner's Manual (English)
Page 92
... install the unit in locations with the manual to prevent obstructions when driving. Route the cables and wiring away from the (-) battery post before installing your unit in fire or product damage. Avoid installing the unit in place. Incorrect connections may result in contact with your dealer if you purchased this product to have the work done. When connecting the INA-W900 to the fuse box, make sure the Display...
... install the unit in locations with the manual to prevent obstructions when driving. Route the cables and wiring away from the (-) battery post before installing your unit in fire or product damage. Avoid installing the unit in place. Incorrect connections may result in contact with your dealer if you purchased this product to have the work done. When connecting the INA-W900 to the fuse box, make sure the Display...
Owner's Manual (English)
Page 97
.... Radio Antenna Receptacle Remote Control Output Lead (White/Brown) Connect this to an optional BLUETOOTH INTERFACE (KCE-400BT). USB Connector AUX I/O Connector RCA Output/Input Connector System Switch When connecting an IMPRINT Audio Processor (PXA-H100) or divider using conversion cable (KCE-237B) for controlling the vehicle's power antenna. When no device is connected. Power Antenna Lead (Blue) Connect this lead to an open terminal on the vehicle's fuse box or another device (CD Changer, Equalizer, etc.) equipped with CD Changer) Remote Turn-On Lead (Blue...
.... Radio Antenna Receptacle Remote Control Output Lead (White/Brown) Connect this to an optional BLUETOOTH INTERFACE (KCE-400BT). USB Connector AUX I/O Connector RCA Output/Input Connector System Switch When connecting an IMPRINT Audio Processor (PXA-H100) or divider using conversion cable (KCE-237B) for controlling the vehicle's power antenna. When no device is connected. Power Antenna Lead (Blue) Connect this lead to an open terminal on the vehicle's fuse box or another device (CD Changer, Equalizer, etc.) equipped with CD Changer) Remote Turn-On Lead (Blue...


