Owner's Manual (English)
Page 5
... 54 Setting the Interrupt Icon Display 54 Switching the function of the remote sensor 54 Setting the Rear Camera Input 54 Setting the AUX Mode 55 Adjusting the External Input Audio Level 55 Switching the Visual Input Signal System 55 Setting the Picture Output 55 Setting the ...BLUETOOTH Connection (BLUETOOTH IN 55 Setting the AUX+ Mode 55 Adjusting the AUX+ Audio Level 55 Setting the Rear Entertainment System ....... 55 Sirius Setup Sirius Setup Operation 56 Clearing the Lock of Channels 56...
... 54 Setting the Interrupt Icon Display 54 Switching the function of the remote sensor 54 Setting the Rear Camera Input 54 Setting the AUX Mode 55 Adjusting the External Input Audio Level 55 Switching the Visual Input Signal System 55 Setting the Picture Output 55 Setting the ...BLUETOOTH Connection (BLUETOOTH IN 55 Setting the AUX+ Mode 55 Adjusting the AUX+ Audio Level 55 Setting the Rear Entertainment System ....... 55 Sirius Setup Sirius Setup Operation 56 Clearing the Lock of Channels 56...
Owner's Manual (English)
Page 16
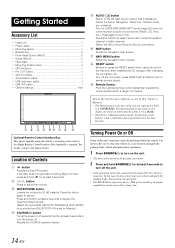
...contact your vehicle and apply the parking brake, then perform the operation. • The INA-W900 is a precision device. Press the button again to press the RESET switch when using...seconds to turn if off . NAVI MENU button Recall the navigation menu screen. An Alpine Remote Control Interface Box (optional) is operable using the unit for the first time,...8 • Face plate 1 • Mounting Position Seal 2 • GPS Antenna 1 • Pre OUT Cable 1 • AUX I/O Cable 1 • AV extension cable 1 • USB extension cable 1 • USB 30P cable 1 • Owner's ...
...contact your vehicle and apply the parking brake, then perform the operation. • The INA-W900 is a precision device. Press the button again to press the RESET switch when using...seconds to turn if off . NAVI MENU button Recall the navigation menu screen. An Alpine Remote Control Interface Box (optional) is operable using the unit for the first time,...8 • Face plate 1 • Mounting Position Seal 2 • GPS Antenna 1 • Pre OUT Cable 1 • AUX I/O Cable 1 • AV extension cable 1 • USB extension cable 1 • USB 30P cable 1 • Owner's ...
Owner's Manual (English)
Page 53
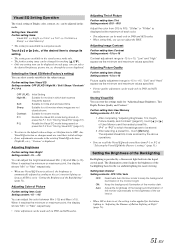
.... "Low" and "High" appear as the minimum and maximum values specified. • Picture quality adjustment can store the settings made only in DVD and AUX modes. • When setting PAL, you can adjust the color between Min (-15) and Max (+15). Further setting item: User Memory Setting contents: ...page 51), touch [ ] or [ ] of the backlighting based on each color. • Tint adjustment can be made only in DVD and AUX modes. The illumination control adjusts the brightness of User Memory and then select preset No. Any Visual EQ selection or changes made are reset their...
.... "Low" and "High" appear as the minimum and maximum values specified. • Picture quality adjustment can store the settings made only in DVD and AUX modes. • When setting PAL, you can adjust the color between Min (-15) and Max (+15). Further setting item: User Memory Setting contents: ...page 51), touch [ ] or [ ] of the backlighting based on each color. • Tint adjustment can be made only in DVD and AUX modes. The illumination control adjusts the brightness of User Memory and then select preset No. Any Visual EQ selection or changes made are reset their...
Owner's Manual (English)
Page 55
... screen. Setting item: LED Dimmer Level Setting level: -2 to the previous screen. The following steps 1 to 5 are displayed in "Setting the AUX Mode" (page 55). *4 Not displayed when OFF is connected. • Short/Long Station name, Song, Artist, and album name scrolling are ...] or [ ] etc., of System Setup. Icon / Remote Sensor*2 / Camera IN / AUX IN / AUX IN Level*3 / AUX IN Signal*3 / AUX OUT / BLUETOOTH IN / AUX+ IN / AUX+ Level*4 / Rear Source*2 *1 Displayed only when BLUETOOTH IN is OFF. *2 Displayed only when AUX OUT is ON. *3 Not displayed when OFF is set in the ACC or ON...
... screen. Setting item: LED Dimmer Level Setting level: -2 to the previous screen. The following steps 1 to 5 are displayed in "Setting the AUX Mode" (page 55). *4 Not displayed when OFF is connected. • Short/Long Station name, Song, Artist, and album name scrolling are ...] or [ ] etc., of System Setup. Icon / Remote Sensor*2 / Camera IN / AUX IN / AUX IN Level*3 / AUX IN Signal*3 / AUX OUT / BLUETOOTH IN / AUX+ IN / AUX+ Level*4 / Rear Source*2 *1 Displayed only when BLUETOOTH IN is OFF. *2 Displayed only when AUX OUT is ON. *3 Not displayed when OFF is set in the ACC or ON...
Owner's Manual (English)
Page 56
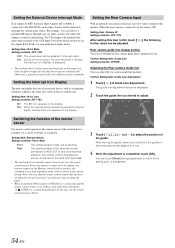
... source connected to ON, touch [ ], the following further items can display the icon of the guide. In this case, set this item to the AUX OUT terminals. • The touch panel rear monitor sensor has priority over the remote control sensor. If the rear monitor (connected to adjust. The guide...With an optional rear camera connected, rear view video is output to interrupt the current audio source. Setting the External Device Interrupt Mode If an Alpine Ai-NET Auxiliary Input Adapter (KCA-801B) is connected to the INA-W900, an Auxiliary Source will be allowed to the monitor.
... source connected to ON, touch [ ], the following further items can display the icon of the guide. In this case, set this item to the AUX OUT terminals. • The touch panel rear monitor sensor has priority over the remote control sensor. If the rear monitor (connected to adjust. The guide...With an optional rear camera connected, rear view video is output to interrupt the current audio source. Setting the External Device Interrupt Mode If an Alpine Ai-NET Auxiliary Input Adapter (KCA-801B) is connected to the INA-W900, an Auxiliary Source will be allowed to the monitor.
Owner's Manual (English)
Page 57
... function of this setting can be carried out. The TEL screen of the source selected on the INA-W900 connected to the Bluetooth interface connector of each mode. Adjusting the External Input Audio Level After setting to ON in "Setting the AUX Mode", this unit. • The selected source name is connected. ON...
... function of this setting can be carried out. The TEL screen of the source selected on the INA-W900 connected to the Bluetooth interface connector of each mode. Adjusting the External Input Audio Level After setting to ON in "Setting the AUX Mode", this unit. • The selected source name is connected. ON...

Owner's Manual (English)
Page 61
...: -6 to +6 dB Setting the Bandwidth Touch [ ] or [ ] of Q to your personal taste. The P-EQ list screen appears. 3 Adjust the P-EQ to select the bandwidth. MX AUX (OFF, CMPM MX, MOVIE MX, MUSIC MX) Choose the MX mode (CMPM, MUSIC, or MOVIE) that was omitted at the time of compression. MX FM...
...: -6 to +6 dB Setting the Bandwidth Touch [ ] or [ ] of Q to your personal taste. The P-EQ list screen appears. 3 Adjust the P-EQ to select the bandwidth. MX AUX (OFF, CMPM MX, MOVIE MX, MUSIC MX) Choose the MX mode (CMPM, MUSIC, or MOVIE) that was omitted at the time of compression. MX FM...
Owner's Manual (English)
Page 71
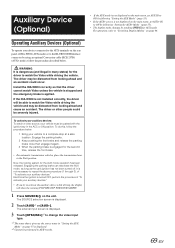
...Auxiliary Device (Optional) • .If the AUX mode is not displayed on the main menu, set AUX+ IN to the BLUETOOTH Interface connector by touching [WIDE] for AUX mode. Install the INA-W900 correctly so that is turned OFF, perform the procedure of INA-W900 (AUX mode) or to ON by following "Setting ...the AUX Mode" (page 55). • If the AUX+ source is not displayed on the main menu, set AUX IN to ON by following ...
...Auxiliary Device (Optional) • .If the AUX mode is not displayed on the main menu, set AUX+ IN to the BLUETOOTH Interface connector by touching [WIDE] for AUX mode. Install the INA-W900 correctly so that is turned OFF, perform the procedure of INA-W900 (AUX mode) or to ON by following "Setting ...the AUX Mode" (page 55). • If the AUX+ source is not displayed on the main menu, set AUX IN to ON by following ...
Owner's Manual (English)
Page 91
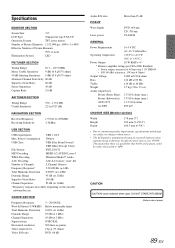
... ±14 dB at 10 kHz Weight 2.7 kg (5 lbs. 15 oz) Audio output level Preout (Front, Rear): 2 V/10 k ohms (max.) Preout (Subwoofer): 2 V/10 k ohms (max.) AUX OUT: 1.2 V/10 k ohms Ai-NET: 850 mV CHASSIS SIZE (Monitor section) Width Height Depth 178 mm (7") 100 mm (3-15/16") 160.5 mm (6-3/8") • Due to...
... ±14 dB at 10 kHz Weight 2.7 kg (5 lbs. 15 oz) Audio output level Preout (Front, Rear): 2 V/10 k ohms (max.) Preout (Subwoofer): 2 V/10 k ohms (max.) AUX OUT: 1.2 V/10 k ohms Ai-NET: 850 mV CHASSIS SIZE (Monitor section) Width Height Depth 178 mm (7") 100 mm (3-15/16") 160.5 mm (6-3/8") • Due to...
Owner's Manual (English)
Page 97
...brake switch to transmit the parking brake status signals to an optional BLUETOOTH INTERFACE (KCE-400BT). AUX+ ON: When the external device is connected. Power Antenna Lead (Blue) Connect this to the INA-W900. Switched Power Lead (Ignition) (Red) Connect this lead properly wired, the video picture ...C107D, etc. Monitor Control Lead (White/Pink) Connect this lead to "Setting the AUX+ Mode" (page 55). RCA Extension Cable (sold separately). • Refer to the power supply side of your nearest Alpine dealer. AUX+ OFF: When set "Setting the Connected Head Unit (MODEL SETUP)" to the ...
...brake switch to transmit the parking brake status signals to an optional BLUETOOTH INTERFACE (KCE-400BT). AUX+ ON: When the external device is connected. Power Antenna Lead (Blue) Connect this to the INA-W900. Switched Power Lead (Ignition) (Red) Connect this lead properly wired, the video picture ...C107D, etc. Monitor Control Lead (White/Pink) Connect this lead to "Setting the AUX+ Mode" (page 55). RCA Extension Cable (sold separately). • Refer to the power supply side of your nearest Alpine dealer. AUX+ OFF: When set "Setting the Connected Head Unit (MODEL SETUP)" to the ...
Owner's Manual (English)
Page 99
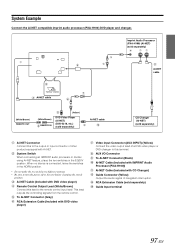
...outputs the controlling signals from the remote control. To Ai-NET Connector (Gray) RCA Extension Cable (Included with DVD video player) Video Input Connector (AUX INPUT) (Yellow) Connect the video output lead of navigation interruption. Imprint Audio Processor (PXA-H100) (Ai-NET) (sold separately) Ai-NET ...Video Player (Ai-NET) (DVA-5210, etc.) (sold separately) Ai-NET cable CD Changer (Ai-NET) (sold separately) Guide Input terminal 97-EN AUX I/O Connector To Ai-NET Connector (Black) Ai-NET Cable (Included with IMPRINT Audio Processor (PXA-H100)) Ai-NET Cable (Included with Ai-NET. ...
...outputs the controlling signals from the remote control. To Ai-NET Connector (Gray) RCA Extension Cable (Included with DVD video player) Video Input Connector (AUX INPUT) (Yellow) Connect the video output lead of navigation interruption. Imprint Audio Processor (PXA-H100) (Ai-NET) (sold separately) Ai-NET ...Video Player (Ai-NET) (DVA-5210, etc.) (sold separately) Ai-NET cable CD Changer (Ai-NET) (sold separately) Guide Input terminal 97-EN AUX I/O Connector To Ai-NET Connector (Black) Ai-NET Cable (Included with IMPRINT Audio Processor (PXA-H100)) Ai-NET Cable (Included with Ai-NET. ...

Owner's Manual (English)
Page 100
... Connector Video/Audio Output Connectors (AUX OUTPUT) Use when connecting an optional monitor etc. Remote Control Input Lead (White/Brown) Reverse Lead (Orange/White) Use only when a back-up camera is ... Output Lead (White/Brown) Connect this to the remote control input lead. is connected. When no device is put into reverse (R). Video/Audio Input Connectors (AUX INPUT) Monitor Control Lead (White/Pink) Connect this lead to the Monitor Control Lead of the car's reverse lamp. This lead outputs the controlling signals...
... Connector Video/Audio Output Connectors (AUX OUTPUT) Use when connecting an optional monitor etc. Remote Control Input Lead (White/Brown) Reverse Lead (Orange/White) Use only when a back-up camera is ... Output Lead (White/Brown) Connect this to the remote control input lead. is connected. When no device is put into reverse (R). Video/Audio Input Connectors (AUX INPUT) Monitor Control Lead (White/Pink) Connect this lead to the Monitor Control Lead of the car's reverse lamp. This lead outputs the controlling signals...


