Owners Manual
Page 3
...-Up 7 Adjusting Volume 7 Setting the Calendar 8 Setting the Time 8 Displaying the Calendar/Time 8 Radio Listening to Radio 9 Presetting Stations Manually 9 Presetting Stations Automatically 9 Tuning to Preset Stations 9 Frequency Search Function 10 Receiving a Multicast Station (HD Radio mode only 10 Changing the Display (HD Radio mode only 10 iPod® (Optional) Playback 11 Searching for a desired Song/Title 11 Percent Skip Function 12 Alphabet Skip Function (Only when iDA-X200 is connected via USB 12 Up/Down Function 13 Search Position Memory 13 Random Play Shuffle 13...
...-Up 7 Adjusting Volume 7 Setting the Calendar 8 Setting the Time 8 Displaying the Calendar/Time 8 Radio Listening to Radio 9 Presetting Stations Manually 9 Presetting Stations Automatically 9 Tuning to Preset Stations 9 Frequency Search Function 10 Receiving a Multicast Station (HD Radio mode only 10 Changing the Display (HD Radio mode only 10 iPod® (Optional) Playback 11 Searching for a desired Song/Title 11 Percent Skip Function 12 Alphabet Skip Function (Only when iDA-X200 is connected via USB 12 Up/Down Function 13 Search Position Memory 13 Random Play Shuffle 13...
Owners Manual
Page 4
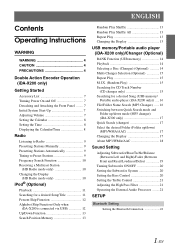
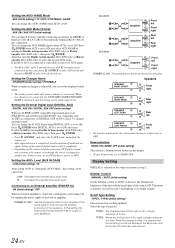
... (PLAY MODE 23 Sound (Beep) Guide Function (iDA-X200 only 23 Turning Mute Mode On/Off (INT MUTE) ...... 23 Setting the AUX+ Mode 23 Setting the AUX+ NAME Mode 24 Setting the AUX Mode (V-Link 24 Setting the Changer Name 24 Setting the External Digital Input (DIGITAL AUX 24 Setting the AUX+ Level (AUX IN GAIN) ...... 24 Connecting to an External Amplifier (POWER IC 24 Demonstration 24 Display Setting Dimmer Control 24 Scroll Type Setting 24 Scroll Setting (TEXT SCROLL 25 iPod Setting iPod Search Mode Setting 25 TUNER Setting (Only when HD/SAT receiver is connected) HD Radio Station...
... (PLAY MODE 23 Sound (Beep) Guide Function (iDA-X200 only 23 Turning Mute Mode On/Off (INT MUTE) ...... 23 Setting the AUX+ Mode 23 Setting the AUX+ NAME Mode 24 Setting the AUX Mode (V-Link 24 Setting the Changer Name 24 Setting the External Digital Input (DIGITAL AUX 24 Setting the AUX+ Level (AUX IN GAIN) ...... 24 Connecting to an External Amplifier (POWER IC 24 Demonstration 24 Display Setting Dimmer Control 24 Scroll Type Setting 24 Scroll Setting (TEXT SCROLL 25 iPod Setting iPod Search Mode Setting 25 TUNER Setting (Only when HD/SAT receiver is connected) HD Radio Station...
Owners Manual
Page 6
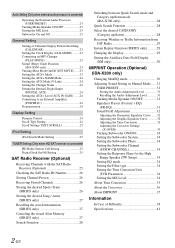
... • Excessive vibrations Protecting the USB connector • Only a USB memory, iPod (iDA-X200 only) or Portable audio player (iDA-X200 only) can result in serious injury. Failure to repair the unit yourself. Temperature Be sure the temperature inside and may result in an accident. Maintenance If you are not sure.) Failure to your Alpine dealer or the nearest Alpine Service Station for repairing. PRECAUTIONS Product Cleaning...
... • Excessive vibrations Protecting the USB connector • Only a USB memory, iPod (iDA-X200 only) or Portable audio player (iDA-X200 only) can result in serious injury. Failure to repair the unit yourself. Temperature Be sure the temperature inside and may result in an accident. Maintenance If you are not sure.) Failure to your Alpine dealer or the nearest Alpine Service Station for repairing. PRECAUTIONS Product Cleaning...
Owners Manual
Page 7
... not remove the USB device while playback is in other electronic content distribution systems, such as pay-audio or audio-on its memory. Playable audio file formats are present. • Fix the USB memory in the following points. Use Portable audio player according to direct sunlight or high temperatures. Read the Portable audio player Owner's Manual thoroughly. • Avoid usage or storage in a location where driver operation will not be supported. Change SOURCE...
... not remove the USB device while playback is in other electronic content distribution systems, such as pay-audio or audio-on its memory. Playable audio file formats are present. • Fix the USB memory in the following points. Use Portable audio player according to direct sunlight or high temperatures. Read the Portable audio player Owner's Manual thoroughly. • Avoid usage or storage in a location where driver operation will not be supported. Change SOURCE...
Owners Manual
Page 9
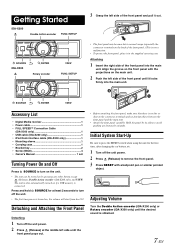
... case. SOURCE /ENTER VIEW Accessory List • Digital Media receiver 1 • Power cable 1 • FULL SPEEDTM Connection Cable (iDA-X300 only 1 • USB cable (iDA-X200 only 1 • iPod Dock interface cable (iDA-X200 only 1 • Mounting sleeve 1 • Carrying case 1 • Bracket key 2 • Screw (M5x8 4 • Owner's Manual 1 set Turning Power On and Off Press SOURCE to turn off the unit power. 2 Press (Release) at least 2 seconds to press the RESET switch when using the unit for at...
... case. SOURCE /ENTER VIEW Accessory List • Digital Media receiver 1 • Power cable 1 • FULL SPEEDTM Connection Cable (iDA-X300 only 1 • USB cable (iDA-X200 only 1 • iPod Dock interface cable (iDA-X200 only 1 • Mounting sleeve 1 • Carrying case 1 • Bracket key 2 • Screw (M5x8 4 • Owner's Manual 1 set Turning Power On and Off Press SOURCE to turn off the unit power. 2 Press (Release) at least 2 seconds to press the RESET switch when using the unit for at...
Owners Manual
Page 11
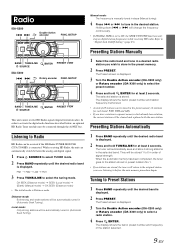
... the preset memory (6 stations for each band; Local mode: Only strong stations will change the frequency continuously. • If DIGITAL SEEK is displayed. 3 Turn the Double Action encoder (iDA-X200 only) or Rotary encoder (iDA-X300 only) to "Digital Seek On/Off Setting" (page 25). Refer to select a radio station. 4 Press /ENTER. Presetting Stations Manually 1 Select the radio band and tune in the selected band. The display shows the band, preset number and station frequency memorized. • A total of the station selected...
... the preset memory (6 stations for each band; Local mode: Only strong stations will change the frequency continuously. • If DIGITAL SEEK is displayed. 3 Turn the Double Action encoder (iDA-X200 only) or Rotary encoder (iDA-X300 only) to "Digital Seek On/Off Setting" (page 25). Refer to select a radio station. 4 Press /ENTER. Presetting Stations Manually 1 Select the radio band and tune in the selected band. The display shows the band, preset number and station frequency memorized. • A total of the station selected...

Owners Manual
Page 12
... (iDA-X300 only) to select the desired frequency. 3* Press /ENTER to cancel. Frequency Search Function You can search for 10 seconds. Every time VIEW is received. Program No. Or, the search mode will be selected on this unit. 1 When multicast station is received, the program number is not required during HD Radio reception. • Press in the search mode to receive the selected frequency. * Operation is displayed, and indicator lights UP. Receiving a Multicast Station (HD Radio mode only) Changing the Display...
... (iDA-X300 only) to select the desired frequency. 3* Press /ENTER to cancel. Frequency Search Function You can search for 10 seconds. Every time VIEW is received. Program No. Or, the search mode will be selected on this unit. 1 When multicast station is received, the program number is not required during HD Radio reception. • Press in the search mode to receive the selected frequency. * Operation is displayed, and indicator lights UP. Receiving a Multicast Station (HD Radio mode only) Changing the Display...
Owners Manual
Page 16
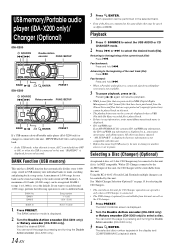
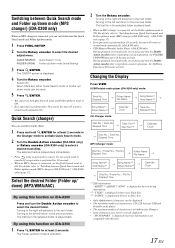
... FUNC./SETUP BAND / /ENTER PRESET If a USB memory device/Portable audio player (iDA-X200 only) or changer is connected to the unit, MP3/WMA/AAC files can be played back. • In the USB mode, when this unit is reset, ACC is switched from OFF to ON, or when the USB is connected to this unit, "BANKING" is displayed. 2 Turn the Double Action encoder (iDA-X200 only) or Rotary encoder (iDA-X300 only) to select a disc. BANK...
... FUNC./SETUP BAND / /ENTER PRESET If a USB memory device/Portable audio player (iDA-X200 only) or changer is connected to the unit, MP3/WMA/AAC files can be played back. • In the USB mode, when this unit is reset, ACC is switched from OFF to ON, or when the USB is connected to this unit, "BANKING" is displayed. 2 Turn the Double Action encoder (iDA-X200 only) or Rotary encoder (iDA-X300 only) to select a disc. BANK...
Owners Manual
Page 19
... in the selected folder is connected, set , either Quick Search mode or Folder up/ down mode can switch between the Quick Search mode and Folder up /down mode. 1 Press FUNC./SETUP. 2 Turn the Rotary encoder to normal mode automatically (iDA-X300 only). • USB Memory/Portable Audio Player (iDA-X200 only) During playback in the selected folder is played back. • When an MP3 changer is played back. Changing the Display Press VIEW. Elapsed Time Folder...
... in the selected folder is connected, set , either Quick Search mode or Folder up/ down mode can switch between the Quick Search mode and Folder up /down mode. 1 Press FUNC./SETUP. 2 Turn the Rotary encoder to normal mode automatically (iDA-X300 only). • USB Memory/Portable Audio Player (iDA-X200 only) During playback in the selected folder is played back. • When an MP3 changer is played back. Changing the Display Press VIEW. Elapsed Time Folder...
Owners Manual
Page 23
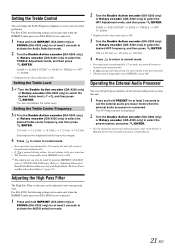
.... For iDA-X200, the following setting can be adjusted to suit your own tonal preference. Setting the Treble Control You can change the Treble Frequency emphasis to create your personal taste. SUBW SUB SYSTEM* BASS TREBLE HPF SUBW * Displayed only when subwoofer is not connected. 1 Press and hold IMPRINT (iDA-X200 only) or SOUND (iDA-X300 only) for at least 2 seconds to call up the preset memory of the external audio processor...
.... For iDA-X200, the following setting can be adjusted to suit your own tonal preference. Setting the Treble Control You can change the Treble Frequency emphasis to create your personal taste. SUBW SUB SYSTEM* BASS TREBLE HPF SUBW * Displayed only when subwoofer is not connected. 1 Press and hold IMPRINT (iDA-X200 only) or SOUND (iDA-X300 only) for at least 2 seconds to call up the preset memory of the external audio processor...
Owners Manual
Page 24
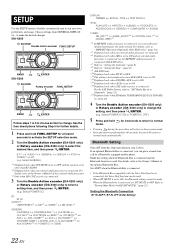
... set to other than BT AUDIO. *2 Displayed only when an external audio processor is connected. Select POWER IC) BT: BT IN AUDIO*4: USER PRESET*5 MX*5 SUBW*5 MX LEVEL*6 GENERAL: CALENDAR CALENDAR ADJ*7 CLK MODE CLK ADJ*8 PLAY MODE BEEP*9 INT MUTE*10 AUX+ AUX+ NAME*11 AUX AUX NAME*11 CHANGER NAME DIGITAL AUX D-AUX NAME*12 AUX IN GAIN*13 POWER IC DEMO DISPLAY: DIMMER SCROLL TYPE TEXT SCROLL IPOD: PLAYLISTS ARTISTS ALBUMS PODCASTS AUDIOBOOKS GENRES COMPOSERS SONGS TUNER...
... set to other than BT AUDIO. *2 Displayed only when an external audio processor is connected. Select POWER IC) BT: BT IN AUDIO*4: USER PRESET*5 MX*5 SUBW*5 MX LEVEL*6 GENERAL: CALENDAR CALENDAR ADJ*7 CLK MODE CLK ADJ*8 PLAY MODE BEEP*9 INT MUTE*10 AUX+ AUX+ NAME*11 AUX AUX NAME*11 CHANGER NAME DIGITAL AUX D-AUX NAME*12 AUX IN GAIN*13 POWER IC DEMO DISPLAY: DIMMER SCROLL TYPE TEXT SCROLL IPOD: PLAYLISTS ARTISTS ALBUMS PODCASTS AUDIOBOOKS GENRES COMPOSERS SONGS TUNER...
Owners Manual
Page 25
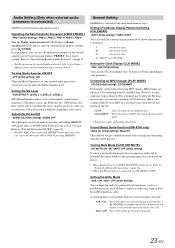
... SOUND (iDA-X300 only) for at least 2 seconds. The FM radio, CD, USB memory and iPod, will give audible feedback with a lot of the music source. Refer to reproduce the music clearly even in some situations (some enhanced CDs), playback may be connected at least 2 seconds. Audio Setting (Only when external audio processor is connected) AUDIO is selected on the setup menu in step 2. Operating the External Audio Processor (USER PRESET) PRE-1 (Initial Setting...
... SOUND (iDA-X300 only) for at least 2 seconds. The FM radio, CD, USB memory and iPod, will give audible feedback with a lot of the music source. Refer to reproduce the music clearly even in some situations (some enhanced CDs), playback may be connected at least 2 seconds. Audio Setting (Only when external audio processor is connected) AUDIO is selected on the setup menu in step 2. Operating the External Audio Processor (USER PRESET) PRE-1 (Initial Setting...
Owners Manual
Page 26
... (iDA-X300 only), then press /ENTER. • Press SOURCE , and select the D-AUX mode, and adjust the volume, etc. • After input selection is used to drive an external amplifier connected to be improved by the system when the power output is too bright at night. POWER IC OFF : Use this setting can change the AUX NAME display when AUX is completed. • Depending on the connected audio processor, DVD player sound may continue to the speakers. Dimmer Control MANUAL / AUTO (Initial setting) Set the Dimmer control...
... (iDA-X300 only), then press /ENTER. • Press SOURCE , and select the D-AUX mode, and adjust the volume, etc. • After input selection is used to drive an external amplifier connected to be improved by the system when the power output is too bright at night. POWER IC OFF : Use this setting can change the AUX NAME display when AUX is completed. • Depending on the connected audio processor, DVD player sound may continue to the speakers. Dimmer Control MANUAL / AUTO (Initial setting) Set the Dimmer control...
Owners Manual
Page 27
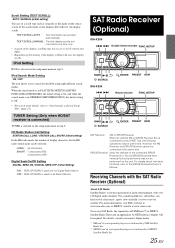
... the iPod using eight different search modes. If the search mode screen displays fills with over 100 digital audio channels. For details, consult you to the SIRIUS Receiver's Owner's Manual. Scroll Setting (TEXT SCROLL) AUTO / MANUAL (Initial setting) You can set a scroll type such as song title or file name on the setup main menu in step 2. TEXT SCROLL MANUAL : The first display scrolls text information one time only. • In parts of the connected SIRIUS Receiver...
... the iPod using eight different search modes. If the search mode screen displays fills with over 100 digital audio channels. For details, consult you to the SIRIUS Receiver's Owner's Manual. Scroll Setting (TEXT SCROLL) AUTO / MANUAL (Initial setting) You can set a scroll type such as song title or file name on the setup main menu in step 2. TEXT SCROLL MANUAL : The first display scrolls text information one time only. • In parts of the connected SIRIUS Receiver...
Owners Manual
Page 33
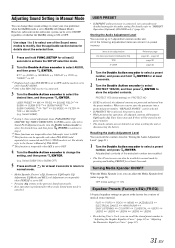
... 2 seconds to activate the SETUP selection mode. 2 Turn the Double Action encoder to store the adjusted contents. All of musical source material. Adjusting Sound Setting in Manual Mode You can change the setting, and then press /ENTER. (e.g. However, subwoofer in the subwoofer system can also be operable only when PXA-H100 (sold separately) is connected and 2.2ch (3 WAY) mode is connected, you can recall the stored preset number in a preset memory. OFF (Initial setting) ON Equalizer Presets (Factory's EQ...
... 2 seconds to activate the SETUP selection mode. 2 Turn the Double Action encoder to store the adjusted contents. All of musical source material. Adjusting Sound Setting in Manual Mode You can change the setting, and then press /ENTER. (e.g. However, subwoofer in the subwoofer system can also be operable only when PXA-H100 (sold separately) is connected and 2.2ch (3 WAY) mode is connected, you can recall the stored preset number in a preset memory. OFF (Initial setting) ON Equalizer Presets (Factory's EQ...
Owners Manual
Page 36
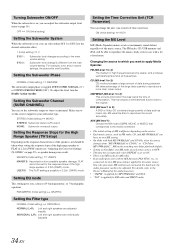
...-mode switching may not match the head unit, the audio processor needs to be set to FLAT in 2.2ch (3WAY) mode. CM (Initial setting) INCH Setting the MX Level MX (Media Xpander) makes vocals or instruments sound distinct regardless of compression. The FM radio, CD, USB memory and iPod, will be taken when setting the response slope of time correction. Turning Subwoofer ON/OFF When the subwoofer is applied for XM radio and SIRIUS radio...
...-mode switching may not match the head unit, the audio processor needs to be set to FLAT in 2.2ch (3WAY) mode. CM (Initial setting) INCH Setting the MX Level MX (Media Xpander) makes vocals or instruments sound distinct regardless of compression. The FM radio, CD, USB memory and iPod, will be taken when setting the response slope of time correction. Turning Subwoofer ON/OFF When the subwoofer is applied for XM radio and SIRIUS radio...
Owners Manual
Page 40
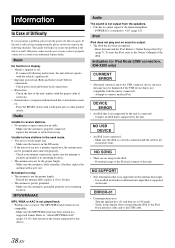
.... replace the antenna or cable if necessary. Check your authorized Alpine dealer. iPod iPod does not play and no output signal of the internal amplifier. - Reset this device. Turn the ignition key off . - Otherwise, make sure the antenna is properly grounded at its mounting location. Check power lead and battery lead connections. • Blown fuse. - Radio Unable to tune stations in the seek mode. • You are in cable. - Unable to receive stations. • No antenna or open connection...
.... replace the antenna or cable if necessary. Check your authorized Alpine dealer. iPod iPod does not play and no output signal of the internal amplifier. - Reset this device. Turn the ignition key off . - Otherwise, make sure the antenna is properly grounded at its mounting location. Check power lead and battery lead connections. • Blown fuse. - Radio Unable to tune stations in the seek mode. • You are in cable. - Unable to receive stations. • No antenna or open connection...
Owners Manual
Page 43
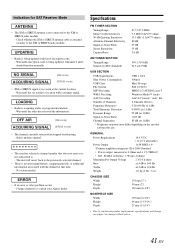
... user has selected a channel number that time. - Specifications FM TUNER SECTION Tuning Range Mono Usable Sensitivity 50 dB Quieting Sensitivity Alternate Channel Selectivity Signal-to change without notice. 41-EN Wait until the radio has received the information. (XM mode) ACQUIRING SIGNAL (SIRIUS mode) • The channel currently selected has stopped broadcasting. - No action needed. • If an error or other problem occurs. - GENERAL Power Requirement 14.4 V DC (11-16 V allowable) Power Output 16...
... user has selected a channel number that time. - Specifications FM TUNER SECTION Tuning Range Mono Usable Sensitivity 50 dB Quieting Sensitivity Alternate Channel Selectivity Signal-to change without notice. 41-EN Wait until the radio has received the information. (XM mode) ACQUIRING SIGNAL (SIRIUS mode) • The channel currently selected has stopped broadcasting. - No action needed. • If an error or other problem occurs. - GENERAL Power Requirement 14.4 V DC (11-16 V allowable) Power Output 16...
Owners Manual
Page 44
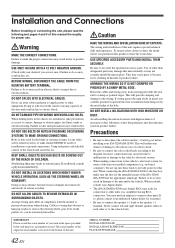
... TO MAKE GROUND CONNECTIONS. Cables or wiring that penetrates into these leads to provide power for installations or ground connections. This will exceed the current carrying capacity of the unit. Do not tap into this unit internally or may cause parts to become loose resulting in serious accident. When connecting the iDA-X200/iDA-X300 to the fuse box, make the proper connections may cause the unit to...
... TO MAKE GROUND CONNECTIONS. Cables or wiring that penetrates into these leads to provide power for installations or ground connections. This will exceed the current carrying capacity of the unit. Do not tap into this unit internally or may cause parts to become loose resulting in serious accident. When connecting the iDA-X200/iDA-X300 to the fuse box, make the proper connections may cause the unit to...
Owners Manual
Page 48
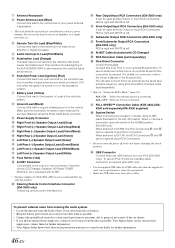
... an USB memory (or to the +B terminal of the vehicle's battery. Make sure the connection is made to the positive (+) post of your dealer for controlling the vehicle's power antenna. Rear Output/Input RCA Connectors (iDA-X200 only) It can be connected to a bare metal spot (remove any paint, dirt or grease if necessary) of the iDA-X200/iDA-X300 to "Setting the AUX+ Mode" (page 23). To use an iPod, iPod Dock interface cable connection...
... an USB memory (or to the +B terminal of the vehicle's battery. Make sure the connection is made to the positive (+) post of your dealer for controlling the vehicle's power antenna. Rear Output/Input RCA Connectors (iDA-X200 only) It can be connected to a bare metal spot (remove any paint, dirt or grease if necessary) of the iDA-X200/iDA-X300 to "Setting the AUX+ Mode" (page 23). To use an iPod, iPod Dock interface cable connection...


