Owners Manual
Page 26
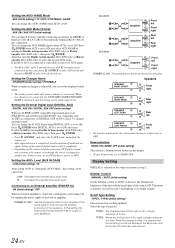
...AUTO to decrease the illumination brightness of the unit with the head lights of the title have been shown. 24...DIGITAL AUX) DIGITAL AUX ON / DIGITAL AUX OFF (Initial setting) When an ALPINE Ai-NET compatible digital audio processor (PXA-H701) and a DVD player (DVE-5207) not compatible with RCA output can be connected. After that, turn the ignition off and back on again. Demonstration DEMO ON / DEMO OFF (Initial setting) This unit... the external input audio level. iDA-X200 : Amplifier Amplifier Front left Front right Rear left Rear right iDA-X300 : Amplifier Front left ...
...AUTO to decrease the illumination brightness of the unit with the head lights of the title have been shown. 24...DIGITAL AUX) DIGITAL AUX ON / DIGITAL AUX OFF (Initial setting) When an ALPINE Ai-NET compatible digital audio processor (PXA-H701) and a DVD player (DVE-5207) not compatible with RCA output can be connected. After that, turn the ignition off and back on again. Demonstration DEMO ON / DEMO OFF (Initial setting) This unit... the external input audio level. iDA-X200 : Amplifier Amplifier Front left Front right Rear left Rear right iDA-X300 : Amplifier Front left ...
Owners Manual
Page 36
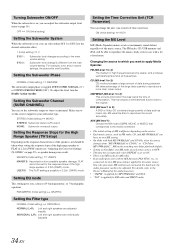
...2.2ch (3WAY) mode. Setting the Time Correction Unit (TCR Parameter) You can adjust the subwoofer output level (refer to page 19). The FM radio, CD, USB memory and iPod, will be ...the Subwoofer System When the subwoofer is applied to reproduce the sound accurately. Subwoofer level change the unit, (cm or inch) of road noise. PARAMETRIC (Initial setting) GRAPHIC Setting the Filter type ...radio. • If an audio processor with both MP3/WMA/AAC and CD-DA, when the source changes from "MP3/WMA/AAC to CD-DA" or "CD-DA to MP3/WMA/AAC", MX-mode switching may not match the head unit...
...2.2ch (3WAY) mode. Setting the Time Correction Unit (TCR Parameter) You can adjust the subwoofer output level (refer to page 19). The FM radio, CD, USB memory and iPod, will be ...the Subwoofer System When the subwoofer is applied to reproduce the sound accurately. Subwoofer level change the unit, (cm or inch) of road noise. PARAMETRIC (Initial setting) GRAPHIC Setting the Filter type ...radio. • If an audio processor with both MP3/WMA/AAC and CD-DA, when the source changes from "MP3/WMA/AAC to CD-DA" or "CD-DA to MP3/WMA/AAC", MX-mode switching may not match the head unit...

Owners Manual
Page 37
...to almost the same level. 1 Sit in the listening position (driver's seat, etc.) and measure the distance (in meters) between your head and the various speakers. 2 Calculate the difference between the sound reaching the listener's right versus the left ear. Example 1. About Time ...frequency characteristics. L = (distance to farthest speaker) - (distance to the farthest speaker and the other speakers. To correct this, this unit is corrected by the time delay between the distance correction value to other words, giving the front left and right speakers for the different speakers...
...to almost the same level. 1 Sit in the listening position (driver's seat, etc.) and measure the distance (in meters) between your head and the various speakers. 2 Calculate the difference between the sound reaching the listener's right versus the left ear. Example 1. About Time ...frequency characteristics. L = (distance to farthest speaker) - (distance to the farthest speaker and the other speakers. To correct this, this unit is corrected by the time delay between the distance correction value to other words, giving the front left and right speakers for the different speakers...

Owners Manual
Page 45
...press too hard and warp the metal plate that the unit is loose in the CONNECTlONS section. 3 Slide the iDA-X200/iDA-X300 into the unit, along the guides on page 43). 43-EN Secure the ground lead of the iDA-X200/iDA-X300 according to details described in the dashboard, the ... unlocked as you install this unit in place. • The main unit must be removed from the dashboard. Less than 35° 1 Mounting Sleeve (Included) Dashboard 2 Hex Nut (M5) Screw *2 Bolt Stud Metal Mounting Strap Ground Lead *1 Chassis This unit Reinforce the head unit with the metal mounting strap ...
...press too hard and warp the metal plate that the unit is loose in the CONNECTlONS section. 3 Slide the iDA-X200/iDA-X300 into the unit, along the guides on page 43). 43-EN Secure the ground lead of the iDA-X200/iDA-X300 according to details described in the dashboard, the ... unlocked as you install this unit in place. • The main unit must be removed from the dashboard. Less than 35° 1 Mounting Sleeve (Included) Dashboard 2 Hex Nut (M5) Screw *2 Bolt Stud Metal Mounting Strap Ground Lead *1 Chassis This unit Reinforce the head unit with the metal mounting strap ...


