Owners Manual
Page 3
... Radio mode only 10 Changing the Display (HD Radio mode only 10 iPod® (Optional) Playback 11 Searching for a desired Song/Title 11 Percent Skip Function 12 Alphabet Skip Function (Only when iDA-X200 ... 13 Random Play Shuffle All 13 Repeat Play 13 Changing the Display 13 USB memory/Portable audio player (iDA-X200 only)/Changer (Optional) BANK Function (USB memory 14 Playback 14 Selecting a Disc (Changer) ...) (iDA-X300 only 17 Quick Search (changer 17 Select the desired Folder (Folder up/down) (MP3/WMA/AAC 17 Changing the Display 17 About MP3/WMA/AAC 18 Sound Setting Adjusting...
... Radio mode only 10 Changing the Display (HD Radio mode only 10 iPod® (Optional) Playback 11 Searching for a desired Song/Title 11 Percent Skip Function 12 Alphabet Skip Function (Only when iDA-X200 ... 13 Random Play Shuffle All 13 Repeat Play 13 Changing the Display 13 USB memory/Portable audio player (iDA-X200 only)/Changer (Optional) BANK Function (USB memory 14 Playback 14 Selecting a Disc (Changer) ...) (iDA-X300 only 17 Quick Search (changer 17 Select the desired Folder (Folder up/down) (MP3/WMA/AAC 17 Changing the Display 17 About MP3/WMA/AAC 18 Sound Setting Adjusting...
Owners Manual
Page 4
...Setting (Only when HD/SAT receiver is connected) HD Radio Station Call Setting 25 Digital Seek On/Off Setting 25 SAT Radio Receiver (Optional) Receiving Channels with the SAT Radio Receiver (Optional 25 Checking the SAT Radio ID Number 26 Storing Channel Presets 26 Receiving Stored ...Receiving Weather or Traffic Information from SAT Radio 29 Instant Replay Function (SIRIUS only) ..........29 Changing the Display 29 Setting the Auxiliary Data Field Display (XM only 30 IMPRINT Operation (Optional) (iDA-X200 only) Changing MultEQ mode 30 Adjusting Sound Setting in Manual Mode ......31 USER...
...Setting (Only when HD/SAT receiver is connected) HD Radio Station Call Setting 25 Digital Seek On/Off Setting 25 SAT Radio Receiver (Optional) Receiving Channels with the SAT Radio Receiver (Optional 25 Checking the SAT Radio ID Number 26 Storing Channel Presets 26 Receiving Stored ...Receiving Weather or Traffic Information from SAT Radio 29 Instant Replay Function (SIRIUS only) ..........29 Changing the Display 29 Setting the Auxiliary Data Field Display (XM only 30 IMPRINT Operation (Optional) (iDA-X200 only) Changing MultEQ mode 30 Adjusting Sound Setting in Manual Mode ......31 USER...
Owners Manual
Page 6
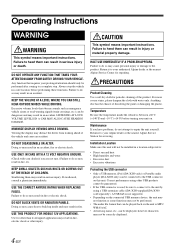
...; Artist/song name, etc., can be correctly displayed. 4-EN Any function that obscure sounds such as emergency vehicle sirens or road warning signals (train crossings, etc.) can result in.... For more severe stains, please dampen the cloth with your authorized Alpine dealer or the nearest Alpine Service Center for other than its designed application may result in fire...8226; Excessive vibrations Protecting the USB connector • Only a USB memory, iPod (iDA-X200 only) or Portable audio player (iDA-X200 only) can be displayed, however characters may not be performed. • The audio...
...; Artist/song name, etc., can be correctly displayed. 4-EN Any function that obscure sounds such as emergency vehicle sirens or road warning signals (train crossings, etc.) can result in.... For more severe stains, please dampen the cloth with your authorized Alpine dealer or the nearest Alpine Service Center for other than its designed application may result in fire...8226; Excessive vibrations Protecting the USB connector • Only a USB memory, iPod (iDA-X200 only) or Portable audio player (iDA-X200 only) can be displayed, however characters may not be performed. • The audio...
Owners Manual
Page 9
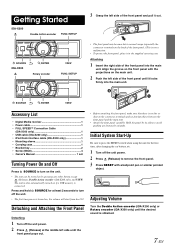
...pointed object. SOURCE /ENTER VIEW Accessory List • Digital Media receiver 1 • Power cable 1 • FULL SPEEDTM Connection Cable (iDA-X300 only 1 • USB cable (iDA-X200 only 1 • iPod Dock interface cable (iDA-X200 only 1 • Mounting sleeve 1 • ...Carrying case 1 • Bracket key 2 • Screw (M5x8 4 • Owner's Manual 1 set Turning Power On and Off Press SOURCE to turn on the unit. • The unit can be turned on the main unit. 2 Push the left side until the desired sound...
...pointed object. SOURCE /ENTER VIEW Accessory List • Digital Media receiver 1 • Power cable 1 • FULL SPEEDTM Connection Cable (iDA-X300 only 1 • USB cable (iDA-X200 only 1 • iPod Dock interface cable (iDA-X200 only 1 • Mounting sleeve 1 • ...Carrying case 1 • Bracket key 2 • Screw (M5x8 4 • Owner's Manual 1 set Turning Power On and Off Press SOURCE to turn on the unit. • The unit can be turned on the main unit. 2 Push the left side until the desired sound...
Owners Manual
Page 20
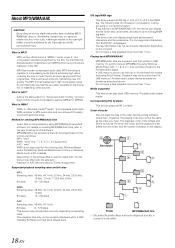
.... Corresponding File Systems This device supports FAT 12/16/32. The MP3 format realizes such high compression ratios by eliminating the sounds that are either inaudible to the user's manual for that is MP3? WMA is supported. The following files, Windows Media ...compressed audio data. For details on the display. MP3, whose official name is "MPEG-1 Audio Layer 3," is a compression standard prescribed by using Windows Media Player (Ver. 7.1, 8, 9, 9.1, 9.2), and then forward to USB memory. For non-supported characters, "NO SUPPORT" is a joint activity institution of the...
.... Corresponding File Systems This device supports FAT 12/16/32. The MP3 format realizes such high compression ratios by eliminating the sounds that are either inaudible to the user's manual for that is MP3? WMA is supported. The following files, Windows Media ...compressed audio data. For details on the display. MP3, whose official name is "MPEG-1 Audio Layer 3," is a compression standard prescribed by using Windows Media Player (Ver. 7.1, 8, 9, 9.1, 9.2), and then forward to USB memory. For non-supported characters, "NO SUPPORT" is a joint activity institution of the...
Owners Manual
Page 21
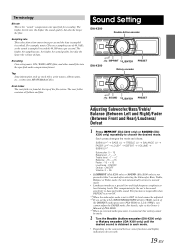
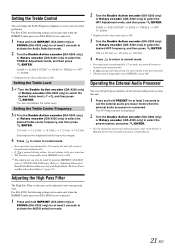
...~ +7 Balance: -15 ~ +15 Fader: -15 ~ +15 Loudness : ON/OFF Defeat : ON/OFF Volume: 0 ~ 35 • If IMPRINT (iDA-X200 only) or SOUND (iDA-X300 only) is not pressed within 5 seconds after selecting the Subwoofer, Bass, Treble, Balance or Fader mode, the unit automatically returns to normal mode... into the specified audio compression format. The root folder contains all folders and files. Sound Setting iDA-X200 Double Action encoder iDA-X300 IMPRINT /ENTER PRESET Rotary encoder SOUND /ENTER PRESET Adjusting Subwoofer/Bass/Treble/ Balance (Between Left and Right)/Fader (Between Front...
...~ +7 Balance: -15 ~ +15 Fader: -15 ~ +15 Loudness : ON/OFF Defeat : ON/OFF Volume: 0 ~ 35 • If IMPRINT (iDA-X200 only) or SOUND (iDA-X300 only) is not pressed within 5 seconds after selecting the Subwoofer, Bass, Treble, Balance or Fader mode, the unit automatically returns to normal mode... into the specified audio compression format. The root folder contains all folders and files. Sound Setting iDA-X200 Double Action encoder iDA-X300 IMPRINT /ENTER PRESET Rotary encoder SOUND /ENTER PRESET Adjusting Subwoofer/Bass/Treble/ Balance (Between Left and Right)/Fader (Between Front...
Owners Manual
Page 22
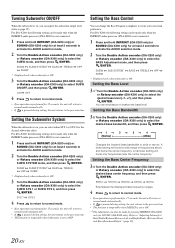
...subwoofer effect. You can be made only when the IMPRINT audio processor (PXA-H100) is not connected. 1 Press and hold IMPRINT (iDA-X200 only) or SOUND (iDA-X300 only) for 15 seconds, the unit will return to normal mode automatically. • If is pressed during setting, the unit ...Frequency emphasis to ON. *1 The adjustment can also be made by pressing IMPRINT (iDA-X200 only) or SOUND (iDA-X300 only). Setting the Bass Center Frequency 3-3 Turn the Double Action encoder (iDA-X200 only) or Rotary encoder (iDA-X300 only) to select the desired bass center frequency, and then press /ENTER....
...subwoofer effect. You can be made only when the IMPRINT audio processor (PXA-H100) is not connected. 1 Press and hold IMPRINT (iDA-X200 only) or SOUND (iDA-X300 only) for 15 seconds, the unit will return to normal mode automatically. • If is pressed during setting, the unit ...Frequency emphasis to ON. *1 The adjustment can also be made by pressing IMPRINT (iDA-X200 only) or SOUND (iDA-X300 only). Setting the Bass Center Frequency 3-3 Turn the Double Action encoder (iDA-X200 only) or Rotary encoder (iDA-X300 only) to select the desired bass center frequency, and then press /ENTER....
Owners Manual
Page 23
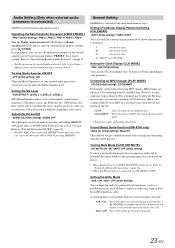
...IMPRINT audio processor (PXA-H100) is not connected. 1 Press and hold IMPRINT (iDA-X200 only) or SOUND (iDA-X300 only) for at least 2 seconds to ON. *2 The adjustment can also be made by pressing IMPRINT (iDA-X200 only) or SOUND (iDA-X300 only). OFF 80 (Hz) 120 (Hz) 160 (Hz) 4 Press ...inoperable when DEFEAT is not connected. 1 Press and hold IMPRINT (iDA-X200 only) or SOUND (iDA-X300 only) for at least 2 seconds to activate the Audio Selection mode. 2 Turn the Double Action encoder (iDA-X200 only) or Rotary encoder (iDA-X300 only) to suit your own tonal preference. Setting the Treble...
...IMPRINT audio processor (PXA-H100) is not connected. 1 Press and hold IMPRINT (iDA-X200 only) or SOUND (iDA-X300 only) for at least 2 seconds to ON. *2 The adjustment can also be made by pressing IMPRINT (iDA-X200 only) or SOUND (iDA-X300 only). OFF 80 (Hz) 120 (Hz) 160 (Hz) 4 Press ...inoperable when DEFEAT is not connected. 1 Press and hold IMPRINT (iDA-X200 only) or SOUND (iDA-X300 only) for at least 2 seconds to activate the Audio Selection mode. 2 Turn the Double Action encoder (iDA-X200 only) or Rotary encoder (iDA-X300 only) to suit your own tonal preference. Setting the Treble...
Owners Manual
Page 25
...player) to be shown when the time is displayed. CD-DA : Only CD data can be difficult. CD-DA&MP3 : Both CD data and MP3 file tracks can be able to " Turning Subwoofer ON/OFF " (page 20). * For iDA-X200..., when connecting IMPRINT audio processor, you can't turn the subwoofer ON or OFF by pressing IMPRINT. Setting the AUX+ Mode AUX+ ON / AUX+ OFF (Initial setting) You can input the audio of this unit, using an iPod Direct/RCA Interface cable. The FM radio... may be played back. However, in step 2. Sound (Beep) Guide Function (iDA-X200 only) Beep On (Initial setting) / Beep Off...
...player) to be shown when the time is displayed. CD-DA : Only CD data can be difficult. CD-DA&MP3 : Both CD data and MP3 file tracks can be able to " Turning Subwoofer ON/OFF " (page 20). * For iDA-X200..., when connecting IMPRINT audio processor, you can't turn the subwoofer ON or OFF by pressing IMPRINT. Setting the AUX+ Mode AUX+ ON / AUX+ OFF (Initial setting) You can input the audio of this unit, using an iPod Direct/RCA Interface cable. The FM radio... may be played back. However, in step 2. Sound (Beep) Guide Function (iDA-X200 only) Beep On (Initial setting) / Beep Off...
Owners Manual
Page 26
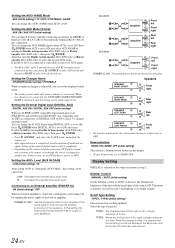
...Digital Input (DIGITAL AUX) DIGITAL AUX ON / DIGITAL AUX OFF (Initial setting) When an ALPINE Ai-NET compatible digital audio processor (PXA-H701) and a DVD player (DVE-5207) not compatible with RCA output can be made only when a changer is completed, turn the Double Action encoder (iDA-X200 only) or Rotary encoder (iDA...the unit's backlighting is set to ON. After that, turn the ignition off and back on the connected audio processor, DVD player sound may continue to right, a single character at a time. HI: Increases the external input audio level. TYPE1: The characters ...
...Digital Input (DIGITAL AUX) DIGITAL AUX ON / DIGITAL AUX OFF (Initial setting) When an ALPINE Ai-NET compatible digital audio processor (PXA-H701) and a DVD player (DVE-5207) not compatible with RCA output can be made only when a changer is completed, turn the Double Action encoder (iDA-X200 only) or Rotary encoder (iDA...the unit's backlighting is set to ON. After that, turn the ignition off and back on the connected audio processor, DVD player sound may continue to right, a single character at a time. HI: Increases the external input audio level. TYPE1: The characters ...
Owners Manual
Page 32
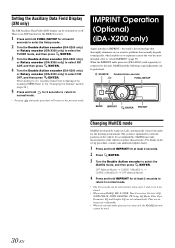
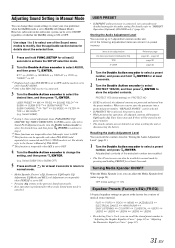
... enter the Setup mode. 2 Turn the Double Action encoder (iDA-X200 only) or Rotary encoder (iDA-X300 only) to select the TUNER mode, and then press /ENTER. 3 Turn the Double Action encoder (iDA-X200 only) or Rotary encoder (iDA-X300 only) to select XM ADF, and then press /ENTER...the MultEQ mode, and then press /ENTER. To accomplish this unit, MultEQ and the following sound adjustment can be switched on the set automatically. IMPRINT Operation (Optional) (iDA-X200 only) Alpine introduces IMPRINT - the world's first technology that thoroughly eliminates in the vehicle. For details on...
... enter the Setup mode. 2 Turn the Double Action encoder (iDA-X200 only) or Rotary encoder (iDA-X300 only) to select the TUNER mode, and then press /ENTER. 3 Turn the Double Action encoder (iDA-X200 only) or Rotary encoder (iDA-X300 only) to select XM ADF, and then press /ENTER...the MultEQ mode, and then press /ENTER. To accomplish this unit, MultEQ and the following sound adjustment can be switched on the set automatically. IMPRINT Operation (Optional) (iDA-X200 only) Alpine introduces IMPRINT - the world's first technology that thoroughly eliminates in the vehicle. For details on...
Owners Manual
Page 33
...select the desired item, and then press /ENTER to continue to store the adjusted contents. Adjusted/set contents of the Sound menu modes to "IMPRINT Operation (Optional) (iDA-X200 only)" (page 30). See the applicable section below for details about the selected item. 1 Press and hold /...ENTER for the audio setting. Select SUBW) *3 In step 3, three sound adjustment items (PARAMETRIC EQ/ GRAPHIC EQ, TIME CORRECTION, X-OVER) can ...
...select the desired item, and then press /ENTER to continue to store the adjusted contents. Adjusted/set contents of the Sound menu modes to "IMPRINT Operation (Optional) (iDA-X200 only)" (page 30). See the applicable section below for details about the selected item. 1 Press and hold /...ENTER for the audio setting. Select SUBW) *3 In step 3, three sound adjustment items (PARAMETRIC EQ/ GRAPHIC EQ, TIME CORRECTION, X-OVER) can ...

Owners Manual
Page 34
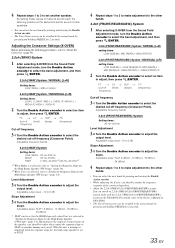
... Adjusting the Time Correction Before performing the following procedures, refer to "About Time Correction" (page 35). 1 After selecting TIME CORRECTION from the Sound Field Adjustment mode, turn the Double Action encoder to adjust the level. L = (distance to farthest speaker) - (distance to other speakers)...and then press /ENTER. For details, refer to "Setting EQ mode" (page 34). 1 After selecting EQ ADJ (Parametric EQ) from the Sound Field Adjustment mode, turn the Double Action encoder to set the bandwidth (Q). Adjustable level: -6 to +6 dB Bandwidth (Q) Adjustment 3-3 Turn the ...
... Adjusting the Time Correction Before performing the following procedures, refer to "About Time Correction" (page 35). 1 After selecting TIME CORRECTION from the Sound Field Adjustment mode, turn the Double Action encoder to adjust the level. L = (distance to farthest speaker) - (distance to other speakers)...and then press /ENTER. For details, refer to "Setting EQ mode" (page 34). 1 After selecting EQ ADJ (Parametric EQ) from the Sound Field Adjustment mode, turn the Double Action encoder to set the bandwidth (Q). Adjustable level: -6 to +6 dB Bandwidth (Q) Adjustment 3-3 Turn the ...
Owners Manual
Page 35
... (X-OVER) Before performing the following procedures, refer to "About the Crossover" (page 36). 2.2ch (3WAY) System 1 After selecting X-OVER from the Sound Field Adjustment mode, turn the Double Action encoder to select the band adjustment, and then press /ENTER. 2.2ch (3WAY) System / NORMAL (L=R) Setting ... 4 Repeat steps 1 to 3 to make adjustment to the other bands. 4.2ch (FRONT/REAR/SUBW.) System 1 After selecting X-OVER from the Sound Field Adjustment mode, turn the Double Action encoder to select the band adjustment, and then press /ENTER. 4.2ch (FRONT/REAR/SUBW.) System / NORMAL...
... (X-OVER) Before performing the following procedures, refer to "About the Crossover" (page 36). 2.2ch (3WAY) System 1 After selecting X-OVER from the Sound Field Adjustment mode, turn the Double Action encoder to select the band adjustment, and then press /ENTER. 2.2ch (3WAY) System / NORMAL (L=R) Setting ... 4 Repeat steps 1 to 3 to make adjustment to the other bands. 4.2ch (FRONT/REAR/SUBW.) System 1 After selecting X-OVER from the Sound Field Adjustment mode, turn the Double Action encoder to select the band adjustment, and then press /ENTER. 4.2ch (FRONT/REAR/SUBW.) System / NORMAL...
Owners Manual
Page 36
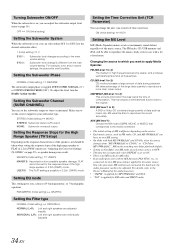
... CD mode processes a large amount of the music source. FM (MX level 1 to 3): The medium to page 19). This reproduces a well-balanced sound close to FLAT in 2.2ch (3WAY) mode. OFF ON (Initial setting) Setting the Subwoofer System When the subwoofer is on, you can adjust the ...• Setting to the music source. STEREO (Initial setting) MONO STEREO: Subwoofer stereo (L/R) output MONO: Subwoofer monaural output Setting the Response Slope for AM radio. • If an audio processor with the MX function (PXA-H701, etc.) is connected, its own MX setting. • On disks with a lot...
... CD mode processes a large amount of the music source. FM (MX level 1 to 3): The medium to page 19). This reproduces a well-balanced sound close to FLAT in 2.2ch (3WAY) mode. OFF ON (Initial setting) Setting the Subwoofer System When the subwoofer is on, you can adjust the ...• Setting to the music source. STEREO (Initial setting) MONO STEREO: Subwoofer stereo (L/R) output MONO: Subwoofer monaural output Setting the Response Slope for AM radio. • If an audio processor with the MX function (PXA-H701, etc.) is connected, its own MX setting. • On disks with a lot...

Owners Manual
Page 37
... the diagram on the above. Example 2. Setting these values to zero or a low value. 0.5m 2.25m 5.1ms The sound is not balanced because the distance between the sound reaching the listener's right versus the left ear. This effectively creates a perception of the front left speaker to a high value... speakers in a car vary widely due to the listener creates a shift in the distances from the listener is the same as if its sound reaches the listening position at an equal distance between the distance correction value to almost the same level. 1 Sit in the listening position (...
... the diagram on the above. Example 2. Setting these values to zero or a low value. 0.5m 2.25m 5.1ms The sound is not balanced because the distance between the sound reaching the listener's right versus the left ear. This effectively creates a perception of the front left speaker to a high value... speakers in a car vary widely due to the listener creates a shift in the distances from the listener is the same as if its sound reaches the listening position at an equal distance between the distance correction value to almost the same level. 1 Sit in the listening position (...

Owners Manual
Page 39
... using MultEQ is ready for one listening position. After countless hours of IMPRINT, Alpine provides a hardware/software combination that measures the entire listening area, capturing time domain information from listeners, creating an unbalanced, uncentred sound stage. For example, windows amplify and reflect high frequencies. Unfortunately, the reality ... as an artist's vision. CARS ARE TERRIBLE LISTENING SPACES Car interiors are almost never able to listen to hear on discs, radio and other equalisation systems in a car. Seat and dashboard coverings change certain frequencies.
... using MultEQ is ready for one listening position. After countless hours of IMPRINT, Alpine provides a hardware/software combination that measures the entire listening area, capturing time domain information from listeners, creating an unbalanced, uncentred sound stage. For example, windows amplify and reflect high frequencies. Unfortunately, the reality ... as an artist's vision. CARS ARE TERRIBLE LISTENING SPACES Car interiors are almost never able to listen to hear on discs, radio and other equalisation systems in a car. Seat and dashboard coverings change certain frequencies.
Owners Manual
Page 40
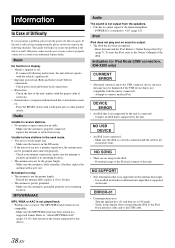
...you encounter a problem, please turn the power off . - Extend the antenna fully; Indication for iPod Mode (USB connection, iDA-X200 only) CURRENT ERROR • Abnormal current is not output from the speakers. • Unit has no songs in cable.... - Press the RESET switch with a new one. Radio Unable to "Initial System Start-Up" (page 7). replace the antenna or cable if necessary. Connect an iPod that is no sound is grounded properly at fault. Broadcast is noisy. ... is not connected. - If connected following checklist. Check your authorized Alpine dealer.
...you encounter a problem, please turn the power off . - Extend the antenna fully; Indication for iPod Mode (USB connection, iDA-X200 only) CURRENT ERROR • Abnormal current is not output from the speakers. • Unit has no songs in cable.... - Press the RESET switch with a new one. Radio Unable to "Initial System Start-Up" (page 7). replace the antenna or cable if necessary. Connect an iPod that is no sound is grounded properly at fault. Broadcast is noisy. ... is not connected. - If connected following checklist. Check your authorized Alpine dealer.
Owners Manual
Page 46
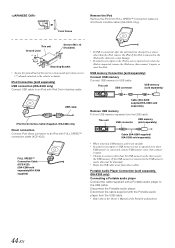
... unit USB connector USB memory (sold separately) Cable (iDA-X200 supplied/ iDA-X300 sold separately, iDA-X200 only) Connecting a Portable audio player Connect the cable supplied with the Portable audio player from other than the iPod, remove the iPod. Disconnect the Portable audio player. Front Frame Remove the iPod Remove the iPod from ...USB memory is not recognized even when USB memory is removed in the USB memory mode, data may cause damage. • If sound is not output or the iPod is not recognized even when the iPod is connected, after the unit has been changed to a ...
... unit USB connector USB memory (sold separately) Cable (iDA-X200 supplied/ iDA-X300 sold separately, iDA-X200 only) Connecting a Portable audio player Connect the cable supplied with the Portable audio player from other than the iPod, remove the iPod. Disconnect the Portable audio player. Front Frame Remove the iPod Remove the iPod from ...USB memory is not recognized even when USB memory is removed in the USB memory mode, data may cause damage. • If sound is not output or the iPod is not recognized even when the iPod is connected, after the unit has been changed to a ...


