Owners Manual
Page 2
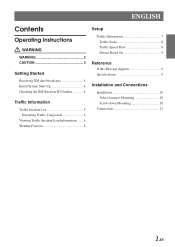
ENGLISH Contents Operating Instructions WARNING WARNING 2 CAUTION 3 Getting Started Receiving XM data broadcasts 4 Initial System Start-Up 4 Checking the XM Receiver ID Number 4 Traffic Information Traffic Incident List 5 Detouring Traffic Congestion 6 Viewing Traffic Incident Icon Information ....... 6 Weather Forecast 6 Setup Traffic Information 7 Traffic Icons 8 Traffic Speed Flow 8 Detour Based On 9 Reference If this Message Appears 9 Specifications 9 Installation and Connections Installation 10 Velcro fastener Mounting 10 Screw-down Mounting 10 Connections 11 1-EN
ENGLISH Contents Operating Instructions WARNING WARNING 2 CAUTION 3 Getting Started Receiving XM data broadcasts 4 Initial System Start-Up 4 Checking the XM Receiver ID Number 4 Traffic Information Traffic Incident List 5 Detouring Traffic Congestion 6 Viewing Traffic Incident Icon Information ....... 6 Weather Forecast 6 Setup Traffic Information 7 Traffic Icons 8 Traffic Speed Flow 8 Detour Based On 9 Reference If this Message Appears 9 Specifications 9 Installation and Connections Installation 10 Velcro fastener Mounting 10 Screw-down Mounting 10 Connections 11 1-EN
Owners Manual
Page 3
... driver from looking ahead of safe driving. 2-EN If swallowed, consult a physician immediately. Failure to a complete stop the vehicle in serious injury or death. Viewing the display may result in fire. DO NOT USE BOLTS OR NUTS IN THE BRAKE OR STEERING SYSTEMS TO MAKE GROUND CONNECTIONS. DO NOT INSTALL IN LOCATIONS WHICH MIGHT HINDER VEHICLE OPERATION...
... driver from looking ahead of safe driving. 2-EN If swallowed, consult a physician immediately. Failure to a complete stop the vehicle in serious injury or death. Viewing the display may result in fire. DO NOT USE BOLTS OR NUTS IN THE BRAKE OR STEERING SYSTEMS TO MAKE GROUND CONNECTIONS. DO NOT INSTALL IN LOCATIONS WHICH MIGHT HINDER VEHICLE OPERATION...
Owners Manual
Page 4
... OR PINCHED BY A SHARP METAL EDGE. Use of the hole. USE SPECIFIED ACCESSORY PARTS AND INSTALL THEM SECURELY. HALT USE IMMEDIATELY IF A PROBLEM APPEARS. This may cause personal injury or damage to become loose resulting in metal, use only the specified accessory parts. Avoid installing the unit in injury or material property damage. Route the cables and wiring away from being cut by the...
... OR PINCHED BY A SHARP METAL EDGE. Use of the hole. USE SPECIFIED ACCESSORY PARTS AND INSTALL THEM SECURELY. HALT USE IMMEDIATELY IF A PROBLEM APPEARS. This may cause personal injury or damage to become loose resulting in metal, use only the specified accessory parts. Avoid installing the unit in injury or material property damage. Route the cables and wiring away from being cut by the...
Owners Manual
Page 5
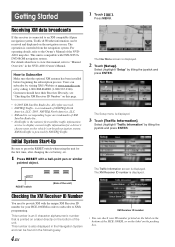
... satellite traffic information service to press the RESET switch when using the unit for the first time, after changing the car battery, etc. 1 Press RESET with a ball-point pen or similar pointed object. Users can check your HCE-100XM in the NVD-A801 Owner's Manual. is displayed. 2 Touch [Setup]. The Nav Menu screen is a trademark of XM Satellite Radio Inc. • NavTraffic is also displayed in the following way. 4-EN XM Receiver ID number • You...
... satellite traffic information service to press the RESET switch when using the unit for the first time, after changing the car battery, etc. 1 Press RESET with a ball-point pen or similar pointed object. Users can check your HCE-100XM in the NVD-A801 Owner's Manual. is displayed. 2 Touch [Setup]. The Nav Menu screen is a trademark of XM Satellite Radio Inc. • NavTraffic is also displayed in the following way. 4-EN XM Receiver ID number • You...

Owners Manual
Page 6
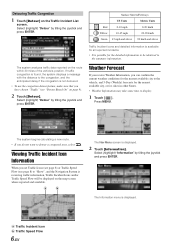
... tilting the joystick and press ENTER. The Information menu is displayed. 2 Touch [Information]. Remote Control Operation: Press TRAFFIC INFO. 5-EN Press MENU. c Legend Tells you can display the Traffic Incident List in order to confirm traffic information enroute to a destination or on roads in the following ways. Select (highlight) "Traffic Incident List" by tilting the joystick and press ENTER. b a cd a Traffic Incident...
... tilting the joystick and press ENTER. The Information menu is displayed. 2 Touch [Information]. Remote Control Operation: Press TRAFFIC INFO. 5-EN Press MENU. c Legend Tells you can display the Traffic Incident List in order to confirm traffic information enroute to a destination or on roads in the following ways. Select (highlight) "Traffic Incident List" by tilting the joystick and press ENTER. b a cd a Traffic Incident...
Owners Manual
Page 7
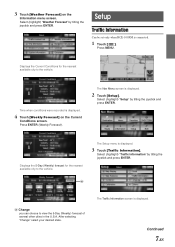
... and press ENTER. The system analyzes traffic data reported on the Traffic Incident List screen. Weather Forecast If you receive Weather Information, you do not want to display. 1 Touch [ ]. Detouring Traffic Congestion 1 Touch [Detour] on the route within 30 miles of the vehicle's position. Red Yellow Green Surface Streets/Freeways US Units Metric Units 0-10 mph 0-20 km/h 10-45 mph...
... and press ENTER. The system analyzes traffic data reported on the Traffic Incident List screen. Weather Forecast If you receive Weather Information, you do not want to display. 1 Touch [ ]. Detouring Traffic Congestion 1 Touch [Detour] on the route within 30 miles of the vehicle's position. Red Yellow Green Surface Streets/Freeways US Units Metric Units 0-10 mph 0-20 km/h 10-45 mph...
Owners Manual
Page 8
... nearest available city to the vehicle. a a Change you can choose to view the 5-Day (Weekly) forecast of several other cities in the U.S.A. Setup Traffic Information Can be set only when HCE-100XM is displayed. 2 Touch [Setup]. Select (highlight) "Weather Forecast" by tilting the joystick and press ENTER. Press MENU. Press ENTER (Weekly Forecast). The Nav Menu screen is connected. 1 Touch [ ]. The Setup menu is displayed. 3 Touch [Traffic...
... nearest available city to the vehicle. a a Change you can choose to view the 5-Day (Weekly) forecast of several other cities in the U.S.A. Setup Traffic Information Can be set only when HCE-100XM is displayed. 2 Touch [Setup]. Select (highlight) "Weather Forecast" by tilting the joystick and press ENTER. Press MENU. Press ENTER (Weekly Forecast). The Nav Menu screen is connected. 1 Touch [ ]. The Setup menu is displayed. 3 Touch [Traffic...
Owners Manual
Page 9
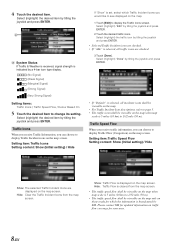
... Signal) (Weak Signal) (Marginal Signal) (Strong Signal) (Very Strong Signal) Setting items: Traffic Icons / Traffic Speed Flow / Detour Based On 5 Touch the desired Item to 1/32 mile (50 m). Traffic Speed Flow When you receive traffic information, you would like to see displayed on the map. 1 Touch [Edit] to display Traffic Incident icons on the map screen. a a System Status If Traffic & Weather is received, signal...
... Signal) (Weak Signal) (Marginal Signal) (Strong Signal) (Very Strong Signal) Setting items: Traffic Icons / Traffic Speed Flow / Detour Based On 5 Touch the desired Item to 1/32 mile (50 m). Traffic Speed Flow When you receive traffic information, you would like to see displayed on the map. 1 Touch [Edit] to display Traffic Incident icons on the map screen. a a System Status If Traffic & Weather is received, signal...
Owners Manual
Page 10
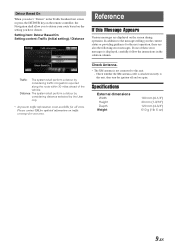
... traffic information is displayed, carefully follow the instructions in the Traffic Incident List screen or press the DETOUR key on the remote controller, the Navigation shall allow you to the messages telling you the current status or providing guidance for updated information on the setting you have chosen. Setting item: Detour Based On Setting content: Traffic (Initial setting) / Distance Reference If this unit, then turn the...
... traffic information is displayed, carefully follow the instructions in the Traffic Incident List screen or press the DETOUR key on the remote controller, the Navigation shall allow you to the messages telling you the current status or providing guidance for updated information on the setting you have chosen. Setting item: Detour Based On Setting content: Traffic (Initial setting) / Distance Reference If this unit, then turn the...
Owners Manual
Page 11
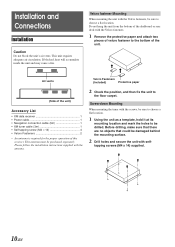
... antenna. 2 Check the position, and then fix the unit to the bottom of this receiver. Please follow the installation instructions supplied with the Velcro fasteners. 1 Remove the protective paper and attach two pieces of velcro fastener to the floor carpet. Air vents Velcro Fasteners (Included) Protective paper (Side of the unit) Accessory List • XM data receiver 1 • Power cable 1 • Navigation connection cable (5m 1 • XM...
... antenna. 2 Check the position, and then fix the unit to the bottom of this receiver. Please follow the installation instructions supplied with the Velcro fasteners. 1 Remove the protective paper and attach two pieces of velcro fastener to the floor carpet. Air vents Velcro Fasteners (Included) Protective paper (Side of the unit) Accessory List • XM data receiver 1 • Power cable 1 • Navigation connection cable (5m 1 • XM...
Owners Manual
Page 12
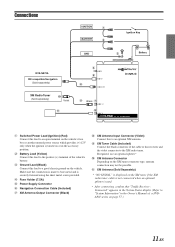
... securely fastened using the sheet metal screw provided. 4 Fuse Holder (7.5A) 5 Power Supply Connector 6 Navigation Connection Cable (Included) 7 XM Antenna Output Connector (Black) 8 XM Antenna Input Connector (Violet) Connect this to an optional XM antenna. 9 XM Tuner Cable (Included) Connect the black connector of the vehicle's battery. 3 Ground Lead (Black) Connect this receiver and the violet connector to a good chassis ground on the vehicle. Connections IGNITION 1 BATTERY 2 Ignition Key GND 3 Battery NVE-N872A XM compatible Navigation (Sold separately) XM Radio Tuner (Sold...
... securely fastened using the sheet metal screw provided. 4 Fuse Holder (7.5A) 5 Power Supply Connector 6 Navigation Connection Cable (Included) 7 XM Antenna Output Connector (Black) 8 XM Antenna Input Connector (Violet) Connect this to an optional XM antenna. 9 XM Tuner Cable (Included) Connect the black connector of the vehicle's battery. 3 Ground Lead (Black) Connect this receiver and the violet connector to a good chassis ground on the vehicle. Connections IGNITION 1 BATTERY 2 Ignition Key GND 3 Battery NVE-N872A XM compatible Navigation (Sold separately) XM Radio Tuner (Sold...


