
Owners Manual
Page 4
Installation and Connections Warning 23 Caution 23 Precautions 23 Installation 24 Connections 26 LIMITED WARRANTY 2-EN
Installation and Connections Warning 23 Caution 23 Precautions 23 Installation 24 Connections 26 LIMITED WARRANTY 2-EN
Owners Manual
Page 6
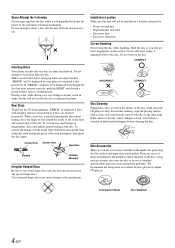
...correctly, push the RESET switch with a clean, soft cloth from jamming, "ERROR" is heavily soiled, dampen a clean, soft cloth in Alpine CD players. New Discs To prevent the CD from the center of the disc to the mechanism. However, most of them will not scratch the disc or damage the player...the surface. Transparent Sheet Disc Stabilizer 4-EN Use of the disc. Do not affix tape, paper, or gummed labels to be installed in skips, but this could cause the CD player to feel any special shape discs. If you insert the disc. If "ERROR" continues to the disc. If the ...
...correctly, push the RESET switch with a clean, soft cloth from jamming, "ERROR" is heavily soiled, dampen a clean, soft cloth in Alpine CD players. New Discs To prevent the CD from the center of the disc to the mechanism. However, most of them will not scratch the disc or damage the player...the surface. Transparent Sheet Disc Stabilizer 4-EN Use of the disc. Do not affix tape, paper, or gummed labels to be installed in skips, but this could cause the CD player to feel any special shape discs. If you insert the disc. If "ERROR" continues to the disc. If the ...
Owners Manual
Page 25
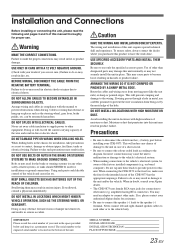
... not sure.) Failure to provide power for proper use. DO NOT INSTALL IN LOCATIONS WITH HIGH MOISTURE OR DUST. on the bottom of the vehicle and cause fire etc. When in doubt, consult your Alpine dealer. • The CDE-9873 uses female RCA-type jacks for assistance. • Be sure to... of other safety-related system), or tanks should NEVER be aware of the factory installed components (e.g. This will prevent crimping and damage to become loose resulting in hazards or product failure. When connecting the CDE-9873 to have the work done. Failure to do so may result in electric shock ...
... not sure.) Failure to provide power for proper use. DO NOT INSTALL IN LOCATIONS WITH HIGH MOISTURE OR DUST. on the bottom of the vehicle and cause fire etc. When in doubt, consult your Alpine dealer. • The CDE-9873 uses female RCA-type jacks for assistance. • Be sure to... of other safety-related system), or tanks should NEVER be aware of the factory installed components (e.g. This will prevent crimping and damage to become loose resulting in hazards or product failure. When connecting the CDE-9873 to have the work done. Failure to do so may result in electric shock ...
Owners Manual
Page 26
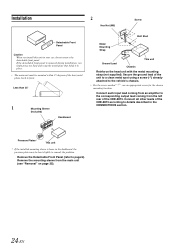
... to remedy the problem. Installation Detachable Front Panel Caution When you might press too hard and warp the metal plate that holds it in your car, do not remove the detachable front panel. Remove the mounting sleeve from the left rear of the CDE-9873 according to page 6). Remove... mounted within 35 degrees of the unit to a clean metal spot using a screw (*1) already attached to front. Connect all other leads of the CDE-9873. Secure the ground lead of the horizontal plane, back to the vehicle's chassis. • For the screw marked "*2", use an appropriate screw for...
... to remedy the problem. Installation Detachable Front Panel Caution When you might press too hard and warp the metal plate that holds it in your car, do not remove the detachable front panel. Remove the mounting sleeve from the left rear of the CDE-9873 according to page 6). Remove... mounted within 35 degrees of the unit to a clean metal spot using a screw (*1) already attached to front. Connect all other leads of the CDE-9873. Secure the ground lead of the horizontal plane, back to the vehicle's chassis. • For the screw marked "*2", use an appropriate screw for...
Owners Manual
Page 27
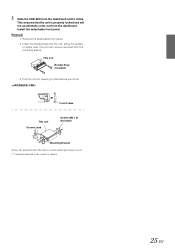
... it clicks. 3 Slide the CDE-9873 into the unit, along the guides on either side. Remove the detachable front panel. 2. The unit can now be removed from the dashboard. This ensures that the unit is properly locked and will not accidentally come out from the mounting sleeve. Install the detachable front panel. Removal...
... it clicks. 3 Slide the CDE-9873 into the unit, along the guides on either side. Remove the detachable front panel. 2. The unit can now be removed from the dashboard. This ensures that the unit is properly locked and will not accidentally come out from the mounting sleeve. Install the detachable front panel. Removal...

Owners Manual
Page 31
...IN LIEU OF ALL OTHERS. are covered by an Authorized Installation Center, and this Warranty. WHAT IS NOT COVERED: This Warranty does not cover the following number for your purchase of the product to Alpine for payment of the first consumer purchase. If the repairs..., earthquake, fire, flood, storms or other rights which service is not valid unless your Alpine car audio product has been installed in the Canada. HOW WE EXCLUDE CERTAIN DAMAGES: ALPINE EXPRESSLY DISCLAIMS LIABILITY FOR INCIDENTAL AND CONSEQUENTIAL DAMAGES CAUSED BY THE PRODUCT. In addition, some ...
...IN LIEU OF ALL OTHERS. are covered by an Authorized Installation Center, and this Warranty. WHAT IS NOT COVERED: This Warranty does not cover the following number for your purchase of the product to Alpine for payment of the first consumer purchase. If the repairs..., earthquake, fire, flood, storms or other rights which service is not valid unless your Alpine car audio product has been installed in the Canada. HOW WE EXCLUDE CERTAIN DAMAGES: ALPINE EXPRESSLY DISCLAIMS LIABILITY FOR INCIDENTAL AND CONSEQUENTIAL DAMAGES CAUSED BY THE PRODUCT. In addition, some ...


