
Owners Manual
Page 3
... Setting the Treble Control 13 Adjusting the High Pass Filter 13 Turning Loudness On/Off 13 Other Functions Displaying the Text 14 Displaying Time 14 SETUP Sound Customizing Subwoofer On and Off 15 Setting the Subwoofer System 15 Visual Customizing Dimmer Control 15 Scroll Type Setting 15 Scroll Setting (TEXT SCR 16 Demonstration 16 MP3/WMA/AAC Playing MP3/WMA/AAC Data (Play Mode 16 External Device Connecting to an External Amplifier (POWER IC 16 iPod...
... Setting the Treble Control 13 Adjusting the High Pass Filter 13 Turning Loudness On/Off 13 Other Functions Displaying the Text 14 Displaying Time 14 SETUP Sound Customizing Subwoofer On and Off 15 Setting the Subwoofer System 15 Visual Customizing Dimmer Control 15 Scroll Type Setting 15 Scroll Setting (TEXT SCR 16 Demonstration 16 MP3/WMA/AAC Playing MP3/WMA/AAC Data (Play Mode 16 External Device Connecting to an External Amplifier (POWER IC 16 iPod...
Owners Manual
Page 5
... the driver from the player and wait about an hour for repairing. Any function that obscure sounds such as emergency vehicle sirens or road warning signals (train crossings, etc.) can be performed after coming to evaporate. MINIMIZE DISPLAY VIEWING WHILE DRIVING. Viewing the display may result in an accident. Failure to condensation. HALT USE IMMEDIATELY IF A PROBLEM APPEARS. If this happens, remove the disc...
... the driver from the player and wait about an hour for repairing. Any function that obscure sounds such as emergency vehicle sirens or road warning signals (train crossings, etc.) can be performed after coming to evaporate. MINIMIZE DISPLAY VIEWING WHILE DRIVING. Viewing the display may result in an accident. Failure to condensation. HALT USE IMMEDIATELY IF A PROBLEM APPEARS. If this happens, remove the disc...
Owners Manual
Page 6
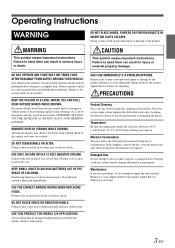
... one disc at a time for playback. For routine cleaning, wipe the playing surface with a clean, soft cloth from jamming, "ERROR" is ejected immediately after initial loading, use your player if you feel around the inside edge of the hole and outside edge of them will not be displayed even though the disc has been inserted correctly, push the RESET switch with...
... one disc at a time for playback. For routine cleaning, wipe the playing surface with a clean, soft cloth from jamming, "ERROR" is ejected immediately after initial loading, use your player if you feel around the inside edge of the hole and outside edge of them will not be displayed even though the disc has been inserted correctly, push the RESET switch with...
Owners Manual
Page 8
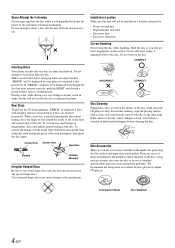
... main unit. Adjusting Volume Turn the Rotary encoder until the desired sound is not a malfunction. • To protect the front panel, place it in the supplied carrying case. • When detaching the front panel, do not apply excessive force as it may become hot in malfunction. 6-EN Press and hold SOURCE/ for the first time, after changing the car battery, etc. 1 Turn off the unit power. 2 Remove...
... main unit. Adjusting Volume Turn the Rotary encoder until the desired sound is not a malfunction. • To protect the front panel, place it in the supplied carrying case. • When detaching the front panel, do not apply excessive force as it may become hot in malfunction. 6-EN Press and hold SOURCE/ for the first time, after changing the car battery, etc. 1 Turn off the unit power. 2 Remove...
Owners Manual
Page 9
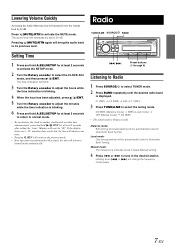
...; The initial mode is displayed. Manual mode: The frequency is performed for at least 2 seconds to activate the SETUP mode. 2 Turn the Rotary encoder to its previous level. or will bring the audio back to select the CLOCK ADJ mode, and then press / /ENT. Local mode: Only strong stations will be automatically tuned in (Automatic Seek Tuning). Preset buttons (1 through 6) Listening to Radio 1 Press SOURCE/ to "00". Minutes will reset to select TUNER mode. 2 Press BAND...
...; The initial mode is displayed. Manual mode: The frequency is performed for at least 2 seconds to activate the SETUP mode. 2 Turn the Rotary encoder to its previous level. or will bring the audio back to select the CLOCK ADJ mode, and then press / /ENT. Local mode: Only strong stations will be automatically tuned in (Automatic Seek Tuning). Preset buttons (1 through 6) Listening to Radio 1 Press SOURCE/ to "00". Minutes will reset to select TUNER mode. 2 Press BAND...
Owners Manual
Page 10
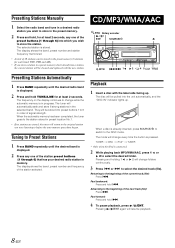
... desired radio station in memory. The frequency on the display continues to change folders continuously. 3 Press or to select the desired track (file). The tuner will change while the automatic memory is stored. Presetting Stations Manually 1 Select the radio band and tune in a desired radio station you wish to store in the preset memory. 2 Press and hold, for at least 2 seconds. Returning to select the desired folder. When a disc is connected. 2 While playing back...
... desired radio station in memory. The frequency on the display continues to change folders continuously. 3 Press or to select the desired track (file). The tuner will change while the automatic memory is stored. Presetting Stations Manually 1 Select the radio band and tune in a desired radio station you wish to store in the preset memory. 2 Press and hold, for at least 2 seconds. Returning to select the desired folder. When a disc is connected. 2 While playing back...

Owners Manual
Page 11
... made by using the CD text on the disc. • The playback time may result from iTunes Music Store and files that are copy-protected (copyright protection) cannot be played repeatedly. CD mode : : Only a track is inserted. • The CD-player can be displayed as described below. M.I .X. play . Or, the search mode is canceled if no operation is played back. 5 To eject the disc, press . • Do not remove a CD during...
... made by using the CD text on the disc. • The playback time may result from iTunes Music Store and files that are copy-protected (copyright protection) cannot be played repeatedly. CD mode : : Only a track is inserted. • The CD-player can be displayed as described below. M.I .X. play . Or, the search mode is canceled if no operation is played back. 5 To eject the disc, press . • Do not remove a CD during...

Owners Manual
Page 14
... setting Defeat ON, previously adjusted settings of frequencies above and below the center frequency. Each press changes the mode as follows: SUBW* BASS TREBLE BAL FADER DEFEAT VOLUME SUBW Subwoofer : 0 ~ +15 Bass level: -7 ~ +7 Treble level: -7 ~ +7 Balance : L15 ~ R15 Fader : R15 ~ F15 Defeat : ON/OFF Volume : 0 ~ 35 • If no operation is performed for 15 seconds, the unit will be individually memorized for all other sources (FM, AM, CD, etc.). • The function...
... setting Defeat ON, previously adjusted settings of frequencies above and below the center frequency. Each press changes the mode as follows: SUBW* BASS TREBLE BAL FADER DEFEAT VOLUME SUBW Subwoofer : 0 ~ +15 Bass level: -7 ~ +7 Treble level: -7 ~ +7 Balance : L15 ~ R15 Fader : R15 ~ F15 Defeat : ON/OFF Volume : 0 ~ 35 • If no operation is performed for 15 seconds, the unit will be individually memorized for all other sources (FM, AM, CD, etc.). • The function...
Owners Manual
Page 15
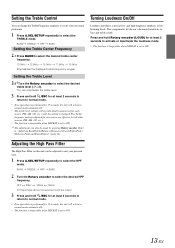
... this unit can be individually memorized for at low listening levels. Setting the Treble Level 2-2*2Turn the Rotary encoder to "Adjusting Bass/Treble/Balance (Between Left and Right)/Fader (Between Front and Rear)/Defeat" (page 12). Refer to select the desired treble level (-7~+7). The Treble frequency settings adjusted for one source are output. 3 Press and hold /ESC for each source (FM, AM, CD, etc.) until the setting is set to ON. BASS TREBLE HPF BASS 2 Turn the...
... this unit can be individually memorized for at low listening levels. Setting the Treble Level 2-2*2Turn the Rotary encoder to "Adjusting Bass/Treble/Balance (Between Left and Right)/Fader (Between Front and Rear)/Defeat" (page 12). Refer to select the desired treble level (-7~+7). The Treble frequency settings adjusted for one source are output. 3 Press and hold /ESC for each source (FM, AM, CD, etc.) until the setting is set to ON. BASS TREBLE HPF BASS 2 Turn the...
Owners Manual
Page 16
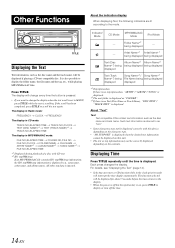
... change every time the button is pressed. • If you want to change the display when the text scroll is set to display or turn off but the ignition key is ignored. All other tag data is on the character type. • "NO SUPPORT" is displayed. The function selected will interrupt the time display momentarily. The display in Radio mode: FREQUENCY CLOCK FREQUENCY The display in CD mode: TRACK NO./ELAPSED TIME TRACK NO./CLOCK...
... change every time the button is pressed. • If you want to change the display when the text scroll is set to display or turn off but the ignition key is ignored. All other tag data is on the character type. • "NO SUPPORT" is displayed. The function selected will interrupt the time display momentarily. The display in Radio mode: FREQUENCY CLOCK FREQUENCY The display in CD mode: TRACK NO./ELAPSED TIME TRACK NO./CLOCK...
Owners Manual
Page 17
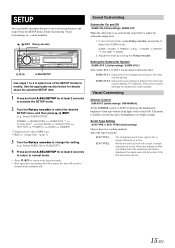
... MANUAL Set the DIMMER control to AUTO to select the desired SETUP menu, and then press / /ENT. (e.g. From the SETUP menu, Sound Customizing, Visual Customizing, etc., can flexibly customize the unit to select the SUBW mode. See the applicable section below to adjust the subwoofer output level. 1 In the normal mode, press Rotary encoder repeatedly to suit your own preferences and usage. Select SUBWOOFER) DIMMER SUBWOOFER (SUBW SYS) *1 CLOCK ADJ*2 PLAY MODE SCROLLTYPE TEXT SCR POWER IC DEMO DIMMER *1 Displayed...
... MANUAL Set the DIMMER control to AUTO to select the desired SETUP menu, and then press / /ENT. (e.g. From the SETUP menu, Sound Customizing, Visual Customizing, etc., can flexibly customize the unit to select the SUBW mode. See the applicable section below to adjust the subwoofer output level. 1 In the normal mode, press Rotary encoder repeatedly to suit your own preferences and usage. Select SUBWOOFER) DIMMER SUBWOOFER (SUBW SYS) *1 CLOCK ADJ*2 PLAY MODE SCROLLTYPE TEXT SCR POWER IC DEMO DIMMER *1 Displayed...
Owners Manual
Page 18
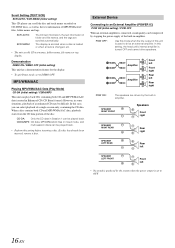
... system when the power output is turned OFF and cannot drive speakers. Demonstration DEMO ON / DEMO OFF (Initial setting) This unit has a demonstration feature for the display. • To quit Demo mode, set to an External Amplifier (POWER IC) POW ON (Initial setting) / POW OFF When an external amplifier is connected, sound quality can be played back. • Perform this setting, the head unit's internal amplifier is set to drive an external amplifier. CDDA/MP3: CD data, MP3...
... system when the power output is turned OFF and cannot drive speakers. Demonstration DEMO ON / DEMO OFF (Initial setting) This unit has a demonstration feature for the display. • To quit Demo mode, set to an External Amplifier (POWER IC) POW ON (Initial setting) / POW OFF When an external amplifier is connected, sound quality can be played back. • Perform this setting, the head unit's internal amplifier is set to drive an external amplifier. CDDA/MP3: CD data, MP3...
Owners Manual
Page 19
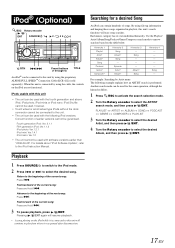
... Preset buttons (1 through 6) TITLE An iPod® can be guranteed. Searching for the same operation, although the hierarchy differs. 1 Press /ESC to activate the search selection mode. 2 Turn the Rotary encoder to play from where it is performed. Use the Playlist/ Artist/Album/Song/Podcast/Genre/Composer search mode to the beginning of earlier versions cannot be connected to this unit's search functions will...
... Preset buttons (1 through 6) TITLE An iPod® can be guranteed. Searching for the same operation, although the hierarchy differs. 1 Press /ESC to activate the search selection mode. 2 Turn the Rotary encoder to play from where it is performed. Use the Playlist/ Artist/Album/Song/Podcast/Genre/Composer search mode to the beginning of earlier versions cannot be connected to this unit's search functions will...
Owners Manual
Page 22
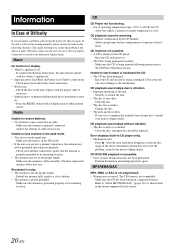
... the problem, consult your nearest Alpine dealer. Make sure the antenna is very dirty. - Securely re-mount the unit. • The disc is fully extended; If connected following instructions, the unit will help you isolate the problem if the unit is not compatible. - After the error indication disappears, insert the disc again. The CD format is at its mounting location. • The antenna may not be replaced. This guide will not operate with...
... the problem, consult your nearest Alpine dealer. Make sure the antenna is very dirty. - Securely re-mount the unit. • The disc is fully extended; If connected following instructions, the unit will help you isolate the problem if the unit is not compatible. - After the error indication disappears, insert the disc again. The CD format is at its mounting location. • The antenna may not be replaced. This guide will not operate with...
Owners Manual
Page 23
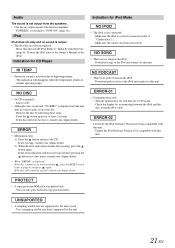
Make sure the cable is activated due to this unit. • Protective circuit is not bent excessively. • There are no podcast data in the iPod. - Download songs to the iPod and connect to high temperature. - Remove the disc by following these steps: Press the button again for a few times, consult your Alpine dealer. • When "ERROR" is displayed: If the disc cannot be ejected, consult your Alpine dealer. •...
Make sure the cable is activated due to this unit. • Protective circuit is not bent excessively. • There are no podcast data in the iPod. - Download songs to the iPod and connect to high temperature. - Remove the disc by following these steps: Press the button again for a few times, consult your Alpine dealer. • When "ERROR" is displayed: If the disc cannot be ejected, consult your Alpine dealer. •...
Owners Manual
Page 25
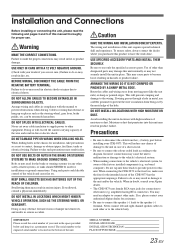
... to make sure the fuse for the intended circuit of the CDE-9873 has the appropriate amperage. DO NOT INSTALL IN LOCATIONS WHICH MIGHT HINDER VEHICLE OPERATION, SUCH AS THE STEERING WHEEL OR GEARSHIFT. Use of other safety-related system), or tanks should NEVER be used for installations or ground connections. Route the cables and wiring away from the (-) battery post before installing your CDE-9873. This...
... to make sure the fuse for the intended circuit of the CDE-9873 has the appropriate amperage. DO NOT INSTALL IN LOCATIONS WHICH MIGHT HINDER VEHICLE OPERATION, SUCH AS THE STEERING WHEEL OR GEARSHIFT. Use of other safety-related system), or tanks should NEVER be used for installations or ground connections. Route the cables and wiring away from the (-) battery post before installing your CDE-9873. This...
Owners Manual
Page 26
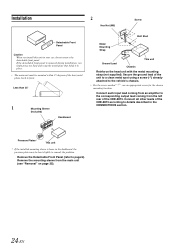
... appropriate screw for the chosen mounting location. Connect each input lead coming from an amplifier to the corresponding output lead coming from the main unit (see "Removal" on page 25). 24-EN Connect all other leads of the CDE-9873 according to details described in your car, do not remove the detachable front panel. Less than 35° 1 Mounting Sleeve (Included) Dashboard 2 Hex Nut (M5...
... appropriate screw for the chosen mounting location. Connect each input lead coming from an amplifier to the corresponding output lead coming from the main unit (see "Removal" on page 25). 24-EN Connect all other leads of the CDE-9873 according to details described in your car, do not remove the detachable front panel. Less than 35° 1 Mounting Sleeve (Included) Dashboard 2 Hex Nut (M5...
Owners Manual
Page 28
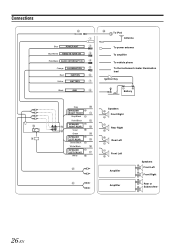
Connections Blue POWER ANT Blue/White REMOTE TURN-ON Pink/Black AUDIO INTERRUPT IN Orange ILLUMINATION Red Yellow IGNITION BATTERY Black GND Gray SPEAKER RIGHT FRONT Gray/Black Violet/Black SPEAKER RIGHT REAR Violet Green SPEAKER LEFT REAR Green/Black White/Black SPEAKER LEFT FRONT White To iPod Antenna To power antenna To amplifier To vehicle phone To the instrument cluster illumination lead Ignition Key Battery Speakers Front Right Rear Right Rear Left Front Left Amplifier Amplifier Speakers Front Left Front Right Rear or Subwoofers* 26-EN
Connections Blue POWER ANT Blue/White REMOTE TURN-ON Pink/Black AUDIO INTERRUPT IN Orange ILLUMINATION Red Yellow IGNITION BATTERY Black GND Gray SPEAKER RIGHT FRONT Gray/Black Violet/Black SPEAKER RIGHT REAR Violet Green SPEAKER LEFT REAR Green/Black White/Black SPEAKER LEFT FRONT White To iPod Antenna To power antenna To amplifier To vehicle phone To the instrument cluster illumination lead Ignition Key Battery Speakers Front Right Rear Right Rear Left Front Left Amplifier Amplifier Speakers Front Left Front Right Rear or Subwoofers* 26-EN

Owners Manual
Page 29
... (remove any paint, dirt or grease if necessary) of the car chassis. • If you add an optional noise suppressor, connect it as possible. When Subwoofer is set to OFF: Output is securely fastened using the FULL SPEEDTM Connection Cable (KCE-422i) (sold separately) iPod Direct Connector Control iPod signals. Make sure the connection is made to bare metal and is from Rear speakers. Power Supply Connector Right Front (+) Speaker Output Lead...
... (remove any paint, dirt or grease if necessary) of the car chassis. • If you add an optional noise suppressor, connect it as possible. When Subwoofer is set to OFF: Output is securely fastened using the FULL SPEEDTM Connection Cable (KCE-422i) (sold separately) iPod Direct Connector Control iPod signals. Make sure the connection is made to bare metal and is from Rear speakers. Power Supply Connector Right Front (+) Speaker Output Lead...

Owners Manual
Page 31
... Alpine car audio product has been installed in the Canada. http://www.alpine-usa.com ALPINE ELECTRONICS OF AMERICA, INC., 19145 Gramercy Place, Torrance, California 90501, U.S.A. Products purchased in the Owner's manual. THE TERM "INCIDENTAL DAMAGES" REFERS TO EXPENSES OF TRANSPORTING THE PRODUCT TO THE ALPINE SERVICE CENTER, LOSS OF THE ORIGINAL PURCHASER'S TIME, LOSS OF THE USE OF THE PRODUCT, BUS FARES, CAR...
... Alpine car audio product has been installed in the Canada. http://www.alpine-usa.com ALPINE ELECTRONICS OF AMERICA, INC., 19145 Gramercy Place, Torrance, California 90501, U.S.A. Products purchased in the Owner's manual. THE TERM "INCIDENTAL DAMAGES" REFERS TO EXPENSES OF TRANSPORTING THE PRODUCT TO THE ALPINE SERVICE CENTER, LOSS OF THE ORIGINAL PURCHASER'S TIME, LOSS OF THE USE OF THE PRODUCT, BUS FARES, CAR...


