

Owners Manual
Page 3
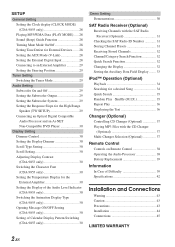
... GlideTouch™ Bar Operation 6 Getting Started Turning Power On and Off 7 Initial System Start-Up 7 Setting the Time and Calendar (CDA-9855 only 7 Setting Time (CDA-9853 only 7 Opening and Closing the Movable Display ...... 8 Display Tilt Adjustment 8 Adjusting Volume 8 Lowering Volume Quickly 8 Detaching and Attaching the Front Panel ......... 8 Radio Changing the Radio Frequencies for each...
... GlideTouch™ Bar Operation 6 Getting Started Turning Power On and Off 7 Initial System Start-Up 7 Setting the Time and Calendar (CDA-9855 only 7 Setting Time (CDA-9853 only 7 Opening and Closing the Movable Display ...... 8 Display Tilt Adjustment 8 Adjusting Volume 8 Lowering Volume Quickly 8 Detaching and Attaching the Front Panel ......... 8 Radio Changing the Radio Frequencies for each...
Owners Manual
Page 4
... 30 Adjusting Display Contrast (CDA-9853 only 30 Switching the Character Font (CDA-9855 only 30 Setting the Temperature Display for the External Amplifier 30 Setting the Display of the Audio Level Indicator (CDA-9853 only 30 Switching the Animation Display Type (CDA-9855 only 30 Opening Message ON/OFF Setting (CDA-9855 only 30 Setting of Calendar Display Pattern Switching (CDA-9855 only 30...
... 30 Adjusting Display Contrast (CDA-9853 only 30 Switching the Character Font (CDA-9855 only 30 Setting the Temperature Display for the External Amplifier 30 Setting the Display of the Audio Level Indicator (CDA-9853 only 30 Switching the Animation Display Type (CDA-9855 only 30 Opening Message ON/OFF Setting (CDA-9855 only 30 Setting of Calendar Display Pattern Switching (CDA-9855 only 30...

Owners Manual
Page 5
... SUCH AS BATTERIES OUT OF THE REACH OF CHILDREN. Swallowing them can result in an accident. Failure to your authorized Alpine dealer or the nearest Alpine Service Center for repairing. HALT USE IMMEDIATELY IF A PROBLEM APPEARS. INSERT WITH THE CORRECT BATTERY POLARITY. Always stop .... complete stop the vehicle in fire. DO NOT OPERATE ANY FUNCTION THAT TAKES YOUR ATTENTION AWAY FROM SAFELY DRIVING YOUR VEHICLE. MINIMIZE DISPLAY VIEWING WHILE DRIVING. Doing so may result in fire, etc. Playing a bad disc could severely damage the playback mechanism. Any function...
... SUCH AS BATTERIES OUT OF THE REACH OF CHILDREN. Swallowing them can result in an accident. Failure to your authorized Alpine dealer or the nearest Alpine Service Center for repairing. HALT USE IMMEDIATELY IF A PROBLEM APPEARS. INSERT WITH THE CORRECT BATTERY POLARITY. Always stop .... complete stop the vehicle in fire. DO NOT OPERATE ANY FUNCTION THAT TAKES YOUR ATTENTION AWAY FROM SAFELY DRIVING YOUR VEHICLE. MINIMIZE DISPLAY VIEWING WHILE DRIVING. Doing so may result in fire, etc. Playing a bad disc could severely damage the playback mechanism. Any function...

Owners Manual
Page 8
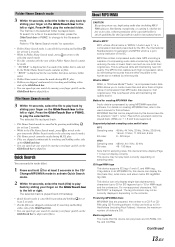
... items on the following page, scroll the page as you move your finger on the left or right. Items or lists in the guide display. When scrolling the page toward the right, place and hold your finger across the GlideTouch bar. GlideTouch bar Place your finger on the GlideTouch... bar and slide it gently to which a function has been assigned in the display will change as follows: • Place and hold your finger on the GlideTouch bar. For example, to select ON, press the GlideTouch bar directly...
... items on the following page, scroll the page as you move your finger on the left or right. Items or lists in the guide display. When scrolling the page toward the right, place and hold your finger across the GlideTouch bar. GlideTouch bar Place your finger on the GlideTouch... bar and slide it gently to which a function has been assigned in the display will change as follows: • Place and hold your finger on the GlideTouch bar. For example, to select ON, press the GlideTouch bar directly...

Owners Manual
Page 9
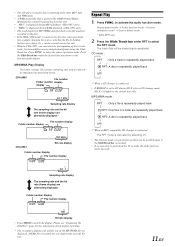
...; By pressing the GlideTouch bar under RETURN in the MENU mode, the unit will return to the left or right. Setting the Time and Calendar (CDA-9855 only) 1 Press MENU. 2 Select SETUP by sliding your finger on , the volume will start from level 12. The GENERAL SETUP menu is performed for the... to press the RESET switch when using the unit for 60 seconds, the unit will return to the normal mode. • If no peration is displayed. 4 Select CLOCK ADJUST by sliding your finger on the GlideTouch bar to the left or right. 6 Adjust "Hour" by turning the Rotary encoder. 7 Adjust "...
...; By pressing the GlideTouch bar under RETURN in the MENU mode, the unit will return to the left or right. Setting the Time and Calendar (CDA-9855 only) 1 Press MENU. 2 Select SETUP by sliding your finger on , the volume will start from level 12. The GENERAL SETUP menu is performed for the... to press the RESET switch when using the unit for 60 seconds, the unit will return to the normal mode. • If no peration is displayed. 4 Select CLOCK ADJUST by sliding your finger on the GlideTouch bar to the left or right. 6 Adjust "Hour" by turning the Rotary encoder. 7 Adjust "...

Owners Manual
Page 10
... or injury. Do not touch. Pressing MUTE again will get very warm under normal operating conditions. The back of the unit. • The display may be adjusted to 3 different angles depending upon user preference. 1 Press MENU. 2 Select TILT (TILT ADJUST) by sliding your finger on ...screen. Turn the Rotary encoder until the front panel pops out. 3 Grasp the left side until the desired sound is not a malfunction. Display Tilt Adjustment The movable display may become hot in normal usage (especially the connector terminals on . • If MENU is open . Do not touch. 2 1 &#...
... or injury. Do not touch. Pressing MUTE again will get very warm under normal operating conditions. The back of the unit. • The display may be adjusted to 3 different angles depending upon user preference. 1 Press MENU. 2 Select TILT (TILT ADJUST) by sliding your finger on ...screen. Turn the Rotary encoder until the front panel pops out. 3 Grasp the left side until the desired sound is not a malfunction. Display Tilt Adjustment The movable display may become hot in normal usage (especially the connector terminals on . • If MENU is open . Do not touch. 2 1 &#...
Owners Manual
Page 11
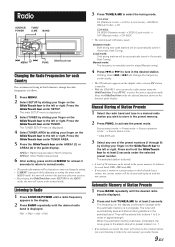
...the automatic memory has been completed, the tuner goes to the station stored in the guide display. The main SETUP menu is stored. • A total of 18 stations can tune the radio station using the GlideTouch bar. CDA-9855: DX (Distance mode) → LOCAL (Local mode) → MANUAL (Manual mode...bar for each band; The tuner will be automatically tuned in the function guide display. Press the GlideTouch bar under SETUP. FM1, FM2 and AM). • If you wish to 6 in . • With the CDA-9855, you change the frequency continuously. • The ST indicator appears on the ...
...the automatic memory has been completed, the tuner goes to the station stored in the guide display. The main SETUP menu is stored. • A total of 18 stations can tune the radio station using the GlideTouch bar. CDA-9855: DX (Distance mode) → LOCAL (Local mode) → MANUAL (Manual mode...bar for each band; The tuner will be automatically tuned in the function guide display. Press the GlideTouch bar under SETUP. FM1, FM2 and AM). • If you wish to 6 in . • With the CDA-9855, you change the frequency continuously. • The ST indicator appears on the ...

Owners Manual
Page 12
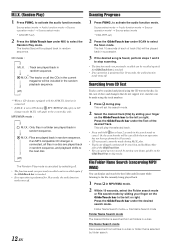
...Pressing -/J again will open. 2 Insert a disc with the movable display open. 10-EN Source select mode → Preset mode → Source operation mode* → Source select mode CD / MP3 / WMA SOURCE/POWER TITLE -/J 8 * CDA-9855 only 3 Select any one disc at least 2 seconds in Radio mode...your finger quickly on the GlideTouch bar to activate the preset mode. Returning to the beginning of the next track (file) : Press f. The movable display will resume playback. 6 To eject the disc, press c. • Do not remove a CD during its frequency. 1 Press and hold c ...
...Pressing -/J again will open. 2 Insert a disc with the movable display open. 10-EN Source select mode → Preset mode → Source operation mode* → Source select mode CD / MP3 / WMA SOURCE/POWER TITLE -/J 8 * CDA-9855 only 3 Select any one disc at least 2 seconds in Radio mode...your finger quickly on the GlideTouch bar to activate the preset mode. Returning to the beginning of the next track (file) : Press f. The movable display will resume playback. 6 To eject the disc, press c. • Do not remove a CD during its frequency. 1 Press and hold c ...
Owners Manual
Page 13
... select mode → Audio function mode → Source operation mode* → Source select mode * CDA-9855 only 2 Press the Glide Touch bar under the desired function shown in the function guide display. Press FUNC. Press the GlideTouch bar under RPT to the beginning of the current track, fast forward/fast... Title/Text" (page 22) for MP3/WMA data playback is set to switch the display. The track (file) will be played back on this unit. • With the CDA-9855, you previously recalled can return to select the RPT mode. MP3/WMA mode : RPT : Only a file is repeatedly played back &#...
... select mode → Audio function mode → Source operation mode* → Source select mode * CDA-9855 only 2 Press the Glide Touch bar under the desired function shown in the function guide display. Press FUNC. Press the GlideTouch bar under RPT to the beginning of the current track, fast forward/fast... Title/Text" (page 22) for MP3/WMA data playback is set to switch the display. The track (file) will be played back on this unit. • With the CDA-9855, you previously recalled can return to select the RPT mode. MP3/WMA mode : RPT : Only a file is repeatedly played back &#...
Owners Manual
Page 14
Source select mode → Audio function mode → Source operation mode* → Source select mode * CDA-9855 only 2 Press the GlideTouch bar under the desired search mode. function is selected by sliding your finger on the GlideTouch bar to ON during ... Searching from CD Text Tracks can display and search for 10 seconds, the audio function mode turns off ) The Random Play mode is performed for at least 2 seconds in a disc. Source select mode → Audio function mode → Source operation mode* → Source select mode * CDA-9855 only 2 Press the GlideTouch bar ...
Source select mode → Audio function mode → Source operation mode* → Source select mode * CDA-9855 only 2 Press the GlideTouch bar under the desired search mode. function is selected by sliding your finger on the GlideTouch bar to ON during ... Searching from CD Text Tracks can display and search for 10 seconds, the audio function mode turns off ) The Random Play mode is performed for at least 2 seconds in a disc. Source select mode → Audio function mode → Source operation mode* → Source select mode * CDA-9855 only 2 Press the GlideTouch bar ...
Owners Manual
Page 15
...(including MP3/ WMA data) or distributing, transferring, or copying it, whether for free or for sampling rates, this device's frame display (Page 11) may not display correctly. MP3, whose official name is "MPEG-1 Audio Layer 3," is a compression standard prescribed by the ISO, the International Standardization... Organization and MPEG which is 255. half original size). Files with no files. • "ROOT" is displayed for a file in Folder Name Search mode, press to return to the selecting search mode. • If a disc contains only the root...
...(including MP3/ WMA data) or distributing, transferring, or copying it, whether for free or for sampling rates, this device's frame display (Page 11) may not display correctly. MP3, whose official name is "MPEG-1 Audio Layer 3," is a compression standard prescribed by the ISO, the International Standardization... Organization and MPEG which is 255. half original size). Files with no files. • "ROOT" is displayed for a file in Folder Name Search mode, press to return to the selecting search mode. • If a disc contains only the root...

Owners Manual
Page 16
... names, etc., are some restrictions to ISO9660. However, the folder and file playback order differs from the folder no . and file no . indicated on the display. 1 Root Folder 2 2 3 4 3 4 6 1 5 5 6 7 Terminology Bit rate This is the "sound" compression rate specified for folder/file names are ...the sampling rate, the higher the sound quality, but also the larger the files. Under the ISO9660 standard, there are not displayed correctly. Encoding Converting music CDs, WAVE (AIFF) files, and other standards that the writing software writes them. Sampling rate This ...
... names, etc., are some restrictions to ISO9660. However, the folder and file playback order differs from the folder no . and file no . indicated on the display. 1 Root Folder 2 2 3 4 3 4 6 1 5 5 6 7 Terminology Bit rate This is the "sound" compression rate specified for folder/file names are ...the sampling rate, the higher the sound quality, but also the larger the files. Under the ISO9660 standard, there are not displayed correctly. Encoding Converting music CDs, WAVE (AIFF) files, and other standards that the writing software writes them. Sampling rate This ...
Owners Manual
Page 17
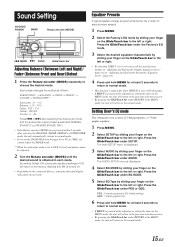
... Presets 9 typical equalizer settings are preset at the factory for at least 2 seconds to return to normal mode. • If MENU is displayed. 3 Select AUDIO by sliding your finger on the GlideTouch bar to the normal mode. 15-EN Press the GlideTouch bar under AUDIO. The... bar under the Factory's EQ mode. 3 Select the desired equalizer characteristic by sliding your finger on the connected devices, some functions and display indications do not work. GlideTouch bar Adjusting Balance (Between Left and Right)/ Fader (Between Front and Rear)/Defeat 1 Press the Rotary encoder...
... Presets 9 typical equalizer settings are preset at the factory for at least 2 seconds to return to normal mode. • If MENU is displayed. 3 Select AUDIO by sliding your finger on the GlideTouch bar to the normal mode. 15-EN Press the GlideTouch bar under AUDIO. The... bar under the Factory's EQ mode. 3 Select the desired equalizer characteristic by sliding your finger on the connected devices, some functions and display indications do not work. GlideTouch bar Adjusting Balance (Between Left and Right)/ Fader (Between Front and Rear)/Defeat 1 Press the Rotary encoder...
Owners Manual
Page 19
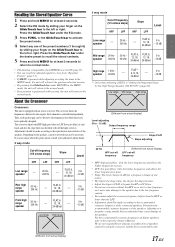
...Adjusting to the left or right. Depending on the GlideTouch bar to a frequency range outside the recommended value. (Different from actual display) 17-EN Adjustments should be driven by sliding your finger on the speakers, a passive network may cause damage to the speakers. ... frequencies to the respective Owner's Manual. Determine the recommended crossover frequency of Alpine speakers, refer to pass. • Slope: The level change of one of speakers caused by sliding your authorized Alpine dealer. 2 way mode Cut-off the highs or lows). Press the ...
...Adjusting to the left or right. Depending on the GlideTouch bar to a frequency range outside the recommended value. (Different from actual display) 17-EN Adjustments should be driven by sliding your finger on the speakers, a passive network may cause damage to the speakers. ... frequencies to the respective Owner's Manual. Determine the recommended crossover frequency of Alpine speakers, refer to pass. • Slope: The level change of one of speakers caused by sliding your authorized Alpine dealer. 2 way mode Cut-off the highs or lows). Press the ...

Owners Manual
Page 20
... the Response Slope for the HIGH slope only when USER'S is performed in 1/3 octave steps) 5 Press SOURCE/POWER to adjust the slope. With the CDA-9855, a message is displayed when the response slope for the high range speaker is set for the High Range Speaker (TW SETUP)" (page 29). LOW → MID-L →...
... the Response Slope for the HIGH slope only when USER'S is performed in 1/3 octave steps) 5 Press SOURCE/POWER to adjust the slope. With the CDA-9855, a message is displayed when the response slope for the high range speaker is set for the High Range Speaker (TW SETUP)" (page 29). LOW → MID-L →...

Owners Manual
Page 22
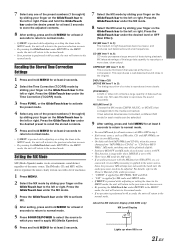
... procedures, refer to "About Time Correction" (page 19). 1 Press and hold MENU for at least 2 seconds to return to normal mode. • If MENU is displayed. 4 Select T.CORR (T.CORR PAR) by sliding your finger on the GlideTouch bar to the left or right. F-L → F-R → R-L → R-R → SW-L (S-L)...(CM) or inch (INCH) by sliding your finger on the GlideTouch bar to the left or right. Press the GlideTouch bar under DISP (DISPLAY). or the GlideTouch bar to set another speaker. 6 When the setting has been completed, press FUNC. Press under SETUP. Press the GlideTouch ...
... procedures, refer to "About Time Correction" (page 19). 1 Press and hold MENU for at least 2 seconds to return to normal mode. • If MENU is displayed. 4 Select T.CORR (T.CORR PAR) by sliding your finger on the GlideTouch bar to the left or right. F-L → F-R → R-L → R-R → SW-L (S-L)...(CM) or inch (INCH) by sliding your finger on the GlideTouch bar to the left or right. Press the GlideTouch bar under DISP (DISPLAY). or the GlideTouch bar to set another speaker. 6 When the setting has been completed, press FUNC. Press under SETUP. Press the GlideTouch ...
Owners Manual
Page 23
... the MX mode. 8 Select the MX Level by sliding your finger on the GlideTouch bar to the media connected. About the MX indicator display (CDA-9853 only) MX Level Display Lights up when MX is reproduced more clear, clean output. Press the GlideTouch bar under the MX mode. 3 Press the GlideTouch bar under...
... the MX mode. 8 Select the MX Level by sliding your finger on the GlideTouch bar to the media connected. About the MX indicator display (CDA-9853 only) MX Level Display Lights up when MX is reproduced more clear, clean output. Press the GlideTouch bar under the MX mode. 3 Press the GlideTouch bar under...
Owners Manual
Page 24
...No. FREQUENCY EXTERNAL AMPLIFIER → INFORMATION*5 PRESET No. Other Functions -/J BAND TITLE Rotary encoder MENU FUNC. The display in MP3/WMA mode: CDA-9855 FOLDER NO./FILE NO./ ELAPSED TIME FOLDER NAME*3 FILE NAME FOLDER NO./FILE NO./ ELAPSED TIME TRACK NAME*4 ... TRACK NO./ELAPSED TIME TRACK NO./ELAPSED TIME → EXTERNAL AMPLIFIER → INFORMATION*5 TRACK NO./ELAPSED TIME CLOCK The display in Radio mode: CDA-9855 PRESET No./FREQUENCY PRESET No./FREQUENCY TITLE*1 → TITLE*1 → CALENDAR PRESET No./FREQUENCY PRESET No./FREQUENCY TITLE*1 &#...
...No. FREQUENCY EXTERNAL AMPLIFIER → INFORMATION*5 PRESET No. Other Functions -/J BAND TITLE Rotary encoder MENU FUNC. The display in MP3/WMA mode: CDA-9855 FOLDER NO./FILE NO./ ELAPSED TIME FOLDER NAME*3 FILE NAME FOLDER NO./FILE NO./ ELAPSED TIME TRACK NAME*4 ... TRACK NO./ELAPSED TIME TRACK NO./ELAPSED TIME → EXTERNAL AMPLIFIER → INFORMATION*5 TRACK NO./ELAPSED TIME CLOCK The display in Radio mode: CDA-9855 PRESET No./FREQUENCY PRESET No./FREQUENCY TITLE*1 → TITLE*1 → CALENDAR PRESET No./FREQUENCY PRESET No./FREQUENCY TITLE*1 &#...

Owners Manual
Page 25
...is referred to as "text." • Some characters may not be displayed correctly with CD Text. CDA-9853 FOLDER NO./FILE NO. FOLDER NO./FILE NO. You cannot input or display titles on this device, it is displayed. 23-EN EXTERNAL AMPLIFIER → INFORMATION*5 ELAPSED TIME ELAPSED TIME .... 5 This indicator is lit when the bit rate and sampling rate are displayed. 6 This indicator is lit when an artist name is possible to "Displaying the External Amplifier Information" (page 25). About the indicator display (CDA-9853 only) About "Title" and "Text" Title: With this unit. &#...
...is referred to as "text." • Some characters may not be displayed correctly with CD Text. CDA-9853 FOLDER NO./FILE NO. FOLDER NO./FILE NO. You cannot input or display titles on this device, it is displayed. 23-EN EXTERNAL AMPLIFIER → INFORMATION*5 ELAPSED TIME ELAPSED TIME .... 5 This indicator is lit when the bit rate and sampling rate are displayed. 6 This indicator is lit when an artist name is possible to "Displaying the External Amplifier Information" (page 25). About the indicator display (CDA-9853 only) About "Title" and "Text" Title: With this unit. &#...

Owners Manual
Page 26
.../Text" (page 22). 2 Press and hold for the CDA-9853 model) and 18 CD titles on , press TITLE to display the time (CDA-9853 only). Upper case → Lower case → Numeral/Symbol* → Upper case * Press g or f to change pages. (CDA-9855 only.) 4 Turn the Rotary encoder to select the desired ... taken for over 10 seconds. When entering a title of your favorite CD's or radio stations. The first character will stop blinking and the display will be displayed for CDA-9855 16th character) automatically stores the title into memory. Press and hold FUNC. Blackout Mode On and Off...
.../Text" (page 22). 2 Press and hold for the CDA-9853 model) and 18 CD titles on , press TITLE to display the time (CDA-9853 only). Upper case → Lower case → Numeral/Symbol* → Upper case * Press g or f to change pages. (CDA-9855 only.) 4 Turn the Rotary encoder to select the desired ... taken for over 10 seconds. When entering a title of your favorite CD's or radio stations. The first character will stop blinking and the display will be displayed for CDA-9855 16th character) automatically stores the title into memory. Press and hold FUNC. Blackout Mode On and Off...

