
Owners Manual
Page 6
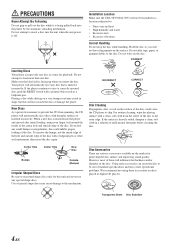
... disc. Installation Location Make sure the CDA-9855/CDA-9853 will automatically eject discs with a pointed object such as a ballpoint pen. CORRECT Inserting Discs Your player accepts only one disc. If the player continues to eject a correctly inserted disc, push the RESET switch with irregular surfaces or inserted incorrectly. Playing a disc while driving on discs played in a solution of them will not scratch the disc or damage the player. New Discs As a protective measure to : • Direct...
... disc. Installation Location Make sure the CDA-9855/CDA-9853 will automatically eject discs with a pointed object such as a ballpoint pen. CORRECT Inserting Discs Your player accepts only one disc. If the player continues to eject a correctly inserted disc, push the RESET switch with irregular surfaces or inserted incorrectly. Playing a disc while driving on discs played in a solution of them will not scratch the disc or damage the player. New Discs As a protective measure to : • Direct...
Owners Manual
Page 11
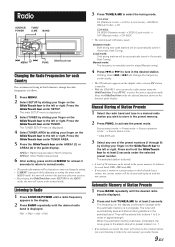
... the selected preset number. When the automatic memory has been completed, the tuner goes to the station stored in the function guide display. Press the GlideTouch bar under the desired function shown in preset location no. 1. • If no stations are stored, the tuner will be automatically tuned in (Automatic Seek Tuning). Press the GlideTouch bar under TUNER AREA. 5 Press the GlideTouch bar under SETUP. The selected station is Distance mode. Radio SOURCE/ POWER TUNE...
... the selected preset number. When the automatic memory has been completed, the tuner goes to the station stored in the function guide display. Press the GlideTouch bar under the desired function shown in preset location no. 1. • If no stations are stored, the tuner will be automatically tuned in (Automatic Seek Tuning). Press the GlideTouch bar under TUNER AREA. 5 Press the GlideTouch bar under SETUP. The selected station is Distance mode. Radio SOURCE/ POWER TUNE...

Owners Manual
Page 12
Source select mode → Preset mode → Source operation mode* → Source select mode CD / MP3 / WMA SOURCE/POWER TITLE -/J 8 * CDA-9855 only 3 Select any one disc at a time. f FUNC. 9 GlideTouch bar g c Station Title Search Function If the title of the selected title is received. • Title Search mode is canceled by pressing and holding for at least 2 seconds in Radio mode to activate Frequency Search mode. 2 Within 10 seconds, select the desired frequency by sliding your finger to the left...
Source select mode → Preset mode → Source operation mode* → Source select mode CD / MP3 / WMA SOURCE/POWER TITLE -/J 8 * CDA-9855 only 3 Select any one disc at a time. f FUNC. 9 GlideTouch bar g c Station Title Search Function If the title of the selected title is received. • Title Search mode is canceled by pressing and holding for at least 2 seconds in Radio mode to activate Frequency Search mode. 2 Within 10 seconds, select the desired frequency by sliding your finger to the left...
Owners Manual
Page 17
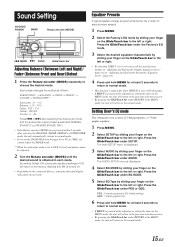
... and hold MENU for a variety of musical source material. 1 Press MENU. 2 Select the Factory's EQ mode by sliding your finger on the connected devices, some functions and display indications do not work. Press the GlideTouch bar under RETURN in the MENU mode, the unit will return to the left or right. Each press changes the modes as follows: SUBWOOFER*1 → BALANCE → FADER → DEFEAT → VOLUME → SUBWOOFER*1 Subwoofer : 0 ~ +15 Balance : L15...
... and hold MENU for a variety of musical source material. 1 Press MENU. 2 Select the Factory's EQ mode by sliding your finger on the connected devices, some functions and display indications do not work. Press the GlideTouch bar under RETURN in the MENU mode, the unit will return to the left or right. Each press changes the modes as follows: SUBWOOFER*1 → BALANCE → FADER → DEFEAT → VOLUME → SUBWOOFER*1 Subwoofer : 0 ~ +15 Balance : L15...
Owners Manual
Page 28
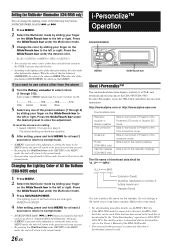
... adjusting or setting the itmes in the USER'S presets described below and follow the on the GlideTouch bar to select colors (1 through 6) by sliding your finger on -screen instructions. Data is connected, data that which you want to use other colors if they have set above 4 Turn the Rotary encoder to the left or right. Do not change the lighting colour of the following four buttons : SOURCE/POWER...
... adjusting or setting the itmes in the USER'S presets described below and follow the on the GlideTouch bar to select colors (1 through 6) by sliding your finger on -screen instructions. Data is connected, data that which you want to use other colors if they have set above 4 Turn the Rotary encoder to the left or right. Do not change the lighting colour of the following four buttons : SOURCE/POWER...
Owners Manual
Page 29
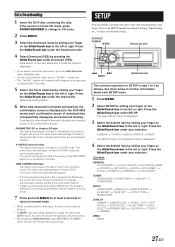
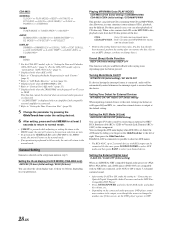
.... Press the GlideTouch bar under your selection. Successfully downloaded items are automatically applied. Choose the SETUP menu from the current EQ mode, Preset 6 setting will not change automatically. CDA-9855: GENERAL CLOCK MODE*1 ↔ CLOCK ADJUST ↔ PLAY MODE ↔ BEEP ↔ INT MUTE ↔ INT AUDIO ↔ AUX IN ↔ (AUX NAME)*2 ↔ D-AUX ↔ POWER IC ↔ STEERING ↔ CLOCK MODE*1 TUNER TUNER MODE ↔ TUNER AREA*3 ↔ XM ADF*4 ↔ TUNER MODE AUDIO SUBWOOFER ↔ SUBW CH ↔ SUBW...
.... Press the GlideTouch bar under your selection. Successfully downloaded items are automatically applied. Choose the SETUP menu from the current EQ mode, Preset 6 setting will not change automatically. CDA-9855: GENERAL CLOCK MODE*1 ↔ CLOCK ADJUST ↔ PLAY MODE ↔ BEEP ↔ INT MUTE ↔ INT AUDIO ↔ AUX IN ↔ (AUX NAME)*2 ↔ D-AUX ↔ POWER IC ↔ STEERING ↔ CLOCK MODE*1 TUNER TUNER MODE ↔ TUNER AREA*3 ↔ XM ADF*4 ↔ TUNER MODE AUDIO SUBWOOFER ↔ SUBW CH ↔ SUBW...
Owners Manual
Page 30
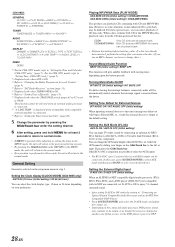
... an ALPINE Ai-NET compatible digital audio processor (PXAH510, PXA-H701) and a DVD player (DVE-5207) not compatible with Ai-NET are connected, set the DVD player's power to select your desired device. Setting the Clock display (CLOCK MODE) (CDA-9855 only) AM12:00 (12-hour (Initial setting) / 00:00 (24-hour) You can select playback of the disc. If a disc has already been inserted, perform the setting after you remove the disc. (If you use an MP3 changer...
... an ALPINE Ai-NET compatible digital audio processor (PXAH510, PXA-H701) and a DVD player (DVE-5207) not compatible with Ai-NET are connected, set the DVD player's power to select your desired device. Setting the Clock display (CLOCK MODE) (CDA-9855 only) AM12:00 (12-hour (Initial setting) / 00:00 (24-hour) You can select playback of the disc. If a disc has already been inserted, perform the setting after you remove the disc. (If you use an MP3 changer...
Owners Manual
Page 31
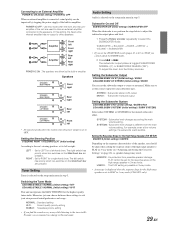
... the power output is toggled SUBWOOFER NORMAL (0°) or SUBWOOFER REVERS (180°). Switching the Tuner Mode CDA-9855:STABLE / NORMAL (Initial setting) / HiFi CDA-9853:STABLE / NORMAL (Initial setting) / HI-FI This unit incorporates the MAX TUNE PRO for the High Range Speaker (TW SETUP) MAKER'S (Initial setting) / USER'S Depending on page 18), as speaker damage may result. Audio Setting Audio is still audible. To adjust the level, turn the Rotary encoder. Setting the Subwoofer Output CDA-9855:SUBW...
... the power output is toggled SUBWOOFER NORMAL (0°) or SUBWOOFER REVERS (180°). Switching the Tuner Mode CDA-9855:STABLE / NORMAL (Initial setting) / HiFi CDA-9853:STABLE / NORMAL (Initial setting) / HI-FI This unit incorporates the MAX TUNE PRO for the High Range Speaker (TW SETUP) MAKER'S (Initial setting) / USER'S Depending on page 18), as speaker damage may result. Audio Setting Audio is still audible. To adjust the level, turn the Rotary encoder. Setting the Subwoofer Output CDA-9855:SUBW...
Owners Manual
Page 32
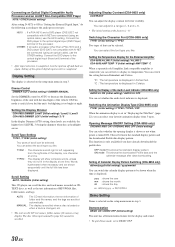
... to DEMO OFF. 30-EN The disc titles input manually (page 24) cannot be selected. Adjusting Display Contrast (CDA-9853 only) CONTRAST You can set to the audio processor type: H510 : If a PXA-H510 and a DVD player (DVE-5207) not compatible with Ai-NET are connected (using an optical cable), use the H510 setting. Switching the Character Font (CDA-9855 only) TYPE1 (Initial setting) / TYPE2 Two types of the display, one time. Setting the Temperature Display...
... to DEMO OFF. 30-EN The disc titles input manually (page 24) cannot be selected. Adjusting Display Contrast (CDA-9853 only) CONTRAST You can set to the audio processor type: H510 : If a PXA-H510 and a DVD player (DVE-5207) not compatible with Ai-NET are connected (using an optical cable), use the H510 setting. Switching the Character Font (CDA-9855 only) TYPE1 (Initial setting) / TYPE2 Two types of the display, one time. Setting the Temperature Display...

Owners Manual
Page 39
.... Alternatively, press SOURCE on this unit. 1 Press SOURCE/POWER to switch to 6 CD Changers. The CD Changer Selection mode remains active for a few seconds. 3 Press BAND until the desired changer indicator appears on page 28. 37-EN Source selection mode ↔ Audio function mode ↔ Direct disc recall mode ↔ Source operation mode* ↔ Source selection mode * CDA-9855 only 3 Select a disc (1 to 6) or (1 to activate the CD Changer Selection mode. When operating two or more changers, the KCA-400C (Multi-Changer Switching device) must be controlled by touching the...
.... Alternatively, press SOURCE on this unit. 1 Press SOURCE/POWER to switch to 6 CD Changers. The CD Changer Selection mode remains active for a few seconds. 3 Press BAND until the desired changer indicator appears on page 28. 37-EN Source selection mode ↔ Audio function mode ↔ Direct disc recall mode ↔ Source operation mode* ↔ Source selection mode * CDA-9855 only 3 Select a disc (1 to 6) or (1 to activate the CD Changer Selection mode. When operating two or more changers, the KCA-400C (Multi-Changer Switching device) must be controlled by touching the...

Owners Manual
Page 40
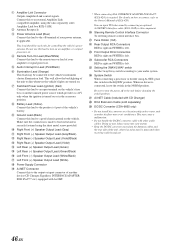
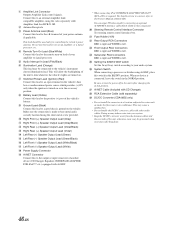
... the power on Remote Control 1 Source Button Press this button to select the audio source. 2 Volume Adjustment Buttons To increase the volume level: Press the L button To decrease the volume level: Press the K button 3 8 Button Radio mode: Pressing this button will select, in descending order, stations programmed into the radio's presets as shown below. 1 → 2 ... 6 → 1 CD Changer mode: DISC Select (UP) button Press this button to select a disc in ascending order. Press this button again to cancel. *1 For the operation of external audio processor, refer to the Owner's Manual...
... the power on Remote Control 1 Source Button Press this button to select the audio source. 2 Volume Adjustment Buttons To increase the volume level: Press the L button To decrease the volume level: Press the K button 3 8 Button Radio mode: Pressing this button will select, in descending order, stations programmed into the radio's presets as shown below. 1 → 2 ... 6 → 1 CD Changer mode: DISC Select (UP) button Press this button to select a disc in ascending order. Press this button again to cancel. *1 For the operation of external audio processor, refer to the Owner's Manual...
Owners Manual
Page 45
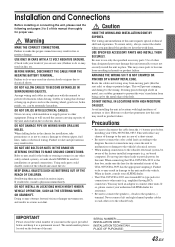
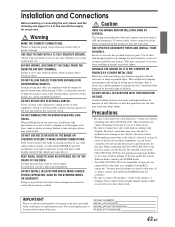
... supply power to other or to the vehicle body. When connecting the CDA-9855/CDA-9853 to the fuse box, make the proper connections may result in doubt, consult your authorized ALPINE dealer for installations or ground connections. USE ONLY IN CARS WITH A 12 VOLT NEGATIVE GROUND. (Check with the manual to the diagram. DO NOT ALLOW CABLES TO BECOME ENTANGLED IN SURROUNDING OBJECTS. Arrange wiring and cables...
... supply power to other or to the vehicle body. When connecting the CDA-9855/CDA-9853 to the fuse box, make the proper connections may result in doubt, consult your authorized ALPINE dealer for installations or ground connections. USE ONLY IN CARS WITH A 12 VOLT NEGATIVE GROUND. (Check with the manual to the diagram. DO NOT ALLOW CABLES TO BECOME ENTANGLED IN SURROUNDING OBJECTS. Arrange wiring and cables...
Owners Manual
Page 48
... connected, leave the switch in the EQ/DIV position. When no device is turned on the vehicle. DC/DC Converter (CDA-9855 only) • Do not install the converter at a location subjected to bare metal and is left. ; 1 Amplifier Link Connector Outputs Amplifier Link control signals. For details on lead of KCA-420i. This lead should be used only for controlling the vehicle's power antenna. Make sure the connection...
... connected, leave the switch in the EQ/DIV position. When no device is turned on the vehicle. DC/DC Converter (CDA-9855 only) • Do not install the converter at a location subjected to bare metal and is left. ; 1 Amplifier Link Connector Outputs Amplifier Link control signals. For details on lead of KCA-420i. This lead should be used only for controlling the vehicle's power antenna. Make sure the connection...

Owners Manual
Page 27
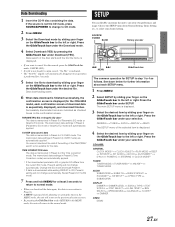
... to normal mode. • SOURCE/POWER, BAND, g and f buttons are changed . Data is downloaded by the "Data Downloading" operation to store the adjustment. For details on -screen instructions. Press the GlideTouch bar under RETURN in the hard disc is set to select colors (1 through 6 in "Setting the Multicolor Illumination" (this unit, the HDA-5460 hard disc can be "A_U*****.MP3." Setting the Multicolor Illumination (CDA-9855 only) You can change a file name...
... to normal mode. • SOURCE/POWER, BAND, g and f buttons are changed . Data is downloaded by the "Data Downloading" operation to store the adjustment. For details on -screen instructions. Press the GlideTouch bar under RETURN in the hard disc is set to select colors (1 through 6 in "Setting the Multicolor Illumination" (this unit, the HDA-5460 hard disc can be "A_U*****.MP3." Setting the Multicolor Illumination (CDA-9855 only) You can change a file name...
Owners Manual
Page 28
..., Preset 6 setting will automatically disappear if no operation is sequentially displayed), and download finishes. CDA-9855: GENERAL CLOCK MODE*1 ↔ CLOCK ADJUST ↔ PLAY MODE ↔ BEEP ↔ INT MUTE ↔ INT AUDIO ↔ AUX IN ↔ (AUX NAME)*2 ↔ D-AUX ↔ POWER IC ↔ STEERING ↔ CLOCK MODE*1 TUNER TUNER MODE ↔ TUNER AREA*3 ↔ XM ADF*4 ↔ TUNER MODE AUDIO SUBWOOFER ↔ SUBW CH ↔ SUBW SYSTEM*5 ↔ EQ MODE*6 ↔ TW SETUP*7 ↔ A.PROC TYPE ↔ SUBWOOFER DISPLAY DIMMER ↔ DIMMER LEVEL ↔...
..., Preset 6 setting will automatically disappear if no operation is sequentially displayed), and download finishes. CDA-9855: GENERAL CLOCK MODE*1 ↔ CLOCK ADJUST ↔ PLAY MODE ↔ BEEP ↔ INT MUTE ↔ INT AUDIO ↔ AUX IN ↔ (AUX NAME)*2 ↔ D-AUX ↔ POWER IC ↔ STEERING ↔ CLOCK MODE*1 TUNER TUNER MODE ↔ TUNER AREA*3 ↔ XM ADF*4 ↔ TUNER MODE AUDIO SUBWOOFER ↔ SUBW CH ↔ SUBW SYSTEM*5 ↔ EQ MODE*6 ↔ TW SETUP*7 ↔ A.PROC TYPE ↔ SUBWOOFER DISPLAY DIMMER ↔ DIMMER LEVEL ↔...
Owners Manual
Page 29
..., i.e., sound for each Country" (page 9) *4 Refer to "SAT Radio Receiver" section (page 31). *5 Displayed only when SUBWOOFER is ON. *6 Refer to "Setting User's EQ mode" (page 15). *7 Displayed only when the 2WAY/3WAY switch (pages 45 to 47) is changed to OFF. 28-EN However, in "Connecting an Optical Digital Compatible Audio Processor and an Ai-NET NonCompatible DVD Player." • Press SOURCE/POWER, and select the D-AUX mode, and adjust the volume...
..., i.e., sound for each Country" (page 9) *4 Refer to "SAT Radio Receiver" section (page 31). *5 Displayed only when SUBWOOFER is ON. *6 Refer to "Setting User's EQ mode" (page 15). *7 Displayed only when the 2WAY/3WAY switch (pages 45 to 47) is changed to OFF. 28-EN However, in "Connecting an Optical Digital Compatible Audio Processor and an Ai-NET NonCompatible DVD Player." • Press SOURCE/POWER, and select the D-AUX mode, and adjust the volume...
Owners Manual
Page 30
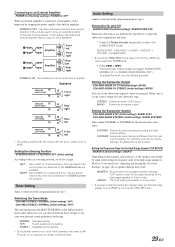
... repeatedly to select the SUBWOOFER mode. SYSTEM1 : Subwoofer level changes according the main volume setting. In this mode when the front and rear preamplifier of the unit are pressed. Switching the Tuner Mode CDA-9855:STABLE / NORMAL (Initial setting) / HiFi CDA-9853:STABLE / NORMAL (Initial setting) / HI-FI This unit incorporates the MAX TUNE PRO for the high range speaker is set for a right-hand drive. Connecting to an External Amplifier POWER-IC ON (Initial setting) / POWER-IC OFF...
... repeatedly to select the SUBWOOFER mode. SYSTEM1 : Subwoofer level changes according the main volume setting. In this mode when the front and rear preamplifier of the unit are pressed. Switching the Tuner Mode CDA-9855:STABLE / NORMAL (Initial setting) / HiFi CDA-9853:STABLE / NORMAL (Initial setting) / HI-FI This unit incorporates the MAX TUNE PRO for the high range speaker is set for a right-hand drive. Connecting to an External Amplifier POWER-IC ON (Initial setting) / POWER-IC OFF...

Owners Manual
Page 38
...; Direct disc recall mode ↔ Source operation mode* ↔ Source selection mode * CDA-9855 only 3 Select a disc (1 to 6) or (1 to 12) by touching the GlideTouch bar and sliding your finger to 4 CD Changers. For details, please see "Setting the AUX Mode (V-Link)" on this unit. If you use 2 Switching devices, you can connect up to this unit. to activate the direct disc recall mode. to activate the direct disc recall mode. Source selection mode ↔ Audio function mode ↔ Direct disc recall mode ↔ Source operation mode* ↔ Source selection mode * CDA...
...; Direct disc recall mode ↔ Source operation mode* ↔ Source selection mode * CDA-9855 only 3 Select a disc (1 to 6) or (1 to 12) by touching the GlideTouch bar and sliding your finger to 4 CD Changers. For details, please see "Setting the AUX Mode (V-Link)" on this unit. If you use 2 Switching devices, you can connect up to this unit. to activate the direct disc recall mode. to activate the direct disc recall mode. Source selection mode ↔ Audio function mode ↔ Direct disc recall mode ↔ Source operation mode* ↔ Source selection mode * CDA...
Owners Manual
Page 44
... sure to connect the color coded leads according to the diagram. on the bottom of the unit. When in doubt, consult your ALPINE dealer. • The CDA-9855/CDA-9853 uses female RCA-type jacks for connection to other safety-related system), or tanks should NEVER be used for assistance. • Be sure to connect the speaker (-) leads to the speaker (-) terminal. SERIAL NUMBER: INSTALLATION DATE: INSTALLATION TECHNICIAN...
... sure to connect the color coded leads according to the diagram. on the bottom of the unit. When in doubt, consult your ALPINE dealer. • The CDA-9855/CDA-9853 uses female RCA-type jacks for connection to other safety-related system), or tanks should NEVER be used for assistance. • Be sure to connect the speaker (-) leads to the speaker (-) terminal. SERIAL NUMBER: INSTALLATION DATE: INSTALLATION TECHNICIAN...
Owners Manual
Page 47
... controlling the vehicle's power antenna. Make sure the connection is made to the unit before changing the switch position. = Ai-NET Cable (Included with other audio cables. DC/DC Converter (CDA-9855 only) • Do not install the converter at a location subjected to the output or input connector of your power antenna, if applicable. 1 Amplifier Link Connector Outputs Amplifier Link control signals. Connect this lead to the remote turn on an amplifier, or a signal processor, etc. 4 Remote Turn-On Lead (Blue/White) Connect...
... controlling the vehicle's power antenna. Make sure the connection is made to the unit before changing the switch position. = Ai-NET Cable (Included with other audio cables. DC/DC Converter (CDA-9855 only) • Do not install the converter at a location subjected to the output or input connector of your power antenna, if applicable. 1 Amplifier Link Connector Outputs Amplifier Link control signals. Connect this lead to the remote turn on an amplifier, or a signal processor, etc. 4 Remote Turn-On Lead (Blue/White) Connect...


