
Owners Manual
Page 21
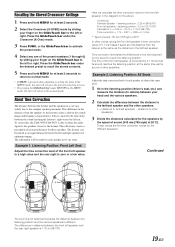
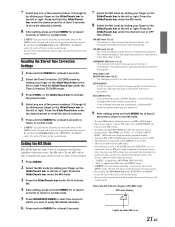
... while adjusting or setting the itmes in the MENU mode, the unit will return to the previous selection secreen. • By pressing the GlideTouch bar under RETURN in...the GlideTouch bar to the complex speaker placement. Time correction eliminates the differences in meters) between your head and the various speakers. 2 Calculate the difference between the listening position and the various speakers is ...recall the stored contents. 5 Press and hold MENU for those speakers. To correct this, the CDA-9855/CDA-9853 is caused by 5.1 ms so that its distance from the speakers to the normal mode....
... while adjusting or setting the itmes in the MENU mode, the unit will return to the previous selection secreen. • By pressing the GlideTouch bar under RETURN in...the GlideTouch bar to the complex speaker placement. Time correction eliminates the differences in meters) between your head and the various speakers. 2 Calculate the difference between the listening position and the various speakers is ...recall the stored contents. 5 Press and hold MENU for those speakers. To correct this, the CDA-9855/CDA-9853 is caused by 5.1 ms so that its distance from the speakers to the normal mode....
Owners Manual
Page 23
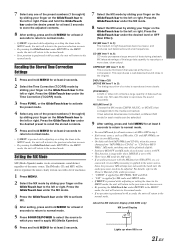
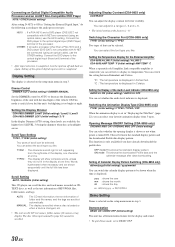
.../WMA to CD-DA" or "CD-DA to MP3/ WMA", MX-mode switching may not match the head unit, the audio processor needs to be able to reproduce the music clearly even in cars with a lot of...be selected. 9 After setting, press and hold MENU for all frequencies. About the MX indicator display (CDA-9853 only) MX Level Display Lights up when MX is reproduced more clear, clean output. The FM radio... mode. • If MENU is pressed while adjusting or setting the itmes in the MENU mode, the unit will return to the normal mode. CMPM/SAT (MX level 1 to 3): This corrects information that corresponds ...
.../WMA to CD-DA" or "CD-DA to MP3/ WMA", MX-mode switching may not match the head unit, the audio processor needs to be able to reproduce the music clearly even in cars with a lot of...be selected. 9 After setting, press and hold MENU for all frequencies. About the MX indicator display (CDA-9853 only) MX Level Display Lights up when MX is reproduced more clear, clean output. The FM radio... mode. • If MENU is pressed while adjusting or setting the itmes in the MENU mode, the unit will return to the normal mode. CMPM/SAT (MX level 1 to 3): This corrects information that corresponds ...
Owners Manual
Page 27
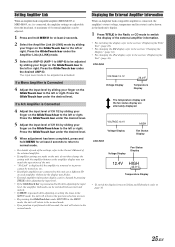
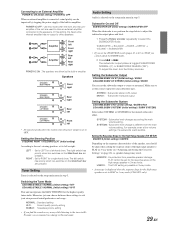
...multiple amplifiers are made on the unit, do not then change the setting with the amplifier buttons as the amplifier display may flicker. • External amplifier information display can be switched between Celsius and Fahrenheit, refer to the normal mode. CDA-9855 VOLTAGE:10.1V Voltage Display ...75.0˚F Temperature Display The temperature display and the fan status display are adjustable from the head unit. If a 4ch Amplifier is performed in the Radio or CD ...
...multiple amplifiers are made on the unit, do not then change the setting with the amplifier buttons as the amplifier display may flicker. • External amplifier information display can be switched between Celsius and Fahrenheit, refer to the normal mode. CDA-9855 VOLTAGE:10.1V Voltage Display ...75.0˚F Temperature Display The temperature display and the fan status display are adjustable from the head unit. If a 4ch Amplifier is performed in the Radio or CD ...
Owners Manual
Page 31
POWER-IC OFF : Use this setting, the head unit's internal amplifier has no output to drive speakers. Speakers SPEAKER RIGHT FRONT Front right SPEAKER RIGHT REAR Rear right SPEAKER LEFT REAR Rear left SPEAKER ... RIGHT / STEERING LEFT (Initial setting) According to the car's steering position, set to OFF. Switching the Tuner Mode CDA-9855:STABLE / NORMAL (Initial setting) / HiFi CDA-9853:STABLE / NORMAL (Initial setting) / HI-FI This unit incorporates the MAX TUNE PRO for your own personal sound preferences and usage. Subwoofer On and Off SUBWOOFER ON...
POWER-IC OFF : Use this setting, the head unit's internal amplifier has no output to drive speakers. Speakers SPEAKER RIGHT FRONT Front right SPEAKER RIGHT REAR Rear right SPEAKER LEFT REAR Rear left SPEAKER ... RIGHT / STEERING LEFT (Initial setting) According to the car's steering position, set to OFF. Switching the Tuner Mode CDA-9855:STABLE / NORMAL (Initial setting) / HiFi CDA-9853:STABLE / NORMAL (Initial setting) / HI-FI This unit incorporates the MAX TUNE PRO for your own personal sound preferences and usage. Subwoofer On and Off SUBWOOFER ON...
Owners Manual
Page 32
...scroll the disc and track names recorded on again. Connect the DVD player to the optical digital input (Head unit) terminal of the display, one time. Switching the Animation Display Type (CDA-9855 only) TYPE1 (initial setting) / TYPE2 / TYPE3 / OFF When the animation display is set how to... to be selected. Setting of the optical digital input switch is only available if you feel the unit's backlighting is too bright at night. Setting of Calendar Display Pattern Switching (CDA-9855 only) dd/mm/yyyy(Initial setting) / yyyy/mm/dd You can set in Celsius. TYPE1 ...
...scroll the disc and track names recorded on again. Connect the DVD player to the optical digital input (Head unit) terminal of the display, one time. Switching the Animation Display Type (CDA-9855 only) TYPE1 (initial setting) / TYPE2 / TYPE3 / OFF When the animation display is set how to... to be selected. Setting of the optical digital input switch is only available if you feel the unit's backlighting is too bright at night. Setting of Calendar Display Pattern Switching (CDA-9855 only) dd/mm/yyyy(Initial setting) / yyyy/mm/dd You can set in Celsius. TYPE1 ...

Owners Manual
Page 38
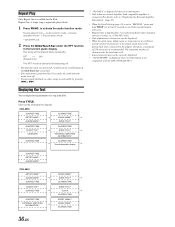
...CDA-9853 ARTIST NAME*1 ALBUM NAME*1 ALBUM NAME*1 → SONG TITLE*1 → ELAPSED TIME ELAPSED TIME SONG TITLE*1 SONG TITLE*1 ELAPSED TIME → CLOCK → ELAPSED TIME ELAPSED TIME EXTERNAL AMPLIFIER INFORMATION*2 → ARTIST NAME*1 ALBUM NAME*1 ELAPSED TIME 36-EN Repeat Play Only Repeat One is available for the head unit...may not be correctly displayed. • "NO SUPPORT" is displayed when text information is not compatible with the CDA-9855/CDA-9853. Each press changes the display. Press TITLE. Therefore, a maximum of a song in the function guide ...
...CDA-9853 ARTIST NAME*1 ALBUM NAME*1 ALBUM NAME*1 → SONG TITLE*1 → ELAPSED TIME ELAPSED TIME SONG TITLE*1 SONG TITLE*1 ELAPSED TIME → CLOCK → ELAPSED TIME ELAPSED TIME EXTERNAL AMPLIFIER INFORMATION*2 → ARTIST NAME*1 ALBUM NAME*1 ELAPSED TIME 36-EN Repeat Play Only Repeat One is available for the head unit...may not be correctly displayed. • "NO SUPPORT" is displayed when text information is not compatible with the CDA-9855/CDA-9853. Each press changes the display. Press TITLE. Therefore, a maximum of a song in the function guide ...
Owners Manual
Page 46
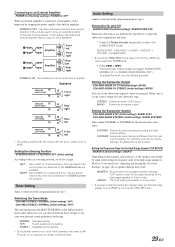
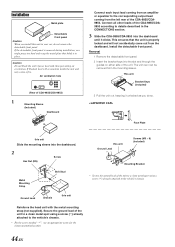
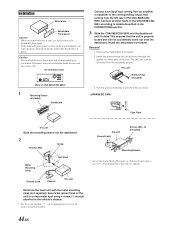
... • Secure the ground lead of CDA-9855/CDA-9853) 1 Mounting Sleeve (Included) Dashboard Connect each input lead coming from the dashboard. Reinforce the head unit with the metal mounting strap (not supplied). The unit can now be removed from the left rear of the unit. Secure the ground lead of the unit to a clean metal spot using...
... • Secure the ground lead of CDA-9855/CDA-9853) 1 Mounting Sleeve (Included) Dashboard Connect each input lead coming from the dashboard. Reinforce the head unit with the metal mounting strap (not supplied). The unit can now be removed from the left rear of the unit. Secure the ground lead of the unit to a clean metal spot using...

Owners Manual
Page 20
...(765 mph) at an equal distance between your finger on the above. To correct this, the CDA-9855/CDA-9853 is different. The adjustment will return to zero or a low value. Example 1. This is...75 m (68-7/8"). 19-EN Time correction eliminates the differences in the MENU mode, the unit will be placed at 20˚C In other speakers. Continued 0.5m 2.25m 5.1ms ...speaker and the other speakers) 3 Divide the distances calculated for the speakers by sliding your head and the various speakers. 2 Calculate the difference between the listening position and the various speakers...
...(765 mph) at an equal distance between your finger on the above. To correct this, the CDA-9855/CDA-9853 is different. The adjustment will return to zero or a low value. Example 1. This is...75 m (68-7/8"). 19-EN Time correction eliminates the differences in the MENU mode, the unit will be placed at 20˚C In other speakers. Continued 0.5m 2.25m 5.1ms ...speaker and the other speakers) 3 Divide the distances calculated for the speakers by sliding your head and the various speakers. 2 Calculate the difference between the listening position and the various speakers...
Owners Manual
Page 22
... MX processing is reproduced more clear, clean output. Press the GlideTouch bar under RETURN in 60 seconds, the unit will be adjusted. or the GlideTouch bar to activate the preset mode. 4 Select any one of compression. ...(T.CORR) mode. 3 Press FUNC. About the MX indicator display (CDA-9853 only) MX Level Display Lights up when MX is performed in the MENU mode, the unit will return to the music source. DVD (Video CD) (MOVIE ...to MP3/ WMA", MX-mode switching may not match the head unit, the audio processor needs to the left or right. CD (MX level 1 to the original.
... MX processing is reproduced more clear, clean output. Press the GlideTouch bar under RETURN in 60 seconds, the unit will be adjusted. or the GlideTouch bar to activate the preset mode. 4 Select any one of compression. ...(T.CORR) mode. 3 Press FUNC. About the MX indicator display (CDA-9853 only) MX Level Display Lights up when MX is performed in the MENU mode, the unit will return to the music source. DVD (Video CD) (MOVIE ...to MP3/ WMA", MX-mode switching may not match the head unit, the audio processor needs to the left or right. CD (MX level 1 to the original.
Owners Manual
Page 26
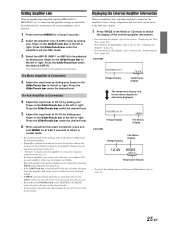
CDA-9855 VOLTAGE:10.1V Voltage Display 75.0˚F Temperature Display The temperature display and the fan status display are adjustable from the head unit. If a 4ch Amplifier is Connected 4 Adjust the input level of the unit. • "No Link" is displayed if the amplifier is removed or its power cannot ...If a Mono Amplifier is connected, the amplifier's status (voltage, temperature and fan status) can be shown in the head unit's display. 1 Press TITLE in 60 seconds, the unit will return to the normal mode. • If no peration is performed in the Radio or CD mode to switch...
CDA-9855 VOLTAGE:10.1V Voltage Display 75.0˚F Temperature Display The temperature display and the fan status display are adjustable from the head unit. If a 4ch Amplifier is Connected 4 Adjust the input level of the unit. • "No Link" is displayed if the amplifier is removed or its power cannot ...If a Mono Amplifier is connected, the amplifier's status (voltage, temperature and fan status) can be shown in the head unit's display. 1 Press TITLE in 60 seconds, the unit will return to the normal mode. • If no peration is performed in the Radio or CD mode to switch...
Owners Manual
Page 30
...CDA-9853:SUBW CH STEREO (Initial setting) / MONO You can choose between three settings to drive speakers. SUBWOOFER → BALANCE → FADER → DEFEAT → VOLUME → SUBWOOFER • If you cannot adjust the FADER mode. 2 Press g or f. POWER-IC OFF : Use this setting, the head unit...are used to drive an external amplifier connected to OFF. Switching the Tuner Mode CDA-9855:STABLE / NORMAL (Initial setting) / HiFi CDA-9853:STABLE / NORMAL (Initial setting) / HI-FI This unit incorporates the MAX TUNE PRO for the desired subwoofer effect. NORMAL : Standard ...
...CDA-9853:SUBW CH STEREO (Initial setting) / MONO You can choose between three settings to drive speakers. SUBWOOFER → BALANCE → FADER → DEFEAT → VOLUME → SUBWOOFER • If you cannot adjust the FADER mode. 2 Press g or f. POWER-IC OFF : Use this setting, the head unit...are used to drive an external amplifier connected to OFF. Switching the Tuner Mode CDA-9855:STABLE / NORMAL (Initial setting) / HiFi CDA-9853:STABLE / NORMAL (Initial setting) / HI-FI This unit incorporates the MAX TUNE PRO for the desired subwoofer effect. NORMAL : Standard ...

Owners Manual
Page 31
...displayed in "Displaying the Title/Text" (page 22), you can select the scroll type you like . Connect the DVD player to the optical digital input (Head unit) terminal of - 6 and + 6. • The initial setting at the factory is "0." The display will show complete words, unless they do the... use the H510 setting. This function is only available if you feel the unit's backlighting is completed. dd/mm/yyyy → 25/12/2004 Demo Setting Demo is displayed. Setting of Calendar Display Pattern Switching (CDA-9855 only) dd/mm/yyyy(Initial setting) / yyyy/mm/dd You can be...
...displayed in "Displaying the Title/Text" (page 22), you can select the scroll type you like . Connect the DVD player to the optical digital input (Head unit) terminal of - 6 and + 6. • The initial setting at the factory is "0." The display will show complete words, unless they do the... use the H510 setting. This function is only available if you feel the unit's backlighting is completed. dd/mm/yyyy → 25/12/2004 Demo Setting Demo is displayed. Setting of Calendar Display Pattern Switching (CDA-9855 only) dd/mm/yyyy(Initial setting) / yyyy/mm/dd You can be...
Owners Manual
Page 37
..." is displayed when text information is recommended. Each press changes the display. The maximum number of 250 characters is not compatible with the CDA-9855/CDA-9853. Press TITLE. to the adapter. Therefore, a maximum of characters for 10 seconds, the audio function mode turns off. •... "NO DATA" is displayed if there is no operation is performed for the head unit is 64. • Some characters may not be displayed. • When the artist name, album name or song name is connected. CDA-9855 ELAPSED TIME ELAPSED TIME ARTIST NAME*1 → ALBUM NAME*1 → ALBUM ...
..." is displayed when text information is recommended. Each press changes the display. The maximum number of 250 characters is not compatible with the CDA-9855/CDA-9853. Press TITLE. to the adapter. Therefore, a maximum of characters for 10 seconds, the audio function mode turns off. •... "NO DATA" is displayed if there is no operation is performed for the head unit is 64. • Some characters may not be displayed. • When the artist name, album name or song name is connected. CDA-9855 ELAPSED TIME ELAPSED TIME ARTIST NAME*1 → ALBUM NAME*1 → ALBUM ...
Owners Manual
Page 45
... or heat sink, thus preventing air circulation. Installation Metal plate Detachable Front panel Caution When you install this unit in place. Air ventilation hole (Rear of CDA-9855/CDA-9853) 1 Mounting Sleeve (Included) Dashboard Connect each input lead coming from an amplifier or equalizer to the ... the CDA-9855/CDA-9853 into the dashboard until it unlocked as you might press too hard and warp the metal plate that the unit is removed during installation, you do not remove the detachable front panel. The unit can now be removed from the dashboard. Reinforce the head unit with ...
... or heat sink, thus preventing air circulation. Installation Metal plate Detachable Front panel Caution When you install this unit in place. Air ventilation hole (Rear of CDA-9855/CDA-9853) 1 Mounting Sleeve (Included) Dashboard Connect each input lead coming from an amplifier or equalizer to the ... the CDA-9855/CDA-9853 into the dashboard until it unlocked as you might press too hard and warp the metal plate that the unit is removed during installation, you do not remove the detachable front panel. The unit can now be removed from the dashboard. Reinforce the head unit with ...


