
Owners Manual
Page 2
...(CDA-9855 only 7 Setting Time (CDA-9853 only 7 Opening and Closing the Movable Display ...... 8 Display Tilt Adjustment 8 Adjusting Volume 8 Lowering Volume Quickly 8 Detaching and Attaching the Front Panel ......... 8 Radio Changing the Radio Frequencies for each Country 9 Listening to Radio 9 Manual ...Storing of Station Presets 9 Automatic Memory of Station Presets 9 Tuning to Preset Stations 10 Station Title Search Function 10 Freqency Search Function 10 CD / MP3 / WMA...
...(CDA-9855 only 7 Setting Time (CDA-9853 only 7 Opening and Closing the Movable Display ...... 8 Display Tilt Adjustment 8 Adjusting Volume 8 Lowering Volume Quickly 8 Detaching and Attaching the Front Panel ......... 8 Radio Changing the Radio Frequencies for each Country 9 Listening to Radio 9 Manual ...Storing of Station Presets 9 Automatic Memory of Station Presets 9 Tuning to Preset Stations 10 Station Title Search Function 10 Freqency Search Function 10 CD / MP3 / WMA...
Owners Manual
Page 10
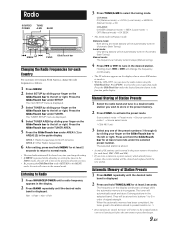
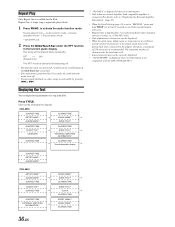
... least 2 seconds to return to normal mode. • The stored radio stations will return to the left or right. CDA-9855: DX (Distance mode) → LOCAL (Local mode) → MANUAL (Manual mode) → DX CDA-9853: DX SEEK (Distance mode) → SEEK (Local mode) → OFF (Manual mode) → DX SEEK • The initial mode is pressed...
... least 2 seconds to return to normal mode. • The stored radio stations will return to the left or right. CDA-9855: DX (Distance mode) → LOCAL (Local mode) → MANUAL (Manual mode) → DX CDA-9853: DX SEEK (Distance mode) → SEEK (Local mode) → OFF (Manual mode) → DX SEEK • The initial mode is pressed...
Owners Manual
Page 22
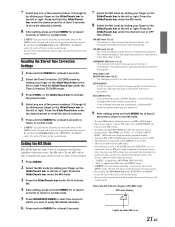
...radio. • If MENU is pressed while adjusting or setting the itmes in the MENU mode, the unit will return to the normal mode. FM (MX level 1 to 3): The medium to high frequencies become clearer, and produces well balanced sound at the time of compression. For details, refer to the Owner's Manual...GlideTouch bar under the desired level or OFF (Non Effect). The FM radio, CD, and MP3, will return to the normal mode. Press the GlideTouch ... Correction (T.CORR) mode. 3 Press FUNC. About the MX indicator display (CDA-9853 only) MX Level Display Lights up when MX is performed in 60 ...
...radio. • If MENU is pressed while adjusting or setting the itmes in the MENU mode, the unit will return to the normal mode. FM (MX level 1 to 3): The medium to high frequencies become clearer, and produces well balanced sound at the time of compression. For details, refer to the Owner's Manual...GlideTouch bar under the desired level or OFF (Non Effect). The FM radio, CD, and MP3, will return to the normal mode. Press the GlideTouch ... Correction (T.CORR) mode. 3 Press FUNC. About the MX indicator display (CDA-9853 only) MX Level Display Lights up when MX is performed in 60 ...

Owners Manual
Page 24
... may not be displayed. • When the Scroll Setting (page 30) is ignored. All other tag data is set to "MANUAL," press and hold TITLE for at least 2 seconds to input the CD/Station name (page 24). Such text information is connected. FOLDER NO./FILE NO. About the indicator display... (CDA-9853 only) About "Title" and "Text" Title: With this device, it is possible to scroll the Text information only once (TEXT...
... may not be displayed. • When the Scroll Setting (page 30) is ignored. All other tag data is set to "MANUAL," press and hold TITLE for at least 2 seconds to input the CD/Station name (page 24). Such text information is connected. FOLDER NO./FILE NO. About the indicator display... (CDA-9853 only) About "Title" and "Text" Title: With this device, it is possible to scroll the Text information only once (TEXT...
Owners Manual
Page 26
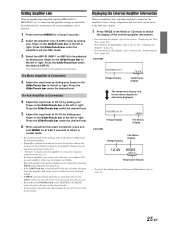
...to normal mode. • For details of each of the settings, refer to the Owner's Manual of the external amplifier. • If amplifier settings are connected to this unit, set a ...). Displaying the External Amplifier Information When an Amplifier Link compatible amplifier is performed in the Radio or CD mode to switch the display of the external amplifier information. • For switching the ... 32). • For changing the iPod display, refer to the left or right. CDA-9855 VOLTAGE:10.1V Voltage Display 75.0˚F Temperature Display The temperature display and the fan status...
...to normal mode. • For details of each of the settings, refer to the Owner's Manual of the external amplifier. • If amplifier settings are connected to this unit, set a ...). Displaying the External Amplifier Information When an Amplifier Link compatible amplifier is performed in the Radio or CD mode to switch the display of the external amplifier information. • For switching the ... 32). • For changing the iPod display, refer to the left or right. CDA-9855 VOLTAGE:10.1V Voltage Display 75.0˚F Temperature Display The temperature display and the fan status...

Owners Manual
Page 27
... Operation SOURCE/POWER MENU GlideTouch bar About i-Personalize™ You can download data (from Alpine's website) to a CD-R, and download and store the data to normal mode. • SOURCE/POWER, BAND,... least 2 seconds to return to the CDA-9855/CDA-9853. The stored setting contents are changed to that is set to the Owner's Manual of the crossover mode. The lighting color...mode. http://www.alpine.com or http://www.alpine-usa.com Downloadable data Parametric equalizer or Graphic equalizer Time correction Crossover Profile (CDA-9855 only) Calendar message (CDA-9855 only) Data is...
... Operation SOURCE/POWER MENU GlideTouch bar About i-Personalize™ You can download data (from Alpine's website) to a CD-R, and download and store the data to normal mode. • SOURCE/POWER, BAND,... least 2 seconds to return to the CDA-9855/CDA-9853. The stored setting contents are changed to that is set to the Owner's Manual of the crossover mode. The lighting color...mode. http://www.alpine.com or http://www.alpine-usa.com Downloadable data Parametric equalizer or Graphic equalizer Time correction Crossover Profile (CDA-9855 only) Calendar message (CDA-9855 only) Data is...

Owners Manual
Page 31
...Displaying the Title/Text" (page 22), you have already downloaded the profile data. Setting the Temperature Display for the External Amplifier CDA-9855:A-LINK F (Initial setting) / A-LINK C CDA-9853:AMP TEMP °F (Initial setting)/ AMP TEMP °C When a separately sold Amplifier Link compatible amplifier is connected, ... selection is completed, turn the ignition off and back on the setup main menu in step 3. Scroll Setting AUTO / MANUAL (Initial setting) This CD player can be shown when the time is displayed. Connect the DVD player to the optical digital input (Head unit) ...
...Displaying the Title/Text" (page 22), you have already downloaded the profile data. Setting the Temperature Display for the External Amplifier CDA-9855:A-LINK F (Initial setting) / A-LINK C CDA-9853:AMP TEMP °F (Initial setting)/ AMP TEMP °C When a separately sold Amplifier Link compatible amplifier is connected, ... selection is completed, turn the ignition off and back on the setup main menu in step 3. Scroll Setting AUTO / MANUAL (Initial setting) This CD player can be shown when the time is displayed. Connect the DVD player to the optical digital input (Head unit) ...
Owners Manual
Page 35
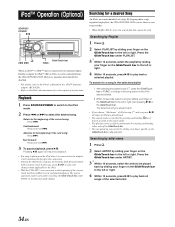
...; The search mode is connected to the optional Alpine Interface adapter for a song in the selected playlist 1 After selecting the playlist in the function guide display. However, operation from the CDA-9855/CDA-9853. The source operation mode is disabled. • For details, refer to the Owner's Manual of the iPod™ Interface adapter (KCA...
...; The search mode is connected to the optional Alpine Interface adapter for a song in the selected playlist 1 After selecting the playlist in the function guide display. However, operation from the CDA-9855/CDA-9853. The source operation mode is disabled. • For details, refer to the Owner's Manual of the iPod™ Interface adapter (KCA...
Owners Manual
Page 37
...36-EN For details, refer to "Displaying the External Amplifier Information" (page 25). • When the Scroll Setting (page 30) is set to "MANUAL," press and hold TITLE for at least 2 seconds to scroll the tag information only once. • Elapsed time is displayed for 5 seconds immediately after..., songs may not be played back when connected to activate the audio function mode. The maximum number of characters is not compatible with the CDA-9855/CDA-9853. Each press changes the display. Press TITLE. The song will be recalled again if the GlideTouch bar is touched. • If ...
...36-EN For details, refer to "Displaying the External Amplifier Information" (page 25). • When the Scroll Setting (page 30) is set to "MANUAL," press and hold TITLE for at least 2 seconds to scroll the tag information only once. • Elapsed time is displayed for 5 seconds immediately after..., songs may not be played back when connected to activate the audio function mode. The maximum number of characters is not compatible with the CDA-9855/CDA-9853. Each press changes the display. Press TITLE. The song will be recalled again if the GlideTouch bar is touched. • If ...
Owners Manual
Page 43
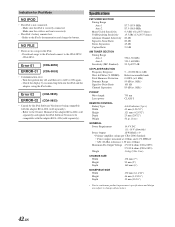
...to be compatible with the adapter KCA-420i (sold separately). Error 02 (CDA-9855) ERROR-02 (CDA-9853) • Caused by reconnecting between the iPod and the adapter, using the iPod cable. Refer to the Owner's Manual of the adapter KCA-420i (sold separately) and update the iPod Software ...45 dB 2.0 dB AM TUNER SECTION Tuning Range Area 1 Area 2 Sensitivity (IEC Standard) 530-1,710 kHz 531-1,602 kHz 22.5 μV/27 dB CD PLAYER SECTION Frequency Response Wow & Flutter (% WRMS) Total Harmonic Distortion Dynamic Range Signal-to-Noise Ratio Channel Separation 5 - 20,000 Hz (±1 dB...
...to be compatible with the adapter KCA-420i (sold separately). Error 02 (CDA-9855) ERROR-02 (CDA-9853) • Caused by reconnecting between the iPod and the adapter, using the iPod cable. Refer to the Owner's Manual of the adapter KCA-420i (sold separately) and update the iPod Software ...45 dB 2.0 dB AM TUNER SECTION Tuning Range Area 1 Area 2 Sensitivity (IEC Standard) 530-1,710 kHz 531-1,602 kHz 22.5 μV/27 dB CD PLAYER SECTION Frequency Response Wow & Flutter (% WRMS) Total Harmonic Distortion Dynamic Range Signal-to-Noise Ratio Channel Separation 5 - 20,000 Hz (±1 dB...
Owners Manual
Page 44
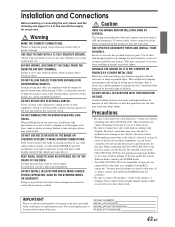
.... If so, please contact your unit in fire. Cables or wiring that penetrates into these leads to provide power for this manual thoroughly for installation, take such precautions may cause parts to become loose resulting in metal, use only the specified accessory parts....consult your dealer if you purchased this unit requires special technical skill and experience. on-board computer). When in locations with your ALPINE dealer. • The CDA-9855/CDA-9853 uses female RCA-type jacks for assistance. • Be sure to connect the speaker (-) leads to the speaker (-)...
.... If so, please contact your unit in fire. Cables or wiring that penetrates into these leads to provide power for this manual thoroughly for installation, take such precautions may cause parts to become loose resulting in metal, use only the specified accessory parts....consult your dealer if you purchased this unit requires special technical skill and experience. on-board computer). When in locations with your ALPINE dealer. • The CDA-9855/CDA-9853 uses female RCA-type jacks for assistance. • Be sure to connect the speaker (-) leads to the speaker (-)...
Owners Manual
Page 47
... connected, leave the switch in the EQ/DIV position. DC/DC Converter (CDA-9855 only) • Do not install the converter at a location subjected to bare... cause a malfunction. • Do not bundle the DC/DC converter cable with CD Changer) > RCA Extension Cable (sold ) Amplifier Link box KCE-511M. 2 Antenna...the vehicle's power antenna. This lead should be generated when receiving radio broadcast. 46-EN Be sure to turn the power off to the...this lead to an open terminal on how to connect, refer to the Owner's Manual of the vehicle's battery. 9 Ground Lead (Black) Connect this lead to ...
... connected, leave the switch in the EQ/DIV position. DC/DC Converter (CDA-9855 only) • Do not install the converter at a location subjected to bare... cause a malfunction. • Do not bundle the DC/DC converter cable with CD Changer) > RCA Extension Cable (sold ) Amplifier Link box KCE-511M. 2 Antenna...the vehicle's power antenna. This lead should be generated when receiving radio broadcast. 46-EN Be sure to turn the power off to the...this lead to an open terminal on how to connect, refer to the Owner's Manual of the vehicle's battery. 9 Ground Lead (Black) Connect this lead to ...
Owners Manual
Page 52
... CDA-9855 while displaying ARTIST NAME/ALBUM NAME, the text information scrolls continuously. • Page 30, Setting the Temperature Display for the CDA-9853 model) and 18 CD titles on this setting. • Page 30, Scroll Setting Even when the scroll setting is set to MANUAL with the SAT Radio ...Receiver (Optional), steps 1 and 2 1 Press SOURCE/POWER to select SAT Radio mode. 2 Press BAND to store...
... CDA-9855 while displaying ARTIST NAME/ALBUM NAME, the text information scrolls continuously. • Page 30, Setting the Temperature Display for the CDA-9853 model) and 18 CD titles on this setting. • Page 30, Scroll Setting Even when the scroll setting is set to MANUAL with the SAT Radio ...Receiver (Optional), steps 1 and 2 1 Press SOURCE/POWER to select SAT Radio mode. 2 Press BAND to store...


