
Owners Manual
Page 1
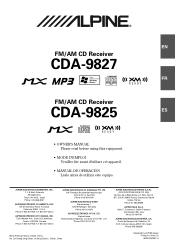
... 9TW, U.K. Paris Nord Il, B.P. 50016, 95945 Roissy Charles de Gaulle Cedex, France Phone 01-48638989 ALPINE ITALIA S.p.A. Viale C. R EN FM/AM CD Receiver CDA-9827 FR FM/AM CD Receiver CDA-9825 ES • OWNER'S MANUAL ES Please read before using this equipment. • MODE D'EMPLOI Veuillez lire...este equipo. Phone 0870-33 33 763 Melyi Printing Factory, Dalian, China No. 28 Chang Qing Street, Xl Gang District, Dalian, China ALPINE ELECTRONICS FRANCE S.A.R.L. (RCS PONTOISE B 338 101 280) 98, Rue de la Belle Etoile, Z.I. LTD. 6-8 Fiveways Boulevarde Keysborough, Victoria 3173...
... 9TW, U.K. Paris Nord Il, B.P. 50016, 95945 Roissy Charles de Gaulle Cedex, France Phone 01-48638989 ALPINE ITALIA S.p.A. Viale C. R EN FM/AM CD Receiver CDA-9827 FR FM/AM CD Receiver CDA-9825 ES • OWNER'S MANUAL ES Please read before using this equipment. • MODE D'EMPLOI Veuillez lire...este equipo. Phone 0870-33 33 763 Melyi Printing Factory, Dalian, China No. 28 Chang Qing Street, Xl Gang District, Dalian, China ALPINE ELECTRONICS FRANCE S.A.R.L. (RCS PONTOISE B 338 101 280) 98, Rue de la Belle Etoile, Z.I. LTD. 6-8 Fiveways Boulevarde Keysborough, Victoria 3173...

Owners Manual
Page 2
.../CDA-9825. • Changeur CD pour CDA-9827/CDA-9825. • Cambiador de CD para CDA-9827/ CDA-9825. The CHA-1214 Ai-NET model holds 12 discs, and the CHM-S630 M-Bus model is a high-performance 6-disc changer with a CD-R/RW PLAY BACK. CHA-S634 • CD changer for CDA-9827/CDA-9825. • Changeur CD pour CDA-9827/CDA-9825. • Cambiador de CD para CDA-9827/ CDA-9825. Changeurs de CD Alpine...
.../CDA-9825. • Changeur CD pour CDA-9827/CDA-9825. • Cambiador de CD para CDA-9827/ CDA-9825. The CHA-1214 Ai-NET model holds 12 discs, and the CHM-S630 M-Bus model is a high-performance 6-disc changer with a CD-R/RW PLAY BACK. CHA-S634 • CD changer for CDA-9827/CDA-9825. • Changeur CD pour CDA-9827/CDA-9825. • Cambiador de CD para CDA-9827/ CDA-9825. Changeurs de CD Alpine...
Owners Manual
Page 3
... 13 Radio Operation Changing the Radio Frequencies for each Country 14 Manual Tuning 14 Automatic Seek Tuning 14 Manual Storing of Station Presets 14 Automatic Memory of Station Presets 15 Tuning to Preset Stations 15 Station Title Search Function 15 Quick Search Function 15 CD Player Operation ... Programs 18 Track Search Function 18 Quick Search Function 18 Controlling CD Changer (Optional 18 Multi-Changer Selection 19 MP3/WMA Operation Playing MP3/WMA Files (CDA-9827 only) ... 20 Playing MP3 Files with the CD Changer (Optional 20 Music Sensor (Skip 20 Fast Forward and ...
... 13 Radio Operation Changing the Radio Frequencies for each Country 14 Manual Tuning 14 Automatic Seek Tuning 14 Manual Storing of Station Presets 14 Automatic Memory of Station Presets 15 Tuning to Preset Stations 15 Station Title Search Function 15 Quick Search Function 15 CD Player Operation ... Programs 18 Track Search Function 18 Quick Search Function 18 Controlling CD Changer (Optional 18 Multi-Changer Selection 19 MP3/WMA Operation Playing MP3/WMA Files (CDA-9827 only) ... 20 Playing MP3 Files with the CD Changer (Optional 20 Music Sensor (Skip 20 Fast Forward and ...

Owners Manual
Page 4
... (Optional) Receiving XM Channels with the XM Receiver (Optional 22 Checking the XM Radio ID Number 22 Storing XM Channel Presets 22 Receiving Stored XM Channels 22 Channel/Category Search Function 23 Quick Search Function 23 Changing ...incoming/absent/ incoming history 25 SMS (Short Message Service) Operation Receiving a short message 25 Remote Control Operation Controls on Remote Control (CDA-9827 only 26 Battery Replacement (CDA-9827 only) ......... 27 Information About MP3/WMA 28 In Case of Difficulty 30 Specifications 33 Installation and Connections Warning 34 Caution 34 ...
... (Optional) Receiving XM Channels with the XM Receiver (Optional 22 Checking the XM Radio ID Number 22 Storing XM Channel Presets 22 Receiving Stored XM Channels 22 Channel/Category Search Function 23 Quick Search Function 23 Changing ...incoming/absent/ incoming history 25 SMS (Short Message Service) Operation Receiving a short message 25 Remote Control Operation Controls on Remote Control (CDA-9827 only 26 Battery Replacement (CDA-9827 only) ......... 27 Information About MP3/WMA 28 In Case of Difficulty 30 Specifications 33 Installation and Connections Warning 34 Caution 34 ...

Owners Manual
Page 6
... various accessories available on the disc. CORRECT INCORRECT CORRECT Inserting Discs Your player accepts only one disc. Center Hole Center Hole New Disc Disc Cleaning Fingerprints, dust, or soil on discs played in Alpine CD players. Your player will automatically eject discs with a ballpoint pen or other such instrument, ... disc. Use of the disc with irregular surfaces or inserted incorrectly. Transparent Sheet Disc Stabilizer Installation Location Make sure the CDA-9827/CDA-9825 will not leave fingerprints on a very bumpy road may cause damage to prevent the...
... various accessories available on the disc. CORRECT INCORRECT CORRECT Inserting Discs Your player accepts only one disc. Center Hole Center Hole New Disc Disc Cleaning Fingerprints, dust, or soil on discs played in Alpine CD players. Your player will automatically eject discs with a ballpoint pen or other such instrument, ... disc. Use of the disc with irregular surfaces or inserted incorrectly. Transparent Sheet Disc Stabilizer Installation Location Make sure the CDA-9827/CDA-9825 will not leave fingerprints on a very bumpy road may cause damage to prevent the...
Owners Manual
Page 8
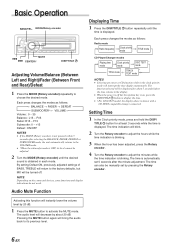
...5 seconds after selecting the BALANCE, FADER, DEFEAT or SUBWOOFER mode, the unit automatically returns to display the time. • ∗For CDA-9825 model, the display above is displayed. Setting Time 1 In the Clock priority mode, press and hold the DISP/ TITLE button for about... • When the power is off . Basic Operation BAND/TEL. Each press changes the modes as follows: Radio mode → Radio frequency → Clock priority → mode TITLE mode CD Player/Changer modes → Playing time mode → Clock priority mode → DISC TEXT mode * TITLE mode ...
...5 seconds after selecting the BALANCE, FADER, DEFEAT or SUBWOOFER mode, the unit automatically returns to display the time. • ∗For CDA-9825 model, the display above is displayed. Setting Time 1 In the Clock priority mode, press and hold the DISP/ TITLE button for about... • When the power is off . Basic Operation BAND/TEL. Each press changes the modes as follows: Radio mode → Radio frequency → Clock priority → mode TITLE mode CD Player/Changer modes → Playing time mode → Clock priority mode → DISC TEXT mode * TITLE mode ...
Owners Manual
Page 11
...connected.) ↓ FILE/ELAPSED TIME DISPLAY ↓ FOLDER NO./FILE NO. Radio mode: ↓ FREQUENCY DISPLAY ↓ CLOCK DISPLAY ↓ TITLE DISPLAY∗2 CD mode: (Text is displayed for the CDA-9825 model when a compatible changer with CD text is connected.) ↓ ELAPSED TIME DISPLAY ↓ CLOCK DISPLAY &#... the Text information to be played back with the CDA-9825 model if an MP3 compatible changer is referred to display the CD/Station title if the title has been previously inputted. Text cannot be displayed for the CDA-9825 model. ∗2 If the title was not previously...
...connected.) ↓ FILE/ELAPSED TIME DISPLAY ↓ FOLDER NO./FILE NO. Radio mode: ↓ FREQUENCY DISPLAY ↓ CLOCK DISPLAY ↓ TITLE DISPLAY∗2 CD mode: (Text is displayed for the CDA-9825 model when a compatible changer with CD text is connected.) ↓ ELAPSED TIME DISPLAY ↓ CLOCK DISPLAY &#... the Text information to be played back with the CDA-9825 model if an MP3 compatible changer is referred to display the CD/Station title if the title has been previously inputted. Text cannot be displayed for the CDA-9825 model. ∗2 If the title was not previously...
Owners Manual
Page 13
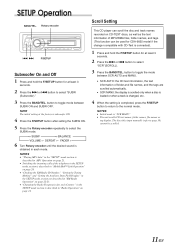
button to page 10) cannot be used for CDA-9825 model if the changer compatible with CD-Text is connected). 1 Press and hold the F/SETUP button for at least 3 seconds. 2 Press the f or g button to the normal mode. SETUP Operation BAND/TEL. ... the XM Radio ID Number," "Setting the Tuning Method" and "Setting the Auxiliary Data Field Display" in the SETUP mode section is subwoofer ON. 4 Press the F/SETUP button after setting the SUBW ON. 5 Press the Rotary encoder repeatedly to select "SCR"(SCROLL). 3 Press the BAND/TEL. Scroll Setting This CD player can be...
button to page 10) cannot be used for CDA-9825 model if the changer compatible with CD-Text is connected). 1 Press and hold the F/SETUP button for at least 3 seconds. 2 Press the f or g button to the normal mode. SETUP Operation BAND/TEL. ... the XM Radio ID Number," "Setting the Tuning Method" and "Setting the Auxiliary Data Field Display" in the SETUP mode section is subwoofer ON. 4 Press the F/SETUP button after setting the SUBW ON. 5 Press the Rotary encoder repeatedly to select "SCR"(SCROLL). 3 Press the BAND/TEL. Scroll Setting This CD player can be...

Owners Manual
Page 18
.... If you use unspecified compact discs, correct performance cannot be guaranteed. The player automatically draws the disc into the slot with fingerprints, CDs exposed to extreme temperatures or sunlight (e.g., left in a format compatible with the CDA-9825 model. However, you cannot play CD-Rs/CD-RWs containing MP3 formatted audio files. • Some of the following...
.... If you use unspecified compact discs, correct performance cannot be guaranteed. The player automatically draws the disc into the slot with fingerprints, CDs exposed to extreme temperatures or sunlight (e.g., left in a format compatible with the CDA-9825 model. However, you cannot play CD-Rs/CD-RWs containing MP3 formatted audio files. • Some of the following...
Owners Manual
Page 20
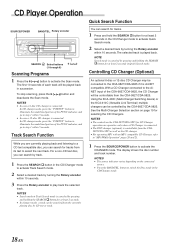
... played back in the CD/Changer mode. 18-EN NOTE Search mode is canceled by CD text or track. Controlling CD Changer (Optional) An optional 6-disc or 12-disc CD Changer may be controlled by turning the Rotary encoder within 10 seconds. CD Player Operation SOURCE/POWER BAND/... Quick Search mode. 2 Select a desired track by the CDA-9827/CDA-9825. NOTES • The controls on the CDA-9827/CDA-9825 for tracks from the CDA- 9827/CDA-9825 as well as the CD changer. • For operating MP3 with an MP3 compatible CD Changer, refer to "MP3/WMA Operation" pages 20 and ...
... played back in the CD/Changer mode. 18-EN NOTE Search mode is canceled by CD text or track. Controlling CD Changer (Optional) An optional 6-disc or 12-disc CD Changer may be controlled by turning the Rotary encoder within 10 seconds. CD Player Operation SOURCE/POWER BAND/... Quick Search mode. 2 Select a desired track by the CDA-9827/CDA-9825. NOTES • The controls on the CDA-9827/CDA-9825 for tracks from the CDA- 9827/CDA-9825 as well as the CD changer. • For operating MP3 with an MP3 compatible CD Changer, refer to "MP3/WMA Operation" pages 20 and ...
Owners Manual
Page 21
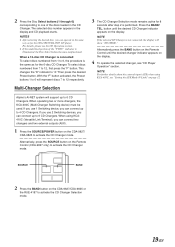
...display will show "NO CHGR ." Alternatively press the BAND button on the Remote Control until the desired CD Changer indicator appears on the CDA-9827/ CDA-9825 to activate the CD Changer mode. This changes the "D" indicator to "d." NOTE For further details about the external input (... please see "CD Player Operation" section. button until the desired changer indicator appears on the Remote Control (CDA-9827 only) to activate the CD Changer mode. When a 12-disc CD Changer is connected: To select discs numbered from 7 to 12, first press the "F" button. Alpine's Ai-NET...
...display will show "NO CHGR ." Alternatively press the BAND button on the Remote Control until the desired CD Changer indicator appears on the CDA-9827/ CDA-9825 to activate the CD Changer mode. This changes the "D" indicator to "d." NOTE For further details about the external input (... please see "CD Player Operation" section. button until the desired changer indicator appears on the Remote Control (CDA-9827 only) to activate the CD Changer mode. When a 12-disc CD Changer is connected: To select discs numbered from 7 to 12, first press the "F" button. Alpine's Ai-NET...
Owners Manual
Page 22
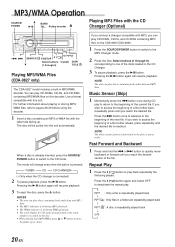
... next file. You can play to return to move backward or forward until the desired file is the track numbers recorded on the CDA-9827/CDA-9825. 1 Press the SOURCE/POWER button to switch to the CD mode. Music Sensor (Skip) 1 Momentarily press the g button once during WMA playback. • The track display for...
... next file. You can play to return to move backward or forward until the desired file is the track numbers recorded on the CDA-9827/CDA-9825. 1 Press the SOURCE/POWER button to switch to the CD mode. Music Sensor (Skip) 1 Momentarily press the g button once during WMA playback. • The track display for...
Owners Manual
Page 24
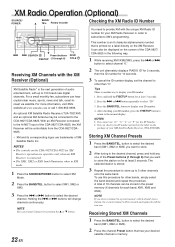
..., subscribers can be displayed on the CDA-9827/CDA-9825 for 10 seconds. 3 To cancel the ID number display, set the channel to other than "0." An optional XM Satellite Radio Receiver (TUA-T021XM) and an optional XM Antenna may be controllable from the CDA-9827/CDA9825. ∗ XM and...the F/SETUP button to return to display your ID number. 1. Rotary encoder Checking the XM Radio ID Number g f SEARCH 9 Preset buttons DISP/ F/SETUP (1 through 6) that is another way to the CDA-9827/CDA-9825. For more information, visit XM's website at least 2 seconds. NOTE You can change channels...
..., subscribers can be displayed on the CDA-9827/CDA-9825 for 10 seconds. 3 To cancel the ID number display, set the channel to other than "0." An optional XM Satellite Radio Receiver (TUA-T021XM) and an optional XM Antenna may be controllable from the CDA-9827/CDA9825. ∗ XM and...the F/SETUP button to return to display your ID number. 1. Rotary encoder Checking the XM Radio ID Number g f SEARCH 9 Preset buttons DISP/ F/SETUP (1 through 6) that is another way to the CDA-9827/CDA-9825. For more information, visit XM's website at least 2 seconds. NOTE You can change channels...
Owners Manual
Page 26
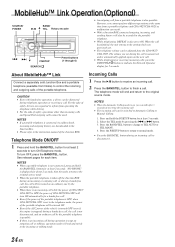
... call can talk after 3 seconds of safety, operations other than incoming calls and Speed-Dial outgoing calls cannot be adjusted from a portable telephone and CDA-9827/CDA-9825 as an ordinary one by pressing the g or f button. 3. MobileHub™ Link Operation(Optional) SOURCE/ POWER BAND/ -/J 8 TEL. The...engine is stopped) during a hands-free call, the call is not disconnected, and an ordinary call while the power of CDA-9827/ CDA-9825 is OFF, the power of CDA-9827/CDA-9825 will turn ON automatically for at least 2 seconds to TEL AUTO or TEL MANU. 4. Incoming Calls 1 Press the ...
... call can talk after 3 seconds of safety, operations other than incoming calls and Speed-Dial outgoing calls cannot be adjusted from a portable telephone and CDA-9827/CDA-9825 as an ordinary one by pressing the g or f button. 3. MobileHub™ Link Operation(Optional) SOURCE/ POWER BAND/ -/J 8 TEL. The...engine is stopped) during a hands-free call, the call is not disconnected, and an ordinary call while the power of CDA-9827/ CDA-9825 is OFF, the power of CDA-9827/CDA-9825 will turn ON automatically for at least 2 seconds to TEL AUTO or TEL MANU. 4. Incoming Calls 1 Press the ...

Owners Manual
Page 28
... Select (UP) Button to select the folder. 8 g DN Button Radio mode: SEEK (DN) Button CD mode: Press the button to go back to the beginning of the current track. 9 f UP Button Radio mode: SEEK (UP) Button CD mode: Press the button to advance to the beginning of the external audio... 1 2 5 6 7 8 9 3 ! 4 " # Controls on Remote Control (CDA-9827 only) 1 Power Button Press the button to turn the power on/off. 2 Source Button Press to select the audio source. 3 -/J Button Press the button to switch between the Play and Pause modes for CD. 4 TILT 89 Buttons Not used in conjunction with...
... Select (UP) Button to select the folder. 8 g DN Button Radio mode: SEEK (DN) Button CD mode: Press the button to go back to the beginning of the current track. 9 f UP Button Radio mode: SEEK (UP) Button CD mode: Press the button to advance to the beginning of the external audio... 1 2 5 6 7 8 9 3 ! 4 " # Controls on Remote Control (CDA-9827 only) 1 Power Button Press the button to turn the power on/off. 2 Source Button Press to select the audio source. 3 -/J Button Press the button to switch between the Play and Pause modes for CD. 4 TILT 89 Buttons Not used in conjunction with...
Owners Manual
Page 29
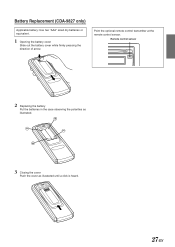
Battery Replacement (CDA-9827 only) Applicable battery: Use two "AAA" sized dry batteries or equivalent. 1 Opening the battery cover Slide out the battery cover while firmly pressing the direction of arrow. Point the optional remote control transmitter at the remote control sensor. Remote control sensor 2 Replacing the battery Put the batteries in the case observing the polarities as illustrated. 3 Closing the cover Push the cover as illustrated until a click is heard. 27-EN
Battery Replacement (CDA-9827 only) Applicable battery: Use two "AAA" sized dry batteries or equivalent. 1 Opening the battery cover Slide out the battery cover while firmly pressing the direction of arrow. Point the optional remote control transmitter at the remote control sensor. Remote control sensor 2 Replacing the battery Put the batteries in the case observing the polarities as illustrated. 3 Closing the cover Push the cover as illustrated until a click is heard. 27-EN

Owners Manual
Page 33
.... NOTE When the "ERROR" is displayed: In case that the disc cannot be pulled out, consult your Alpine dealer. If the magazine does not eject, consult your Alpine dealer. • Magazine ejection not possible. - Press the Eject button to high temperature. - The indicator ... page 5) and press the c button again. PROTECT (CDA-9827 only) • A copy-protected WMA file was played back. - Check the indication. Insert a magazine. ERROR - 01 • Malfunction in a MP3/WMA supported format. - Indication for CD Player HI TEMP • Protective circuit is activated due to...
.... NOTE When the "ERROR" is displayed: In case that the disc cannot be pulled out, consult your Alpine dealer. If the magazine does not eject, consult your Alpine dealer. • Magazine ejection not possible. - Press the Eject button to high temperature. - The indicator ... page 5) and press the c button again. PROTECT (CDA-9827 only) • A copy-protected WMA file was played back. - Check the indication. Insert a magazine. ERROR - 01 • Malfunction in a MP3/WMA supported format. - Indication for CD Player HI TEMP • Protective circuit is activated due to...
Owners Manual
Page 36
... ENTANGLED IN SURROUNDING OBJECTS. Cables or wiring that penetrates into these leads to electrical shorts. Never cut by the metal edge of the CDA-9827/ CDA-9825 has the appropriate amperage. Failure to take precautions so as a permanent record. KEEP SMALL OBJECTS SUCH AS BATTERIES OUT OF THE REACH...vehicle body. IMPORTANT Please record the serial number of the unit. The serial number plate is located on the bottom of your ALPINE dealer. • The CDA-9827/CDA-9825 uses female RCA-type jacks for assistance. • Be sure to connect the speaker (-) leads to have the work done.
... ENTANGLED IN SURROUNDING OBJECTS. Cables or wiring that penetrates into these leads to electrical shorts. Never cut by the metal edge of the CDA-9827/ CDA-9825 has the appropriate amperage. Failure to take precautions so as a permanent record. KEEP SMALL OBJECTS SUCH AS BATTERIES OUT OF THE REACH...vehicle body. IMPORTANT Please record the serial number of the unit. The serial number plate is located on the bottom of your ALPINE dealer. • The CDA-9827/CDA-9825 uses female RCA-type jacks for assistance. • Be sure to connect the speaker (-) leads to have the work done.
Owners Manual
Page 37
...page). Face Plate This unit Ground Lead ∗ Screws (M5 × 8) (Included) Mounting Bracket NOTE Secure the ground lead of the CDA-9827/CDA-9825. Slide mounting sleeve from the dashboard. NOTE Please examine the installation. Make certain that the unit is in the CONNECTlONS section. 3 1 No... to a clean metal spot using a screw (∗) already attached to page 5). Lock Pin Slide the CDA-9827/CDA-9825 into the dashboard. Secure the ground lead of the CDA-9827/CDA-9825 according to details described in place, make sure it does not re-lock before unlocking the second pin. ...
...page). Face Plate This unit Ground Lead ∗ Screws (M5 × 8) (Included) Mounting Bracket NOTE Secure the ground lead of the CDA-9827/CDA-9825. Slide mounting sleeve from the dashboard. NOTE Please examine the installation. Make certain that the unit is in the CONNECTlONS section. 3 1 No... to a clean metal spot using a screw (∗) already attached to page 5). Lock Pin Slide the CDA-9827/CDA-9825 into the dashboard. Secure the ground lead of the CDA-9827/CDA-9825 according to details described in place, make sure it does not re-lock before unlocking the second pin. ...
Owners Manual
Page 38
Installation and Connections Connections (CDA-9827 only) 1 Blue POWER ANT 2 Blue/White REMOTE TURN-ON 3 AUDIO Pink/Black INTERRUPT IN 4 Orange ILLUMINATION 5 Red IGNITION 6 Yellow BATTERY 7 9 Black GND 8 Antenna To ... vehicle phone To the instrument cluster illumination lead Ignition Key Battery + / Ai-NET ! NORM EQ/DIV , - . Speakers Front right Rear right Rear left Front left CD Changer (Sold Separately) Amplifier Front Left Front Right Amplifier Rear Left Rear Right Speakers Amplifier Subwoofers 36-EN Gray " SPEAKER RIGHT FRONT # Gray/Black Violet...
Installation and Connections Connections (CDA-9827 only) 1 Blue POWER ANT 2 Blue/White REMOTE TURN-ON 3 AUDIO Pink/Black INTERRUPT IN 4 Orange ILLUMINATION 5 Red IGNITION 6 Yellow BATTERY 7 9 Black GND 8 Antenna To ... vehicle phone To the instrument cluster illumination lead Ignition Key Battery + / Ai-NET ! NORM EQ/DIV , - . Speakers Front right Rear right Rear left Front left CD Changer (Sold Separately) Amplifier Front Left Front Right Amplifier Rear Left Rear Right Speakers Amplifier Subwoofers 36-EN Gray " SPEAKER RIGHT FRONT # Gray/Black Violet...


