
Owners Manual
Page 3
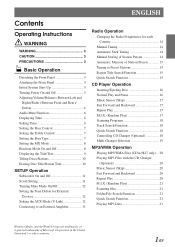
... and Rear)/ Defeat 6 Audio Mute Function 6 Displaying Time 6 Setting Time 6 Setting the Bass Control 7 Setting the Treble Control 7 Setting the Bass Type 7 Setting the MX Mode 8 Blackout Mode On and Off 8 Displaying the Title/Text 9 Titling Discs/Stations 10 Erasing Disc Title/Station Title 10 SETUP Operation Subwoofer On and Off 11 Scroll Setting 11 Turning Mute Mode On/Off 12 Setting the Tone Defeat for External Devices 12 Setting the AUX Mode (V-Link 12 Connecting to an External Amplifier 13 Radio Operation Changing the Radio Frequencies for each Country 14 Manual Tuning...
... and Rear)/ Defeat 6 Audio Mute Function 6 Displaying Time 6 Setting Time 6 Setting the Bass Control 7 Setting the Treble Control 7 Setting the Bass Type 7 Setting the MX Mode 8 Blackout Mode On and Off 8 Displaying the Title/Text 9 Titling Discs/Stations 10 Erasing Disc Title/Station Title 10 SETUP Operation Subwoofer On and Off 11 Scroll Setting 11 Turning Mute Mode On/Off 12 Setting the Tone Defeat for External Devices 12 Setting the AUX Mode (V-Link 12 Connecting to an External Amplifier 13 Radio Operation Changing the Radio Frequencies for each Country 14 Manual Tuning...

Owners Manual
Page 4
... the XM Radio ID Number 22 Storing XM Channel Presets 22 Receiving Stored XM Channels 22 Channel/Category Search Function 23 Quick Search Function 23 Changing the Display 23 Setting the tuning method 23 Setting the Auxiliary Data Field Display ........ 23 MobileHub™Link Operation (Optional) About MobileHub™ Link 24 Telephone Mode ON/OFF 24 Incoming Calls 24 Calling Calling by the address book 25 Calling by using the...
... the XM Radio ID Number 22 Storing XM Channel Presets 22 Receiving Stored XM Channels 22 Channel/Category Search Function 23 Quick Search Function 23 Changing the Display 23 Setting the tuning method 23 Setting the Auxiliary Data Field Display ........ 23 MobileHub™Link Operation (Optional) About MobileHub™ Link 24 Telephone Mode ON/OFF 24 Incoming Calls 24 Calling Calling by the address book 25 Calling by using the...
Owners Manual
Page 5
... death. KEEP THE VOLUME AT A LEVEL WHERE YOU CAN STILL HEAR OUTSIDE NOISE WHILE DRIVING. USE ONLY IN CARS WITH A 12 VOLT NEGATIVE GROUND. (Check with your Alpine dealer or the nearest Alpine Service Station for servicing. 3-EN Doing so may result in an accident. CAUTION This symbol means important instructions. DO NOT MIX NEW BATTERIES WITH OLD BATTERIES. MINIMIZE DISPLAY VIEWING WHILE DRIVING. Return it...
... death. KEEP THE VOLUME AT A LEVEL WHERE YOU CAN STILL HEAR OUTSIDE NOISE WHILE DRIVING. USE ONLY IN CARS WITH A 12 VOLT NEGATIVE GROUND. (Check with your Alpine dealer or the nearest Alpine Service Station for servicing. 3-EN Doing so may result in an accident. CAUTION This symbol means important instructions. DO NOT MIX NEW BATTERIES WITH OLD BATTERIES. MINIMIZE DISPLAY VIEWING WHILE DRIVING. Return it...

Owners Manual
Page 6
... damage the player. Hold the disc so you insert the disc. When a new disc is off. Center Hole Center Hole New Disc Disc Cleaning Fingerprints, dust, or soil on discs played in Alpine CD players. Using such accessories can cause the disc to be installed in a location subjected to the mechanism. Do not attempt to use round shape discs only for protecting the disc surface and improving sound quality. For...
... damage the player. Hold the disc so you insert the disc. When a new disc is off. Center Hole Center Hole New Disc Disc Cleaning Fingerprints, dust, or soil on discs played in Alpine CD players. Using such accessories can cause the disc to be installed in a location subjected to the mechanism. Do not attempt to use round shape discs only for protecting the disc surface and improving sound quality. For...
Owners Manual
Page 8
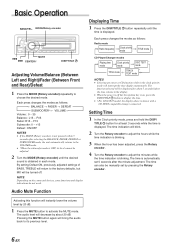
... time display momentarily. Each press changes the modes as follows: Radio mode → Radio frequency → Clock priority → mode TITLE mode CD Player/Changer modes → Playing time mode → Clock priority mode → DISC TEXT mode * TITLE mode ← TRACK TEXT mode * ← NOTES • Selecting any tuner or CD function while in each mode. The time indication will be adjusted. 2 Turn the MODE (Rotary encoder) until the Each press changes the modes as follows: → BALANCE → FADER → DEFEAT SUBWOOFER*← VOLUME ← Volume...
... time display momentarily. Each press changes the modes as follows: Radio mode → Radio frequency → Clock priority → mode TITLE mode CD Player/Changer modes → Playing time mode → Clock priority mode → DISC TEXT mode * TITLE mode ← TRACK TEXT mode * ← NOTES • Selecting any tuner or CD function while in each mode. The time indication will be adjusted. 2 Turn the MODE (Rotary encoder) until the Each press changes the modes as follows: → BALANCE → FADER → DEFEAT SUBWOOFER*← VOLUME ← Volume...
Owners Manual
Page 10
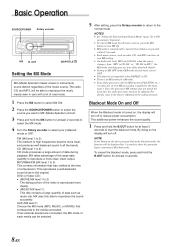
... adjusted. DVD (or Video CD): • (MOVIE MX level 1 to start the blackout mode. To cancel the blackout mode, press and hold the B.OUT button for 5 seconds to show the operation before returning to select your preferred mode or OFF. Basic Operation SOURCE/POWER Rotary encoder MX B. OUT DISP/TITLE Setting the MX Mode MX (Media Xpander) makes vocals or instruments sound distinct regardless of the audio processor. AUX (MX level...
... adjusted. DVD (or Video CD): • (MOVIE MX level 1 to start the blackout mode. To cancel the blackout mode, press and hold the B.OUT button for 5 seconds to show the operation before returning to select your preferred mode or OFF. Basic Operation SOURCE/POWER Rotary encoder MX B. OUT DISP/TITLE Setting the MX Mode MX (Media Xpander) makes vocals or instruments sound distinct regardless of the audio processor. AUX (MX level...
Owners Manual
Page 11
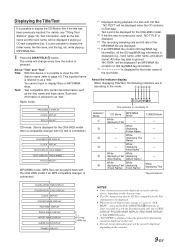
...; The CD changer must also be CD Text compatible for the CDA-9825 model when a compatible changer with CD text is connected.) ↓ ELAPSED TIME DISPLAY ↓ CLOCK DISPLAY ↓ TEXT DISPLAY (DISC NAME)∗1 ↓ TEXT DISPLAY (TRACK NAME)∗1 ↓ TITLE DISPLAY∗2 MP3/WMA mode: (MP3 files can be played back with the CDA-9825 model if an MP3 compatible changer is displayed when the desired text information cannot be displayed on this unit...
...; The CD changer must also be CD Text compatible for the CDA-9825 model when a compatible changer with CD text is connected.) ↓ ELAPSED TIME DISPLAY ↓ CLOCK DISPLAY ↓ TEXT DISPLAY (DISC NAME)∗1 ↓ TEXT DISPLAY (TRACK NAME)∗1 ↓ TITLE DISPLAY∗2 MP3/WMA mode: (MP3 files can be played back with the CDA-9825 model if an MP3 compatible changer is displayed when the desired text information cannot be displayed on this unit...
Owners Manual
Page 13
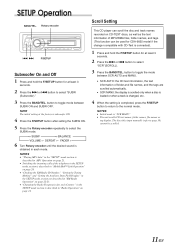
... The initial setting at least 3 seconds. 2 Press the f or g button to select the SUBW mode. → SUBW → BALANCE VOLUME ← DEFEAT ← FADER ← 6 Turn Rotary encoder until the desired sound is "SCR MANU." • The unit scrolls CD text names, folder names, file names or tag display. button to page 10) cannot be used for CDA-9825 model if the changer compatible with CD-Text is...
... The initial setting at least 3 seconds. 2 Press the f or g button to select the SUBW mode. → SUBW → BALANCE VOLUME ← DEFEAT ← FADER ← 6 Turn Rotary encoder until the desired sound is "SCR MANU." • The unit scrolls CD text names, folder names, file names or tag display. button to page 10) cannot be used for CDA-9825 model if the changer compatible with CD-Text is...
Owners Manual
Page 14
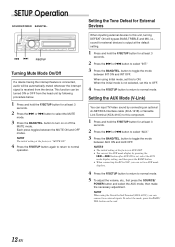
... turn on the unit. 12-EN button to ON. button on or off the MUTE mode. SETUP Operation SOURCE/POWER BAND/TEL. This function can set this to toggle the mode between the MUTE ON and OFF modes. NOTE The initial setting at least 3 seconds. 2 Press the f or g button to normal mode. g f F/SETUP Turning Mute Mode On/Off If a device having the interrupt feature is connected, audio will bypass BASS,TREBLE and MX, i.e., sound for external devices is set, select the AUX mode display setting...
... turn on the unit. 12-EN button to ON. button on or off the MUTE mode. SETUP Operation SOURCE/POWER BAND/TEL. This function can set this to toggle the mode between the MUTE ON and OFF modes. NOTE The initial setting at least 3 seconds. 2 Press the f or g button to normal mode. g f F/SETUP Turning Mute Mode On/Off If a device having the interrupt feature is connected, audio will bypass BASS,TREBLE and MX, i.e., sound for external devices is set, select the AUX mode display setting...
Owners Manual
Page 16
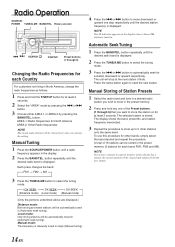
...the next station. The selected station is displayed. button repeatedly until a radio frequency appears in the preset memory. 2 Press and hold the F/SETUP button for a station downward or upward respectively. Manual mode: The frequency is tuned in steps (Manual tuning). 14-EN A total of the Preset buttons (1 through 6) Changing the Radio Frequencies for North America AREA 2: Other Radio frequencies NOTE The stored radio stations will stop at the next station it finds. Radio Operation SOURCE/ POWER TUNE/A.ME BAND/TEL. Rotary encoder g f SEARCH F/SETUP Preset buttons...
...the next station. The selected station is displayed. button repeatedly until a radio frequency appears in the preset memory. 2 Press and hold the F/SETUP button for a station downward or upward respectively. Manual mode: The frequency is tuned in steps (Manual tuning). 14-EN A total of the Preset buttons (1 through 6) Changing the Radio Frequencies for North America AREA 2: Other Radio frequencies NOTE The stored radio stations will stop at the next station it finds. Radio Operation SOURCE/ POWER TUNE/A.ME BAND/TEL. Rotary encoder g f SEARCH F/SETUP Preset buttons...
Owners Manual
Page 21
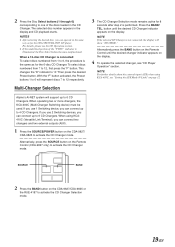
... "F" button. Multi-Changer Selection 3 The CD Changer Selection mode remains active for the CDA-9827/CDA-9825 CD player. Alternatively press the BAND button on the Remote Control until the desired CD Changer indicator appears on the display. 4 To operate the selected changer, see "CD Player Operation" section. When operating two or more changers, the KCA-400C (Multi-Changer Switching device) must be used. 2 Press the Disc Select buttons (1 through 6) corresponding to one of the "FUNC" indicator is not connected, the display will support up...
... "F" button. Multi-Changer Selection 3 The CD Changer Selection mode remains active for the CDA-9827/CDA-9825 CD player. Alternatively press the BAND button on the Remote Control until the desired CD Changer indicator appears on the display. 4 To operate the selected changer, see "CD Player Operation" section. When operating two or more changers, the KCA-400C (Multi-Changer Switching device) must be used. 2 Press the Disc Select buttons (1 through 6) corresponding to one of the "FUNC" indicator is not connected, the display will support up...
Owners Manual
Page 22
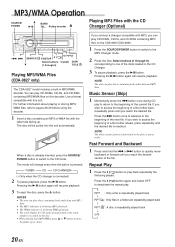
... • The unit can play discs containing both audio data and MP3 data. Music Sensor (Skip) 1 Momentarily press the g button once during WMA playback. • The track display for CD audio data playback is connected) 2 To pause playback, press the -/J button. You can play CD-ROMs, CD-Rs, and CD-RWs containing MP3/WMA files on the CDA-9827/CDA-9825. 1 Press the SOURCE/POWER button to switch to quickly...
... • The unit can play discs containing both audio data and MP3 data. Music Sensor (Skip) 1 Momentarily press the g button once during WMA playback. • The track display for CD audio data playback is connected) 2 To pause playback, press the -/J button. You can play CD-ROMs, CD-Rs, and CD-RWs containing MP3/WMA files on the CDA-9827/CDA-9825. 1 Press the SOURCE/POWER button to switch to quickly...
Owners Manual
Page 24
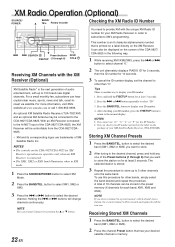
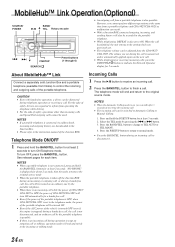
... XM Receiver connected to the Ai-NET input of the CDA-9827/ CDA-9825 in XM mode. 1 Press the SOURCE/POWER button to other than "0." After checking your ID number printed on the label on the package of XM Satellite Radio Inc. NOTE If you store a channel in a preset memory which already has a station, the current channel will be displayed on for your ID number. 1. Storing XM Channel Presets 1 Press...
... XM Receiver connected to the Ai-NET input of the CDA-9827/ CDA-9825 in XM mode. 1 Press the SOURCE/POWER button to other than "0." After checking your ID number printed on the label on the package of XM Satellite Radio Inc. NOTE If you store a channel in a preset memory which already has a station, the current channel will be displayed on for your ID number. 1. Storing XM Channel Presets 1 Press...
Owners Manual
Page 25
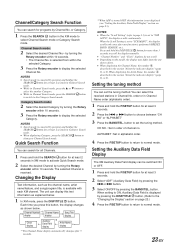
... order. 4 Press the F/SETUP button to return to normal mode. 23-EN You can select the received stations in the section "About the indicator display" (page 9), is not displayed (see "Setting the Auxiliary Data Field Display" section on page 23.) 4 Press the F/SETUP button to return to normal mode. ALPHABET :Set in Channel Search mode, press the SEARCH button to switch to scroll the display manually. • "Channel Number" and "Clock" displays do not scroll...
... order. 4 Press the F/SETUP button to return to normal mode. 23-EN You can select the received stations in the section "About the indicator display" (page 9), is not displayed (see "Setting the Auxiliary Data Field Display" section on page 23.) 4 Press the F/SETUP button to return to normal mode. ALPHABET :Set in Channel Search mode, press the SEARCH button to switch to scroll the display manually. • "Channel Number" and "Clock" displays do not scroll...
Owners Manual
Page 26
...-9825 will turn OFF, press the BAND/TEL. Rotary encoder g f 9 F/SETUP SEARCH Preset buttons (1 through 6) • An outgoing call to the original source mode. "NO PHONE" is displayed for 5 seconds. See relevant pages for a hands-free call. • Even if the power of the portable telephone. For the sake of safety, drivers are downloaded to the Junction Box. • Please refer to the instruction manual...
...-9825 will turn OFF, press the BAND/TEL. Rotary encoder g f 9 F/SETUP SEARCH Preset buttons (1 through 6) • An outgoing call to the original source mode. "NO PHONE" is displayed for 5 seconds. See relevant pages for a hands-free call. • Even if the power of the portable telephone. For the sake of safety, drivers are downloaded to the Junction Box. • Please refer to the instruction manual...

Owners Manual
Page 28
... # Controls on Remote Control (CDA-9827 only) 1 Power Button Press the button to turn the power on/off. 2 Source Button Press to select the audio source. 3 -/J Button Press the button to select a disc in ascending order. CD/Changer mode: To switch the disc mode. 6 Volume Adjustment Buttons To increase the volume level: Press the L button To decrease the volume level: Press the K button 7 8 Button Radio mode: Pressing the button will select, in ascending order, stations programmed into the radio's presets as shown below. → 1 → 2 ... 6 CD Changer mode: DISC Select (UP) Button Press...
... # Controls on Remote Control (CDA-9827 only) 1 Power Button Press the button to turn the power on/off. 2 Source Button Press to select the audio source. 3 -/J Button Press the button to select a disc in ascending order. CD/Changer mode: To switch the disc mode. 6 Volume Adjustment Buttons To increase the volume level: Press the L button To decrease the volume level: Press the K button 7 8 Button Radio mode: Pressing the button will select, in ascending order, stations programmed into the radio's presets as shown below. → 1 → 2 ... 6 CD Changer mode: DISC Select (UP) Button Press...

Owners Manual
Page 32
... the unit; If the unit is at its mounting location. This guide will not operate with a new one. Otherwise, make sure the antenna is properly connected or consult your nearest ALPINE dealer. If connected following checklist. Check power lead connections. • Blown fuse. - Check the fuse on pages 28-29, then rewrite in CD player only) • Mechanical error - replace with a ballpoint pen or other pointed article. Press the RESET switch...
... the unit; If the unit is at its mounting location. This guide will not operate with a new one. Otherwise, make sure the antenna is properly connected or consult your nearest ALPINE dealer. If connected following checklist. Check power lead connections. • Blown fuse. - Check the fuse on pages 28-29, then rewrite in CD player only) • Mechanical error - replace with a ballpoint pen or other pointed article. Press the RESET switch...
Owners Manual
Page 36
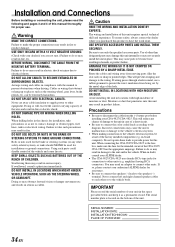
... work done. Warning MAKE THE CORRECT CONNECTIONS. If swallowed, consult a physician immediately. DO NOT INSTALL IN LOCATIONS WHICH MIGHT HINDER VEHICLE OPERATION, SUCH AS THE STEERING WHEEL OR GEARSHIFT. and results in compliance with your authorized ALPINE dealer for assistance. • Be sure to connect the speaker (-) leads to the speaker (-) terminal. USE SPECIFIED ACCESSORY PARTS AND INSTALL THEM SECURELY. Route the cables and wiring...
... work done. Warning MAKE THE CORRECT CONNECTIONS. If swallowed, consult a physician immediately. DO NOT INSTALL IN LOCATIONS WHICH MIGHT HINDER VEHICLE OPERATION, SUCH AS THE STEERING WHEEL OR GEARSHIFT. and results in compliance with your authorized ALPINE dealer for assistance. • Be sure to connect the speaker (-) leads to the speaker (-) terminal. USE SPECIFIED ACCESSORY PARTS AND INSTALL THEM SECURELY. Route the cables and wiring...
Owners Manual
Page 37
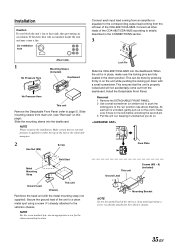
... screw for the chosen mounting location. This ensures that no external pressure is unlocked, gently pull out on the unit to the "up" position (see "Removal" on the unit while pushing the locking pin down position. As each input lead coming from an amplifier or equalizer to the corresponding output lead coming from the dashboard. Face Plate This unit Ground Lead ∗...
... screw for the chosen mounting location. This ensures that no external pressure is unlocked, gently pull out on the unit to the "up" position (see "Removal" on the unit while pushing the locking pin down position. As each input lead coming from an amplifier or equalizer to the corresponding output lead coming from the dashboard. Face Plate This unit Ground Lead ∗...
Owners Manual
Page 39
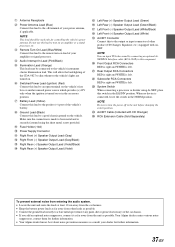
... (Blue/White) Connect this lead to the remote turn the power off to the output or input connector of other leads as possible. • Connect the ground lead securely to the +B terminal of your dealer for controlling the vehicle's power antenna. Rear Output RCA Connectors RED is right and WHITE is left. / System Switch When connecting a processor or divider using the sheet metal screw provided. 9 Fuse Holder (10A) ! Subwoofer RCA Connectors...
... (Blue/White) Connect this lead to the remote turn the power off to the output or input connector of other leads as possible. • Connect the ground lead securely to the +B terminal of your dealer for controlling the vehicle's power antenna. Rear Output RCA Connectors RED is right and WHITE is left. / System Switch When connecting a processor or divider using the sheet metal screw provided. 9 Fuse Holder (10A) ! Subwoofer RCA Connectors...


