
User Manual (3D)
Page 1
Acer Projectors with 3D Technology Quick Guide
Acer Projectors with 3D Technology Quick Guide

User Manual (3D)
Page 2
Acer Projector Series Quick Guide Original Issue: 10/2014 Model number Serial number Date of purchase Place of purchase © 2014 All Rights Reserved.
Acer Projector Series Quick Guide Original Issue: 10/2014 Model number Serial number Date of purchase Place of purchase © 2014 All Rights Reserved.

User Manual (3D)
Page 3
...how to enhance battery life, they turn the 3D technology on page 7. Using 3D glasses DLP 3D glasses are turned on or not. English 3 The Acer projector you have connected your glasses for 24P contents. (1080P, 24Hz) Important: When you turn off , otherwise the image may not be shown a reminder ...that indicates if the glasses are turned on . In order to change the battery. Acer projectors need to a computer, please read "Watching 3D DVD or Blu-ray content" on , you can press, and an LED that 3D is a power ...
...how to enhance battery life, they turn the 3D technology on page 7. Using 3D glasses DLP 3D glasses are turned on or not. English 3 The Acer projector you have connected your glasses for 24P contents. (1080P, 24Hz) Important: When you turn off , otherwise the image may not be shown a reminder ...that indicates if the glasses are turned on . In order to change the battery. Acer projectors need to a computer, please read "Watching 3D DVD or Blu-ray content" on , you can press, and an LED that 3D is a power ...

User Manual (3D)
Page 4
... 3D glasses. Note: Please refer to your graphics card for frame/field sequential 3D formats. To download software and use an NVIDIA 3DTV Play ready projector with DLP glasses, refer to open the OSD. Setting up the environment. 1 Set the refresh rate to do the following. 1 Ensure your graphics card. Note... which the 3D content requires. Before you are viewing Blu-ray 3D content over an HDMI 1.4a or later connection is not supported on the projector remote control to the NVIDIA 3DTV Play website: www.nvidia.com/3dtv. If you can enjoy the benefits of LED...
... 3D glasses. Note: Please refer to your graphics card for frame/field sequential 3D formats. To download software and use an NVIDIA 3DTV Play ready projector with DLP glasses, refer to open the OSD. Setting up the environment. 1 Set the refresh rate to do the following. 1 Ensure your graphics card. Note... which the 3D content requires. Before you are viewing Blu-ray 3D content over an HDMI 1.4a or later connection is not supported on the projector remote control to the NVIDIA 3DTV Play website: www.nvidia.com/3dtv. If you can enjoy the benefits of LED...

User Manual (3D)
Page 5
... provide different 3D mode, convergence and depth setting. 6 3D Format shows while no enough info, please choose suitable one for HDMI 1.4 or 2nd generation 3D projectors. 2. "2D to On. 4 Alternatively, press the 3D Key on some specific models. 4. The "Frame Packing" is only existed at HDMI 1.4 or later input. 3. From the...
... provide different 3D mode, convergence and depth setting. 6 3D Format shows while no enough info, please choose suitable one for HDMI 1.4 or 2nd generation 3D projectors. 2. "2D to On. 4 Alternatively, press the 3D Key on some specific models. 4. The "Frame Packing" is only existed at HDMI 1.4 or later input. 3. From the...
User Manual (3D)
Page 6
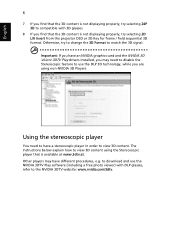
... viewer) with 3D glasses. 8 If you are using the Stereoscopic player that the 3D content is not displaying properly, try selecting 3D L/R Invert from the projector OSD or 3D Key for frame / field sequential 3D format. to match the 3D signal.
... viewer) with 3D glasses. 8 If you are using the Stereoscopic player that the 3D content is not displaying properly, try selecting 3D L/R Invert from the projector OSD or 3D Key for frame / field sequential 3D format. to match the 3D signal.

User Manual (3D)
Page 7
... 3D over HDMI 1.4a, check that supports 3D playback, you can watch 3D DVD content using any of the available input formats. Connect your projector. Older connections should check the resolution is set the viewing method by going to View > Viewing Method > Software pageflipping. 2 Open the 3D ... to view content at fullscreen resolution in the "Setting up a 3D environment" section on your DVD or Blu-ray player to the projector using your Acer 3D-enabled projector. English 7 1 Open the stereoscopic player and set to 480i or 576i. Watching 3D DVD or Blu-ray content If you have ...
... 3D over HDMI 1.4a, check that supports 3D playback, you can watch 3D DVD content using any of the available input formats. Connect your projector. Older connections should check the resolution is set the viewing method by going to View > Viewing Method > Software pageflipping. 2 Open the 3D ... to view content at fullscreen resolution in the "Setting up a 3D environment" section on your DVD or Blu-ray player to the projector using your Acer 3D-enabled projector. English 7 1 Open the stereoscopic player and set to 480i or 576i. Watching 3D DVD or Blu-ray content If you have ...

User Manual
Page 1
Acer Projector H6540BD/H6521BD/X1623H/X168H/X138WH/X128H/X128/ X118H/X118AH/X118/S1386WHN/S1386WH/S1286HN/S1286H/ E156D/E155F/D860D/D666D/D626D/D616D/D616/D606D/ D606B/D606/T421DT/T421D/T411DT/T411D/ HE-...
Acer Projector H6540BD/H6521BD/X1623H/X168H/X138WH/X128H/X128/ X118H/X118AH/X118/S1386WHN/S1386WH/S1286HN/S1286H/ E156D/E155F/D860D/D666D/D626D/D616D/D616/D606D/ D606B/D606/T421DT/T421D/T411DT/T411D/ HE-...

User Manual
Page 2
... and model number are trademarks or registered trademarks of purchase information in the space provided below. All correspondence concerning your projector. Such changes will be made periodically to their respective companies. Acer Projector User's Guide Original Issue: 09/2017 Changes may be reproduced, stored in a retrieval system, or transmitted, in any form or...
... and model number are trademarks or registered trademarks of purchase information in the space provided below. All correspondence concerning your projector. Such changes will be made periodically to their respective companies. Acer Projector User's Guide Original Issue: 09/2017 Changes may be reproduced, stored in a retrieval system, or transmitted, in any form or...

User Manual
Page 3
... provided. • Never push objects of any kind onto or into this product from the wall outlet before removing the power supply unit from the projector. • If the system has multiple sources of power, disconnect power from the power supplies. Turning the product off before cleaning Unplug this product through...
... provided. • Never push objects of any kind onto or into this product from the wall outlet before removing the power supply unit from the projector. • If the system has multiple sources of power, disconnect power from the power supplies. Turning the product off before cleaning Unplug this product through...
User Manual
Page 5
...up. • Locations where excessive humidity, dust, or cigarette smoke may contain small parts. It might cause fire or electric shock. Consult your projector. In this product to break or drop it. For safety reasons, do not use non-compliant parts when adding or changing components. The bright... may hurt your projector. The best way is to wait for service • the product does not operate normally after following environments: • Space that are ...
...up. • Locations where excessive humidity, dust, or cigarette smoke may contain small parts. It might cause fire or electric shock. Consult your projector. In this product to break or drop it. For safety reasons, do not use non-compliant parts when adding or changing components. The bright... may hurt your projector. The best way is to wait for service • the product does not operate normally after following environments: • Space that are ...
User Manual
Page 6
... safety concern of the lamp itself. Allow the projector to cool for ceiling mount installation. Refer servicing only to removing the lamp assembly for mounting the projector and ensure it is under operation as this projector. Only use acer ceiling mount kit for replacement. • Do ...not operate lamps beyond the rated lamp life. The temperature inside which may cause the projector to become heated and deformed ...
... safety concern of the lamp itself. Allow the projector to cool for ceiling mount installation. Refer servicing only to removing the lamp assembly for mounting the projector and ensure it is under operation as this projector. Only use acer ceiling mount kit for replacement. • Do ...not operate lamps beyond the rated lamp life. The temperature inside which may cause the projector to become heated and deformed ...

User Manual
Page 7
... gradually until you can 't hear people speaking near you. For more information on the Waste from Electrical and Electronics Equipment (WEEE) regulations, visit http://www.acer-group.com/public/Sustainability/sustainability01.htm Mercury advisory For projectors or electronic products containing an LCD/CRT monitor or display: "Lamp(s) contain Mercury, Dispose Properly."
... gradually until you can 't hear people speaking near you. For more information on the Waste from Electrical and Electronics Equipment (WEEE) regulations, visit http://www.acer-group.com/public/Sustainability/sustainability01.htm Mercury advisory For projectors or electronic products containing an LCD/CRT monitor or display: "Lamp(s) contain Mercury, Dispose Properly."

User Manual
Page 8
... Usage Notes Do: • Turn off the product before disconnecting power. • Turn on the projector first and then the signal sources. • Do not use lens cap when projector is in this user's guide to maximize the life of your eyes. • To reduce the ... Reset the "Lamp Hour Reset" function from the Onscreen display "Management" menu after replacing the lamp module. • When switching the projector off, please ensure the projector completes its cooling cycle before cleaning. • Use a soft cloth moistened with mild detergent to clean the display housing. • Disconnect...
... Usage Notes Do: • Turn off the product before disconnecting power. • Turn on the projector first and then the signal sources. • Do not use lens cap when projector is in this user's guide to maximize the life of your eyes. • To reduce the ... Reset the "Lamp Hour Reset" function from the Onscreen display "Management" menu after replacing the lamp module. • When switching the projector off, please ensure the projector completes its cooling cycle before cleaning. • Use a soft cloth moistened with mild detergent to clean the display housing. • Disconnect...

User Manual
Page 9
... 4 Control Panel 7 Remote Control Layout 8 MHL (Mobile High-Definition Link) Control 11 Getting Started 13 Connecting the Projector 13 Turning the Projector On/Off 15 Turning on the Projector 15 Turning the projector off 16 Adjusting the Projected Image 17 Adjusting the Height of Projected Image 17 How to optimize image size and distance...
... 4 Control Panel 7 Remote Control Layout 8 MHL (Mobile High-Definition Link) Control 11 Getting Started 13 Connecting the Projector 13 Turning the Projector On/Off 15 Turning on the Projector 15 Turning the projector off 16 Adjusting the Projected Image 17 Adjusting the Height of Projected Image 17 How to optimize image size and distance...
User Manual
Page 11
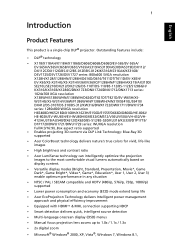
... Product Features This product is a single-chip DLP® projector. Outstanding features include: • DLP® technology •...310T/DS-310/BS-312/KW316/DWX1722/DWX1711/DWX1734 series: 1280x800 WXGA resolution H6540BD/H6521BD/X168H/X1623H/E156D/E155F/D666D/D860D/HE-806J/ HE-802K/EV-WU65H/EV-WU80H/GM532/GM512/... 576i/p, 720p, 1080i/p) supported • Lower power consumption and economy (ECO) mode extend lamp life • Acer EcoProjeciton Technology delivers Intelligent power management approach and physical efficiency improvement • Equipped with HDMI™ & MHL connection ...
... Product Features This product is a single-chip DLP® projector. Outstanding features include: • DLP® technology •...310T/DS-310/BS-312/KW316/DWX1722/DWX1711/DWX1734 series: 1280x800 WXGA resolution H6540BD/H6521BD/X168H/X1623H/E156D/E155F/D666D/D860D/HE-806J/ HE-802K/EV-WU65H/EV-WU80H/GM532/GM512/... 576i/p, 720p, 1080i/p) supported • Lower power consumption and economy (ECO) mode extend lamp life • Acer EcoProjeciton Technology delivers Intelligent power management approach and physical efficiency improvement • Equipped with HDMI™ & MHL connection ...

User Manual
Page 13
Contact your unit is missing. 3 Package Overview This projector comes with all the items shown below. English Projector Power cord HDMI cable (option) VGA cable (option) Security card (option) User's guide (option) Quick start guide AAA battery x2 (option) Carrying case (option) MHL HDMI DC 5V IN WirelessCAST (option) Remote control WirelessHD-Kit (option) User's guide (for multi-media and wireless functions) Quick start guide (for multi-media and wireless functions) WirelessProjection-Kit (option) Check to make sure your dealer immediately if any thing is complete.
Contact your unit is missing. 3 Package Overview This projector comes with all the items shown below. English Projector Power cord HDMI cable (option) VGA cable (option) Security card (option) User's guide (option) Quick start guide AAA battery x2 (option) Carrying case (option) MHL HDMI DC 5V IN WirelessCAST (option) Remote control WirelessHD-Kit (option) User's guide (for multi-media and wireless functions) Quick start guide (for multi-media and wireless functions) WirelessProjection-Kit (option) Check to make sure your dealer immediately if any thing is complete.

User Manual
Page 14
English 4 Projector Overview Projector Outlook Front / upper side 12 34 56 56 7 7 8 8 11 # Description 1 Lamp cover 2 Air outlet 3 Control panel 4 Power button 5 Zoom ring 6 Air inlet 9 9 10 10 # Description 7 Focus ring 8 Remote control receiver 9 Projection lens 10 Lens cap 11 Tilt adjusting wheels
English 4 Projector Overview Projector Outlook Front / upper side 12 34 56 56 7 7 8 8 11 # Description 1 Lamp cover 2 Air outlet 3 Control panel 4 Power button 5 Zoom ring 6 Air inlet 9 9 10 10 # Description 7 Focus ring 8 Remote control receiver 9 Projection lens 10 Lens cap 11 Tilt adjusting wheels
User Manual
Page 17
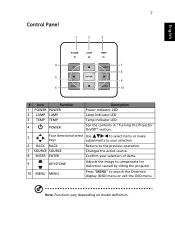
... POWER POWER 2 LAMP LAMP 3 TEMP TEMP 4 POWER Description Power Indicator LED Lamp Indicator LED Temp Indicator LED See the contents in "Turning the Projector On/Off" section. 5 Four directional select Use to select items or make keys adjustments to your selection. 6 BACK BACK Returns to the previous ...the active source. 8 ENTER ENTER Confirm your selection of items. 9 KEYSTONE Adjusts the image to compensate for distortion caused by tilting the projector. 10 MENU MENU Press "MENU" to launch the Onscreen display (OSD) menu or exit the OSD menu. Note: Functions vary depending on ...
... POWER POWER 2 LAMP LAMP 3 TEMP TEMP 4 POWER Description Power Indicator LED Lamp Indicator LED Temp Indicator LED See the contents in "Turning the Projector On/Off" section. 5 Four directional select Use to select items or make keys adjustments to your selection. 6 BACK BACK Returns to the previous ...the active source. 8 ENTER ENTER Confirm your selection of items. 9 KEYSTONE Adjusts the image to compensate for distortion caused by tilting the projector. 10 MENU MENU Press "MENU" to launch the Onscreen display (OSD) menu or exit the OSD menu. Note: Functions vary depending on ...

User Manual
Page 18
English 8 Remote Control Layout 1 1 7 2 8 2 3 7 4 9 4 5 10 5 6 Model No:T-2501 11 12 13 MC.JPQ11.003 Model No:T-2502 14 15 16 17 18 MC.JPQ11.004 2 3 4 5 6 19 11 20 12 21 13 22 14 23 15 24 16 25 17 18 1 7 8 9 10 26 8 9 10 19 20 21 22 23 24 Model No:J-25091 25 27 MC.JQ011.004 28 6 11 12 13 14 15 Model No:J-25021 16 17 18 MC.JMV11.006 19 20 21 22 23 24 25 Model No:J-25050 MC.JMV11.009 # Icon Function Description 1 Infrared transmitter Sends signals to the projector. 2 POWER Refer to the "Turning the Projector On/Off" section.
English 8 Remote Control Layout 1 1 7 2 8 2 3 7 4 9 4 5 10 5 6 Model No:T-2501 11 12 13 MC.JPQ11.003 Model No:T-2502 14 15 16 17 18 MC.JPQ11.004 2 3 4 5 6 19 11 20 12 21 13 22 14 23 15 24 16 25 17 18 1 7 8 9 10 26 8 9 10 19 20 21 22 23 24 Model No:J-25091 25 27 MC.JQ011.004 28 6 11 12 13 14 15 Model No:J-25021 16 17 18 MC.JMV11.006 19 20 21 22 23 24 25 Model No:J-25050 MC.JMV11.009 # Icon Function Description 1 Infrared transmitter Sends signals to the projector. 2 POWER Refer to the "Turning the Projector On/Off" section.


