
User Manual
Page 3
... external power supply unit: • Install the power supply unit before cleaning Unplug this product through cabinet slots as possible. Turning the product off before connecting the power cord to protect it could be blocked by unplugging all warnings and instructions marked on a bed, sofa, rug or other similar surface. When you need to disconnect power to the equipment, be blocked or covered. iii...
... external power supply unit: • Install the power supply unit before cleaning Unplug this product through cabinet slots as possible. Turning the product off before connecting the power cord to protect it could be blocked by unplugging all warnings and instructions marked on a bed, sofa, rug or other similar surface. When you need to disconnect power to the equipment, be blocked or covered. iii...
User Manual
Page 5
... • the product exhibits a distinct change in performance, indicating a need for purchase options. Consult your eyes. • Turn on . v Product servicing Do not attempt to service this product from walls and free flow of air around the projector are necessary. • Locations where temperatures may become excessively high, such as opening or removing covers may expose you to qualified service personnel. Unplug this product yourself...
... • the product exhibits a distinct change in performance, indicating a need for purchase options. Consult your eyes. • Turn on . v Product servicing Do not attempt to service this product from walls and free flow of air around the projector are necessary. • Locations where temperatures may become excessively high, such as opening or removing covers may expose you to qualified service personnel. Unplug this product yourself...

User Manual
Page 6
... the filter/ventilation slots are dangerous high voltages inside may hurt your eyes. • Always open the lens shutter or remove the lens cap when the projector is on the remote control. • The lamp becomes extremely hot during operation. Please be sure to change the lamp when warning messages display. • When changing the lamp, please allow the projector to cool down, and follow all changing instructions. • Reset the "Lamp Hour Reset" function...
... the filter/ventilation slots are dangerous high voltages inside may hurt your eyes. • Always open the lens shutter or remove the lens cap when the projector is on the remote control. • The lamp becomes extremely hot during operation. Please be sure to change the lamp when warning messages display. • When changing the lamp, please allow the projector to cool down, and follow all changing instructions. • Reset the "Lamp Hour Reset" function...

User Manual
Page 8
... from the Onscreen Display "Management" menu after replacing the lamp module. • When switching the projector off, please ensure the projector completes its cooling cycle before disconnecting power. • Turn on the projector first and then the signal sources. • Do not use lens cap when projector is in operation. • When the lamp reaches the end of its life, it shows warning messages. • Reset the "Lamp Hour Reset" function from AC outlet...
... from the Onscreen Display "Management" menu after replacing the lamp module. • When switching the projector off, please ensure the projector completes its cooling cycle before disconnecting power. • Turn on the projector first and then the signal sources. • Do not use lens cap when projector is in operation. • When the lamp reaches the end of its life, it shows warning messages. • Reset the "Lamp Hour Reset" function from AC outlet...
User Manual
Page 9
... Overview 3 Projector Outlook 3 Control Panel 4 Remote Control Layout 5 Getting Started 7 Connecting the Projector 7 Turning the Projector On/Off 8 Turning On the Projector 8 Turning Off the Projector 9 Adjusting the Projected Image 10 Adjusting the Height of the Projected Image 10 How to Optimize Image Size and Distance 11 How to Get a Preferred Image Size by Adjusting Distance and Zoom 13 User Controls 15 Installation Menu 15 Acer Empowering Technology 16 Onscreen Display (OSD) Menus 17 Color 18 Image 20 Setting 23 Management 25 Audio 26 Timer 27...
... Overview 3 Projector Outlook 3 Control Panel 4 Remote Control Layout 5 Getting Started 7 Connecting the Projector 7 Turning the Projector On/Off 8 Turning On the Projector 8 Turning Off the Projector 9 Adjusting the Projected Image 10 Adjusting the Height of the Projected Image 10 How to Optimize Image Size and Distance 11 How to Get a Preferred Image Size by Adjusting Distance and Zoom 13 User Controls 15 Installation Menu 15 Acer Empowering Technology 16 Onscreen Display (OSD) Menus 17 Color 18 Image 20 Setting 23 Management 25 Audio 26 Timer 27...

User Manual
Page 11
... is a single-chip DLP® projector, including the following outstanding features: • DLP® technology • X1110/X1110A: Native 800 x 600 SVGA resolution X1210/X1210A/X1210K/X1210S/X1213/X1216: Native 1024 x 768 XGA resolution 4:3 / 16:9 aspect ratio supported • Acer ColorBoost technology delivers vivid, life-like images • High brightness and contrast ratio • Versatile display modes (Bright, Presentation, Standard, Video, Picture, Game, Education, User) enable optimum performance...
... is a single-chip DLP® projector, including the following outstanding features: • DLP® technology • X1110/X1110A: Native 800 x 600 SVGA resolution X1210/X1210A/X1210K/X1210S/X1213/X1216: Native 1024 x 768 XGA resolution 4:3 / 16:9 aspect ratio supported • Acer ColorBoost technology delivers vivid, life-like images • High brightness and contrast ratio • Versatile display modes (Bright, Presentation, Standard, Video, Picture, Game, Education, User) enable optimum performance...
User Manual
Page 14
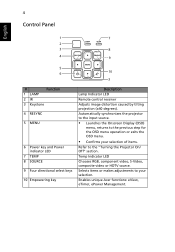
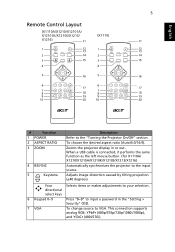
... video, S-Video, composite video or HDTV source. Enables unique Acer functions: eView, eTimer, ePower Management. Automatically synchronizes the projector to the input source. • Launches the Onscreen Display (OSD) menu, returns to the "Turning the Projector On/ Off" section. 4 Control Panel English 1 7 LAMP TEMP 2 3 8 4 9 5 6 10 3 # Function 1 LAMP 2 IR 3 Keystone 4 RESYNC 5 MENU 6 Power key and Power indicator LED 7 TEMP 8 SOURCE 9 Four directional select keys 10 Empowering key Description Lamp Indicator LED Remote control receiver Adjusts image distortion...
... video, S-Video, composite video or HDTV source. Enables unique Acer functions: eView, eTimer, ePower Management. Automatically synchronizes the projector to the input source. • Launches the Onscreen Display (OSD) menu, returns to the "Turning the Projector On/ Off" section. 4 Control Panel English 1 7 LAMP TEMP 2 3 8 4 9 5 6 10 3 # Function 1 LAMP 2 IR 3 Keystone 4 RESYNC 5 MENU 6 Power key and Power indicator LED 7 TEMP 8 SOURCE 9 Four directional select keys 10 Empowering key Description Lamp Indicator LED Remote control receiver Adjusts image distortion...
User Manual
Page 15
... projector display in the "Setting > Security" OSD. 7 VGA To change source to the input source. This connection supports analog RGB, YPbPr (480p/576p/720p/1080i/1080p), and YCbCr (480i/576i). directional select keys 6 Keypad 0~9 Press "0~9" to input a password in or out. To choose the desired aspect ratio (Auto/4:3/16:9). Adjusts image distortion caused by tilting projection (±40 degrees). Four Selects items or makes adjustments to the "Turning...
... projector display in the "Setting > Security" OSD. 7 VGA To change source to the input source. This connection supports analog RGB, YPbPr (480p/576p/720p/1080i/1080p), and YCbCr (480i/576i). directional select keys 6 Keypad 0~9 Press "0~9" to input a password in or out. To choose the desired aspect ratio (Auto/4:3/16:9). Adjusts image distortion caused by tilting projection (±40 degrees). Four Selects items or makes adjustments to the "Turning...

User Manual
Page 16
... the projector via a USB cable. (for wireless models) (X1110A/X1210/X12101A/ X12101K/X1210S/X1213/X1216) (X1110) Displays the image which is only available when connected to a computer via the "Acer eProjection Management" utility. (for X1110A/X1210/X1210A/X1210K/X1210S/X1213/X1216) To change source to HDMI™(for the OSD menu operation or exits the OSD menu. • Confirms your selection of items. For computer mode only...
... the projector via a USB cable. (for wireless models) (X1110A/X1210/X12101A/ X12101K/X1210S/X1213/X1216) (X1110) Displays the image which is only available when connected to a computer via the "Acer eProjection Management" utility. (for X1110A/X1210/X1210A/X1210K/X1210S/X1213/X1216) To change source to HDMI™(for the OSD menu operation or exits the OSD menu. • Confirms your selection of items. For computer mode only...

User Manual
Page 18
... no such type of input signal detected. • If the screen displays "No Signal", please make sure the signal cables are securely connected. English 8 Turning the Projector On/Off Turning On the Projector 1 Remove the lens cap. 2 Ensure that the power cord and signal cable are securely connected. • If you connect to multiple sources at the same time, use "SOURCE" on the control panel or remote control, or the direct source key on the remote control to switch between inputs. LAMP TEMP IR 2&3 1 Lens cap
... no such type of input signal detected. • If the screen displays "No Signal", please make sure the signal cables are securely connected. English 8 Turning the Projector On/Off Turning On the Projector 1 Remove the lens cap. 2 Ensure that the power cord and signal cable are securely connected. • If you connect to multiple sources at the same time, use "SOURCE" on the control panel or remote control, or the direct source key on the remote control to switch between inputs. LAMP TEMP IR 2&3 1 Lens cap
User Manual
Page 25
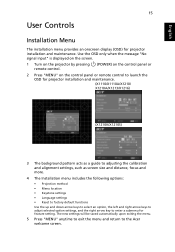
... for feature setting. English 15 User Controls Installation Menu The installation menu provides an onscreen display (OSD) for projector installation and maintenance. (X1110/X1110A/X1210/ X1210A/X1213/X1216) (X1210K/X1210S) 3 The background pattern acts as a guide to adjusting the calibration and alignment settings, such as screen size and distance, focus and more. 4 The Installation menu includes the following options: • Projection method • Menu location • Keystone settings • Language settings • Reset to factory default functions Use the up...
... for feature setting. English 15 User Controls Installation Menu The installation menu provides an onscreen display (OSD) for projector installation and maintenance. (X1110/X1110A/X1210/ X1210A/X1213/X1216) (X1210K/X1210S) 3 The background pattern acts as a guide to adjusting the calibration and alignment settings, such as screen size and distance, focus and more. 4 The Installation menu includes the following options: • Projection method • Menu location • Keystone settings • Language settings • Reset to factory default functions Use the up...
User Manual
Page 28
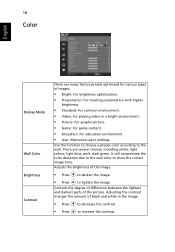
... Color English Display Mode Wall Color Brightness Contrast There are several choices, including white, light yellow, light blue, pink, dark green. Adjusting the contrast changes the amount of the image. • Press to darken the image. • Press to the wall. Adjusts the brightness of black and white in a bright environment. • Picture: For graphic picture. • Game: For game content. • Education: For education environment. • User: Memorize user's settings. Controls...
... Color English Display Mode Wall Color Brightness Contrast There are several choices, including white, light yellow, light blue, pink, dark green. Adjusting the contrast changes the amount of the image. • Press to darken the image. • Press to the wall. Adjusts the brightness of black and white in a bright environment. • Picture: For graphic picture. • Game: For game content. • Education: For education environment. • User: Memorize user's settings. Controls...
User Manual
Page 34
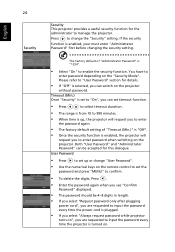
... Password" displayed. • The password should be accepted for this dialogue. User Password • Press to set up or change the "Security" setting. Both "User Password" and "Administrator Password" can be 4~8 digits in length. • If you select "Request password only after plugging power cord", you are requested to input the password every time the projector is enabled, the projector will request you can set the password and press "MENU" to enter password when switching...
... Password" displayed. • The password should be accepted for this dialogue. User Password • Press to set up or change the "Security" setting. Both "User Password" and "Administrator Password" can be 4~8 digits in length. • If you select "Request password only after plugging power cord", you are requested to input the password every time the projector is enabled, the projector will request you can set the password and press "MENU" to enter password when switching...

User Manual
Page 35
... slightly increases the standby power consumption. Choose "Off" to return to the factory default settings. If you forget your administrator password, do the following to dim the projector lamp, which is lost, please contact your projector. Reset Press after choosing "Yes" to return the display parameters on the Security Card that came with your local Acer service center. Management ECO Mode Choose "On" to...
... slightly increases the standby power consumption. Choose "Off" to return to the factory default settings. If you forget your administrator password, do the following to dim the projector lamp, which is lost, please contact your projector. Reset Press after choosing "Yes" to return the display parameters on the Security Card that came with your local Acer service center. Management ECO Mode Choose "On" to...

User Manual
Page 36
... warning message Lamp Reminding when the changing lamp message is displayed. Lamp Hour Reset Press after the setting time. English 26 High Altitude Choose "On" to turn on , the projector fans operate at full speed continuously to cool down while there is (Minutes) no signal input detected after choosing "Yes" to turn mute off. Choose this function is turned on the High Altitude mode. The message will automatically shut down the projector's temperature. When this function to 0 hours. Lamp Hour...
... warning message Lamp Reminding when the changing lamp message is displayed. Lamp Hour Reset Press after the setting time. English 26 High Altitude Choose "On" to turn on , the projector fans operate at full speed continuously to cool down while there is (Minutes) no signal input detected after choosing "Yes" to turn mute off. Choose this function is turned on the High Altitude mode. The message will automatically shut down the projector's temperature. When this function to 0 hours. Lamp Hour...

User Manual
Page 38
... display you are using and follow the steps below: • Verify that the resolution setting of the connector pins are correctly connected as onscreen described in the "Getting Started" section. • Ensure none of the monitor display is switched on. 2 Partial, scrolling • Press "RESYNC" on the control panel or remote or incorrectly control. 28 Appendices English Troubleshooting If you experience a problem with your Acer projector...
... display you are using and follow the steps below: • Verify that the resolution setting of the connector pins are correctly connected as onscreen described in the "Getting Started" section. • Ensure none of the monitor display is switched on. 2 Partial, scrolling • Press "RESYNC" on the control panel or remote or incorrectly control. 28 Appendices English Troubleshooting If you experience a problem with your Acer projector...

User Manual
Page 39
.... • Change the display color setting on your computer. 6 Image has vertical • Use "Frequency" to Get a Preferred Image Size by Adjusting Distance and Zoom" section for detailed information. • If you are using a Microsoft® Windows® based notebook computer is not displaying your monitor freezes, restart all equipment including the projector. 4 The screen of the • If you are using an Apple® Mac® OS...
.... • Change the display color setting on your computer. 6 Image has vertical • Use "Frequency" to Get a Preferred Image Size by Adjusting Distance and Zoom" section for detailed information. • If you are using a Microsoft® Windows® based notebook computer is not displaying your monitor freezes, restart all equipment including the projector. 4 The screen of the • If you are using an Apple® Mac® OS...

User Manual
Page 40
... reconnecting power. 2 Lamp burns out or makes a popping sound When the lamp reaches the end of the screen. • Press the Keystone correction keys on the control panel or remote control until the lamp module has been replaced. Go to "Image > Aspect Ratio" and try different settings. 10 Image has slanted • If possible, reposition the projector so that it will also need to open the OSD menu...
... reconnecting power. 2 Lamp burns out or makes a popping sound When the lamp reaches the end of the screen. • Press the Keystone correction keys on the control panel or remote control until the lamp module has been replaced. Go to "Image > Aspect Ratio" and try different settings. 10 Image has slanted • If possible, reposition the projector so that it will also need to open the OSD menu...
User Manual
Page 41
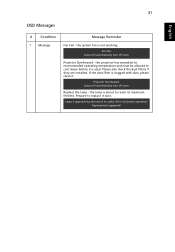
... OSD Messages # Condition 1 Message Message Reminder Fan Fail - Replace the lamp - Replacement suggested! Projector Overheated - If the dust filter is not working. the system fan is clogged with dust, please clean it. Fan Fail. Please also check the dust filters if they are installed. Projector Overheated. the lamp is about to reach its recommended operating temperature and must be allowed to replace it is approaching the end of its useful life in full power operation. the projector has...
... OSD Messages # Condition 1 Message Message Reminder Fan Fail - Replace the lamp - Replacement suggested! Projector Overheated - If the dust filter is not working. the system fan is clogged with dust, please clean it. Fan Fail. Please also check the dust filters if they are installed. Projector Overheated. the lamp is about to reach its recommended operating temperature and must be allowed to replace it is approaching the end of its useful life in full power operation. the projector has...
User Manual
Page 42
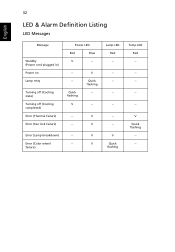
V Lamp LED Red -- ---- -- --- failure) V V V Quick flashing Temp LED Red -- --- -- -- V Quick flashing --- 32 English LED & Alarm Definition Listing LED Messages Message Standby (Power cord plugged in) Power on Lamp retry Turning off (Cooling state) Turning off (Cooling completed) Error (Thermal failure) Error (Fan lock failure) Power LED Red Blue V -- --- Error (Lamp breakdown) -- V -- Error (Color wheel -- Quick flashing V V Quick flashing -- -- --
V Lamp LED Red -- ---- -- --- failure) V V V Quick flashing Temp LED Red -- --- -- -- V Quick flashing --- 32 English LED & Alarm Definition Listing LED Messages Message Standby (Power cord plugged in) Power on Lamp retry Turning off (Cooling state) Turning off (Cooling completed) Error (Thermal failure) Error (Fan lock failure) Power LED Red Blue V -- --- Error (Lamp breakdown) -- V -- Error (Color wheel -- Quick flashing V V Quick flashing -- -- --


