

User Manual
Page 1
Acer Projector User's Guide Original Issue: 03/2018 All Rights Reserved. Acer Projector H6820M/V6820M/E8620/E8620C/ET-4K17/ HT-4K17/GM836/HV836/VH-737/TH-737/ H6820i/V6820i/D4K1736/D4K1731 User's Guide Copyright © 2018. Acer Incorporated.
Acer Projector User's Guide Original Issue: 03/2018 All Rights Reserved. Acer Projector H6820M/V6820M/E8620/E8620C/ET-4K17/ HT-4K17/GM836/HV836/VH-737/TH-737/ H6820i/V6820i/D4K1736/D4K1731 User's Guide Copyright © 2018. Acer Incorporated.
User Manual
Page 2
... the serial number, model number and purchase information. Model number Serial number Date of purchase Place of purchase Acer and the Acer logo are trademarks or registered trademarks of HDMI Licensing LLC." This company makes no representations or warranties, either expressed...implied, with respect to the contents hereof and specifically disclaims the implied warranties of Acer Incorporated. Such changes will be incorporated in the space provided below. All correspondence concerning your projector. Changes may be reproduced, stored in a retrieval system, or transmitted, in...
... the serial number, model number and purchase information. Model number Serial number Date of purchase Place of purchase Acer and the Acer logo are trademarks or registered trademarks of HDMI Licensing LLC." This company makes no representations or warranties, either expressed...implied, with respect to the contents hereof and specifically disclaims the implied warranties of Acer Incorporated. Such changes will be incorporated in the space provided below. All correspondence concerning your projector. Changes may be reproduced, stored in a retrieval system, or transmitted, in...

User Manual
Page 3
... sure that could be placed near water. • Do not place this product from the wall outlet before removing the power supply unit from the projector. • If the system has multiple sources of power, disconnect power from the electrical outlet. Caution for plug as possible. If the product falls, it...
... sure that could be placed near water. • Do not place this product from the wall outlet before removing the power supply unit from the projector. • If the system has multiple sources of power, disconnect power from the electrical outlet. Caution for plug as possible. If the product falls, it...

User Manual
Page 5
...Your device and its cooling cycle before disconnecting power. • Do not frequently turn off the main power abruptly or unplug the projector during operation. Additional safety information • Do not look into the product • the product was exposed to break or drop...following the operating instructions Note: Adjust only those controls that are covered by a qualified technician to restore the product to ensure the projector completes its enhancements may contaminate optical components, shortening the life span and darkening the image. • Locations near fire alarms. &#...
...Your device and its cooling cycle before disconnecting power. • Do not frequently turn off the main power abruptly or unplug the projector during operation. Additional safety information • Do not look into the product • the product was exposed to break or drop...following the operating instructions Note: Adjust only those controls that are covered by a qualified technician to restore the product to ensure the projector completes its enhancements may contaminate optical components, shortening the life span and darkening the image. • Locations near fire alarms. &#...

User Manual
Page 6
... rare occasions. • Never replace the lamp assembly or any object when the projector is operating. The only user serviceable part is capable of the lamp itself. Only use acer ceiling mount kit for replacement. • Do not operate lamps beyond the rated lamp life. It may hurt your eyes. &#...8226; Always open the lens shutter or remove the lens cap when the projector is on. • Do not block the projector lens with any electronic ...
... rare occasions. • Never replace the lamp assembly or any object when the projector is operating. The only user serviceable part is capable of the lamp itself. Only use acer ceiling mount kit for replacement. • Do not operate lamps beyond the rated lamp life. It may hurt your eyes. &#...8226; Always open the lens shutter or remove the lens cap when the projector is on. • Do not block the projector lens with any electronic ...

User Manual
Page 7
... protection of according to music at www.eiae.org. For more information on the Waste from Electrical and Electronics Equipment (WEEE) regulations, visit http://www.acer-group.com/public/Sustainability/sustainability01.htm Mercury advisory For projectors or electronic products containing an LCD/CRT monitor or display: "Lamp(s) contain Mercury, Dispose Properly."
... protection of according to music at www.eiae.org. For more information on the Waste from Electrical and Electronics Equipment (WEEE) regulations, visit http://www.acer-group.com/public/Sustainability/sustainability01.htm Mercury advisory For projectors or electronic products containing an LCD/CRT monitor or display: "Lamp(s) contain Mercury, Dispose Properly."

User Manual
Page 8
... changing instructions. • This product will not turn back on until the lamp module has been replaced. Warning: • Do not look into the projector's lens when the lamp is on. viii First things first Usage Notes Do: • Turn off , please ensure the...Onscreen display "Settings" menu after replacing the lamp module. • When switching the projector off the product before disconnecting power. • Turn on the projector first and then the signal sources. • Do not use lens cap when projector is in this user's guide to maximize the life of your eyes. • ...
... changing instructions. • This product will not turn back on until the lamp module has been replaced. Warning: • Do not look into the projector's lens when the lamp is on. viii First things first Usage Notes Do: • Turn off , please ensure the...Onscreen display "Settings" menu after replacing the lamp module. • When switching the projector off the product before disconnecting power. • Turn on the projector first and then the signal sources. • Do not use lens cap when projector is in this user's guide to maximize the life of your eyes. • ...

User Manual
Page 9
...viii Precautions viii Introduction 1 Product Features 1 Package Overview 2 Projector Overview 4 Projector Outlook 4 Control Panel 6 Remote Control Layout 7 Getting Started 9 Connecting the Projector 9 Turning the Projector On/Off 11 Turning on the Projector 11 Turning the projector off 12 Adjusting the Projected Image 13 Adjusting the Height ...shift 16 User Controls 18 Onscreen Display (OSD) Menus 18 Startup menu (for First time) 19 Projector menu 19 Application menu 20 Settings menu 20 Projector System OSD 23 Color 23 3D 26 Audio 27 Setting 27
...viii Precautions viii Introduction 1 Product Features 1 Package Overview 2 Projector Overview 4 Projector Outlook 4 Control Panel 6 Remote Control Layout 7 Getting Started 9 Connecting the Projector 9 Turning the Projector On/Off 11 Turning on the Projector 11 Turning the projector off 12 Adjusting the Projected Image 13 Adjusting the Height ...shift 16 User Controls 18 Onscreen Display (OSD) Menus 18 Startup menu (for First time) 19 Projector menu 19 Application menu 20 Settings menu 20 Projector System OSD 23 Color 23 3D 26 Audio 27 Setting 27

User Manual
Page 10
Information 29 Reset All 29 Acer LAN management 30 Configuring the network settings 30 Configuring the Projector Control 32 Configuring the Wireless 33 Appendices 34 Troubleshooting 34 LED & Alarm Definition Listing 38 Replacing the Lamp 39 Ceiling Mount Installation 40 Specifications 43 Compatibility modes 45 Regulations and safety notices 50
Information 29 Reset All 29 Acer LAN management 30 Configuring the network settings 30 Configuring the Projector Control 32 Configuring the Wireless 33 Appendices 34 Troubleshooting 34 LED & Alarm Definition Listing 38 Replacing the Lamp 39 Ceiling Mount Installation 40 Specifications 43 Compatibility modes 45 Regulations and safety notices 50

User Manual
Page 11
English 1 Introduction Product Features This product is a single-chip DLP® projector. Outstanding features include: • DLP® technology • Auto/4:3/16:9/Native aspect ratio supported • High brightness and contrast...8226; HDTV (480i/p, 576i/p, 720p, 1080i/p, 2160p) supported • Lower power consumption and economy (ECO) mode extend lamp life • Acer EcoProjeciton Technology delivers Intelligent power management approach and physical efficiency improvement • Smart detection delivers quick, intelligent source detection • Multi-language onscreen display...
English 1 Introduction Product Features This product is a single-chip DLP® projector. Outstanding features include: • DLP® technology • Auto/4:3/16:9/Native aspect ratio supported • High brightness and contrast...8226; HDTV (480i/p, 576i/p, 720p, 1080i/p, 2160p) supported • Lower power consumption and economy (ECO) mode extend lamp life • Acer EcoProjeciton Technology delivers Intelligent power management approach and physical efficiency improvement • Smart detection delivers quick, intelligent source detection • Multi-language onscreen display...

User Manual
Page 12
Contact your unit is missing. Check to make sure your dealer immediately if any thing is complete. English Projector Power cord HDMI cable User's guide (option) Quick start guide Remote control AAA battery x2 (option) Carrying case (option) MHL HDMI DC 5V IN WirelessCAST (option) WirelessHD-Kit (option) WirelessProjection-Kit User's guide (for multi-media and wireless functions) Quick start guide (for multi-media and wireless functions) 2 Package Overview This projector comes with all the items shown below.
Contact your unit is missing. Check to make sure your dealer immediately if any thing is complete. English Projector Power cord HDMI cable User's guide (option) Quick start guide Remote control AAA battery x2 (option) Carrying case (option) MHL HDMI DC 5V IN WirelessCAST (option) WirelessHD-Kit (option) WirelessProjection-Kit User's guide (for multi-media and wireless functions) Quick start guide (for multi-media and wireless functions) 2 Package Overview This projector comes with all the items shown below.

User Manual
Page 14
English 4 Projector Overview Projector Outlook Front / upper side 1 23 4 5 6 7 8 4 # Description 1 Lamp cover 2 Control panel 3 Power button 4 Remote control receiver 5 Lens shift control ring 6 Air inlet 10 9 11 # Description 7 Zoom ring 8 Focus ring 9 Lens cap 10 Air outlet 11 Tilt adjusting wheels
English 4 Projector Overview Projector Outlook Front / upper side 1 23 4 5 6 7 8 4 # Description 1 Lamp cover 2 Control panel 3 Power button 4 Remote control receiver 5 Lens shift control ring 6 Air inlet 10 9 11 # Description 7 Zoom ring 8 Focus ring 9 Lens cap 10 Air outlet 11 Tilt adjusting wheels

User Manual
Page 16
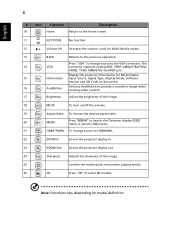
Note: Functions vary depending on model definition. Lamp Indicator LED Temp Indicator LED See the contents in "Turning the Projector On/Off" section. 6 Four directional select Use to select items or make keys adjustments to your selection. 7 BACK BACK Returns to the previous operation. 8 Home ...
Note: Functions vary depending on model definition. Lamp Indicator LED Temp Indicator LED See the contents in "Turning the Projector On/Off" section. 6 Four directional select Use to select items or make keys adjustments to your selection. 7 BACK BACK Returns to the previous operation. 8 Home ...

User Manual
Page 17
... 15 22 16 23 17 24 Model No:J-25101 17 19 25 26 MC.JQD11.001 # Icon Function Description 1 Infrared transmitter Sends signals to the projector. 2 POWER Refer to your selection. 8 Backlight Remote backlight. 9 SOURCE Changes the active source. HDR has 4 3 HDR levels and each level suits different type of field.... (only for Multi-Media mode) 7 Four directional select keys Use up, down, left, right buttons to select items or make adjustments to the "Turning the Projector On/Off" section.
... 15 22 16 23 17 24 Model No:J-25101 17 19 25 26 MC.JQD11.001 # Icon Function Description 1 Infrared transmitter Sends signals to the projector. 2 POWER Refer to your selection. 8 Backlight Remote backlight. 9 SOURCE Changes the active source. HDR has 4 3 HDR levels and each level suits different type of field.... (only for Multi-Media mode) 7 Four directional select keys Use up, down, left, right buttons to select items or make adjustments to the "Turning the Projector On/Off" section.
User Manual
Page 18
Display the projector information for Multi-Media mode) 13 BACK Returns to the previous operation. Note: Functions vary depending on /off the volume. 19 Aspect Ratio To choose ... image. 18 MUTE To turn on model definition. Press "VGA" to change source to HDMI/MHL. 22 ZOOM In Zooms the projector display in. 23 ZOOM Out Zooms the projector display out. 24 Sharpness Adjusts the sharpness of the image. 25 Lanches the media quick menu when playing media. 26 3D Press...
Display the projector information for Multi-Media mode) 13 BACK Returns to the previous operation. Note: Functions vary depending on /off the volume. 19 Aspect Ratio To choose ... image. 18 MUTE To turn on model definition. Press "VGA" to change source to HDMI/MHL. 22 ZOOM In Zooms the projector display in. 23 ZOOM Out Zooms the projector display out. 24 Sharpness Adjusts the sharpness of the image. 25 Lanches the media quick menu when playing media. 26 3D Press...

User Manual
Page 19
English 9 Getting Started Connecting the Projector 2 2 LR 3 3 10 10 USB flash drive 16 9 10 3 HDTV adapter 4 5 7 8 Smart devices 5 RCA 6 Display Video Output 2 Speakers 11 Screen 12 13 14 3D IR emitter 15 Audio Output 1
English 9 Getting Started Connecting the Projector 2 2 LR 3 3 10 10 USB flash drive 16 9 10 3 HDTV adapter 4 5 7 8 Smart devices 5 RCA 6 Display Video Output 2 Speakers 11 Screen 12 13 14 3D IR emitter 15 Audio Output 1
User Manual
Page 20
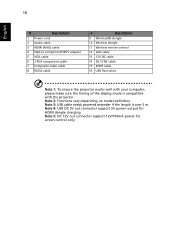
... Wireless remote control 12 LAN cable 13 12V DC cable 14 3D SYNC cable 15 SPDIF cable 16 USB flash drive Note 1: To ensure the projector works well with the...
... Wireless remote control 12 LAN cable 13 12V DC cable 14 3D SYNC cable 15 SPDIF cable 16 USB flash drive Note 1: To ensure the projector works well with the...

User Manual
Page 21
...the control panel or remote control, and the Power indicator LED will detect your source (computer, notebook, video player ,etc.). English 11 Turning the Projector On/Off Turning on the remote control to multiple sources at the same time, use the "Source" button on either control panel or the remote... control or direct source key on the Projector 1 Ensure that the power cord and signal cable are securely connected or press source direct key. • If you connect to switch between inputs....
...the control panel or remote control, and the Power indicator LED will detect your source (computer, notebook, video player ,etc.). English 11 Turning the Projector On/Off Turning on the remote control to multiple sources at the same time, use the "Source" button on either control panel or the remote... control or direct source key on the Projector 1 Ensure that the power cord and signal cable are securely connected or press source direct key. • If you connect to switch between inputs....

User Manual
Page 22
... to ensure continued optimal lamp operation. Lamp will turn solid red. Attention! English 12 Turning the projector off 1 To turn the projector off projector within 1 minute after the projector is now safe to unplug the power cord. This message appears: "Please press the power button ...your local dealer or service center. The lamp will automatically turn off , press and hold the power button. Note 1: Whenever the projector automatically shuts down , and the LED temp indicator will continue to operate for about 10 seconds to complete the shutdown process." Attention...
... to ensure continued optimal lamp operation. Lamp will turn solid red. Attention! English 12 Turning the projector off 1 To turn the projector off projector within 1 minute after the projector is now safe to unplug the power cord. This message appears: "Please press the power button ...your local dealer or service center. The lamp will automatically turn off , press and hold the power button. Note 1: Whenever the projector automatically shuts down , and the LED temp indicator will continue to operate for about 10 seconds to complete the shutdown process." Attention...

User Manual
Page 23
Tilt adjusting wheel To raise/lower the image: Use Tilt adjusting wheel to fine-tune the display angle. English 13 Adjusting the Projected Image Adjusting the Height of Projected Image The projector is equipped with elevator feet for adjusting the height of image.
Tilt adjusting wheel To raise/lower the image: Use Tilt adjusting wheel to fine-tune the display angle. English 13 Adjusting the Projected Image Adjusting the Height of Projected Image The projector is equipped with elevator feet for adjusting the height of image.


