

User Manual
Page 1
All Rights Reserved. Acer Projector User's Guide Original Issue: 02/2018 Acer DLP Projector V6810/E8610C/HT-4K13/ HV832/TH-733/A4K1719/ H6810/E8610/HE-4K13/ GM832/VH-733/A4K1720 Series User's Guide Copyright © 2018. Acer Incorporated.
All Rights Reserved. Acer Projector User's Guide Original Issue: 02/2018 Acer DLP Projector V6810/E8610C/HT-4K13/ HV832/TH-733/A4K1719/ H6810/E8610/HE-4K13/ GM832/VH-733/A4K1720 Series User's Guide Copyright © 2018. Acer Incorporated.

User Manual
Page 2
... the HDMI logo and High-Definition Multimedia Interface are registered trademarks of Acer Incorporated. The serial number and model number are used herein for a particular purpose. All correspondence concerning your projector. Other companies' product names or trademarks are recorded on the label ...notify any means, electronically, mechanically, by any person of such revisions or changes. Acer Projector Model number Serial number Date of purchase Place of purchase Acer and the Acer logo are trademarks or registered trademarks of HDMI Licensing LLC." Such changes will be ...
... the HDMI logo and High-Definition Multimedia Interface are registered trademarks of Acer Incorporated. The serial number and model number are used herein for a particular purpose. All correspondence concerning your projector. Other companies' product names or trademarks are recorded on the label ...notify any means, electronically, mechanically, by any person of such revisions or changes. Acer Projector Model number Serial number Date of purchase Place of purchase Acer and the Acer logo are trademarks or registered trademarks of HDMI Licensing LLC." Such changes will be ...

User Manual
Page 3
... supply unit before connecting the power cord to the AC power outlet. • Unplug the power cord before removing the power supply unit from the projector. • If the system has multiple sources of the product and to protect it could result in a fire or electric shock. Warnings! • Do not...
... supply unit before connecting the power cord to the AC power outlet. • Unplug the power cord before removing the power supply unit from the projector. • If the system has multiple sources of the product and to protect it could result in a fire or electric shock. Warnings! • Do not...

User Manual
Page 5
...Do not look into the product • the product was exposed to qualified service personnel. RG2 IEC 62471-5:2015 • Turn on the projector first and then signal sources. • Do not place the product in the following the operating instructions Note: Adjust only those controls that...servicing to qualified service personnel when: • the power cord or plug is damaged, cut or frayed • liquid was spilled into the projector's lens when the lamp is poorly ventilated or confined. Your device and its enhancements may result in performance, indicating a need for purchase options...
...Do not look into the product • the product was exposed to qualified service personnel. RG2 IEC 62471-5:2015 • Turn on the projector first and then signal sources. • Do not place the product in the following the operating instructions Note: Adjust only those controls that...servicing to qualified service personnel when: • the power cord or plug is damaged, cut or frayed • liquid was spilled into the projector's lens when the lamp is poorly ventilated or confined. Your device and its enhancements may result in performance, indicating a need for purchase options...

User Manual
Page 6
...control. • Do not operate lamps beyond the rated lamp life. Please contact your local dealer or Acer service center for mounting the projector and ensure it is securely installed. • The projector should not exceed 6 degrees, otherwise it to break on rare occasions. • Contact your local ...dealer or Acer service center when you . • Do not stand the projector on end vertically. vi may cause the fan(s) to operate in a horizontal way by means of desktop or ceiling mount ...
...control. • Do not operate lamps beyond the rated lamp life. Please contact your local dealer or Acer service center for mounting the projector and ensure it is securely installed. • The projector should not exceed 6 degrees, otherwise it to break on rare occasions. • Contact your local ...dealer or Acer service center when you . • Do not stand the projector on end vertically. vi may cause the fan(s) to operate in a horizontal way by means of desktop or ceiling mount ...

User Manual
Page 7
... information, check www.lamprecycle.org For more information on the Waste from Electrical and Electronics Equipment (WEEE) regulations, visit http://www.acer-group.com/public/ Sustainability/index.htm Mercury advisory For projectors or electronic products containing an LCD/CRT monitor or display: "Lamp(s) contain Mercury, Dispose Properly." Disposal instructions Do not throw...
... information, check www.lamprecycle.org For more information on the Waste from Electrical and Electronics Equipment (WEEE) regulations, visit http://www.acer-group.com/public/ Sustainability/index.htm Mercury advisory For projectors or electronic products containing an LCD/CRT monitor or display: "Lamp(s) contain Mercury, Dispose Properly." Disposal instructions Do not throw...
User Manual
Page 8
... the lamp reaches the end of your eyes. • To reduce the risk of fire or electric shock, do not expose this happens, the projector will detect the life of time. Don't: • Block the slots and openings on until the lamp module has been replaced. To replace the lamp..., contact your local dealer or Acer service center for a long period of the lamp itself. Please contact your local dealer or Acer service center. Precautions Follow all warnings, precautions and maintenance as this user's guide to maximize the life...
... the lamp reaches the end of your eyes. • To reduce the risk of fire or electric shock, do not expose this happens, the projector will detect the life of time. Don't: • Block the slots and openings on until the lamp module has been replaced. To replace the lamp..., contact your local dealer or Acer service center for a long period of the lamp itself. Please contact your local dealer or Acer service center. Precautions Follow all warnings, precautions and maintenance as this user's guide to maximize the life...

User Manual
Page 9
... First Thing First viii Usage Notes viii Precautions viii Introduction 1 Product Features 1 Package Overview 2 Projector Overview 3 Projector Outlook 3 Control Panel 4 Remote Control Layout 5 Getting Started 7 Connecting the Projector 7 Turning the Projector On/Off 9 Turning On the Projector 9 Turning Off the Projector 9 Adjusting the Projected Image 10 Adjusting the Height of the Projected Image 10 How to...
... First Thing First viii Usage Notes viii Precautions viii Introduction 1 Product Features 1 Package Overview 2 Projector Overview 3 Projector Outlook 3 Control Panel 4 Remote Control Layout 5 Getting Started 7 Connecting the Projector 7 Turning the Projector On/Off 9 Turning On the Projector 9 Turning Off the Projector 9 Adjusting the Projected Image 10 Adjusting the Height of the Projected Image 10 How to...
User Manual
Page 11
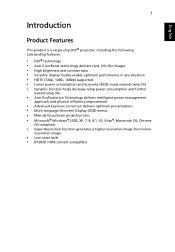
English 1 Introduction Product Features This product is a single-chip DLP® projector, including the following outstanding features: • DLP® technology • Acer ColorBoost technology delivers vivid, life-like images • High brightness and contrast ratio &#...) mode extends lamp life • Dynamic function helps decrease lamp power consumption and further extend lamp life. • Acer EcoProjection Technology delivers Intelligent power management approach and physical efficiency improvement • Advanced keystone correction delivers optimum presentations • Multi...
English 1 Introduction Product Features This product is a single-chip DLP® projector, including the following outstanding features: • DLP® technology • Acer ColorBoost technology delivers vivid, life-like images • High brightness and contrast ratio &#...) mode extends lamp life • Dynamic function helps decrease lamp power consumption and further extend lamp life. • Acer EcoProjection Technology delivers Intelligent power management approach and physical efficiency improvement • Advanced keystone correction delivers optimum presentations • Multi...

User Manual
Page 12
English Projector Power cord VGA cable (Optional) HDMI cable (Optional) Quick Start Guide Security card (Optional) User's guide (CDROM) (Optional) Remote control Quick start guide AAA Battery x 2 Carrying case (Optional) Note: The package content may differ by regions. Check to make sure you have them all the items shown below. Contact your dealer immediately if any thing is missing. 2 Package Overview This projector comes with all .
English Projector Power cord VGA cable (Optional) HDMI cable (Optional) Quick Start Guide Security card (Optional) User's guide (CDROM) (Optional) Remote control Quick start guide AAA Battery x 2 Carrying case (Optional) Note: The package content may differ by regions. Check to make sure you have them all the items shown below. Contact your dealer immediately if any thing is missing. 2 Package Overview This projector comes with all .
User Manual
Page 13
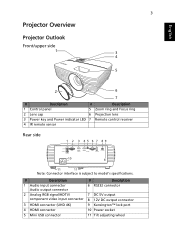
English Projector Overview Projector Outlook Front/upper side 1 3 3 4 5 2 6 7 # Description # Description 1 Control panel 5 Zoom ring and Focus ring 2 Lens cap 6 Projection lens 3 Power key and Power indicator LED 7 Remote control ...
English Projector Overview Projector Outlook Front/upper side 1 3 3 4 5 2 6 7 # Description # Description 1 Control panel 5 Zoom ring and Focus ring 2 Lens cap 6 Projection lens 3 Power key and Power indicator LED 7 Remote control ...

User Manual
Page 14
... image distortion caused by tilting projection. Refer to previous page. Selects items or makes adjustments to your selection, or goes back to the "Turning the Projector On/Off" section. Confirms your selection of items. Cancels your selection Launches the Onscreen Display (OSD) menu or exits the OSD menu. Changes the active...
... image distortion caused by tilting projection. Refer to previous page. Selects items or makes adjustments to your selection, or goes back to the "Turning the Projector On/Off" section. Confirms your selection of items. Cancels your selection Launches the Onscreen Display (OSD) menu or exits the OSD menu. Changes the active...
User Manual
Page 15
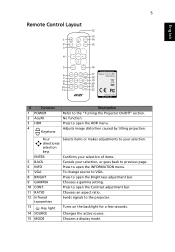
... 2 15 3 4 5 16 Model No:J-25081 6 17 7 18 8 19 9 20 10 21 11 22 MC.JPC11.001 # Function 1 POWER 2 AcuM. 3 HDR 4 Keystone Description Refer to the projector. 13 Key light Turns on the backlight for a few seconds. 14 SOURCE Changes the active source. 15 MODE Chooses a display mode. ENTER Confirms your selection... Cancels your selection. Press to open the Contrast adjustment bar. 11 RATIO Chooses an aspect ratio. 12 Infrared transmitter Sends signals to the "Turning the Projector On/Off" section. No function.
... 2 15 3 4 5 16 Model No:J-25081 6 17 7 18 8 19 9 20 10 21 11 22 MC.JPC11.001 # Function 1 POWER 2 AcuM. 3 HDR 4 Keystone Description Refer to the projector. 13 Key light Turns on the backlight for a few seconds. 14 SOURCE Changes the active source. 15 MODE Chooses a display mode. ENTER Confirms your selection... Cancels your selection. Press to open the Contrast adjustment bar. 11 RATIO Chooses an aspect ratio. 12 Infrared transmitter Sends signals to the "Turning the Projector On/Off" section. No function.

User Manual
Page 17
English LR HDTV adapter 7 Getting Started Connecting the Projector 2 2 3 3 9 10 3 4 5 7 8 Smart devices 5 RCA 6 Display Video Output 2 Speakers 11 12 13 Screen 1
English LR HDTV adapter 7 Getting Started Connecting the Projector 2 2 3 3 9 10 3 4 5 7 8 Smart devices 5 RCA 6 Display Video Output 2 Speakers 11 12 13 Screen 1

User Manual
Page 18
.../HDTV adapter 11 Wired remote control 5 VGA cable 12 RJ45 cable 6 3 RCA component cable 13 12V DC cable 7 Composite video cable Note: To ensure the projector works well with your computer, please make sure the timing of the display mode is compatible with the...
.../HDTV adapter 11 Wired remote control 5 VGA cable 12 RJ45 cable 6 3 RCA component cable 13 12V DC cable 7 Composite video cable Note: To ensure the projector works well with your computer, please make sure the timing of the display mode is compatible with the...

User Manual
Page 19
...to indicate standby mode. 3 It is "On"). • If the screen displays "No Signal", please make sure the signal cables are securely connected. The projector will turn blue. 3 Turn on your source automatically (when it is the first time you connect to multiple sources at the same time, use "SOURCE... or the direct source key on the remote control to switch between inputs. Turning Off the Projector 1 To turn the projector off, press the power button. The Power LED will light red. 2 Turn on the projector by pressing (POWER) on the control panel or remote control, and the Power indicator LED ...
...to indicate standby mode. 3 It is "On"). • If the screen displays "No Signal", please make sure the signal cables are securely connected. The projector will turn blue. 3 Turn on your source automatically (when it is the first time you connect to multiple sources at the same time, use "SOURCE... or the direct source key on the remote control to switch between inputs. Turning Off the Projector 1 To turn the projector off, press the power button. The Power LED will light red. 2 Turn on the projector by pressing (POWER) on the control panel or remote control, and the Power indicator LED ...

User Manual
Page 20
English 10 Adjusting the Projected Image Adjusting the Height of the Projected Image The projector is equipped with two elevator feet for adjusting the image height. To lower the image: 1 Use the front Tilt adjusting wheel to lower the image to the desired height and angle. 2 Use the rear Tilt adjusting wheel to fine-tune the display angle. To raise the image: 1 Use the front Tilt adjusting wheel to raise the image to the desired height and angle. 2 Use the rear Tilt adjusting wheel to fine-tune the display angle. Tilt adjusting wheel Tilt adjusting wheel
English 10 Adjusting the Projected Image Adjusting the Height of the Projected Image The projector is equipped with two elevator feet for adjusting the image height. To lower the image: 1 Use the front Tilt adjusting wheel to lower the image to the desired height and angle. 2 Use the rear Tilt adjusting wheel to fine-tune the display angle. To raise the image: 1 Use the front Tilt adjusting wheel to raise the image to the desired height and angle. 2 Use the rear Tilt adjusting wheel to fine-tune the display angle. Tilt adjusting wheel Tilt adjusting wheel

User Manual
Page 21
To obtain an image size of 70", set the projector at a distance between 2.3 m and 2.7 m from the screen and adjust the zoom level accordingly. 70" Desired image size 2.3 m 2.7 m Desired distance Height: 92 cm From base to ...
To obtain an image size of 70", set the projector at a distance between 2.3 m and 2.7 m from the screen and adjust the zoom level accordingly. 70" Desired image size 2.3 m 2.7 m Desired distance Height: 92 cm From base to ...

User Manual
Page 22
Main menu Submenu Setting Note: Some of your projector. Please refer to the actual OSD of the following OSD settings may not be available. Using the OSD menus • To open the OSD menu, .... • To go back to make image adjustments and change a variety of settings. It will close and the projector will automatically save the new settings. English 12 User Controls Onscreen Display (OSD) Menus The projector has multilingual Onscreen Display (OSD) menus that allow you to the previous menu, press "BACK". • To...
Main menu Submenu Setting Note: Some of your projector. Please refer to the actual OSD of the following OSD settings may not be available. Using the OSD menus • To open the OSD menu, .... • To go back to make image adjustments and change a variety of settings. It will close and the projector will automatically save the new settings. English 12 User Controls Onscreen Display (OSD) Menus The projector has multilingual Onscreen Display (OSD) menus that allow you to the previous menu, press "BACK". • To...

User Manual
Page 23
... are not suitable for your need of watching movies that requires an ultraquiet environment so that you can be disturbed by the noise of the projector. The new name can further fine-tune the image based on the selections listed below. • Rename User Mode: Select to lighten the image. It...
... are not suitable for your need of watching movies that requires an ultraquiet environment so that you can be disturbed by the noise of the projector. The new name can further fine-tune the image based on the selections listed below. • Rename User Mode: Select to lighten the image. It...


