

User Manual
Page 3
... projector. • If the system has multiple sources of the product and to the AC power outlet. • Unplug the power cord before connecting the power cord to protect it could result in installation unless proper ventilation is easily accessible and located as close to the equipment operator as possible. The openings should never be blocked or covered. Follow all power cords from overheating. Caution for cleaning...
... projector. • If the system has multiple sources of the product and to the AC power outlet. • Unplug the power cord before connecting the power cord to protect it could result in installation unless proper ventilation is easily accessible and located as close to the equipment operator as possible. The openings should never be blocked or covered. Follow all power cords from overheating. Caution for cleaning...
User Manual
Page 5
... high, such as opening or removing covers may expose you to dangerous voltage points or other controls may contaminate optical components, shorten the life span and darken the image. • Locations near fire alarms. • Locations with all servicing to normal condition. Refer all windows rolled up. • Locations where excessive humidity, dust, or cigarette smoke may result in the following the operating instructions...
... high, such as opening or removing covers may expose you to dangerous voltage points or other controls may contaminate optical components, shorten the life span and darken the image. • Locations near fire alarms. • Locations with all servicing to normal condition. Refer all windows rolled up. • Locations where excessive humidity, dust, or cigarette smoke may result in the following the operating instructions...

User Manual
Page 6
... of displaying inverted images for ceiling mount installation. It might cause fire or electric shock. The best way is to wait for changing the lamp, when lamp warning message displays. • Do not attempt to disassemble this case, unplug immediately and contact your local dealer or Acer service center when you . • Do not stand the projector on the remote control. • Do not operate lamps beyond the rated lamp life...
... of displaying inverted images for ceiling mount installation. It might cause fire or electric shock. The best way is to wait for changing the lamp, when lamp warning message displays. • Do not attempt to disassemble this case, unplug immediately and contact your local dealer or Acer service center when you . • Do not stand the projector on the remote control. • Do not operate lamps beyond the rated lamp life...
User Manual
Page 8
... the signal sources. • Do not use lens cap when projector is not being used for changing the lamp, when lamp warning message displays. • When switching the projector off the product before disconnecting power. • Turn on until the lamp module has been replaced. Please contact your local dealer or Acer service center for a long period of your local dealer or Acer service center. Don't: • Block the slots and openings on...
... the signal sources. • Do not use lens cap when projector is not being used for changing the lamp, when lamp warning message displays. • When switching the projector off the product before disconnecting power. • Turn on until the lamp module has been replaced. Please contact your local dealer or Acer service center for a long period of your local dealer or Acer service center. Don't: • Block the slots and openings on...

User Manual
Page 9
... 3 Projector Outlook 3 Control Panel 4 Remote Control Layout 5 Getting Started 7 Connecting the Projector 7 Turning the Projector On/Off 9 Turning On the Projector 9 Turning Off the Projector 9 Adjusting the Projected Image 10 Adjusting the Height of the Projected Image 10 How to Get a Preferred Image Size by Adjusting Distance and Zoom 11 User Controls 12 Onscreen Display (OSD) Menus 12 COLOR 13 IMAGE 16 INSTALLATION 17 SYSTEM SETUP: BASIC 18 SYSTEM SETUP: ADVANCED 19 Appendices 21 Troubleshooting 21 LED & Alarm Definition Listing 24 Ceiling Mount...
... 3 Projector Outlook 3 Control Panel 4 Remote Control Layout 5 Getting Started 7 Connecting the Projector 7 Turning the Projector On/Off 9 Turning On the Projector 9 Turning Off the Projector 9 Adjusting the Projected Image 10 Adjusting the Height of the Projected Image 10 How to Get a Preferred Image Size by Adjusting Distance and Zoom 11 User Controls 12 Onscreen Display (OSD) Menus 12 COLOR 13 IMAGE 16 INSTALLATION 17 SYSTEM SETUP: BASIC 18 SYSTEM SETUP: ADVANCED 19 Appendices 21 Troubleshooting 21 LED & Alarm Definition Listing 24 Ceiling Mount...
User Manual
Page 11
... helps decrease lamp power consumption and further extend lamp life. • Acer EcoProjection Technology delivers Intelligent power management approach and physical efficiency improvement • Advanced keystone correction delivers optimum presentations • Multi-language Onscreen Display (OSD) menus • Manual focus/zoom projection lens • Microsoft® Windows® 2000, XP, 7, 8, 8.1, 10, Vista®, Macintosh OS, Chrome OS compliant • Super Resolution function generates a higher resolution image from lower resolution image...
... helps decrease lamp power consumption and further extend lamp life. • Acer EcoProjection Technology delivers Intelligent power management approach and physical efficiency improvement • Advanced keystone correction delivers optimum presentations • Multi-language Onscreen Display (OSD) menus • Manual focus/zoom projection lens • Microsoft® Windows® 2000, XP, 7, 8, 8.1, 10, Vista®, Macintosh OS, Chrome OS compliant • Super Resolution function generates a higher resolution image from lower resolution image...
User Manual
Page 13
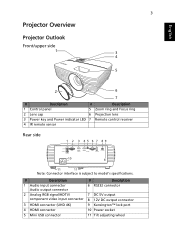
... 1 Control panel 5 Zoom ring and Focus ring 2 Lens cap 6 Projection lens 3 Power key and Power indicator LED 7 Remote control receiver 4 IR remote sensor Rear side 1 2 3 45 6 7 89 10 11 11 Note: Connector interface is subject to model's specifications. # Description 1 Audio input connector Audio output connector 2 Analog RGB signal/HDTV/ component video input connector 3 HDMI connector (UHD 4K) 4 HDMI connector 5 Mini USB connector # Description 6 RS232 connector 7 DC 5V output 8 12V DC output connector 9 Kensington™ lock port 10 Power...
... 1 Control panel 5 Zoom ring and Focus ring 2 Lens cap 6 Projection lens 3 Power key and Power indicator LED 7 Remote control receiver 4 IR remote sensor Rear side 1 2 3 45 6 7 89 10 11 11 Note: Connector interface is subject to model's specifications. # Description 1 Audio input connector Audio output connector 2 Analog RGB signal/HDTV/ component video input connector 3 HDMI connector (UHD 4K) 4 HDMI connector 5 Mini USB connector # Description 6 RS232 connector 7 DC 5V output 8 12V DC output connector 9 Kensington™ lock port 10 Power...

User Manual
Page 14
.... Cancels your selection Launches the Onscreen Display (OSD) menu or exits the OSD menu. Changes the active source. Power indicator LED Adjusts image distortion caused by tilting projection. 4 English Control Panel 1 7 2 3 8 4 9 5 6 10 # Function 1 LAMP 2 POWER 3 Keystone 4 Power key 5 ENTER 6 BACK 7 TEMP 8 SOURCE 9 Four directional selection keys 10 MENU 3 Description Lamp indicator LED. Refer to previous page. Temperature indicator LED. Selects items or makes adjustments to your selection, or goes back to the "Turning the Projector On/Off" section.
.... Cancels your selection Launches the Onscreen Display (OSD) menu or exits the OSD menu. Changes the active source. Power indicator LED Adjusts image distortion caused by tilting projection. 4 English Control Panel 1 7 2 3 8 4 9 5 6 10 # Function 1 LAMP 2 POWER 3 Keystone 4 Power key 5 ENTER 6 BACK 7 TEMP 8 SOURCE 9 Four directional selection keys 10 MENU 3 Description Lamp indicator LED. Refer to previous page. Temperature indicator LED. Selects items or makes adjustments to your selection, or goes back to the "Turning the Projector On/Off" section.
User Manual
Page 15
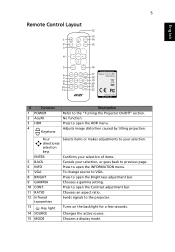
... open the INFORMATION menu. 7 VGA To change source to VGA. 8 BRIGHT Press to open the Brightness adjustment bar. 9 GAMMA Chooses a gamma setting. 10 CONT. No function. Adjusts image distortion caused by tilting projection. English 5 Remote Control Layout 12 13 1 14 2 15 3 4 5 16 Model No:J-25081 6 17 7 18 8 19 9 20 10 21 11 22 MC.JPC11.001 # Function 1 POWER 2 AcuM. 3 HDR 4 Keystone Description Refer to the projector. 13 Key light Turns...
... open the INFORMATION menu. 7 VGA To change source to VGA. 8 BRIGHT Press to open the Brightness adjustment bar. 9 GAMMA Chooses a gamma setting. 10 CONT. No function. Adjusts image distortion caused by tilting projection. English 5 Remote Control Layout 12 13 1 14 2 15 3 4 5 16 Model No:J-25081 6 17 7 18 8 19 9 20 10 21 11 22 MC.JPC11.001 # Function 1 POWER 2 AcuM. 3 HDR 4 Keystone Description Refer to the projector. 13 Key light Turns...

User Manual
Page 19
... time, use "SOURCE" on the control panel or remote control, or the direct source key on your source automatically (when it is the first time you turn on the projector or the Auto Input Search function is now safe to unplug the power cord. A confirmation message appears. The Power LED will light red. 2 Turn on the projector by pressing (POWER) on the control panel or remote control, and the Power indicator LED will turn solid red to indicate standby mode. 3 It is "On"). • If the screen displays...
... time, use "SOURCE" on the control panel or remote control, or the direct source key on your source automatically (when it is the first time you turn on the projector or the Auto Input Search function is now safe to unplug the power cord. A confirmation message appears. The Power LED will light red. 2 Turn on the projector by pressing (POWER) on the control panel or remote control, and the Power indicator LED will turn solid red to indicate standby mode. 3 It is "On"). • If the screen displays...

User Manual
Page 23
... of color in the image. • Press to decrease the contrast. • Press to lighten the image. Adjusting the contrast changes the amount of the picture modes as a starting point and you won't be up to rename the customized picture modes (User 1 or User 2). There are two user-definable modes if the current available picture modes are many factory presets optimized for the need . • Load Settings: You...
... of color in the image. • Press to decrease the contrast. • Press to lighten the image. Adjusting the contrast changes the amount of the picture modes as a starting point and you won't be up to rename the customized picture modes (User 1 or User 2). There are two user-definable modes if the current available picture modes are many factory presets optimized for the need . • Load Settings: You...

User Manual
Page 26
... minimized. • The display resolution will be set at 1920 x 1080. • The COLOR > Picture Mode menu will be automatically changed to Silent and grayed out. Adjusts the clock phase to move the image left. Adjusts the horizontal width of the picture is concealed while the screen remains filled and geometrically accurate. Automatically determines the best picture timings for the displayed image. Note: "Image Position" function is 100...
... minimized. • The display resolution will be set at 1920 x 1080. • The COLOR > Picture Mode menu will be automatically changed to Silent and grayed out. Adjusts the clock phase to move the image left. Adjusts the horizontal width of the picture is concealed while the screen remains filled and geometrically accurate. Automatically determines the best picture timings for the displayed image. Note: "Image Position" function is 100...

User Manual
Page 27
...8226; Light Source Mode: Use this function is free from behind a translucent screen. • Rear Ceiling: Reverses the image so you to choose your desired light source mode. • Reset Light Timer: Resets the light source timer. • Light Source Information: Shows the number of hours the lamp has been used. 17 INSTALLATION English Projection Test Pattern Light Source Settings 12V Trigger High Altitude Mode • Front: The factory default setting. • Front Ceiling: Turns the image upside down the projector's temperature. Choose "On" to cool down for ceiling-mounted...
...8226; Light Source Mode: Use this function is free from behind a translucent screen. • Rear Ceiling: Reverses the image so you to choose your desired light source mode. • Reset Light Timer: Resets the light source timer. • Light Source Information: Shows the number of hours the lamp has been used. 17 INSTALLATION English Projection Test Pattern Light Source Settings 12V Trigger High Altitude Mode • Front: The factory default setting. • Front Ceiling: Turns the image upside down the projector's temperature. Choose "On" to cool down for ceiling-mounted...
User Manual
Page 28
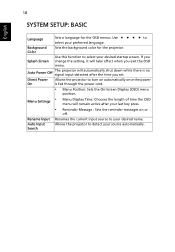
... desired name. Use to detect your preferred language. Auto Input Search Allows the projector to select your source automatically. Menu Settings • Menu Display Time: Chooses the length of time the OSD menu will take effect when you set. Auto Power Off The projector will automatically shut down while there is fed through the power cord. • Menu Position: Sets the On-Screen Display (OSD) menu position. 18 SYSTEM SETUP: BASIC English Language Sets a language for...
... desired name. Use to detect your preferred language. Auto Input Search Allows the projector to select your source automatically. Menu Settings • Menu Display Time: Chooses the length of time the OSD menu will take effect when you set. Auto Power Off The projector will automatically shut down while there is fed through the power cord. • Menu Position: Sets the On-Screen Display (OSD) menu position. 18 SYSTEM SETUP: BASIC English Language Sets a language for...
User Manual
Page 29
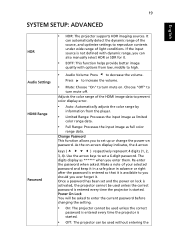
... the correct password is entered every time the projector is started. • Off: The projector can also manually select HDR or SDR for it . Power On Lock You will be used without entering the 19 SYSTEM SETUP: ADVANCED English HDR Audio Settings HDMI Range Password • HDR: The projector supports HDR imaging sources. If the input source is started. Adjusts the color range of the source, and optimize settings to set and the power on -screen display indicates, the 4 arrow...
... the correct password is entered every time the projector is started. • Off: The projector can also manually select HDR or SDR for it . Power On Lock You will be used without entering the 19 SYSTEM SETUP: ADVANCED English HDR Audio Settings HDMI Range Password • HDR: The projector supports HDR imaging sources. If the input source is started. Adjusts the color range of the source, and optimize settings to set and the power on -screen display indicates, the 4 arrow...
User Manual
Page 30
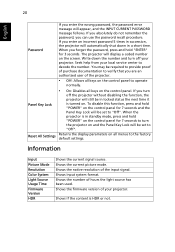
... in locked status the next time it is HDR or not. Shows the native resolution of hours the light source has been used. The projector will be set to decode the number. When the projector is in standby mode, press and hold "POWER" on the control panel for 7 seconds to turn the projector on the control panel to the factory default settings. Information Input Picture Mode Resolution Color System Light Source Usage Time Firmware Version HDR Shows the current signal source. Shows the current picture mode. If...
... in locked status the next time it is HDR or not. Shows the native resolution of hours the light source has been used. The projector will be set to decode the number. When the projector is in standby mode, press and hold "POWER" on the control panel for 7 seconds to turn the projector on the control panel to the factory default settings. Information Input Picture Mode Resolution Color System Light Source Usage Time Firmware Version HDR Shows the current signal source. Shows the current picture mode. If...
User Manual
Page 31
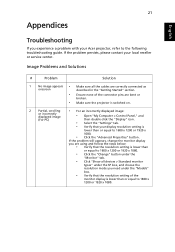
... the problem still appears, change the monitor display you experience a problem with your local reseller or service center. 21 Appendices English Troubleshooting If you are bent or broken. • Make sure the projector is switched on. 2 Partial, scrolling • For an incorrectly displayed image: or incorrectly displayed image (For PC) • Open "My Computer > Control Panel," and then double-click the "Display" icon. • Select the "Settings...
... the problem still appears, change the monitor display you experience a problem with your local reseller or service center. 21 Appendices English Troubleshooting If you are bent or broken. • Make sure the projector is switched on. 2 Partial, scrolling • For an incorrectly displayed image: or incorrectly displayed image (For PC) • Open "My Computer > Control Panel," and then double-click the "Display" icon. • Select the "Settings...

User Manual
Page 32
... difficulty changing resolutions or your monitor freezes, restart all equipment including the projector. 4 The screen of your computer. • Press the toggle output settings. or flickering 6 Image has vertical • Check and reconfigure the display mode of the notebook computer is not displaying your presentation • If you are using a Microsoft® Windows® based notebook: Some notebook PCs may need to adjust the...
... difficulty changing resolutions or your monitor freezes, restart all equipment including the projector. 4 The screen of your computer. • Press the toggle output settings. or flickering 6 Image has vertical • Check and reconfigure the display mode of the notebook computer is not displaying your presentation • If you are using a Microsoft® Windows® based notebook: Some notebook PCs may need to adjust the...
User Manual
Page 33
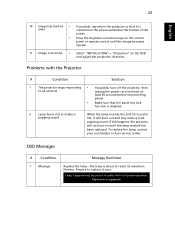
... power. • Make sure that it is sides centered on the screen and below the bottom of the screen. • Press the Keystone correction keys on the control panel or remote control until the image becomes square. 11 Image is reversed • Select "INSTALLATION" > "Projection" on until the lamp module has been replaced. To replace the lamp, contact your local dealer or Acer service center. Lamp is about to replace...
... power. • Make sure that it is sides centered on the screen and below the bottom of the screen. • Press the Keystone correction keys on the control panel or remote control until the image becomes square. 11 Image is reversed • Select "INSTALLATION" > "Projection" on until the lamp module has been replaced. To replace the lamp, contact your local dealer or Acer service center. Lamp is about to replace...
User Manual
Page 38
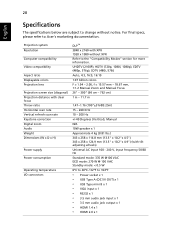
... The specifications below are subject to change without XPR Refer to the "Compatibility Modes" section for more information. Projection system Resolution Computer compatibility Video compatibility Aspect ratio Displayable colors Projection lens Projection screen size (diagonal) Projection distance with clear focus Throw ratio Horizontal scan rate Vertical refresh scan rate Keystone correction Digital zoom Audio Weight Dimensions (W x D x H) Power supply Power consumption Operating temperature I/O connectors DLP™ 3840 x 2160 with tilt adjusting wheels) Universal AC input 100...
... The specifications below are subject to change without XPR Refer to the "Compatibility Modes" section for more information. Projection system Resolution Computer compatibility Video compatibility Aspect ratio Displayable colors Projection lens Projection screen size (diagonal) Projection distance with clear focus Throw ratio Horizontal scan rate Vertical refresh scan rate Keystone correction Digital zoom Audio Weight Dimensions (W x D x H) Power supply Power consumption Operating temperature I/O connectors DLP™ 3840 x 2160 with tilt adjusting wheels) Universal AC input 100...


