

User Manual (3D)
Page 1
Acer Projectors with 3D Technology Quick Guide
Acer Projectors with 3D Technology Quick Guide

User Manual (3D)
Page 2
© 2012 All Rights Reserved. Acer Projector Series Quick Guide Original Issue: 8/2012 Model number Serial number Date of purchase Place of purchase
© 2012 All Rights Reserved. Acer Projector Series Quick Guide Original Issue: 8/2012 Model number Serial number Date of purchase Place of purchase
User Manual (3D)
Page 3
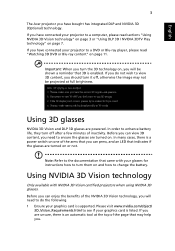
... be projected at the top of the arms that indicates if the glasses are powered. English 3 The Acer projector you should turn it off after a few minutes of inactivity. If you need to ensure the glasses ...battery life, they turn the 3D technology on, you will need to do not wish to see if your projector to a computer, please read "Watching 3D DVD or Blu-ray content" on page 11. If you ... and DLP 3D glasses are turned on one of the page that came with NVIDIA 3D Vision certified projectors when using NVIDIA 3D glasses. In many cases, there is a power switch on or not. If...
... be projected at the top of the arms that indicates if the glasses are powered. English 3 The Acer projector you should turn it off after a few minutes of inactivity. If you need to ensure the glasses ...battery life, they turn the 3D technology on, you will need to do not wish to see if your projector to a computer, please read "Watching 3D DVD or Blu-ray content" on page 11. If you ... and DLP 3D glasses are turned on one of the page that came with NVIDIA 3D Vision certified projectors when using NVIDIA 3D glasses. In many cases, there is a power switch on or not. If...
User Manual (3D)
Page 5
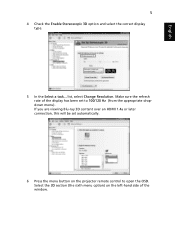
If you are viewing Blu-ray 3D content over an HDMI 1.4a or later connection, this will be set to open the OSD. English 5 4 Check the Enable Stereoscopic 3D option and select the correct display type. 5 In the Select a task... Make sure the refresh rate of the window. list, select Change Resolution. Select the 3D section (the sixth menu option) on the left-hand side of the display has been set automatically. 6 Press the menu button on the projector remote control to 100/120 Hz (from the appropriate dropdown menu).
If you are viewing Blu-ray 3D content over an HDMI 1.4a or later connection, this will be set to open the OSD. English 5 4 Check the Enable Stereoscopic 3D option and select the correct display type. 5 In the Select a task... Make sure the refresh rate of the window. list, select Change Resolution. Select the 3D section (the sixth menu option) on the left-hand side of the display has been set automatically. 6 Press the menu button on the projector remote control to 100/120 Hz (from the appropriate dropdown menu).
User Manual (3D)
Page 6
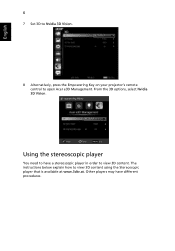
From the 3D options, select Nvidia 3D Vision. Using the stereoscopic player You need to have different procedures. The instructions below explain how to view 3D content. English 6 7 Set 3D to Nvidia 3D Vision. 8 Alternatively, press the Empowering Key on your projector's remote control to open Acer e3D Management. Other players may have a stereoscopic player in order to view 3D content using the Stereoscopic player that is available at www.3dtv.at.
From the 3D options, select Nvidia 3D Vision. Using the stereoscopic player You need to have different procedures. The instructions below explain how to view 3D content. English 6 7 Set 3D to Nvidia 3D Vision. 8 Alternatively, press the Empowering Key on your projector's remote control to open Acer e3D Management. Other players may have a stereoscopic player in order to view 3D content using the Stereoscopic player that is available at www.3dtv.at.
User Manual (3D)
Page 7
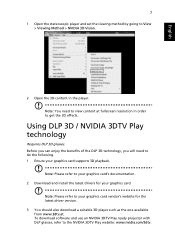
...: Please refer to your graphics card vendor's website for your graphics card supports 3D playback. To download software and use an NVIDIA 3DTV Play ready projector with DLP glasses, refer to do the following. 1 Ensure your graphics card. Note: You need to the NVIDIA 3DTV Play website: www.nvidia.com/3dtv...
...: Please refer to your graphics card vendor's website for your graphics card supports 3D playback. To download software and use an NVIDIA 3DTV Play ready projector with DLP glasses, refer to do the following. 1 Ensure your graphics card. Note: You need to the NVIDIA 3DTV Play website: www.nvidia.com/3dtv...
User Manual (3D)
Page 8
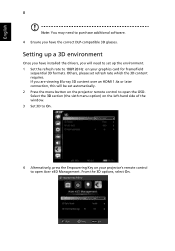
... (the sixth menu option) on the left-hand side of the window. 3 Set 3D to On. 4 Alternatively, press the Empowering Key on your projector's remote control to open Acer e3D Management. Others, please set up a 3D environment Once you have the correct DLP-compatible 3D glasses. From the 3D options, select On... you are viewing Blu-ray 3D content over an HDMI 1.4a or later connection, this will be set automatically. 2 Press the menu button on the projector remote control to open the OSD.
... (the sixth menu option) on the left-hand side of the window. 3 Set 3D to On. 4 Alternatively, press the Empowering Key on your projector's remote control to open Acer e3D Management. Others, please set up a 3D environment Once you have the correct DLP-compatible 3D glasses. From the 3D options, select On... you are viewing Blu-ray 3D content over an HDMI 1.4a or later connection, this will be set automatically. 2 Press the menu button on the projector remote control to open the OSD.
User Manual (3D)
Page 9
... not displaying properly, try to change the 3D Format to disable the Otherwise, try selecting 3D Sync Invert from the projector OSD or Acer e3D Management for HDMI 1.4 or 2nd generation 3D projectors. 2. Note: 1. Important: If you have an NVIDIA graphics card and the NVIDIA 3D Vision/ 3DTV Play drivers installed, you find...
... not displaying properly, try to change the 3D Format to disable the Otherwise, try selecting 3D Sync Invert from the projector OSD or Acer e3D Management for HDMI 1.4 or 2nd generation 3D projectors. 2. Note: 1. Important: If you have an NVIDIA graphics card and the NVIDIA 3D Vision/ 3DTV Play drivers installed, you find...
User Manual (3D)
Page 11
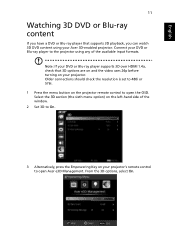
... Management. Older connections should check the resolution is set to 480i or 576i. 1 Press the menu button on the projector remote control to the projector using your Acer 3D-enabled projector. English 11 Watching 3D DVD or Blu-ray content If you can watch 3D DVD content using any of the window.... 2 Set 3D to On. 3 Alternatively, press the Empowering Key on your projector's remote control to open the OSD. Select ...
... Management. Older connections should check the resolution is set to 480i or 576i. 1 Press the menu button on the projector remote control to the projector using your Acer 3D-enabled projector. English 11 Watching 3D DVD or Blu-ray content If you can watch 3D DVD content using any of the window.... 2 Set 3D to On. 3 Alternatively, press the Empowering Key on your projector's remote control to open the OSD. Select ...
User Manual (3D)
Page 12
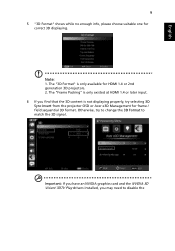
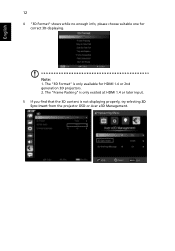
English 12 4 "3D Format" shows while no enough info, please choose suitable one for HDMI 1.4 or 2nd generation 3D projectors. 2. The "3D Format" is not displaying properly, try selecting 3D Sync Invert from the projector OSD or Acer e3D Management. The "Frame Packing" is only existed at HDMI 1.4 or later input. 5 If you find that the 3D content is only available for correct 3D displaying. Note: 1.
English 12 4 "3D Format" shows while no enough info, please choose suitable one for HDMI 1.4 or 2nd generation 3D projectors. 2. The "3D Format" is not displaying properly, try selecting 3D Sync Invert from the projector OSD or Acer e3D Management. The "Frame Packing" is only existed at HDMI 1.4 or later input. 5 If you find that the 3D content is only available for correct 3D displaying. Note: 1.
User Manual (3D)
Page 13
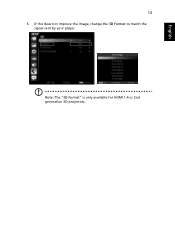
Note: The "3D Format" is only available for HDMI 1.4 or 2nd generation 3D projectors. English 13 6 If this does not improve the image, change the 3D Format to match the signal sent by your player.
Note: The "3D Format" is only available for HDMI 1.4 or 2nd generation 3D projectors. English 13 6 If this does not improve the image, change the 3D Format to match the signal sent by your player.
User Manual
Page 2
... affixed to your unit should include the serial number, model number and purchase information. Acer Projector User's Guide Issue date: 01/2015 Changes may be incorporated in any form or by any person of Acer Incorporated. All correspondence concerning your projector. Acer Incorporated. This company makes no representations or warranties, either expressed or implied, with...
... affixed to your unit should include the serial number, model number and purchase information. Acer Projector User's Guide Issue date: 01/2015 Changes may be incorporated in any form or by any person of Acer Incorporated. All correspondence concerning your projector. Acer Incorporated. This company makes no representations or warranties, either expressed or implied, with...
User Manual
Page 3
... the power supplies. These openings must not be seriously damaged. • Slots and openings are provided for future reference. Follow all power cords from the projector. • If the system has multiple sources of any kind into this product near or over a radiator or heat register, or in a built-in a fire...
... the power supplies. These openings must not be seriously damaged. • Slots and openings are provided for future reference. Follow all power cords from the projector. • If the system has multiple sources of any kind into this product near or over a radiator or heat register, or in a built-in a fire...
User Manual
Page 5
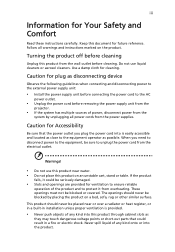
Unplug this product yourself, as inside of a car with all servicing to qualified service personnel. It Your device and its enhancements may hurt your projector. Keep them out of the reach of small children. Do not operate if smoke, strange noise or odor comes out of your reseller for... service personnel when: • the power cord or plug is damaged, cut or frayed • liquid was spilled into the projector's lens when the lamp is on the projector first and then signal sources. • Do not place the product in the following the operating instructions Note: Adjust only those...
Unplug this product yourself, as inside of a car with all servicing to qualified service personnel. It Your device and its enhancements may hurt your projector. Keep them out of the reach of small children. Do not operate if smoke, strange noise or odor comes out of your reseller for... service personnel when: • the power cord or plug is damaged, cut or frayed • liquid was spilled into the projector's lens when the lamp is on the projector first and then signal sources. • Do not place the product in the following the operating instructions Note: Adjust only those...
User Manual
Page 6
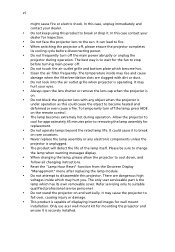
...fan to fire. • When switching the projector off the main power abruptly or unplug the projector during operation. The temperature inside which become heated and deformed or even cause a fire. Only use acer wall mount kit for mounting the projector and ensure it . There are dangerous high... voltages inside may hurt you. To temporarily turn off , please ensure the projector completes its own removable cover. It can lead to ...
...fan to fire. • When switching the projector off the main power abruptly or unplug the projector during operation. The temperature inside which become heated and deformed or even cause a fire. Only use acer wall mount kit for mounting the projector and ensure it . There are dangerous high... voltages inside may hurt you. To temporarily turn off , please ensure the projector completes its own removable cover. It can lead to ...
User Manual
Page 7
... into the trash when discarding. For more information on the Waste from Electrical and Electronics Equipment (WEEE) regulations, visit http://www.acer-group.com/public/ Sustainability/index.htm Mercury advisory For projectors or electronic products containing an LCD/CRT monitor or display: "Lamp(s) contain Mercury, Dispose Properly." For more information, contact the...
... into the trash when discarding. For more information on the Waste from Electrical and Electronics Equipment (WEEE) regulations, visit http://www.acer-group.com/public/ Sustainability/index.htm Mercury advisory For projectors or electronic products containing an LCD/CRT monitor or display: "Lamp(s) contain Mercury, Dispose Properly." For more information, contact the...
User Manual
Page 8
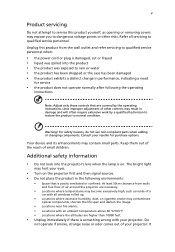
...• This product will not turn back on until the lamp module has been replaced. Don't: • Block the slots and openings on the projector provided for ventilation. • Use abrasive cleaners, waxes or solvents to clean the unit. • Use under "Replacing the Lamp". The bright ...hot, cold or humid environments. • In areas susceptible to cool down, and follow all warnings, precautions and maintenance as this happens, the projector will detect the life of the lamp itself. If this may make a loud popping sound. viii First Thing First Usage Notes Do: • ...
...• This product will not turn back on until the lamp module has been replaced. Don't: • Block the slots and openings on the projector provided for ventilation. • Use abrasive cleaners, waxes or solvents to clean the unit. • Use under "Replacing the Lamp". The bright ...hot, cold or humid environments. • In areas susceptible to cool down, and follow all warnings, precautions and maintenance as this happens, the projector will detect the life of the lamp itself. If this may make a loud popping sound. viii First Thing First Usage Notes Do: • ...
User Manual
Page 9
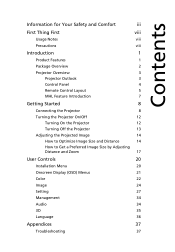
... First viii Usage Notes viii Precautions viii Introduction 1 Product Features 1 Package Overview 2 Projector Overview 3 Projector Outlook 3 Control Panel 4 Remote Control Layout 5 MHL Feature Introduction 7 Getting Started 8 Connecting the Projector 8 Turning the Projector On/Off 12 Turning On the Projector 12 Turning Off the Projector 13 Adjusting the Projected Image 14 How to Optimize Image Size and...
... First viii Usage Notes viii Precautions viii Introduction 1 Product Features 1 Package Overview 2 Projector Overview 3 Projector Outlook 3 Control Panel 4 Remote Control Layout 5 MHL Feature Introduction 7 Getting Started 8 Connecting the Projector 8 Turning the Projector On/Off 12 Turning On the Projector 12 Turning Off the Projector 13 Adjusting the Projected Image 14 How to Optimize Image Size and...
User Manual
Page 11
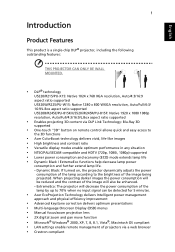
... allows quick and easy access to the brightness of the image being projected. ExtremeEco: The projector will also be detected for 5 minutes. • Acer EcoProjection Technology delivers Intelligent power management approach and physical efficiency improvement • Advanced keystone correction delivers...- English 1 Introduction Product Features This product is a single-chip DLP® projector, including the following outstanding features: THIS PROJECTOR CAN ONLY BE WALL MOUNTED. • DLP® technology U5220/R215/PU-X15: Native 1024 x 768 XGA resolution, Auto/4:3/16:9 aspect ratio...
... allows quick and easy access to the brightness of the image being projected. ExtremeEco: The projector will also be detected for 5 minutes. • Acer EcoProjection Technology delivers Intelligent power management approach and physical efficiency improvement • Advanced keystone correction delivers...- English 1 Introduction Product Features This product is a single-chip DLP® projector, including the following outstanding features: THIS PROJECTOR CAN ONLY BE WALL MOUNTED. • DLP® technology U5220/R215/PU-X15: Native 1024 x 768 XGA resolution, Auto/4:3/16:9 aspect ratio...
User Manual
Page 12
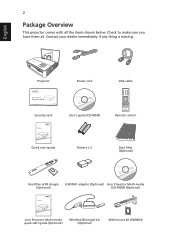
2 Package Overview This projector comes with all . English Projector Power cord VGA cable Security card User's guide (CD-ROM) Remote control Quick start guide Battery x 2 Dust filter (Optional) SmartPen & PB dongle (Optional) USB WiFi adapter (Optional) Acer Projector Multi-media (CD-ROM) (Optional) Acer Projector Multi-media quick start guide (Optional) WirelessHD dongle kit (Optional) Wall mount kit (SWM04) Contact your dealer immediately if any thing is missing. Check to make sure you have them all the items shown below.
2 Package Overview This projector comes with all . English Projector Power cord VGA cable Security card User's guide (CD-ROM) Remote control Quick start guide Battery x 2 Dust filter (Optional) SmartPen & PB dongle (Optional) USB WiFi adapter (Optional) Acer Projector Multi-media (CD-ROM) (Optional) Acer Projector Multi-media quick start guide (Optional) WirelessHD dongle kit (Optional) Wall mount kit (SWM04) Contact your dealer immediately if any thing is missing. Check to make sure you have them all the items shown below.


