
User Manual (3D)
Page 4
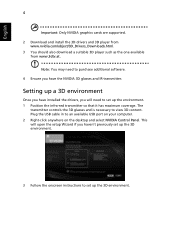
... set up a 3D environment Once you have the NVIDIA 3D glasses and IR-transmitter. Plug the USB cable in to view 3D content. The transmitter controls the 3D glasses and is necessary to an available USB port on your computer. 2 Right-click anywhere on the desktop and select NVIDIA Control Panel. English 4 Important: Only NVIDIA graphics cards are supported. 2 Download and install...
... set up a 3D environment Once you have the NVIDIA 3D glasses and IR-transmitter. Plug the USB cable in to view 3D content. The transmitter controls the 3D glasses and is necessary to an available USB port on your computer. 2 Right-click anywhere on the desktop and select NVIDIA Control Panel. English 4 Important: Only NVIDIA graphics cards are supported. 2 Download and install...
User Manual (3D)
Page 7
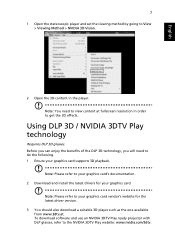
... from www.3dtv.at fullscreen resolution in the player. To download software and use an NVIDIA 3DTV Play ready projector with DLP glasses, refer to get the 3D effects. Note: Please refer to your graphics card. Using DLP 3D / NVIDIA 3DTV Play technology Requires DLP 3D glasses. Note: You need to View > Viewing Method > NVIDIA 3D Vision. 2 Open the 3D content in...
... from www.3dtv.at fullscreen resolution in the player. To download software and use an NVIDIA 3DTV Play ready projector with DLP glasses, refer to get the 3D effects. Note: Please refer to your graphics card. Using DLP 3D / NVIDIA 3DTV Play technology Requires DLP 3D glasses. Note: You need to View > Viewing Method > NVIDIA 3D Vision. 2 Open the 3D content in...
User Manual
Page 5
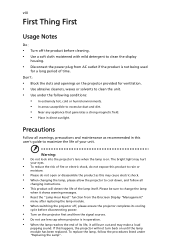
... extensive work by the operating instructions, since improper adjustment of small children. v Product servicing Do not attempt to service this product from walls and free flow of air around the projector are necessary. • Locations where temperatures may become excessively high, such as opening or removing covers may expose you to dangerous voltage points or other controls may contain small parts. Refer all windows rolled up. • Locations where...
... extensive work by the operating instructions, since improper adjustment of small children. v Product servicing Do not attempt to service this product from walls and free flow of air around the projector are necessary. • Locations where temperatures may become excessively high, such as opening or removing covers may expose you to dangerous voltage points or other controls may contain small parts. Refer all windows rolled up. • Locations where...
User Manual
Page 6
... user serviceable part is capable of the lamp itself. In this case contact your dealer for wall mount installation. It may cause the projector to become hot. • Clean the air filter frequently. Please be sure to change the lamp when warning messages display. • When changing the lamp, please allow the projector to cool down, and follow all changing instructions. • Reset the "Lamp Hour Reset" function from the Onscreen Display "Management" menu after replacing the lamp...
... user serviceable part is capable of the lamp itself. In this case contact your dealer for wall mount installation. It may cause the projector to become hot. • Clean the air filter frequently. Please be sure to change the lamp when warning messages display. • When changing the lamp, please allow the projector to cool down, and follow all changing instructions. • Reset the "Lamp Hour Reset" function from the Onscreen Display "Management" menu after replacing the lamp...
User Manual
Page 8
...: • Turn off , please ensure the projector completes its life, it shows warning messages. • Reset the "Lamp Hour Reset" function from the Onscreen Display "Management" menu after replacing the lamp module. • When switching the projector off the product before disconnecting power. • Turn on the projector first and then the signal sources. • Do not use lens cap when projector is in direct sunlight. Don't: • Block the slots and openings on .
...: • Turn off , please ensure the projector completes its life, it shows warning messages. • Reset the "Lamp Hour Reset" function from the Onscreen Display "Management" menu after replacing the lamp module. • When switching the projector off the product before disconnecting power. • Turn on the projector first and then the signal sources. • Do not use lens cap when projector is in direct sunlight. Don't: • Block the slots and openings on .
User Manual
Page 11
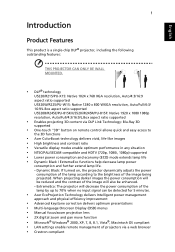
... compliant • LAN settings enable remote management of projectors via DLP Link Technology: Blu-Ray 3D supported • One-touch "3D" button on , the projector dynamically adjusts the power consumption of the lamp according to the brightness of the lamp by up to the 3D functions • Acer ColorBoost technology delivers vivid, life-like images • High brightness and contrast ratio • Versatile display modes enable optimum performance...
... compliant • LAN settings enable remote management of projectors via DLP Link Technology: Blu-Ray 3D supported • One-touch "3D" button on , the projector dynamically adjusts the power consumption of the lamp according to the brightness of the lamp by up to the 3D functions • Acer ColorBoost technology delivers vivid, life-like images • High brightness and contrast ratio • Versatile display modes enable optimum performance...
User Manual
Page 13
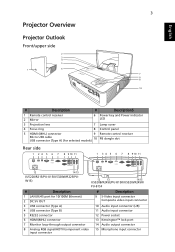
... port for selected models) 10 PB dongle slot Rear side 1 2 4 5 6 7 8 9 10 11 1 3 4 5 6 7 8 9 10 11 12 14 15 (U5220/R215/PU-X15/U5320W/R225/PU- English Projector Overview Projector Outlook Front/upper side 2 3 4 5 1 6 3 7 8 9 10 # Description # Description5 1 Remote control receiver 2 Mirror 6 Power key and Power indicator LED 3 Projection lens 7 Lamp cover 4 Focus ring 8 Control panel 5 HDMI (MHL) connector 9 Remote control receiver Micro USB cable USB connector (Type A) (for 10/100M Ethernet) 2 DC 5V OUT 9 S-Video input connector Composite video input...
... port for selected models) 10 PB dongle slot Rear side 1 2 4 5 6 7 8 9 10 11 1 3 4 5 6 7 8 9 10 11 12 14 15 (U5220/R215/PU-X15/U5320W/R225/PU- English Projector Overview Projector Outlook Front/upper side 2 3 4 5 1 6 3 7 8 9 10 # Description # Description5 1 Remote control receiver 2 Mirror 6 Power key and Power indicator LED 3 Projection lens 7 Lamp cover 4 Focus ring 8 Control panel 5 HDMI (MHL) connector 9 Remote control receiver Micro USB cable USB connector (Type A) (for 10/100M Ethernet) 2 DC 5V OUT 9 S-Video input connector Composite video input...
User Manual
Page 15
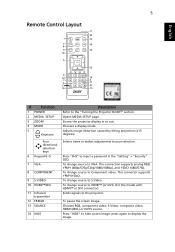
5 Remote Control Layout English # Function 1 POWER 2 MEDIA SETUP 3 ZOOM 4 MODE 5 Keystone Four directional selection keys 6 Keypad 0~9 7 VGA 8 COMPONENT 9 S-VIDEO 10 HDMI™/DVI 11 Infrared transmitter 12 FREEZE 13 SOURCE 14 HIDE Description Refer to Component video. Zooms the projector display in the "Setting" > "Security" OSD. To change source to the projector. This connector supports YPbPr/YCbCr. To pause the screen image. Chooses a display mode. Press "0~9" to display the image. Opens MEDIA SETUP page. This connection supports analog RGB, YPbPr...
5 Remote Control Layout English # Function 1 POWER 2 MEDIA SETUP 3 ZOOM 4 MODE 5 Keystone Four directional selection keys 6 Keypad 0~9 7 VGA 8 COMPONENT 9 S-VIDEO 10 HDMI™/DVI 11 Infrared transmitter 12 FREEZE 13 SOURCE 14 HIDE Description Refer to Component video. Zooms the projector display in the "Setting" > "Security" OSD. To change source to the projector. This connector supports YPbPr/YCbCr. To pause the screen image. Chooses a display mode. Press "0~9" to display the image. Opens MEDIA SETUP page. This connection supports analog RGB, YPbPr...
User Manual
Page 24
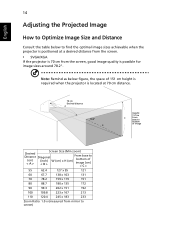
... From base to bottom of image Desired Distance (cm) < A > Screen Size (Min zoom) Diagonal (inch) < B > W (cm) x H (cm) From base to bottom of 151 cm height is required when the projector is located at a desired distance from the screen. • SVGA/XGA If the projector is 70 cm from mirror to screen) English 14 Adjusting the Projected Image How to Optimize Image Size and Distance Consult the table below...
... From base to bottom of image Desired Distance (cm) < A > Screen Size (Min zoom) Diagonal (inch) < B > W (cm) x H (cm) From base to bottom of 151 cm height is required when the projector is located at a desired distance from the screen. • SVGA/XGA If the projector is 70 cm from mirror to screen) English 14 Adjusting the Projected Image How to Optimize Image Size and Distance Consult the table below...
User Manual
Page 30
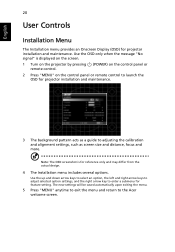
... enter a submenu for reference only and may differ from the actual design. 4 The Installation menu includes several options. Use the OSD only when the message "No signal" is for feature setting. English 20 User Controls Installation Menu The Installation menu provides an Onscreen Display (OSD) for projector installation and maintenance. 3 The background pattern acts as a guide to adjusting the calibration and alignment settings, such as screen size and distance, focus and more.
... enter a submenu for reference only and may differ from the actual design. 4 The Installation menu includes several options. Use the OSD only when the message "No signal" is for feature setting. English 20 User Controls Installation Menu The Installation menu provides an Onscreen Display (OSD) for projector installation and maintenance. 3 The background pattern acts as a guide to adjusting the calibration and alignment settings, such as screen size and distance, focus and more.
User Manual
Page 32
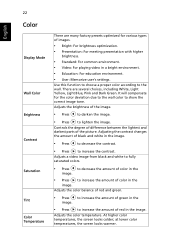
... and darkest parts of black and white in the image. Adjusts the color temperature. at lower color temperatures, the screen looks warmer. There are many factory presets optimized for the color deviation due to the wall color to lighten the image. At higher color temperatures, the screen looks colder; English 22 Color Display Mode Wall Color Brightness Contrast Saturation Tint Color Temperature There are several choices, including White, Light Yellow, Light Blue, Pink and Dark Green. Adjusts a video image from black...
... and darkest parts of black and white in the image. Adjusts the color temperature. at lower color temperatures, the screen looks warmer. There are many factory presets optimized for the color deviation due to the wall color to lighten the image. At higher color temperatures, the screen looks colder; English 22 Color Display Mode Wall Color Brightness Contrast Saturation Tint Color Temperature There are several choices, including White, Light Yellow, Light Blue, Pink and Dark Green. Adjusts a video image from black...
User Manual
Page 38
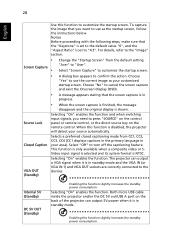
... Display (OSD). • A message appears stating that the "Keystone" is set to the default value "0", and the "Aspect Ratio" is NTSC. To capture the image that you need to turn off the captioning feature. Both micro USB cable inside the projector and/or the DC 5V out/USB A port on the remote control. Selecting "On" enables the function. 28 English Screen Capture Source Lock Closed Caption VGA OUT (Standby) Use...
... Display (OSD). • A message appears stating that the "Keystone" is set to the default value "0", and the "Aspect Ratio" is NTSC. To capture the image that you need to turn off the captioning feature. Both micro USB cable inside the projector and/or the DC 5V out/USB A port on the remote control. Selecting "On" enables the function. 28 English Screen Capture Source Lock Closed Caption VGA OUT (Standby) Use...
User Manual
Page 40
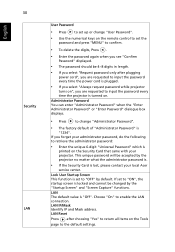
... are requested to input the password every time the projector is turned on. Choose "On" to the default settings. English 30 Security LAN User Password • Press to set up or change "Administrator Password". • The factory default of "Administrator Password" is printed on the Security Card that came with your local Acer service center. LAN Reset Press after plugging power cord", you are requested to input the password every time the power cord is plugged. •...
... are requested to input the password every time the projector is turned on. Choose "On" to the default settings. English 30 Security LAN User Password • Press to set up or change "Administrator Password". • The factory default of "Administrator Password" is printed on the Security Card that came with your local Acer service center. LAN Reset Press after plugging power cord", you are requested to input the password every time the power cord is plugged. •...
User Manual
Page 44
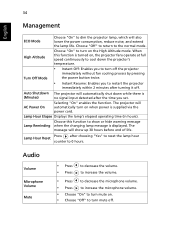
Lamp Hour Elapse Displays the lamp's elapsed operating time (in hours). Lamp Hour Reset Press after turning it off. English 34 Management ECO Mode High Altitude Turn Off Mode Choose "On" to dim the projector lamp, which will show or hide warning message Lamp Reminding when the changing lamp message is (Minutes) no signal input detected after the time you to restart the projector immediately within 2 minutes after choosing "Yes" to reset the lamp hour counter to 0 hours. Choose "Off" to return to...
Lamp Hour Elapse Displays the lamp's elapsed operating time (in hours). Lamp Hour Reset Press after turning it off. English 34 Management ECO Mode High Altitude Turn Off Mode Choose "On" to dim the projector lamp, which will show or hide warning message Lamp Reminding when the changing lamp message is (Minutes) no signal input detected after the time you to restart the projector immediately within 2 minutes after choosing "Yes" to reset the lamp hour counter to 0 hours. Choose "Off" to return to...
User Manual
Page 47
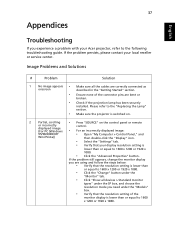
... resolution mode you need under the "Models" box. • Verify that the resolution setting of the connector pins are using and follow the steps below: • Verify that the resolution setting is lower than or equal to the following troubleshooting guide. If the problem still appears, change the monitor display you are bent or broken. • Check if the projection lamp has been securely installed. If the problem...
... resolution mode you need under the "Models" box. • Verify that the resolution setting of the connector pins are using and follow the steps below: • Verify that the resolution setting is lower than or equal to the following troubleshooting guide. If the problem still appears, change the monitor display you are bent or broken. • Check if the projection lamp has been securely installed. If the problem...
User Manual
Page 48
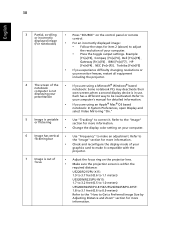
... • Press "SOURCE" on the control panel or remote or incorrectly displayed image (For notebooks) control. • For an incorrectly displayed image: • Follow the steps for item 2 (above) to adjust the resolution of the notebook computer is not displaying your presentation • If you are using a Microsoft® Windows® based notebook: Some notebook PCs may deactivate their own screens when a second display device is...
... • Press "SOURCE" on the control panel or remote or incorrectly displayed image (For notebooks) control. • For an incorrectly displayed image: • Follow the steps for item 2 (above) to adjust the resolution of the notebook computer is not displaying your presentation • If you are using a Microsoft® Windows® based notebook: Some notebook PCs may deactivate their own screens when a second display device is...
User Manual
Page 49
... before reconnecting power. 2 Lamp burns out or makes a popping sound When the lamp reaches the end of its useful life, it is sides centered on the screen and below the bottom of the projector. Set up the display format to open the OSD menu. or too large • Move the projector closer to or further from the screen. • Press "MENU" on the control panel or remote control to...
... before reconnecting power. 2 Lamp burns out or makes a popping sound When the lamp reaches the end of its useful life, it is sides centered on the screen and below the bottom of the projector. Set up the display format to open the OSD menu. or too large • Move the projector closer to or further from the screen. • Press "MENU" on the control panel or remote control to...
User Manual
Page 50
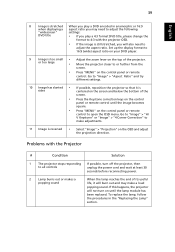
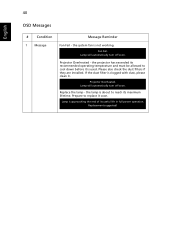
... installed. Replace the lamp - Projector Overheated - Projector Overheated. 40 English OSD Messages # Condition 1 Message Message Reminder Fan Fail - the system fan is about to reach its maximum lifetime. If the dust filter is approaching the end of its recommended operating temperature and must be allowed to replace it . Prepare to cool down before it is used. Lamp is clogged with dust, please clean it soon. Lamp will automatically turn off soon. Lamp...
... installed. Replace the lamp - Projector Overheated - Projector Overheated. 40 English OSD Messages # Condition 1 Message Message Reminder Fan Fail - the system fan is about to reach its maximum lifetime. If the dust filter is approaching the end of its recommended operating temperature and must be allowed to replace it . Prepare to cool down before it is used. Lamp is clogged with dust, please clean it soon. Lamp will automatically turn off soon. Lamp...
User Manual
Page 51
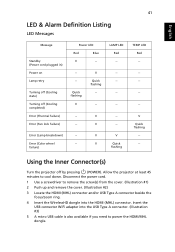
Error (Lamp breakdown) -- V Quick flashing --- Using the Inner Connector(s) Turn the projector off (Cooling completed) Error (Thermal failure) Error (Fan lock failure) Power LED Red Blue V -- --- Disconnect the power cord. 1 Use a screwdriver to remove the screw(s) from the cover. (Illustration #1) 2 Push up and remove the cover. (Illustration #2) 3 Locate the HDMI (MHL) connector and/or USB Type A connector beside the focus/zoom ring. 4 Insert the WirelessHD dongle into the USB Type A connector. (Illustration #3) 5 A micro USB cable is also available if you need to cool...
Error (Lamp breakdown) -- V Quick flashing --- Using the Inner Connector(s) Turn the projector off (Cooling completed) Error (Thermal failure) Error (Fan lock failure) Power LED Red Blue V -- --- Disconnect the power cord. 1 Use a screwdriver to remove the screw(s) from the cover. (Illustration #1) 2 Push up and remove the cover. (Illustration #2) 3 Locate the HDMI (MHL) connector and/or USB Type A connector beside the focus/zoom ring. 4 Insert the WirelessHD dongle into the USB Type A connector. (Illustration #3) 5 A micro USB cable is also available if you need to cool...
User Manual
Page 55
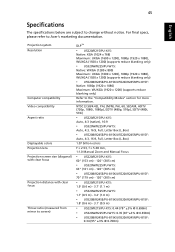
Projection system Resolution Computer compatibility Video compatibility Aspect ratio Displayable colors Projection lens Projection screen size (diagonal) with clear focus Projection distance with clear focus Throw ratio (measured from mirror to screen) DLP™ • U5220/R215/PU-X15: Native: XGA (1024 x 768) Maximum: UXGA (1600 x 1200), 1080p (1920 x 1080), WUXGA (1920 x 1200) (supports reduce blanking only) • U5320W/R225/PU-W15: Native: WXGA (1280 x 800) Maximum: UXGA (1600 x 1200...
Projection system Resolution Computer compatibility Video compatibility Aspect ratio Displayable colors Projection lens Projection screen size (diagonal) with clear focus Projection distance with clear focus Throw ratio (measured from mirror to screen) DLP™ • U5220/R215/PU-X15: Native: XGA (1024 x 768) Maximum: UXGA (1600 x 1200), 1080p (1920 x 1080), WUXGA (1920 x 1200) (supports reduce blanking only) • U5320W/R225/PU-W15: Native: WXGA (1280 x 800) Maximum: UXGA (1600 x 1200...


