TravelMate 6593 Service Guide
Page 7
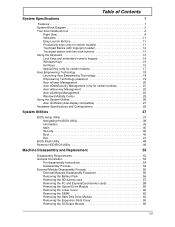
...Special Key (only for certain models 17 Acer Empowering Technology 18 Launching Acer Empowering Technology 18 Empowering Technology password 19 Acer ePower Management 20 Acer eDataSecurity Management (only for certain models 21 Acer eRecovery Management 22 Acer eSettings Management 24 Windows Mobility Center 25 Using...54 Pre-disassembly Instructions 54 Disassembly Process 54 External Module Disassembly Process 55 External Modules Disassembly Flowchart 55 Removing the Battery Pack 56 Removing the SD dummy card 57 Removing the PC and ExpressCard dummy cards 58 Removing the Optical ...
...Special Key (only for certain models 17 Acer Empowering Technology 18 Launching Acer Empowering Technology 18 Empowering Technology password 19 Acer ePower Management 20 Acer eDataSecurity Management (only for certain models 21 Acer eRecovery Management 22 Acer eSettings Management 24 Windows Mobility Center 25 Using...54 Pre-disassembly Instructions 54 Disassembly Process 54 External Module Disassembly Process 55 External Modules Disassembly Flowchart 55 Removing the Battery Pack 56 Removing the SD dummy card 57 Removing the PC and ExpressCard dummy cards 58 Removing the Optical ...

TravelMate 6593 Service Guide
Page 13
... a/b/g/n 36 (WLAN) SATA HDD SATA 24 SATA ODD SATA (Module Bay) 23 MIC in/Line-out/Line-in /Line out/AC Jack 44,45 2nd Battery LAN Parallel-port Seria-port SuperIO PC87383MG 44 FIR 44 System Block Diagram Chapter 1
... a/b/g/n 36 (WLAN) SATA HDD SATA 24 SATA ODD SATA (Module Bay) 23 MIC in/Line-out/Line-in /Line out/AC Jack 44,45 2nd Battery LAN Parallel-port Seria-port SuperIO PC87383MG 44 FIR 44 System Block Diagram Chapter 1
TravelMate 6593 Service Guide
Page 20
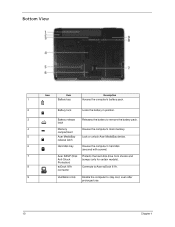
... computer's main memory. release latch 6 Hard disk bay Houses the computer's hard disk (secured with screws) 7 Acer DASP (Disk Protects the hard disk drive from shocks and Anti-Shock bumps (only for certain models). Protection) 8... Chapter 1 connector 9 Ventilation slots Enable the computer to Acer ezDock II/II+. compartment 5 Acer MediaBay Lock or unlock Acer MediaBay device. Bottom View Icon Item Description 1 Battery bay Houses the computer's battery pack. 2 Battery lock Locks the battery in position. 3 Battery release Releases the battery to remove the...
... computer's main memory. release latch 6 Hard disk bay Houses the computer's hard disk (secured with screws) 7 Acer DASP (Disk Protects the hard disk drive from shocks and Anti-Shock bumps (only for certain models). Protection) 8... Chapter 1 connector 9 Ventilation slots Enable the computer to Acer ezDock II/II+. compartment 5 Acer MediaBay Lock or unlock Acer MediaBay device. Bottom View Icon Item Description 1 Battery bay Houses the computer's battery pack. 2 Battery lock Locks the battery in position. 3 Battery release Releases the battery to remove the...
TravelMate 6593 Service Guide
Page 21
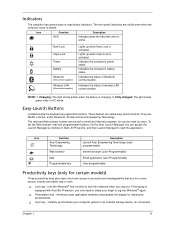
.... instantly synchronizes your finger to start the application. Indicates the computer's battery status. These buttons are visible even when the computer cover is equipped with Acer Bio-Protection, you step out. Icon P Function Acer Empowering Technology Web browser Mail Programmable key Description Launch Acer Empowering Technology (userprogrammable) Internet browser (user-Programmable) Email application (user...
.... instantly synchronizes your finger to start the application. Indicates the computer's battery status. These buttons are visible even when the computer cover is equipped with Acer Bio-Protection, you step out. Icon P Function Acer Empowering Technology Web browser Mail Programmable key Description Launch Acer Empowering Technology (userprogrammable) Internet browser (user-Programmable) Email application (user...
TravelMate 6593 Service Guide
Page 28
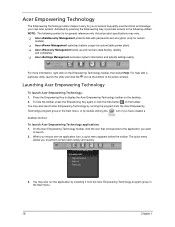
...created a desktop shortcut. K Acer ePower Management optimizes battery usage via customizable power plans. Launching Acer Empowering Technology To launch Acer Empowering Technology: 1. The quick menu allows you to display the Acer Empowering Technology toolbar on the desktop. 2. K Acer eSettings Management accesses system information...click the hide button on the Empowering Technology toolbar, then select Help. You may vary. K Acer eRecovery Management backs up and recovers data flexibly, reliably and completely. For help with passwords and encryption (only for...
...created a desktop shortcut. K Acer ePower Management optimizes battery usage via customizable power plans. Launching Acer Empowering Technology To launch Acer Empowering Technology: 1. The quick menu allows you to display the Acer Empowering Technology toolbar on the desktop. 2. K Acer eSettings Management accesses system information...click the hide button on the Empowering Technology toolbar, then select Help. You may vary. K Acer eRecovery Management backs up and recovers data flexibly, reliably and completely. For help with passwords and encryption (only for...
TravelMate 6593 Service Guide
Page 30
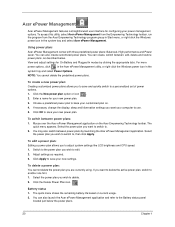
.... 2. Click the Delete Power Plan icon. The quick menu shows the remaining battery life based on . 4. You can also create customized power plans. Mouse over the Acer ePower Management application on the Acer Empowering Technology toolbar. Select the power plan you to save and quickly switch to...another one first. 1. If you wish to switch to save your new settings. View and adjust settings for On Battery and Plugged In modes by launching the Acer ePower Management application. The quick menu appears. You may also switch between power plans by clicking the appropriate tabs....
.... 2. Click the Delete Power Plan icon. The quick menu shows the remaining battery life based on . 4. You can also create customized power plans. Mouse over the Acer ePower Management application on the Acer Empowering Technology toolbar. Select the power plan you to save and quickly switch to...another one first. 1. If you wish to switch to save your new settings. View and adjust settings for On Battery and Plugged In modes by launching the Acer ePower Management application. The quick menu appears. You may also switch between power plans by clicking the appropriate tabs....
TravelMate 6593 Service Guide
Page 31
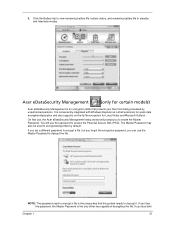
...to encrypt a file, but you forgot the encryption password, you to view remaining battery life, battery status, and remaining battery life in standby and hibernate modes. 3. It is conveniently integrated with Windows Explorer as... a shell extension for quick data encryption/decryption and also supports on-the-fly file encryption for certain models) Acer eDataSecurity Management is the unique key that protects your files from being accessed by default. Acer...
...to encrypt a file, but you forgot the encryption password, you to view remaining battery life, battery status, and remaining battery life in standby and hibernate modes. 3. It is conveniently integrated with Windows Explorer as... a shell extension for quick data encryption/decryption and also supports on-the-fly file encryption for certain models) Acer eDataSecurity Management is the unique key that protects your files from being accessed by default. Acer...
TravelMate 6593 Service Guide
Page 44
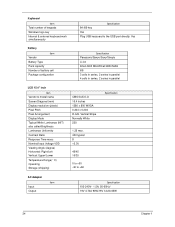
Keyboard Item Total number of keypads Windows logo key Internal & external keyboard work simultaneously Battery Item Vendor Battery Type Pack capacity Number of battery cell Package configuration Specification 84-/85-key Yes Plug USB keyboard to +60 Specification AC Adaptor Item Input Output Specification 100-240V~ 1.5A, 50-60Hz/ ...
Keyboard Item Total number of keypads Windows logo key Internal & external keyboard work simultaneously Battery Item Vendor Battery Type Pack capacity Number of battery cell Package configuration Specification 84-/85-key Yes Plug USB keyboard to +60 Specification AC Adaptor Item Input Output Specification 100-240V~ 1.5A, 50-60Hz/ ...
TravelMate 6593 Service Guide
Page 58
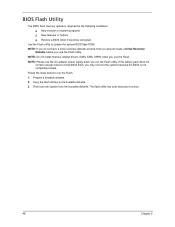
... memory-related drivers (XMS, EMS, DPMI) when you run the Flash. 1. The flash utility has auto-execution function. 48 Chapter 2 Prepare a bootable diskette. 2. If the battery pack does not contain enough power to update the system BIOS flash ROM. Use the Flash utility to finish BIOS flash, you use the Flash...
... memory-related drivers (XMS, EMS, DPMI) when you run the Flash. 1. The flash utility has auto-execution function. 48 Chapter 2 Prepare a bootable diskette. 2. If the battery pack does not contain enough power to update the system BIOS flash ROM. Use the Flash utility to finish BIOS flash, you use the Flash...

TravelMate 6593 Service Guide
Page 64
.... 86.900F80.723 86.9A552.4R0 86.00E33.736 86.00C07.220 86.9A554.4R0 86.00F87.735 86.00F24.724 54 Chapter 3 Remove the battery pack. Disassembly Process The disassembly process is divided into the following : 1. General Information Pre-disassembly Instructions Before proceeding with the disassembly procedure, make sure that...
.... 86.900F80.723 86.9A552.4R0 86.00E33.736 86.00C07.220 86.9A554.4R0 86.00F87.735 86.00F24.724 54 Chapter 3 Remove the battery pack. Disassembly Process The disassembly process is divided into the following : 1. General Information Pre-disassembly Instructions Before proceeding with the disassembly procedure, make sure that...
TravelMate 6593 Service Guide
Page 65
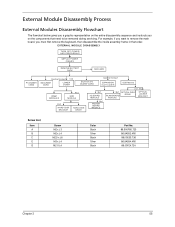
... Flowchart The flowchart below gives you a graphic representation on the components that order. EXTERNAL MODULE DISASSEMBLY TURN OFF POWER AND PERIPHERALS UNPLUG POWER CABLES REMOVE BATTERY PACK SIM CARD PC DUMMY CARD Captive Screwx3 Cx4 SD DUMMY CARD LOWER COVER ExpressCard DUMMY CARD Captive Screwx1 EXPANSION SLOT COVER ODD Module DIMM...
... Flowchart The flowchart below gives you a graphic representation on the components that order. EXTERNAL MODULE DISASSEMBLY TURN OFF POWER AND PERIPHERALS UNPLUG POWER CABLES REMOVE BATTERY PACK SIM CARD PC DUMMY CARD Captive Screwx3 Cx4 SD DUMMY CARD LOWER COVER ExpressCard DUMMY CARD Captive Screwx1 EXPANSION SLOT COVER ODD Module DIMM...

TravelMate 6593 Service Guide
Page 66
Slide the battery lock/unlock latch to the release position. 4. Then slide out the battery from the battery bay. 56 Chapter 3 Slide and hold the battery release latch to the unlock position. 3. Removing the Battery Pack 1. Turn base unit over. 2.
Slide the battery lock/unlock latch to the release position. 4. Then slide out the battery from the battery bay. 56 Chapter 3 Slide and hold the battery release latch to the unlock position. 3. Removing the Battery Pack 1. Turn base unit over. 2.

TravelMate 6593 Service Guide
Page 67
Pull it after removing the battery pack. If there is a SIM card, remove it out from the slot. Push the SD dummy card all the way in to eject it. 2. Chapter 3 57 Removing the SD dummy card 1. 5.
Pull it after removing the battery pack. If there is a SIM card, remove it out from the slot. Push the SD dummy card all the way in to eject it. 2. Chapter 3 57 Removing the SD dummy card 1. 5.
TravelMate 6593 Service Guide
Page 69
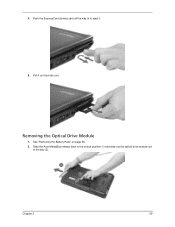
Removing the Optical Drive Module 1. Chapter 3 59 Pull it . 5. See "Removing the Battery Pack" on page 56. 2. 4. Push the ExpressCard dummy card all the way in to the unlock position (1) and slide out the optical drive module out of the bay (2). Slide the Acer MediaBay release latch to eject it out from the slot.
Removing the Optical Drive Module 1. Chapter 3 59 Pull it . 5. See "Removing the Battery Pack" on page 56. 2. 4. Push the ExpressCard dummy card all the way in to the unlock position (1) and slide out the optical drive module out of the bay (2). Slide the Acer MediaBay release latch to eject it out from the slot.

TravelMate 6593 Service Guide
Page 70
Torque 1.6 kgf-cm 1.6 kgf-cm 60 Chapter 3 Remove the three screws (A x 1, B x 2) securing the locker bracket and remove the locker bracket from the optical disk drive module. Step 1 2~3 Size (Quantity) M2 x L3 (1) M2 x L4 (2) Black Silver Color Removing the Lower Cover 1. 3. See "Removing the Battery Pack" on page 56.
Torque 1.6 kgf-cm 1.6 kgf-cm 60 Chapter 3 Remove the three screws (A x 1, B x 2) securing the locker bracket and remove the locker bracket from the optical disk drive module. Step 1 2~3 Size (Quantity) M2 x L3 (1) M2 x L4 (2) Black Silver Color Removing the Lower Cover 1. 3. See "Removing the Battery Pack" on page 56.

TravelMate 6593 Service Guide
Page 72
See "Removing the Battery Pack" on both sides of the DIMM socket to release the DIMM. 62 Chapter 3 Removing the DIMM 1. Remove the lower cover from the lower case. Push out the latches on page 56. 2. See "Removing the Lower Cover" on page 60.. 3. 4.
See "Removing the Battery Pack" on both sides of the DIMM socket to release the DIMM. 62 Chapter 3 Removing the DIMM 1. Remove the lower cover from the lower case. Push out the latches on page 56. 2. See "Removing the Lower Cover" on page 60.. 3. 4.

TravelMate 6593 Service Guide
Page 73
See "Removing the Lower Cover" on page 56. 2. 4. See "Removing the Battery Pack" on page 60. 3. Removing the Hard Disk Drive Module 1. Remove the DIMM module. Remove the two screws (A) securing the hard disk drive module. Step 1~2 Size (Quantity) M2 x L3 (2) Color Black Torque 1.6 kgf-cm Chapter 3 63
See "Removing the Lower Cover" on page 56. 2. 4. See "Removing the Battery Pack" on page 60. 3. Removing the Hard Disk Drive Module 1. Remove the DIMM module. Remove the two screws (A) securing the hard disk drive module. Step 1~2 Size (Quantity) M2 x L3 (2) Color Black Torque 1.6 kgf-cm Chapter 3 63

TravelMate 6593 Service Guide
Page 75
Remove the two screws (E) securing the hard disk to the bracket and remove the hard disk from the bracket. 7. Step 1~2 Size (Quantity) M3 x L4 (2) Color Silver Removing the Expansion Slots Cover 1. See "Removing the Battery Pack" on page 56. Torque 3.0 kgf-cm Chapter 3 65
Remove the two screws (E) securing the hard disk to the bracket and remove the hard disk from the bracket. 7. Step 1~2 Size (Quantity) M3 x L4 (2) Color Silver Removing the Expansion Slots Cover 1. See "Removing the Battery Pack" on page 56. Torque 3.0 kgf-cm Chapter 3 65
TravelMate 6593 Service Guide
Page 76
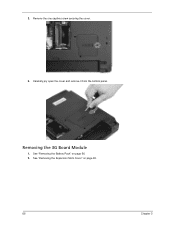
See "Removing the Battery Pack" on page 65. 66 Chapter 3 See "Removing the Expansion Slots Cover" on page 56. 2. Remove the one captive screw securing the cover. 3. Carefully pry open the cover and remove it from the bottom panel. Removing the 3G Board Module 1. 2.
See "Removing the Battery Pack" on page 65. 66 Chapter 3 See "Removing the Expansion Slots Cover" on page 56. 2. Remove the one captive screw securing the cover. 3. Carefully pry open the cover and remove it from the bottom panel. Removing the 3G Board Module 1. 2.

TravelMate 6593 Service Guide
Page 78
See "Removing the Expansion Slots Cover" on the WLAN board to release the WLAN board. Removing the WLAN Board Module 1. Remove the one screw (B) on page 65. 3. Disconnect the antenna cables from the WLAN board. Step 1 Size (Quantity) M2 x L4 (1) Color Silver Torque 1.6 kgf-cm 68 Chapter 3 See "Removing the Battery Pack" on page 56. 2. NOTE: There are 3 antenna cables connected to connector 3. 4. The Black antenna cable is connected to connector 1, the White antenna cable is connected to connector 2 and the Grey antenna cable is connected to the WLAN board.
See "Removing the Expansion Slots Cover" on the WLAN board to release the WLAN board. Removing the WLAN Board Module 1. Remove the one screw (B) on page 65. 3. Disconnect the antenna cables from the WLAN board. Step 1 Size (Quantity) M2 x L4 (1) Color Silver Torque 1.6 kgf-cm 68 Chapter 3 See "Removing the Battery Pack" on page 56. 2. NOTE: There are 3 antenna cables connected to connector 3. 4. The Black antenna cable is connected to connector 1, the White antenna cable is connected to connector 2 and the Grey antenna cable is connected to the WLAN board.


