TravelMate 6593 Service Guide
Page 7
... System Block Diagram 3 Your Acer Notebook tour 4 Right View 8 Indicators 11 Easy-Launch Buttons 11 Productivity keys (only for certain models 11 Touchpad Basics (with fingerprint reader 12 Touchpad basics (with two-click buttons 13 Using the Keyboard 14 Lock Keys and embedded numeric... keypad 14 Windows Keys 15 Hot Keys 16 Special Key (only for certain models 17 Acer Empowering Technology 18 Launching Acer Empowering Technology 18 Empowering Technology password 19 Acer ePower Management 20 Acer eDataSecurity Management (...
... System Block Diagram 3 Your Acer Notebook tour 4 Right View 8 Indicators 11 Easy-Launch Buttons 11 Productivity keys (only for certain models 11 Touchpad Basics (with fingerprint reader 12 Touchpad basics (with two-click buttons 13 Using the Keyboard 14 Lock Keys and embedded numeric... keypad 14 Windows Keys 15 Hot Keys 16 Special Key (only for certain models 17 Acer Empowering Technology 18 Launching Acer Empowering Technology 18 Empowering Technology password 19 Acer ePower Management 20 Acer eDataSecurity Management (...
TravelMate 6593 Service Guide
Page 8
... the LCD Brackets 105 Troubleshooting 107 System Check Procedures 108 External Diskette Drive Check 108 External CD-ROM Drive Check 108 Keyboard or Auxiliary Input Device Check 108 Memory check 109 Power System Check 109 Touchpad Check 111 Power-On Self-Test (POST... 128 Clearing Password Check 128 BIOS Recovery by Crisis Disk 129 FRU (Field Replaceable Unit) List 131 TravelMate 6593 Series Exploded Diagram 132 Model Definition and Configuration 140 TravelMate 6593 Series 140 Test Compatible Components 163 Microsoft® Windows® Vista Environment Test 164 VIII
... the LCD Brackets 105 Troubleshooting 107 System Check Procedures 108 External Diskette Drive Check 108 External CD-ROM Drive Check 108 Keyboard or Auxiliary Input Device Check 108 Memory check 109 Power System Check 109 Touchpad Check 111 Power-On Self-Test (POST... 128 Clearing Password Check 128 BIOS Recovery by Crisis Disk 129 FRU (Field Replaceable Unit) List 131 TravelMate 6593 Series Exploded Diagram 132 Model Definition and Configuration 140 TravelMate 6593 Series 140 Test Compatible Components 163 Microsoft® Windows® Vista Environment Test 164 VIII

TravelMate 6593 Service Guide
Page 11
...-1 card reader Special keys and controls K 88-/89-/93-key keyboard K Touchpad pointing device Audio K Two built-in Acer 3DSonic stereo speakers K High-definition audio support K MS-Sound compatible K Acer PureZone technology with two built-in stereo microphones* Communication K Acer Video Conference, featuring: jIntegrated Acer Crystal Eye webcam jAcer Video Conference Manager software* jAcer PureZone...
...-1 card reader Special keys and controls K 88-/89-/93-key keyboard K Touchpad pointing device Audio K Two built-in Acer 3DSonic stereo speakers K High-definition audio support K MS-Sound compatible K Acer PureZone technology with two built-in stereo microphones* Communication K Acer Video Conference, featuring: jIntegrated Acer Crystal Eye webcam jAcer Video Conference Manager software* jAcer PureZone...

TravelMate 6593 Service Guide
Page 15
...and right buttons function like the left center* and right) and right mouse buttons. *The center button serves as Acer BioProtect fingerprint reader supporting Acer FingerNav 4-way control function (only for certain models). 10 Touchpad Touch-sensitive pointing device which functions like a computer... mouse. 11 FineTrack buttons Function like the left and right mouse buttons (left and right) when used together with the center-keyboard ...
...and right buttons function like the left center* and right) and right mouse buttons. *The center button serves as Acer BioProtect fingerprint reader supporting Acer FingerNav 4-way control function (only for certain models). 10 Touchpad Touch-sensitive pointing device which functions like a computer... mouse. 11 FineTrack buttons Function like the left and right mouse buttons (left and right) when used together with the center-keyboard ...
TravelMate 6593 Service Guide
Page 21
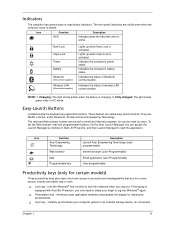
...Lights up when Num Lock is activated. Indicates the computer's power status. These buttons are : WLAN, Internet, email, Bluetooth, Arcade and Acer Empowering Technology. runs the Windows® lock function to lock the notebook when you only need to swipe your computer system to start the .... K Sync key - Indicates the status of wireless LAN communication. Easy-Launch Buttons Located beside the keyboard are pre-set the Web browser, mail and programmable buttons, run the Acer Launch Manager.You can be reset by clicking on Start, All Programs, and then Launch Manager to ...
...Lights up when Num Lock is activated. Indicates the computer's power status. These buttons are : WLAN, Internet, email, Bluetooth, Arcade and Acer Empowering Technology. runs the Windows® lock function to lock the notebook when you only need to swipe your computer system to start the .... K Sync key - Indicates the status of wireless LAN communication. Easy-Launch Buttons Located beside the keyboard are pre-set the Web browser, mail and programmable buttons, run the Acer Launch Manager.You can be reset by clicking on Start, All Programs, and then Launch Manager to ...
TravelMate 6593 Service Guide
Page 24
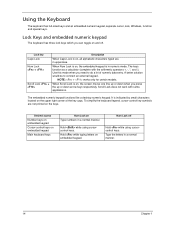
... on and off Hold while using cursorcontrol keys. A better solution would be to do a lot of the key caps. Using the Keyboard The keyboard has full-sized keys and an embedded numeric keypad, separate cursor, lock, Windows, function and special keys. Lock key Caps Lock Num...on, all alphabetic characters typed are not printed on , the screen moves one line up or down arrow keys respectively. To simplify the keyboard legend, cursor-control key symbols are in numeric mode. Hold while using cursorcontrol keys. The embedded numeric keypad functions like a desktop numeric...
... on and off Hold while using cursorcontrol keys. A better solution would be to do a lot of the key caps. Using the Keyboard The keyboard has full-sized keys and an embedded numeric keypad, separate cursor, lock, Windows, function and special keys. Lock key Caps Lock Num...on, all alphabetic characters typed are not printed on , the screen moves one line up or down arrow keys respectively. To simplify the keyboard legend, cursor-control key symbols are in numeric mode. Hold while using cursorcontrol keys. The embedded numeric keypad functions like a desktop numeric...
TravelMate 6593 Service Guide
Page 25
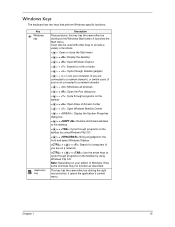
... + < > + : Search for a file or folder < > + : Cycle through programs on the taskbar by using Windows Flip 3-D Note: Depending on the Windows Start button; Windows Keys The keyboard has two keys that perform Windows-specific functions.
... + < > + : Search for a file or folder < > + : Cycle through programs on the taskbar by using Windows Flip 3-D Note: Depending on the Windows Start button; Windows Keys The keyboard has two keys that perform Windows-specific functions.

TravelMate 6593 Service Guide
Page 27
... and the US dollar sign at the upper-center and/or bottom-right of the keyboard. Either press < > at the bottom-right of the keyboard, or hold and then press the key at the upper-center of your keyboard. NOTE: Some fonts and software do not support the Euro symbol. Open a text editor... or word processor. 2. Either press < > at the bottom-right of the keyboard, or hold and then press the key at the upper-center of the...
... and the US dollar sign at the upper-center and/or bottom-right of the keyboard. Either press < > at the bottom-right of the keyboard, or hold and then press the key at the upper-center of your keyboard. NOTE: Some fonts and software do not support the Euro symbol. Open a text editor... or word processor. 2. Either press < > at the bottom-right of the keyboard, or hold and then press the key at the upper-center of the...

TravelMate 6593 Service Guide
Page 43
... function control System Board Major Chips Item Core logic VGA USB 2.0 Super I/O controller MODEM Bluetooth Wireless 802.11 b+g PCMCIA/ 5 in 1 Card Reader Audio Codec Keyboard Item Keyboard controller Chapter 1 Specification Realtek ALC883 Azalia and Amplifier Maxim MAX9710 & MAX4411 Built-in Stereo 18 bit stereo full duplex HD audio Interface; S/PDIF output for...
... function control System Board Major Chips Item Core logic VGA USB 2.0 Super I/O controller MODEM Bluetooth Wireless 802.11 b+g PCMCIA/ 5 in 1 Card Reader Audio Codec Keyboard Item Keyboard controller Chapter 1 Specification Realtek ALC883 Azalia and Amplifier Maxim MAX9710 & MAX4411 Built-in Stereo 18 bit stereo full duplex HD audio Interface; S/PDIF output for...
TravelMate 6593 Service Guide
Page 44
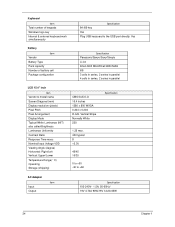
... Storage (shipping) CMO/AUO/LG 15.4 inches 1280 x 800 WXGA 0.204 x 0.204 R.G.B. Keyboard Item Total number of keypads Windows logo key Internal & external keyboard work simultaneously Battery Item Vendor Battery Type Pack capacity Number of battery cell Package configuration Specification 84-/85...-key Yes Plug USB keyboard to +60 Specification AC Adaptor Item Input Output Specification ...
... Storage (shipping) CMO/AUO/LG 15.4 inches 1280 x 800 WXGA 0.204 x 0.204 R.G.B. Keyboard Item Total number of keypads Windows logo key Internal & external keyboard work simultaneously Battery Item Vendor Battery Type Pack capacity Number of battery cell Package configuration Specification 84-/85...-key Yes Plug USB keyboard to +60 Specification AC Adaptor Item Input Output Specification ...
TravelMate 6593 Service Guide
Page 49
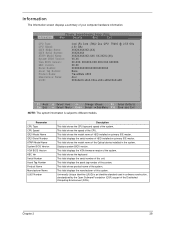
... 2.53 GHz XXXXXXXXXXX-(XX) XXXXXXXX XXXXXXXXXXX-XXX XX-XXXX-(XX) VX.XX XX-XXX XXXXXX.XXX.XXX.XXX.XXXXXX XX.XX XXXXXXXXXXXXXXXXXXXXXXX None TravelMate 6593 Acer XXXxXxXX-xXxX-XXxx-xXXx-xXXxXXxXxxXX F1 Help Esc Exit Select Item -/+ Change Values F9 Setup Defaults Select Menu Enter Select Sub-Menu F10 Save...system information is an identifier standard used in the system. This field shows the model name of the system. This field shows the keyboard This field displays the serial number of the system. This field displays the VGA firmware version of this system. This field displays the ...
... 2.53 GHz XXXXXXXXXXX-(XX) XXXXXXXX XXXXXXXXXXX-XXX XX-XXXX-(XX) VX.XX XX-XXX XXXXXX.XXX.XXX.XXX.XXXXXX XX.XX XXXXXXXXXXXXXXXXXXXXXXX None TravelMate 6593 Acer XXXxXxXX-xXxX-XXxx-xXXx-xXXxXXxXxxXX F1 Help Esc Exit Select Item -/+ Change Values F9 Setup Defaults Select Menu Enter Select Sub-Menu F10 Save...system information is an identifier standard used in the system. This field shows the model name of the system. This field shows the keyboard This field displays the serial number of the system. This field displays the VGA firmware version of this system. This field displays the ...

TravelMate 6593 Service Guide
Page 64
....724 54 Chapter 3 Unplug the AC adapter and all peripherals. 2. For example, if you want to remove the main board, you must first remove the keyboard, then disassemble the inside assembly frame in the succeeding disassembly sections illustrate the entire disassembly sequence. Turn off the power to any of the sequence...
....724 54 Chapter 3 Unplug the AC adapter and all peripherals. 2. For example, if you want to remove the main board, you must first remove the keyboard, then disassemble the inside assembly frame in the succeeding disassembly sections illustrate the entire disassembly sequence. Turn off the power to any of the sequence...
TravelMate 6593 Service Guide
Page 65
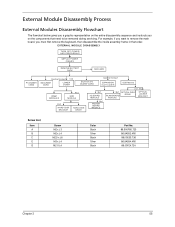
... Disassembly Process External Modules Disassembly Flowchart The flowchart below gives you a graphic representation on the entire disassembly sequence and instructs you must first remove the keyboard, then disassemble the inside assembly frame in that need to remove the main board, you on the components that order. For example, if you want...
... Disassembly Process External Modules Disassembly Flowchart The flowchart below gives you a graphic representation on the entire disassembly sequence and instructs you must first remove the keyboard, then disassemble the inside assembly frame in that need to remove the main board, you on the components that order. For example, if you want...
TravelMate 6593 Service Guide
Page 81
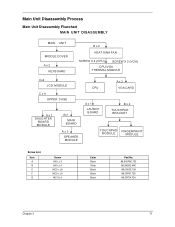
Main Unit Disassembly Process Main Unit Disassembly Flowchart MAIN UNIT DISASSEMBLY MAIN UNIT MIDDLE COVER Ax 2 KEYBOARD B x 2 HEAT SINK FAN SCREW X 4 (CPU) SCREW X 2 (VGA) CPU/VGA THERMAL MODULE Cx4 LCD MODULE C x 9 UPPER CASE Ax 1 DAUGHTER BOARD MODULE Ax1 MAIN BOARD Ax 2 SPEAKER ...
Main Unit Disassembly Process Main Unit Disassembly Flowchart MAIN UNIT DISASSEMBLY MAIN UNIT MIDDLE COVER Ax 2 KEYBOARD B x 2 HEAT SINK FAN SCREW X 4 (CPU) SCREW X 2 (VGA) CPU/VGA THERMAL MODULE Cx4 LCD MODULE C x 9 UPPER CASE Ax 1 DAUGHTER BOARD MODULE Ax1 MAIN BOARD Ax 2 SPEAKER ...

TravelMate 6593 Service Guide
Page 83
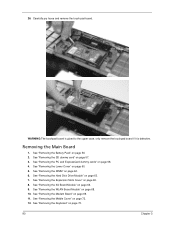
Removing the Keyboard 1. Remove the two screws (A) securing the keyboard. Chapter 3 73 See "Removing the Middle Cover" on the touchpad area. Step 1~2 Size (Quantity) M2 x L3 (2) Color Black Torque 1.6 kgf-cm 4. Carefully pry loose the keyboard and turn it over on page 72. 3. See "Removing the Battery Pack" on page 56. 2.
Removing the Keyboard 1. Remove the two screws (A) securing the keyboard. Chapter 3 73 See "Removing the Middle Cover" on the touchpad area. Step 1~2 Size (Quantity) M2 x L3 (2) Color Black Torque 1.6 kgf-cm 4. Carefully pry loose the keyboard and turn it over on page 72. 3. See "Removing the Battery Pack" on page 56. 2.

TravelMate 6593 Service Guide
Page 84
5. Removing the Heatsink Fan Module 1. See "Removing the Lower Cover" on page 56. 2. Disconnect the heat sink fan connector from the main board to remove the keyboard. See "Removing the Battery Pack" on page 60. 3. Disconnect the keyboard cable from the main board. 74 Chapter 3
5. Removing the Heatsink Fan Module 1. See "Removing the Lower Cover" on page 56. 2. Disconnect the heat sink fan connector from the main board to remove the keyboard. See "Removing the Battery Pack" on page 60. 3. Disconnect the keyboard cable from the main board. 74 Chapter 3
TravelMate 6593 Service Guide
Page 91
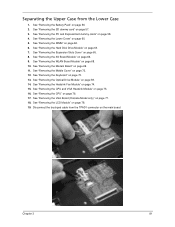
... Case 1. See "Removing the SD dummy card" on page 77. 18. See "Removing the Hard Disk Drive Module" on page 73. 13. See "Removing the Keyboard" on page 63. 7. See "Removing the Optical Drive Module" on page 74. 15. See "Removing the Heatsink Fan Module" on page 59. 14. See "Removing...
... Case 1. See "Removing the SD dummy card" on page 77. 18. See "Removing the Hard Disk Drive Module" on page 73. 13. See "Removing the Keyboard" on page 63. 7. See "Removing the Optical Drive Module" on page 74. 15. See "Removing the Heatsink Fan Module" on page 59. 14. See "Removing...
TravelMate 6593 Service Guide
Page 94
... case from the bottom panel. See "Removing the DIMM" on page 68. 10. See "Removing the WLAN Board Module" on page 62. 6. See "Removing the Keyboard" on page 63. 7. 23. See "Removing the Hard Disk Drive Module" on page 73. 13. See "Removing the 3G Board Module" on page 56. 2. See...
... case from the bottom panel. See "Removing the DIMM" on page 68. 10. See "Removing the WLAN Board Module" on page 62. 6. See "Removing the Keyboard" on page 63. 7. 23. See "Removing the Hard Disk Drive Module" on page 73. 13. See "Removing the 3G Board Module" on page 56. 2. See...

TravelMate 6593 Service Guide
Page 96
... Fingerprint and Touchpad Module 1. See "Removing the Lower Cover" on page 65. 8. See "Removing the Expansion Slots Cover" on page 60. 5. 21. See "Removing the Keyboard" on page 62. 6. See "Removing the DIMM" on page 73. 13. See "Removing the WLAN Board Module" on page 69. 11. See "Removing the Modem...
... Fingerprint and Touchpad Module 1. See "Removing the Lower Cover" on page 65. 8. See "Removing the Expansion Slots Cover" on page 60. 5. 21. See "Removing the Keyboard" on page 62. 6. See "Removing the DIMM" on page 73. 13. See "Removing the WLAN Board Module" on page 69. 11. See "Removing the Modem...
TravelMate 6593 Service Guide
Page 100
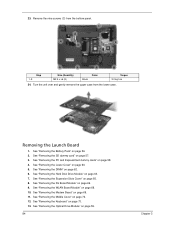
See "Removing the Battery Pack" on page 60. 5. See "Removing the Lower Cover" on page 56. 2. See "Removing the Keyboard" on page 63. 7. See "Removing the Hard Disk Drive Module" on page 73. 90 Chapter 3 See "Removing the Modem Board" on page 66. 9. Removing the ...
See "Removing the Battery Pack" on page 60. 5. See "Removing the Lower Cover" on page 56. 2. See "Removing the Keyboard" on page 63. 7. See "Removing the Hard Disk Drive Module" on page 73. 90 Chapter 3 See "Removing the Modem Board" on page 66. 9. Removing the ...


