
TravelMate 3250 Service Guide
Page 7
... the Keyboard 16 Lock Keys and embedded numeric keypad 16 Windows Keys 16 Hot Keys 17 Special Key 18 Acer Empowering Technology 20 Empowering Technology password 20 Acer eNet Management (for selected models 20 Acer ePower Management 22 Acer ePresentation Management 24 Acer eDataSecurity Management 25 Acer eLock Management 27 Acer eRecovery Management 28 Acer eSettings Management 29 Acer ePerformance...
... the Keyboard 16 Lock Keys and embedded numeric keypad 16 Windows Keys 16 Hot Keys 17 Special Key 18 Acer Empowering Technology 20 Empowering Technology password 20 Acer eNet Management (for selected models 20 Acer ePower Management 22 Acer ePresentation Management 24 Acer eDataSecurity Management 25 Acer eLock Management 27 Acer eRecovery Management 28 Acer eSettings Management 29 Acer ePerformance...
TravelMate 3250 Service Guide
Page 8
... Module 79 Disassembling the ODD Module 79 Chapter 4 Troubleshooting 81 System Check Procedures 82 External Diskette Drive Check 82 External CD-ROM Drive Check 82 Keyboard or Auxiliary Input Device Check 82 Memory check 83 Power System Check 83 Touchpad Check 85 Power-On Self-Test (POST) Error Message 86 Index... Intermittent Problems 97 Undetermined Problems 98 Chapter 5 Jumper and Connector Locations 99 Top View 99 Bottom View 100 Chapter 6 FRU (Field Replaceable Unit) List 103 TravelMate 3250/2470 Exploded Diagram 104 VIII
... Module 79 Disassembling the ODD Module 79 Chapter 4 Troubleshooting 81 System Check Procedures 82 External Diskette Drive Check 82 External CD-ROM Drive Check 82 Keyboard or Auxiliary Input Device Check 82 Memory check 83 Power System Check 83 Touchpad Check 85 Power-On Self-Test (POST) Error Message 86 Index... Intermittent Problems 97 Undetermined Problems 98 Chapter 5 Jumper and Connector Locations 99 Top View 99 Bottom View 100 Chapter 6 FRU (Field Replaceable Unit) List 103 TravelMate 3250/2470 Exploded Diagram 104 VIII

TravelMate 3250 Service Guide
Page 13
Board Layout Top View 1 CVR1 LID switch 8 BTBTN1 Bluetooth launch switch 2 MIC1 Microphone cable connector 9 SPK1 Speaker set cable 3 LCD1 LCD cable connector 10 BT1 Bluetooth module cable connector 4 U38 Cardbus controller (ENE CB-1410) 11 LEDB1 LED FFC connector 5 U43 LAN controller (Realtek RTL8100CL) 12 TAPD1 Touchpad cable connector 6 N/A Card reader controller (Ricoh R5C832) 13 KB1 Keyboard cable connector 7 WLBTN1 Wireless launch switch Chapter 1 5
Board Layout Top View 1 CVR1 LID switch 8 BTBTN1 Bluetooth launch switch 2 MIC1 Microphone cable connector 9 SPK1 Speaker set cable 3 LCD1 LCD cable connector 10 BT1 Bluetooth module cable connector 4 U38 Cardbus controller (ENE CB-1410) 11 LEDB1 LED FFC connector 5 U43 LAN controller (Realtek RTL8100CL) 12 TAPD1 Touchpad cable connector 6 N/A Card reader controller (Ricoh R5C832) 13 KB1 Keyboard cable connector 7 WLBTN1 Wireless launch switch Chapter 1 5

TravelMate 3250 Service Guide
Page 16
.... Chapter 1 Comfortable support area for our hands when you around your new TravelMate computer. For entering data into your computer. Front view # 1 2 3 4 5 6 7 8 9 10 8 Icon Item Display screen Status indicators Keyboard Touchpad Click buttons (left and right mouse buttons; Your Acer Notebook tour After knowing your computer features, let us show the status of...
.... Chapter 1 Comfortable support area for our hands when you around your new TravelMate computer. For entering data into your computer. Front view # 1 2 3 4 5 6 7 8 9 10 8 Icon Item Display screen Status indicators Keyboard Touchpad Click buttons (left and right mouse buttons; Your Acer Notebook tour After knowing your computer features, let us show the status of...
TravelMate 3250 Service Guide
Page 20
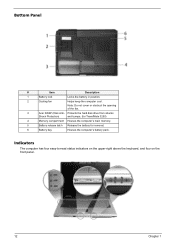
... status indicators on the upper-right above the keyboard, and four on the front panel. 12 Chapter 1 Note: Do not cover or obstruct the opening of the fan. 3 Acer DASP (Disk Anti- Protects the hard disk drive from shocks Shock Protection) and bumps. (for TravelMate 3250) 4 Memory compartment Houses the computer's main memory. 5 Battery...
... status indicators on the upper-right above the keyboard, and four on the front panel. 12 Chapter 1 Note: Do not cover or obstruct the opening of the fan. 3 Acer DASP (Disk Anti- Protects the hard disk drive from shocks Shock Protection) and bumps. (for TravelMate 3250) 4 Memory compartment Houses the computer's main memory. 5 Battery...

TravelMate 3250 Service Guide
Page 21
...amber when the battery is active. The mail and Web browser buttons are pre-set the Web browser, mail and programmable buttons, run the Acer Empowering Technology. Chapter 1 13 HDD Bluetooth Wireless LAN Battery Power Indicates when the hard disc or optical drive is charging. 2. Lights up... when Cap Lock is activated Icon Function Description Num lock Lights when Num Lock is being charged. Easy-Launch Buttons Located above the keyboard are called easy-launch buttons. These buttons are four buttons. They are visible even when the LCD display is on. To set ...
...amber when the battery is active. The mail and Web browser buttons are pre-set the Web browser, mail and programmable buttons, run the Acer Empowering Technology. Chapter 1 13 HDD Bluetooth Wireless LAN Battery Power Indicates when the hard disc or optical drive is charging. 2. Lights up... when Cap Lock is activated Icon Function Description Num lock Lights when Num Lock is being charged. Easy-Launch Buttons Located above the keyboard are called easy-launch buttons. These buttons are four buttons. They are visible even when the LCD display is on. To set ...

TravelMate 3250 Service Guide
Page 24
...of numeric data entry. When Scroll Lock is indicated by small characters located on embedded keypad. Type the letters in numeric mode. Using the Keyboard The keyboard has full-sized keys and an embedded keypad, separate cursor keys, two Windows keys and twelve function keys. When Num Lock is on,... the embedded keypad is on, all alphabetic characters typed are not printed on embedded keypad Main keyboard keys Num Lock On Type numbers in uppercase. Use this mode when you press the up or down arrow keys respectively. Lock Keys and...
...of numeric data entry. When Scroll Lock is indicated by small characters located on embedded keypad. Type the letters in numeric mode. Using the Keyboard The keyboard has full-sized keys and an embedded keypad, separate cursor keys, two Windows keys and twelve function keys. When Num Lock is on,... the embedded keypad is on, all alphabetic characters typed are not printed on embedded keypad Main keyboard keys Num Lock On Type numbers in uppercase. Use this mode when you press the up or down arrow keys respectively. Lock Keys and...

TravelMate 3250 Service Guide
Page 26
... the screen brightness Special Key You can locate the Euro symbol and US dollar sign at the upper-center and/or bottom-right of your keyboard. Fn-z Brightness down Decreases the speaker volume. Fn-F5 Fn-F6 Fn-F7 Display toggle Screen blank Touchpad toggle Switches display output between the display...
... the screen brightness Special Key You can locate the Euro symbol and US dollar sign at the upper-center and/or bottom-right of your keyboard. Fn-z Brightness down Decreases the speaker volume. Fn-F5 Fn-F6 Fn-F7 Display toggle Screen blank Touchpad toggle Switches display output between the display...

TravelMate 3250 Service Guide
Page 27
Chapter 1 19 Open a text editor or word processor. 2. NOTE: This function varies by the operating system version. Please refer to www.microsoft.com/ typography/faq/faq12.htm for more information. Either directly press the symbol at the bottom-right of the keyboard, or hold and then press the key at the upper-center of the keyboard. The US dollar sign 1. Either directly press the key at the bottom-right of the keyboard, or hold and then press the symbol at the upper-center of the keyboard. NOTE: Some fonts and software do not support the Euro symbol. 2.
Chapter 1 19 Open a text editor or word processor. 2. NOTE: This function varies by the operating system version. Please refer to www.microsoft.com/ typography/faq/faq12.htm for more information. Either directly press the symbol at the bottom-right of the keyboard, or hold and then press the key at the upper-center of the keyboard. The US dollar sign 1. Either directly press the key at the bottom-right of the keyboard, or hold and then press the symbol at the upper-center of the keyboard. NOTE: Some fonts and software do not support the Euro symbol. 2.

TravelMate 3250 Service Guide
Page 45
Launch Manager "Easy-launch buttons" on Start > All Programs > Launch Manager to the manufacturer's recommendNedovtea:lueN. You can access the Launch Manager by clicking on pSatgaert24All Programs Launch Manager Start All Programs Chapter 1 37 NOTE: Please ensure that the resolution setting of the second monitor is set to start the application. ote: Launch Manager Launch Manager allows"yEoausyto-laseutnthche fbourtteoansys"-laounncphabguetto2n4s located above the keyboard.
Launch Manager "Easy-launch buttons" on Start > All Programs > Launch Manager to the manufacturer's recommendNedovtea:lueN. You can access the Launch Manager by clicking on pSatgaert24All Programs Launch Manager Start All Programs Chapter 1 37 NOTE: Please ensure that the resolution setting of the second monitor is set to start the application. ote: Launch Manager Launch Manager allows"yEoausyto-laseutnthche fbourtteoansys"-laounncphabguetto2n4s located above the keyboard.
TravelMate 3250 Service Guide
Page 46
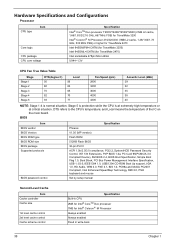
... Boot Up support, IrDA 1.0, HD Audio, WfM 2.0, PXE 2.1, BIS 1.0, PC99a and Mobile PC2001 Compliant, Intel Enhanced SpeedStep Technology, DMI 2.0, PS/2 keyboard and mouse Set by setup manual Second Level Cache Item Cache controller Cache size 1st level cache control 2st level cache control Cache scheme control...Celeron® M Processor 410/420/430 (1MB L2 cache, 1.46/1.60/1.73 GHz, 533 MHz FSB) or higher for TravelMate 2470 Intel 945GM/PM+ICH7M (for TravelMate 3250) Intel 940GML+ICH7M (for Intel® Celeron® M Processor Always enabled Always enabled Fixed in write-back 38 Chapter 1...
... Boot Up support, IrDA 1.0, HD Audio, WfM 2.0, PXE 2.1, BIS 1.0, PC99a and Mobile PC2001 Compliant, Intel Enhanced SpeedStep Technology, DMI 2.0, PS/2 keyboard and mouse Set by setup manual Second Level Cache Item Cache controller Cache size 1st level cache control 2st level cache control Cache scheme control...Celeron® M Processor 410/420/430 (1MB L2 cache, 1.46/1.60/1.73 GHz, 533 MHz FSB) or higher for TravelMate 2470 Intel 945GM/PM+ICH7M (for TravelMate 3250) Intel 940GML+ICH7M (for Intel® Celeron® M Processor Always enabled Always enabled Fixed in write-back 38 Chapter 1...

TravelMate 3250 Service Guide
Page 59
... version of the system. This field displays the serial number of devices installed on primary IDE master. This field shows the keyboard This field displays the serial number of this unit. This will be visible only when an internal LAN device is automatically detected....05 VGA BIOS Ver 1227 KBC Ver 01.00 Serial Number xxxxxxxxxxxxxxxxxxxxxx Asset Tag Number N/A 22 Byte Produce Name Aspire 3620/TravelMate 2420 32 Byte Manufacturer Name: Acer 16 Byte UUID: xxxxxxxxxxxxxxxxxxxxxxxxxxxxxxxx 16 Byte 32 Byte F1 Help Esc Exit ↑ ↓ Select Item ← →...
... version of the system. This field displays the serial number of devices installed on primary IDE master. This field shows the keyboard This field displays the serial number of this unit. This will be visible only when an internal LAN device is automatically detected....05 VGA BIOS Ver 1227 KBC Ver 01.00 Serial Number xxxxxxxxxxxxxxxxxxxxxx Asset Tag Number N/A 22 Byte Produce Name Aspire 3620/TravelMate 2420 32 Byte Manufacturer Name: Acer 16 Byte UUID: xxxxxxxxxxxxxxxxxxxxxxxxxxxxxxxx 16 Byte 32 Byte F1 Help Esc Exit ↑ ↓ Select Item ← →...

TravelMate 3250 Service Guide
Page 73
For example, if you want to be removed during servicing. Start Battery Middle Cover H*2 DIMM Cover Memory P*1 Keyboard ODD Module E*1 J*2 on bottom side K*2 on top side LCD Module E*1 on upper case assemby E*12 on bottom side F*3 on bottom side A*2 on the ...components that need to remove the system board, you must first remove the keyboard, then disassemble the inside assembly frame in that order. Disassembly Procedure Flowchart The flowchart on the succeeding page gives you a graphic representation on the entire...
For example, if you want to be removed during servicing. Start Battery Middle Cover H*2 DIMM Cover Memory P*1 Keyboard ODD Module E*1 J*2 on bottom side K*2 on top side LCD Module E*1 on upper case assemby E*12 on bottom side F*3 on bottom side A*2 on the ...components that need to remove the system board, you must first remove the keyboard, then disassemble the inside assembly frame in that order. Disassembly Procedure Flowchart The flowchart on the succeeding page gives you a graphic representation on the entire...

TravelMate 3250 Service Guide
Page 78
Then remove the launch board from the main unit. 12. Remove the keyboard from the middle cover. . 8. Disconnect the keyboard cable. 11. Pull the antenna set from the middle cover. 6. Tear off the tapes fastening the wireless antenna cable. 13. Disconnect the LCD cable. 15. Take out the microphone from the main unit. 14. Remove the screw holding the keyboard. 9. Turn over the notebook then remove two screws fastening the LCD module. 70 Chapter 3 Turn over the keyboard as shown. 10. 5. Remove the two screws fastening the launch board. 7.
Then remove the launch board from the main unit. 12. Remove the keyboard from the middle cover. . 8. Disconnect the keyboard cable. 11. Pull the antenna set from the middle cover. 6. Tear off the tapes fastening the wireless antenna cable. 13. Disconnect the LCD cable. 15. Take out the microphone from the main unit. 14. Remove the screw holding the keyboard. 9. Turn over the notebook then remove two screws fastening the LCD module. 70 Chapter 3 Turn over the keyboard as shown. 10. 5. Remove the two screws fastening the launch board. 7.

TravelMate 3250 Service Guide
Page 90
... 4 The following one label attached to it . See if FDD Test is correctly seated in the connector on the system board. Replace the keyboard. 3. Replace the main board. Follow the instructions in the message window. Reconnect the external diskette drive/CD-ROM module. 2. Replace the main... board. NOTE: Make sure that the CD-ROM does not have more than one at a time to correct the problem. Reconnect the keyboard cables. 2. External CD-ROM Drive Check Do the following to isolate the problem to a controller, driver, or diskette. Do not replace a non-defective...
... 4 The following one label attached to it . See if FDD Test is correctly seated in the connector on the system board. Replace the keyboard. 3. Replace the main board. Follow the instructions in the message window. Reconnect the external diskette drive/CD-ROM module. 2. Replace the main... board. NOTE: Make sure that the CD-ROM does not have more than one at a time to correct the problem. Reconnect the keyboard cables. 2. External CD-ROM Drive Check Do the following to isolate the problem to a controller, driver, or diskette. Do not replace a non-defective...
TravelMate 3250 Service Guide
Page 95
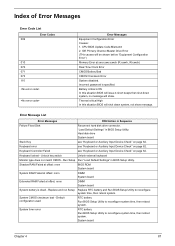
... Bad CMOS Checksum Error System disabled. Unlock key switch Unlock external keyboard Monitor type does not match CMOS - Incorrect password is dead - CPU BIOS Update Code Mismatch 2. Keyboard Controller Failed see "Keyboard or Auxiliary Input Device Check" on page 82. Default configuration used...Setup Replace RTC battery and Run BIOS Setup Utility to reconfigure system time, then reboot system. System board Chapter 4 87 Keyboard error see "Keyboard or Auxiliary Input Device Check" on page 82. IDE Primary Channel Master Drive Error (THe causes will be shown before ...
... Bad CMOS Checksum Error System disabled. Unlock key switch Unlock external keyboard Monitor type does not match CMOS - Incorrect password is dead - CPU BIOS Update Code Mismatch 2. Keyboard Controller Failed see "Keyboard or Auxiliary Input Device Check" on page 82. Default configuration used...Setup Replace RTC battery and Run BIOS Setup Utility to reconfigure system time, then reboot system. System board Chapter 4 87 Keyboard error see "Keyboard or Auxiliary Input Device Check" on page 82. IDE Primary Channel Master Drive Error (THe causes will be shown before ...

TravelMate 3250 Service Guide
Page 98
...Load alternate registers with initial POST values Restore CPU control word during warm boot Initialize PCI Bus Mastering devices Initialize keyboard controller BIOS ROM checksum Initialize cache before memory autosize 8254 timer initialization 8237 DMA controller initialization Reset Programmable Interrupt ...Controller Test DRAM refresh Test 8742 Keyboard Controller Set ES segment register to 4 GB Enable A20 line Autosize DRAM Initialize POST Memory Manager Clear 215 KB...
...Load alternate registers with initial POST values Restore CPU control word during warm boot Initialize PCI Bus Mastering devices Initialize keyboard controller BIOS ROM checksum Initialize cache before memory autosize 8254 timer initialization 8237 DMA controller initialization Reset Programmable Interrupt ...Controller Test DRAM refresh Test 8742 Keyboard Controller Set ES segment register to 4 GB Enable A20 line Autosize DRAM Initialize POST Memory Manager Clear 215 KB...

TravelMate 3250 Service Guide
Page 99
... system QuietBoot start (optional) Shadow video BIOS ROM Display BIOS copyright notice Display CPU type and speed Initialize EISA board Test keyboard Set key click if enabled Test for unexpected interrupts Initialize POST display service Display prompt "Press F2 to enter SETUP" Disable... (optional) Display shadow-area message Display possible high address for UMB recovery Display error messages Check for configuration errors Check for keyboard errors Set up hardware interrupt vectors Initialize coprocessor if present Disable onboard Super I/O ports and IRQs Late POST device initialization Detect...
... system QuietBoot start (optional) Shadow video BIOS ROM Display BIOS copyright notice Display CPU type and speed Initialize EISA board Test keyboard Set key click if enabled Test for unexpected interrupts Initialize POST display service Display prompt "Press F2 to enter SETUP" Disable... (optional) Display shadow-area message Display possible high address for UMB recovery Display error messages Check for configuration errors Check for keyboard errors Set up hardware interrupt vectors Initialize coprocessor if present Disable onboard Super I/O ports and IRQs Late POST device initialization Detect...

TravelMate 3250 Service Guide
Page 102
Keyboard (if contrast and brightness function key doesn't work LCD is too dark LCD brightness cannot be adjusted LCD contrast cannot be adjusted Unreadable LCD screen ...
Keyboard (if contrast and brightness function key doesn't work LCD is too dark LCD brightness cannot be adjusted LCD contrast cannot be adjusted Unreadable LCD screen ...
TravelMate 3250 Service Guide
Page 103
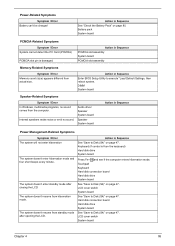
...Symptoms Symptom / Error Memory count (size) appears different from hibernation mode. Internal speakers make noise or emit no sound comes from the keyboard) Hard disk drive System board Press Fn+oand see if the computer enters hibernation mode. Hard disk connection board Hard disk drive System ...multimedia programs, no sound. Audio driver Speaker System board Speaker System board Action in Sequence See "Save to Disk (S4)" on page 85. Keyboard (if control is damaged. LCD cover switch System board See "Save to Disk (S4)" on page 47. The system doesn't enter standby mode...
...Symptoms Symptom / Error Memory count (size) appears different from hibernation mode. Internal speakers make noise or emit no sound comes from the keyboard) Hard disk drive System board Press Fn+oand see if the computer enters hibernation mode. Hard disk connection board Hard disk drive System ...multimedia programs, no sound. Audio driver Speaker System board Speaker System board Action in Sequence See "Save to Disk (S4)" on page 85. Keyboard (if control is damaged. LCD cover switch System board See "Save to Disk (S4)" on page 47. The system doesn't enter standby mode...


