

Quick Start Guide
Page 1
... carefully. The screen can be blocked or covered. Do not allow anything metallic into the monitor openings. If the monitor still does not function properly, please refer to the troubleshooting section to perform this monitor LCD Monitor Quick Setup Guide Power-ON Monitor and Computer Power-ON the monitor first, then power-ON the computer. The monitor's power indicator is properly connected to the computer's port. 2. You can clean the exterior of...
... carefully. The screen can be blocked or covered. Do not allow anything metallic into the monitor openings. If the monitor still does not function properly, please refer to the troubleshooting section to perform this monitor LCD Monitor Quick Setup Guide Power-ON Monitor and Computer Power-ON the monitor first, then power-ON the computer. The monitor's power indicator is properly connected to the computer's port. 2. You can clean the exterior of...
Quick Start Guide
Page 2
... cause harmful interference, and (2) this LCD monitor is no guarantee that may cause undesired operation. Notice: Canadian users This Class B digital apparatus complies with Canadian ICES-003. able protection against harmful interference in accordance with the instructions, may be made using shielded cables to radio communica- Operation with non-certified peripherals is connected. • Consult the dealer or...
... cause harmful interference, and (2) this LCD monitor is no guarantee that may cause undesired operation. Notice: Canadian users This Class B digital apparatus complies with Canadian ICES-003. able protection against harmful interference in accordance with the instructions, may be made using shielded cables to radio communica- Operation with non-certified peripherals is connected. • Consult the dealer or...

User Manual
Page 1
TABLE OF CONTENTS Special notes on LCD monitors 1 Information for your safety and comfort 2 Unpacking 5 Attaching/Removing the base 6 Screen position adjustment 6 Connecting the power cord 7 Safety precaution 7 Cleaning your monitor 7 Power saving 8 DDC 8 Connector Pin Assignment 9 Standard Timing Table 11 Installation 12 User controls 13 Troubleshooting 19
TABLE OF CONTENTS Special notes on LCD monitors 1 Information for your safety and comfort 2 Unpacking 5 Attaching/Removing the base 6 Screen position adjustment 6 Connecting the power cord 7 Safety precaution 7 Cleaning your monitor 7 Power saving 8 DDC 8 Connector Pin Assignment 9 Standard Timing Table 11 Installation 12 User controls 13 Troubleshooting 19
User Manual
Page 2
... to make sure the flicker disappears. · You may flicker during initial use . · The LCD screen has effective pixels of the previous screen may remain after switching the image, when the same image is recovered slowly by changing the image or turning off the Power Switch and then turn it on the desktop pattern you use . SPECIAL NOTES ON LCD MONITORS The following symptoms are normal with LCD monitor and do...
... to make sure the flicker disappears. · You may flicker during initial use . · The LCD screen has effective pixels of the previous screen may remain after switching the image, when the same image is recovered slowly by changing the image or turning off the Power Switch and then turn it on the desktop pattern you use . SPECIAL NOTES ON LCD MONITORS The following symptoms are normal with LCD monitor and do...

User Manual
Page 3
...8226; Turn the volume down if you can 't hear people speaking near water. • Do not place this document for future reference. Keep this product on an unstable cart, stand or table. These openings must...instructions marked on a vibrating surface. • Never use this product near you plug the power cord into the product. • To avoid damage of internal components and to protect it afteryour ears adjust. • Limit the amount of the following power supplies: Manufacturer: FSP Technology Inc.,Model: FSP040- The openings should never be blocked or covered...
...8226; Turn the volume down if you can 't hear people speaking near water. • Do not place this document for future reference. Keep this product on an unstable cart, stand or table. These openings must...instructions marked on a vibrating surface. • Never use this product near you plug the power cord into the product. • To avoid damage of internal components and to protect it afteryour ears adjust. • Limit the amount of the following power supplies: Manufacturer: FSP Technology Inc.,Model: FSP040- The openings should never be blocked or covered...
User Manual
Page 4
...: • the power cord or plug is produced with high-precision manufacturing techniques. Users are covered by the operating instructions, since improper adjustment of a computer. Nevertheless, some pixels may lead to carpal tunnel syndrome, tendonitis, tenosynovitis or other recurring or persistent discomfort and/or pain related to computer use . Long work periods, bad posture, poor work by adjusting the viewing angle of physical...
...: • the power cord or plug is produced with high-precision manufacturing techniques. Users are covered by the operating instructions, since improper adjustment of a computer. Nevertheless, some pixels may lead to carpal tunnel syndrome, tendonitis, tenosynovitis or other recurring or persistent discomfort and/or pain related to computer use . Long work periods, bad posture, poor work by adjusting the viewing angle of physical...

User Manual
Page 5
... documents, place the display at bright light sources, such as open windows, for only short periods, take short rests to relax your neck and shoulders • avoid tensing your muscles or shrugging your shoulders • install the external display, keyboard and mouse properly and within comfort able reach • if you view your monitor more information and help in such a way...
... documents, place the display at bright light sources, such as open windows, for only short periods, take short rests to relax your neck and shoulders • avoid tensing your muscles or shrugging your shoulders • install the external display, keyboard and mouse properly and within comfort able reach • if you view your monitor more information and help in such a way...
User Manual
Page 6
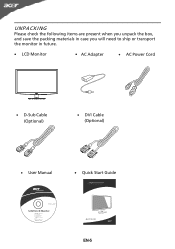
UNPACKING Please check the following items are present when you unpack the box, and save the packing materials in case you will need to ship or transport the monitor in future. · LCD Monitor · AC Adapter · AC Power Cord · D-Sub Cable (Optional) · DVI Cable (Optional) · User Manual · Quick Start Guide S232HL LCD monitor P/N:MU.LQY00.001 $'0 2010 EN-5
UNPACKING Please check the following items are present when you unpack the box, and save the packing materials in case you will need to ship or transport the monitor in future. · LCD Monitor · AC Adapter · AC Power Cord · D-Sub Cable (Optional) · DVI Cable (Optional) · User Manual · Quick Start Guide S232HL LCD monitor P/N:MU.LQY00.001 $'0 2010 EN-5
User Manual
Page 7
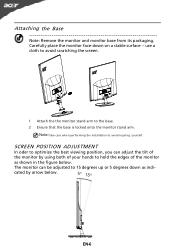
SCREEN POSITION ADJUSTMENT In oder to optimize the best viewing position, you can be adjusted to avoid injuring yourself. The monitor can adjust the tilt of the monitor by arrow below . cated by using both of your hands to the base. 2 Ensure that the base is locked onto the monitor stand arm. Carefully place the monitor face-down as shown in the figure below . 5o 15 o EN-6 use a cloth to avoid...
SCREEN POSITION ADJUSTMENT In oder to optimize the best viewing position, you can be adjusted to avoid injuring yourself. The monitor can adjust the tilt of the monitor by arrow below . cated by using both of your hands to the base. 2 Ensure that the base is locked onto the monitor stand arm. Carefully place the monitor face-down as shown in the figure below . 5o 15 o EN-6 use a cloth to avoid...
User Manual
Page 8
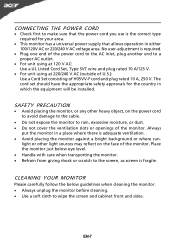
... and plug rated 10 A/125 V. · For unit using at 220/240 V AC (outside of U.S.): Use a Cord Set consisting of the monitor. light or other heavy object, on the face of the monitor. Place the monitor just below guidelines when cleaning the monitor. · Always unplug the monitor before cleaning. · Use a soft cloth to wipe the screen and cabinet front and sides. EN-7 CONNECTING THE POWER CORD · Check...
... and plug rated 10 A/125 V. · For unit using at 220/240 V AC (outside of U.S.): Use a Cord Set consisting of the monitor. light or other heavy object, on the face of the monitor. Place the monitor just below guidelines when cleaning the monitor. · Always unplug the monitor before cleaning. · Use a soft cloth to wipe the screen and cabinet front and sides. EN-7 CONNECTING THE POWER CORD · Check...
User Manual
Page 9
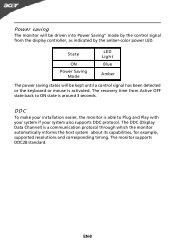
...) is activated. DDC To make your installation easier, the monitor is able to ON state is around 3 seconds. Power saving The monitor will be driven into Power Saving" mode by the amber-color power LED. State ON Power Saving Mode LED Light Blue Amber The power saving states will be kept until a control signal has been detected or the keyboard or mouse is a communication protocol through which the monitor automatically informs the host...
...) is activated. DDC To make your installation easier, the monitor is able to ON state is around 3 seconds. Power saving The monitor will be driven into Power Saving" mode by the amber-color power LED. State ON Power Saving Mode LED Light Blue Amber The power saving states will be kept until a control signal has been detected or the keyboard or mouse is a communication protocol through which the monitor automatically informs the host...

User Manual
Page 10
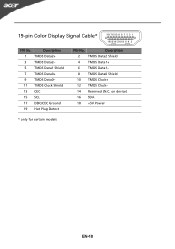
.... * only for certain models EN-9 Meaning NC +5V Power Logic Ground Hot Plug Detect TMDS Data0TMDS Data0+ TMDS Data 0/5 Shield NC NC TMDS Clock Shield TMDS Clock+ DDC TMDS Clock- NC 16. 5. DESCRIPTION Red Green Blue Monitor Ground DDC-return R-Ground G-Ground B-Ground PIN NO. 9. 10. 11. 12. 13. 14. 15. CONNECTOR PIN ASSIGNMENT 15-Pin Color Display Signal Cable PIN NO...
.... * only for certain models EN-9 Meaning NC +5V Power Logic Ground Hot Plug Detect TMDS Data0TMDS Data0+ TMDS Data 0/5 Shield NC NC TMDS Clock Shield TMDS Clock+ DDC TMDS Clock- NC 16. 5. DESCRIPTION Red Green Blue Monitor Ground DDC-return R-Ground G-Ground B-Ground PIN NO. 9. 10. 11. 12. 13. 14. 15. CONNECTOR PIN ASSIGNMENT 15-Pin Color Display Signal Cable PIN NO...
User Manual
Page 11
on device) 16 SDA 18 +5V Power * only for certain models EN-10 Description 1 TMDS Data2+ 3 TMDS Data2- 5 TMDS Data1 Shield 7 TMDS Data0+ 9 TMDS Data0- 11 TMDS Clock Shield 13 CEC 15 SCL 17 DDC/CEC Ground 19 Hot Plug Detect PIN No. 19-pin Color Display Signal Cable* 1917151311 9 7 5 3 1 1816141210 8 6 4 2 PIN No. Description 2 TMDS Data2 Shield 4 TMDS Data1+ 6 TMDS Data1- 8 TMDS Data0 Shield 10 TMDS Clock+ 12 TMDS Clock- 14 Reserved (N.C.
on device) 16 SDA 18 +5V Power * only for certain models EN-10 Description 1 TMDS Data2+ 3 TMDS Data2- 5 TMDS Data1 Shield 7 TMDS Data0+ 9 TMDS Data0- 11 TMDS Clock Shield 13 CEC 15 SCL 17 DDC/CEC Ground 19 Hot Plug Detect PIN No. 19-pin Color Display Signal Cable* 1917151311 9 7 5 3 1 1816141210 8 6 4 2 PIN No. Description 2 TMDS Data2 Shield 4 TMDS Data1+ 6 TMDS Data1- 8 TMDS Data0 Shield 10 TMDS Clock+ 12 TMDS Clock- 14 Reserved (N.C.

User Manual
Page 13
.... Connect the VGA video cable to diagnose the problem. Make sure both the monitor and computer are powered-OFF. b. Power-ON Monitor and Computer Power-ON the monitor first, then power-ON the computer. Connect the adapter a Connect the AC cord to a properly grounded, AC outlet . 3. b Connect one end of the 24-pin DVI cable to the back of the adapter to the monitor and the other end to the computer's port. 1-3 HDMI Cable (Only HDMI-Input Model...
.... Connect the VGA video cable to diagnose the problem. Make sure both the monitor and computer are powered-OFF. b. Power-ON Monitor and Computer Power-ON the monitor first, then power-ON the computer. Connect the adapter a Connect the AC cord to a properly grounded, AC outlet . 3. b Connect one end of the 24-pin DVI cable to the back of the adapter to the monitor and the other end to the computer's port. 1-3 HDMI Cable (Only HDMI-Input Model...
User Manual
Page 14
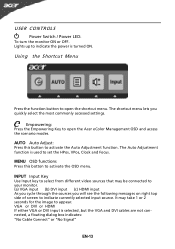
... to indicate the power is selected ,but the VGA and DVI cables are not connected, a floating dialog box indicates: "No Cable Connect" or "No Signal" EN-13 Lights up to open the shortcut menu. VGA or DVI or HDMI If either VGA or DVI input is turned ON. AUTO Auto Adjust: Press this botton to indicate currently selected input source. Using the Shortcut Menu Press the function button to activate the Auto Adjustment function. USER CONTROLS Power Switch / Power LED: To turn the monitor ON or...
... to indicate the power is selected ,but the VGA and DVI cables are not connected, a floating dialog box indicates: "No Cable Connect" or "No Signal" EN-13 Lights up to open the shortcut menu. VGA or DVI or HDMI If either VGA or DVI input is turned ON. AUTO Auto Adjust: Press this botton to indicate currently selected input source. Using the Shortcut Menu Press the function button to activate the Auto Adjustment function. USER CONTROLS Power Switch / Power LED: To turn the monitor ON or...
User Manual
Page 15
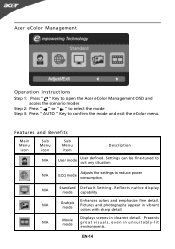
Acer eColor Management Operation instructions Step 1: Press " " Key to open the Acer eColor Management OSD and access the scenario modes Step 2: Press " " or " " to select the mode Step 3: Press " AUTO " Key to reduce power consumption. Features and Benefits Main Menu icon Sub Menu icon Sub Menu item Description N/A User mode User defined. R eflects n a tive d isp lay mode capability N/A Grahpic mode Enhances colors and emphasize fine detail. EN-14 N/A Standard...
Acer eColor Management Operation instructions Step 1: Press " " Key to open the Acer eColor Management OSD and access the scenario modes Step 2: Press " " or " " to select the mode Step 3: Press " AUTO " Key to reduce power consumption. Features and Benefits Main Menu icon Sub Menu icon Sub Menu item Description N/A User mode User defined. R eflects n a tive d isp lay mode capability N/A Grahpic mode Enhances colors and emphasize fine detail. EN-14 N/A Standard...
User Manual
Page 16
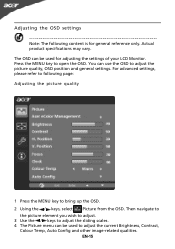
... picture quality, OSD position and general settings. Press the MENU key to open the OSD. For advanced settings, please refer to following content is for adjusting the settings of your LCD Monitor. Adjusting the OSD settings Note: The following page: Adjusting the picture quality 1 Press the MENU key to bring up the OSD. 2 Using the / keys, select Picture from the OSD. You can be used to adjust the current Brightness, Contrast, Colour Temp, Auto Config and other image...
... picture quality, OSD position and general settings. Press the MENU key to open the OSD. For advanced settings, please refer to following content is for adjusting the settings of your LCD Monitor. Adjusting the OSD settings Note: The following page: Adjusting the picture quality 1 Press the MENU key to bring up the OSD. 2 Using the / keys, select Picture from the OSD. You can be used to adjust the current Brightness, Contrast, Colour Temp, Auto Config and other image...
User Manual
Page 18
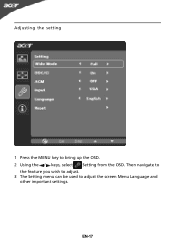
Then navigate to the feature you wish to adjust. 3 The Setting menu can be used to bring up the OSD. 2 Using the / keys, select Setting from the OSD. EN-17 Adjusting the setting 1 Press the MENU key to adjust the screen Menu Language and other important settings.
Then navigate to the feature you wish to adjust. 3 The Setting menu can be used to bring up the OSD. 2 Using the / keys, select Setting from the OSD. EN-17 Adjusting the setting 1 Press the MENU key to adjust the screen Menu Language and other important settings.

User Manual
Page 20
... specification of graphics adapter and monitor is ON. small or too large in display · Using OSD, in compliance which may be causing the input signal frequency mismatch. LED OFF · Check the power switch. TROUBLESHOOTING Before sending your LCD monitor for a few seconds after adjusting the size of the image before changing or disconnecting the signal cable or powering OFF the monitor. Abnormal Picture Display is properly connected to their default settings. EN-19 No Picture · Check if AC power cord...
... specification of graphics adapter and monitor is ON. small or too large in display · Using OSD, in compliance which may be causing the input signal frequency mismatch. LED OFF · Check the power switch. TROUBLESHOOTING Before sending your LCD monitor for a few seconds after adjusting the size of the image before changing or disconnecting the signal cable or powering OFF the monitor. Abnormal Picture Display is properly connected to their default settings. EN-19 No Picture · Check if AC power cord...
User Manual
Page 21
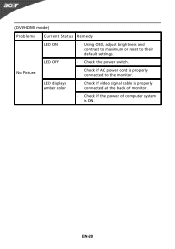
(DVI/HDMI mode) Problems Current Status Remedy LED ON · Using OSD, adjust brightness and contrast to maximum or reset to the monitor. LED displays amber color · Check if video signal cable is properly connected at the back of monitor. · Check if the power of computer system is properly connected to their default settings. EN-20 LED OFF · Check the power switch. No Picture · Check if AC power cord is ON.
(DVI/HDMI mode) Problems Current Status Remedy LED ON · Using OSD, adjust brightness and contrast to maximum or reset to the monitor. LED displays amber color · Check if video signal cable is properly connected at the back of monitor. · Check if the power of computer system is properly connected to their default settings. EN-20 LED OFF · Check the power switch. No Picture · Check if AC power cord is ON.


