
User Manual
Page 9
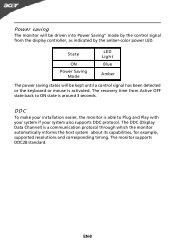
...back to Plug and Play with your system if your installation easier, the monitor is able to ON state is around 3 seconds. Power saving The monitor will be driven into Power Saving" mode by the amber-color power LED. The DDC (Display Data Channel) is activated. DDC To make your ...system also supports DDC protocol. EN-8 The monitor supports DDC2B standard. State ON Power Saving Mode LED Light Blue Amber The power saving states will be kept until a control signal has been detected or the keyboard or mouse is a ...
...back to Plug and Play with your system if your installation easier, the monitor is able to ON state is around 3 seconds. Power saving The monitor will be driven into Power Saving" mode by the amber-color power LED. The DDC (Display Data Channel) is activated. DDC To make your ...system also supports DDC protocol. EN-8 The monitor supports DDC2B standard. State ON Power Saving Mode LED Light Blue Amber The power saving states will be kept until a control signal has been detected or the keyboard or mouse is a ...
User Manual
Page 14
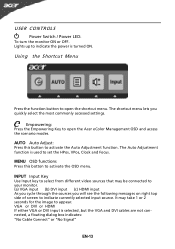
...button to open the shortcut menu. Empowering: Press the Empowering Key to open the Acer eColor Management OSD and access the scenario modes. The Auto Adjustment function is used to appear. It may be connected to your monitor. (a) VGA input (b) DVI input (c) HDMI input As you cycle through the ...to activate the OSD menu. MENU OSD functions Press this button to indicate currently selected input source. USER CONTROLS Power Switch / Power LED: To turn the monitor ON or OFF. The shortcut menu lets you will see the following messages on right top side of screen to activate the Auto...
...button to open the shortcut menu. Empowering: Press the Empowering Key to open the Acer eColor Management OSD and access the scenario modes. The Auto Adjustment function is used to appear. It may be connected to your monitor. (a) VGA input (b) DVI input (c) HDMI input As you cycle through the ...to activate the OSD menu. MENU OSD functions Press this button to indicate currently selected input source. USER CONTROLS Power Switch / Power LED: To turn the monitor ON or OFF. The shortcut menu lets you will see the following messages on right top side of screen to activate the Auto...

User Manual
Page 20
...list below to see if you can self-diagnose the problem. (VGA Mode) Problems Current Status Remedy LED ON · Using OSD, adjust brightness and contrast to maximum or reset to the monitor. LED OFF · Check the power switch. No Picture · Check if AC power cord is &#...OSD, adjust RESOLUTION, CLOCK, missing, center CLOCK-PHASE, H-POSITION and V- LED displays amber color · Check if video signal cable is properly connected at the back of monitor. · Check if the power of graphics adapter and monitor is ON. small or too large in display · Using OSD, in...
...list below to see if you can self-diagnose the problem. (VGA Mode) Problems Current Status Remedy LED ON · Using OSD, adjust brightness and contrast to maximum or reset to the monitor. LED OFF · Check the power switch. No Picture · Check if AC power cord is &#...OSD, adjust RESOLUTION, CLOCK, missing, center CLOCK-PHASE, H-POSITION and V- LED displays amber color · Check if video signal cable is properly connected at the back of monitor. · Check if the power of graphics adapter and monitor is ON. small or too large in display · Using OSD, in...
User Manual
Page 21
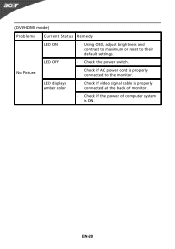
(DVI/HDMI mode) Problems Current Status Remedy LED ON · Using OSD, adjust brightness and contrast to maximum or reset to the monitor. EN-20 No Picture · Check if AC power cord is ON. LED OFF · Check the power switch. LED displays amber color · Check if video signal cable is properly connected at the back of monitor. · Check if the power of computer system is properly connected to their default settings.
(DVI/HDMI mode) Problems Current Status Remedy LED ON · Using OSD, adjust brightness and contrast to maximum or reset to the monitor. EN-20 No Picture · Check if AC power cord is ON. LED OFF · Check the power switch. LED displays amber color · Check if video signal cable is properly connected at the back of monitor. · Check if the power of computer system is properly connected to their default settings.


