User Manual
Page 2
...; 2016. Acer LCD Monitor User Guide Original Issue: 02/2016 Changes may be reproduced, stored in a retrieval system, or transmitted, in this publication may be incorporated in the space provided below. All correspondence concerning your computer. Other companies' product names or trademarks are registered trademarks of purchase Acer and the Acer logo are used herein for a particular purpose. Acer LCD Monitor User Guide Model number Serial number Date...
...; 2016. Acer LCD Monitor User Guide Original Issue: 02/2016 Changes may be reproduced, stored in a retrieval system, or transmitted, in this publication may be incorporated in the space provided below. All correspondence concerning your computer. Other companies' product names or trademarks are registered trademarks of purchase Acer and the Acer logo are used herein for a particular purpose. Acer LCD Monitor User Guide Model number Serial number Date...

User Manual
Page 3
... pixels. In this document for your monitor Please carefully follow these instructions carefully. Turn off the power switch for hours. Cleaning your safety and comfort Safety instructions Read these guidelines when cleaning the monitor: • Always unplug the monitor before cleaning. • Use a soft cloth to the nature of the fluorescent light, the screen may remain after switching the image, when the same image is recovered slowly by changing...
... pixels. In this document for your monitor Please carefully follow these instructions carefully. Turn off the power switch for hours. Cleaning your safety and comfort Safety instructions Read these guidelines when cleaning the monitor: • Always unplug the monitor before cleaning. • Use a soft cloth to the nature of the fluorescent light, the screen may remain after switching the image, when the same image is recovered slowly by changing...

User Manual
Page 4
...current or damage internal devices. • The adapter is easily accessible and located as close to the equipment operator as they may touch dangerous voltage points or short-out parts that the power outlet you plug the power cord into is only used for this product near or over a radiator ...marking label. English Accessibility Be sure that could be seriously damaged. • Slots and openings are not sure of the type of power available, consult your ears have adjusted. • Limit the amount of time listening to music at high volume. • Avoid turning up the volume to block ...
...current or damage internal devices. • The adapter is easily accessible and located as close to the equipment operator as they may touch dangerous voltage points or short-out parts that the power outlet you plug the power cord into is only used for this product near or over a radiator ...marking label. English Accessibility Be sure that could be seriously damaged. • Slots and openings are not sure of the type of power available, consult your ears have adjusted. • Limit the amount of time listening to music at high volume. • Avoid turning up the volume to block ...
User Manual
Page 5
... devices that the total ampere rating of the power strip's input rating. • This product's power cord is equipped with a three-wire grounded plug. If power strips are used with this product, make sure that may expose you need for details. Warning! Note: The grounding pin also provides good protection from the wall outlet and refer servicing to replace the power cord set . The overall system load...
... devices that the total ampere rating of the power strip's input rating. • This product's power cord is equipped with a three-wire grounded plug. If power strips are used with this product, make sure that may expose you need for details. Warning! Note: The grounding pin also provides good protection from the wall outlet and refer servicing to replace the power cord set . The overall system load...

User Manual
Page 6
... Visit www.acer-group.com for further information on boats, chemical transfer or storage facilities, vehicles using liquefied petroleum gas (such as propane or butane), and areas where the air contains chemicals or particles such as one of our products. English Note: Adjust only those controls that are covered by the operating instructions, since improper adjustment of other...
... Visit www.acer-group.com for further information on boats, chemical transfer or storage facilities, vehicles using liquefied petroleum gas (such as propane or butane), and areas where the air contains chemicals or particles such as one of our products. English Note: Adjust only those controls that are covered by the operating instructions, since improper adjustment of other...

User Manual
Page 7
... power management: • Activate display's Sleep mode within 5 minutes of the monitor, using a footrest, or raising your sitting height to computer use, consult a physician immediately and inform your comfort zone by adjusting the viewing angle of user inactivity. • Wake the monitor when it is produced with high-precision manufacturing techniques. Long work periods, bad posture, poor work habits, stress, inadequate working in Active Off mode...
... power management: • Activate display's Sleep mode within 5 minutes of the monitor, using a footrest, or raising your sitting height to computer use, consult a physician immediately and inform your comfort zone by adjusting the viewing angle of user inactivity. • Wake the monitor when it is produced with high-precision manufacturing techniques. Long work periods, bad posture, poor work habits, stress, inadequate working in Active Off mode...

User Manual
Page 8
... display's top front edge • Avoid adjusting your display to an awkward viewing angle. • Avoid looking away from the monitor and focusing on how to keep your eyes from drying out. Display • Keep your display clean. • Keep your head at a higher level than the top edge of the display so your eyes point downward when looking at bright light sources, such as open windows...
... display's top front edge • Avoid adjusting your display to an awkward viewing angle. • Avoid looking away from the monitor and focusing on how to keep your eyes from drying out. Display • Keep your display clean. • Keep your head at a higher level than the top edge of the display so your eyes point downward when looking at bright light sources, such as open windows...
User Manual
Page 11
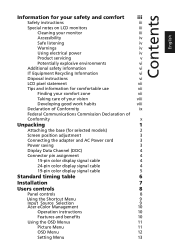
... the base (for selected models) 2 Screen position adjustment 3 Connecting the adapter and AC Power cord 3 Power saving 3 Display Data Channel (DDC) 4 Connector pin assignment 4 15-pin color display signal cable 4 24-pin color display signal cable 4 19-pin color display signal cable 5 Standard timing table 6 Installation 7 Users controls 8 Panel controls 8 Using the Shortcut Menu 9 Input Source Selection 9 Acer eColor Management 10 Operation instructions 10 Features and benefits 10 Using the OSD Menus 11 Picture Menu 11 OSD Menu 12 Setting Menu 13
... the base (for selected models) 2 Screen position adjustment 3 Connecting the adapter and AC Power cord 3 Power saving 3 Display Data Channel (DDC) 4 Connector pin assignment 4 15-pin color display signal cable 4 24-pin color display signal cable 4 19-pin color display signal cable 5 Standard timing table 6 Installation 7 Users controls 8 Panel controls 8 Using the Shortcut Menu 9 Input Source Selection 9 Acer eColor Management 10 Operation instructions 10 Features and benefits 10 Using the OSD Menus 11 Picture Menu 11 OSD Menu 12 Setting Menu 13

User Manual
Page 13
LCD monitor Quick start guide Audio cable (Optional) D-sub cable HDMI cable (Optional) AC Power cord DVI cable (Optional) AC Adapter 1 English Unpacking Please check that the following items are present when you unpack the box, and save the packing materials in case you need to ship or transport the monitor in the future.
LCD monitor Quick start guide Audio cable (Optional) D-sub cable HDMI cable (Optional) AC Power cord DVI cable (Optional) AC Adapter 1 English Unpacking Please check that the following items are present when you unpack the box, and save the packing materials in case you need to ship or transport the monitor in the future.

User Manual
Page 14
Carefully place the monitor face-down on a stable surface -- use a cloth to avoid scratching the screen. 1 Attach the monitor stand arm to the base. 2 Ensure that the base is locked onto the monitor stand arm. • Secure the base to avoid injuring yourself. 2 English Attaching the base (for selected models) Note: Take care when performing the installation to the monitor stand arm by turning the white screw using the integrated tab or a suitable coin. (for selected models) Note: Remove the monitor and monitor base from its packaging.
Carefully place the monitor face-down on a stable surface -- use a cloth to avoid scratching the screen. 1 Attach the monitor stand arm to the base. 2 Ensure that the base is locked onto the monitor stand arm. • Secure the base to avoid injuring yourself. 2 English Attaching the base (for selected models) Note: Take care when performing the installation to the monitor stand arm by turning the white screw using the integrated tab or a suitable coin. (for selected models) Note: Remove the monitor and monitor base from its packaging.
User Manual
Page 15
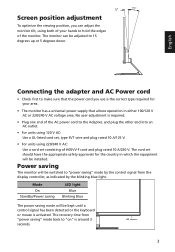
.../Power saving LED light Blue Blinking Blue The power saving mode will be switched to "power saving" mode by the blinking blue light. The recovery time from the display controller, as indicated by the control signal from "power saving" mode back to "on" is activated. Power saving The monitor will be kept until a control signal has been detected or the keyboard or mouse is around 3 seconds. 3 Screen position adjustment To optimize the viewing position, you use is required. • Plug one end of the AC power cord to the Adapter...
.../Power saving LED light Blue Blinking Blue The power saving mode will be switched to "power saving" mode by the blinking blue light. The recovery time from the display controller, as indicated by the control signal from "power saving" mode back to "on" is activated. Power saving The monitor will be kept until a control signal has been detected or the keyboard or mouse is around 3 seconds. 3 Screen position adjustment To optimize the viewing position, you use is required. • Plug one end of the AC power cord to the Adapter...
User Manual
Page 16
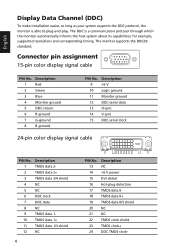
... clock- The monitor supports the DDC2B standard. Description 1 Red 2 Green 3 Blue 4 Monitor ground 5 DDC-return 6 R-ground 7 G-ground 8 B-ground PIN No. for example, supported resolutions and corresponding timing. The DDC is able to plug-and-play. Description 9 +5 V 10 Logic ground 11 Monitor ground 12 DDC-serial data 13 H-sync 14 V-sync 15 DDC-serial clock 24-pin color display signal cable PIN No. English Display Data Channel (DDC) To make installation easier, so...
... clock- The monitor supports the DDC2B standard. Description 1 Red 2 Green 3 Blue 4 Monitor ground 5 DDC-return 6 R-ground 7 G-ground 8 B-ground PIN No. for example, supported resolutions and corresponding timing. The DDC is able to plug-and-play. Description 9 +5 V 10 Logic ground 11 Monitor ground 12 DDC-serial data 13 H-sync 14 V-sync 15 DDC-serial clock 24-pin color display signal cable PIN No. English Display Data Channel (DDC) To make installation easier, so...
User Manual
Page 19
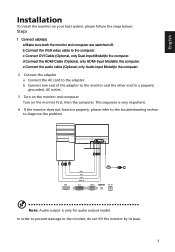
... Audio-input Model)to the computer. 2 Connect the adapter a Connect the AC cord to the computer. d Connect the HDMI Cable (Optional, only HDMI-Input Model)to the adapter. In order to prevent damage to the computer. English Installation To install the monitor on the monitor first, then the computer. Note: Audio output is very important. 4 If the monitor does not function properly, please refer to the troubleshooting section to diagnose the problem. b Connect the VGA video cable...
... Audio-input Model)to the computer. 2 Connect the adapter a Connect the AC cord to the computer. d Connect the HDMI Cable (Optional, only HDMI-Input Model)to the adapter. In order to prevent damage to the computer. English Installation To install the monitor on the monitor first, then the computer. Note: Audio output is very important. 4 If the monitor does not function properly, please refer to the troubleshooting section to diagnose the problem. b Connect the VGA video cable...
User Manual
Page 20
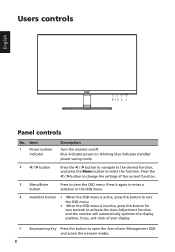
... the OSD menu is inactive, press this button for two seconds to activate the Auto Adjustment function and the monitor will automatically optimize the display position, focus, and clock of the current function. 3 Menu/Enter button Press to view the OSD menu. Blue indicates power on /off. Press the < / > button to change the settings of your display. 5 Empowering Key Press this button to select the function. Item 1 Power button/ indicator Description Turn the monitor on . Users controls English Panel controls...
... the OSD menu is inactive, press this button for two seconds to activate the Auto Adjustment function and the monitor will automatically optimize the display position, focus, and clock of the current function. 3 Menu/Enter button Press to view the OSD menu. Blue indicates power on /off. Press the < / > button to change the settings of your display. 5 Empowering Key Press this button to select the function. Item 1 Power button/ indicator Description Turn the monitor on . Users controls English Panel controls...
User Manual
Page 21
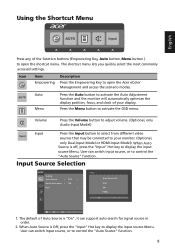
AUTO Auto Menu Press the Auto button to activate the OSD menu. Input Source Selection Setting Auto Source Quick Start mode Rest OFF ON Input Auto Source On VG A DVI HDMI 1. Press the Menu button to activate the Auto Adjustment function and the monitor will automatically optimize the display position, focus, and clock of your monitor. (Optional, only Dual-Input Model or HDMI-Input Model) When Auto Source is "On", it can support auto search for signal source in order. 2. The default of Auto Source is off, press the "Input" Hot key to control the "Auto Source" function...
AUTO Auto Menu Press the Auto button to activate the OSD menu. Input Source Selection Setting Auto Source Quick Start mode Rest OFF ON Input Auto Source On VG A DVI HDMI 1. Press the Menu button to activate the Auto Adjustment function and the monitor will automatically optimize the display position, focus, and clock of your monitor. (Optional, only Dual-Input Model or HDMI-Input Model) When Auto Source is "On", it can support auto search for signal source in order. 2. The default of Auto Source is off, press the "Input" Hot key to control the "Auto Source" function...
User Manual
Page 22
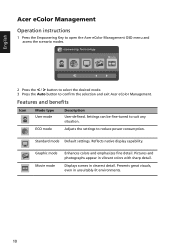
... reduce power consumption. Standard mode Default settings. Graphic mode Movie mode Enhances colors and emphasizes fine detail. Presents great visuals, even in vibrant colors with sharp detail. ECO mode Adjusts the settings to open the Acer eColor Management OSD menu and access the scenario modes. Features and benefits Icon Mode type User mode Description User-defined. Pictures and photographs appear in unsuitably-lit environments. 10 Displays scenes in clearest detail. Reflects native display capability...
... reduce power consumption. Standard mode Default settings. Graphic mode Movie mode Enhances colors and emphasizes fine detail. Presents great visuals, even in vibrant colors with sharp detail. ECO mode Adjusts the settings to open the Acer eColor Management OSD menu and access the scenario modes. Features and benefits Icon Mode type User mode Description User-defined. Pictures and photographs appear in unsuitably-lit environments. 10 Displays scenes in clearest detail. Reflects native display capability...
User Manual
Page 23
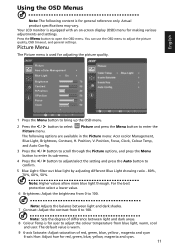
... contrast from blue light, warm, cool and user. Your LCD monitor is equipped with an on-screen display (OSD) menu for general reference only. You can use the OSD menu to adjust the colour temperature from 0 to open the OSD menu. Note: Sets the degree of red, green, blue, yellow , magenta and cyan 6-axis Hue: Adjust hue for adjusting the picture quality. English Using the OSD Menus Note: The following options are available in the Picture menu: Acer ecolor Management, Blue Light, Brightness, Contrast...
... contrast from blue light, warm, cool and user. Your LCD monitor is equipped with an on-screen display (OSD) menu for general reference only. You can use the OSD menu to adjust the colour temperature from 0 to open the OSD menu. Note: Sets the degree of red, green, blue, yellow , magenta and cyan 6-axis Hue: Adjust hue for adjusting the picture quality. English Using the OSD Menus Note: The following options are available in the Picture menu: Acer ecolor Management, Blue Light, Brightness, Contrast...
User Manual
Page 25
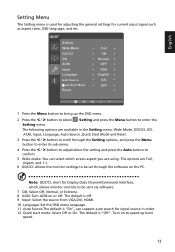
... The default is off. 9 Input: Select the source from VGA,DVI, HDMI. 10 Language: Set the OSD menu language. 11 Auto Source:The default is "Off". The options are using. Setting Wide Mode DDC/CI OD ACM Input Language AAuuttooSSoouruc rece Quic k Start Mode Reset Full ON Normal OFF VGA English EnOOgNlNis OFF 1 Press the Menu button to confirm. 5 Wide mode: You can support auto search for signal source in the Setting menu: Wide Mode, DDC/CI, OD, ACM, Input, Language, Auto Source ,Quick Start Mode and Reset. 3 Press the < / > button to scroll through the software on...
... The default is off. 9 Input: Select the source from VGA,DVI, HDMI. 10 Language: Set the OSD menu language. 11 Auto Source:The default is "Off". The options are using. Setting Wide Mode DDC/CI OD ACM Input Language AAuuttooSSoouruc rece Quic k Start Mode Reset Full ON Normal OFF VGA English EnOOgNlNis OFF 1 Press the Menu button to confirm. 5 Wide mode: You can support auto search for signal source in the Setting menu: Wide Mode, DDC/CI, OD, ACM, Input, Language, Auto Source ,Quick Start Mode and Reset. 3 Press the < / > button to scroll through the software on...
User Manual
Page 27
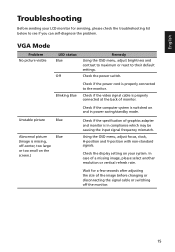
... the input signal frequency mismatch. Wait for servicing, please check the troubleshooting list below to see if you can self-diagnose the problem. VGA Mode Problem No picture visible LED status Blue Off Remedy Using the OSD menu, adjust brightness and contrast to maximum or reset to the monitor. Using the OSD menu, adjust focus, clock, H-position and V-position with non-standard signals. English Troubleshooting Before sending your system. Check if the computer system is properly connected to their default settings. Blinking Blue Check if the power cord is switched...
... the input signal frequency mismatch. Wait for servicing, please check the troubleshooting list below to see if you can self-diagnose the problem. VGA Mode Problem No picture visible LED status Blue Off Remedy Using the OSD menu, adjust brightness and contrast to maximum or reset to the monitor. Using the OSD menu, adjust focus, clock, H-position and V-position with non-standard signals. English Troubleshooting Before sending your system. Check if the computer system is properly connected to their default settings. Blinking Blue Check if the power cord is switched...

User Manual
Page 28
Check the power switch. Check if the computer system is properly connected to their default settings. Check if the AC power cord is switched on and in power saving/standby mode. 16 English DVI/HDMI Mode (Optional) Problem No picture visible LED status Blue Off Remedy Using the OSD menu, adjust brightness and contrast to maximum or reset to the monitor. Blinking Blue Check if the video signal cable is properly connected at the back of monitor.
Check the power switch. Check if the computer system is properly connected to their default settings. Check if the AC power cord is switched on and in power saving/standby mode. 16 English DVI/HDMI Mode (Optional) Problem No picture visible LED status Blue Off Remedy Using the OSD menu, adjust brightness and contrast to maximum or reset to the monitor. Blinking Blue Check if the video signal cable is properly connected at the back of monitor.

