

Acer Aspire 7738, Aspire 7738G Notebook Series Start Guide
Page 3
... on the screen to complete the installation. It covers basic topics such as system utilities, data recovery, expansion options and troubleshooting. In addition it : 1 Click on Start, All Programs, AcerSystem. 2 Click on such subjects as using the keyboard and audio, etc. Note: Viewing the file requires Adobe Reader. The Aspire Series Generic User Guide contains useful information applying to use your notebook. Follow these steps to access it contains warranty...
... on the screen to complete the installation. It covers basic topics such as system utilities, data recovery, expansion options and troubleshooting. In addition it : 1 Click on Start, All Programs, AcerSystem. 2 Click on such subjects as using the keyboard and audio, etc. Note: Viewing the file requires Adobe Reader. The Aspire Series Generic User Guide contains useful information applying to use your notebook. Follow these steps to access it contains warranty...

Acer Aspire 7738, Aspire 7738G Notebook Series Start Guide
Page 5
... the battery is activated. 6 Wireless LAN Enables/disables the wireless LAN communication function. 5 English # Icon Item Description 4 Power button Turns the computer on and off . 13 Acer MediaTouch Touch sensitive controls for three-step data backup. 7 Keyboard For entering data into your hands when you use the computer. 12 Touchpad toggle Turns the internal touchpad on and off . 5 HDD Indicates when the hard disk drive is active. Caps Lock Lights up when Num Lock is activated. Bluetooth communication button/indicator Enables/disables the Bluetooth...
... the battery is activated. 6 Wireless LAN Enables/disables the wireless LAN communication function. 5 English # Icon Item Description 4 Power button Turns the computer on and off . 13 Acer MediaTouch Touch sensitive controls for three-step data backup. 7 Keyboard For entering data into your hands when you use the computer. 12 Touchpad toggle Turns the internal touchpad on and off . 5 HDD Indicates when the hard disk drive is active. Caps Lock Lights up when Num Lock is activated. Bluetooth communication button/indicator Enables/disables the Bluetooth...

Acer Aspire 7738, Aspire 7738G Notebook Series Start Guide
Page 6
... other key in Sleep mode. + + + Display toggle Screen blank Speaker toggle Switches display output between the display screen, external monitor (if connected) and both. Bluetooth Enables/disables the Bluetooth function. (only for displaying system information. Turns the display screen backlight off . + < > + < > + < > + < > Brightness up Increases the screen brightness. Brightness down Decreases the sound volume. Press any key to access most of the computer's controls like screen brightness and volume output. 6 English # Icon Item Description 14 Acer PowerSmart...
... other key in Sleep mode. + + + Display toggle Screen blank Speaker toggle Switches display output between the display screen, external monitor (if connected) and both. Bluetooth Enables/disables the Bluetooth function. (only for displaying system information. Turns the display screen backlight off . + < > + < > + < > + < > Brightness up Increases the screen brightness. Brightness down Decreases the sound volume. Press any key to access most of the computer's controls like screen brightness and volume output. 6 English # Icon Item Description 14 Acer PowerSmart...

Acer Aspire 7738, Aspire 7738G Notebook Series Start Guide
Page 8
...) Microphone-in jack Supports high definition digital video connections. S/PDIF support Connect to an Ethernet 10/100/1000based network. 8 Left view English # Icon 1 Item DC-in jack Description Connects to an AC adapter. 2 3 4 HDMI 5 6 Ethernet (RJ-45) port Connects to USB 2.0 devices (e.g., USB mouse, USB camera). Headphones/speaker/ Connects to a display device (e.g., external monitor, LCD projector). External display (VGA) port Connects to audio line-out devices line-out jack with (e.g., speakers, headphones). HDMI port USB 2.0 port Line-in jack Accepts...
...) Microphone-in jack Supports high definition digital video connections. S/PDIF support Connect to an Ethernet 10/100/1000based network. 8 Left view English # Icon 1 Item DC-in jack Description Connects to an AC adapter. 2 3 4 HDMI 5 6 Ethernet (RJ-45) port Connects to USB 2.0 devices (e.g., USB mouse, USB camera). Headphones/speaker/ Connects to a display device (e.g., external monitor, LCD projector). External display (VGA) port Connects to audio line-out devices line-out jack with (e.g., speakers, headphones). HDMI port USB 2.0 port Line-in jack Accepts...

Acer Aspire 7738, Aspire 7738G Notebook Series Start Guide
Page 10
... Item 1 Battery bay Description Houses the computer's battery pack. 2 Battery release latch Releases the battery for certain models). 5 Hard disk bay-Main Houses the computer's hard disk (secured with screws). 6 Memory compartment Houses the computer's main memory. 7 Ventilation slots and Enable the computer to stay cool, even cooling fan after prolonged use. Secondary Houses the computer's hard disk (secured with screws) (only for removal. 3 Battery lock Locks the battery in position. 4 Hard disk bay-
... Item 1 Battery bay Description Houses the computer's battery pack. 2 Battery release latch Releases the battery for certain models). 5 Hard disk bay-Main Houses the computer's hard disk (secured with screws). 6 Memory compartment Houses the computer's main memory. 7 Ventilation slots and Enable the computer to stay cool, even cooling fan after prolonged use. Secondary Houses the computer's hard disk (secured with screws) (only for removal. 3 Battery lock Locks the battery in position. 4 Hard disk bay-

Acer Aspire 7738, Aspire 7738G Notebook Series Start Guide
Page 12
... adapter* • 3-pin 120 W AC adapter* • ENERGY STAR®* Special keys and controls • 103-/104-/107-key keyboard • Touchpad pointing device I/O interface • Acer Bio-Protection fingerprint reader* • 5-in-1 card reader (SD/MMC/MS/MS PRO/xD) • USB 2.0 port • HDMI™ port with HDCP support • External display (VGA) port • Consumer infrared (CIR) port • RF-in jack* • Headphones/speaker/line-out jack with S/PDIF support • Microphone-in jack...
... adapter* • 3-pin 120 W AC adapter* • ENERGY STAR®* Special keys and controls • 103-/104-/107-key keyboard • Touchpad pointing device I/O interface • Acer Bio-Protection fingerprint reader* • 5-in-1 card reader (SD/MMC/MS/MS PRO/xD) • USB 2.0 port • HDMI™ port with HDCP support • External display (VGA) port • Consumer infrared (CIR) port • RF-in jack* • Headphones/speaker/line-out jack with S/PDIF support • Microphone-in jack...

User Guide
Page 6
... full performance of fire or explosion. Use the battery only for Optical Drive Device CAUTION: This appliance contains a laser system and is damaged. Battery performance is fully charged. Replacing the battery pack The notebook uses lithium batteries. Use of another battery may present a risk of a new battery is left in hot or cold places, such as a "CLASS 1 LASER PRODUCT." Do not disassemble or dispose of times, but...
... full performance of fire or explosion. Use the battery only for Optical Drive Device CAUTION: This appliance contains a laser system and is damaged. Battery performance is fully charged. Replacing the battery pack The notebook uses lithium batteries. Use of another battery may present a risk of a new battery is left in hot or cold places, such as a "CLASS 1 LASER PRODUCT." Do not disassemble or dispose of times, but...
User Guide
Page 13
... as system utilities, data recovery, expansion options and troubleshooting. Please refre to "Quick Guide" for certain models". Follow these steps to complete the installation. Please understand that due to its nature, the Generic User Guide as well as Acer eRecovery Management, using your computer Turning your computer on and off , the Just for your computer can help you use Adobe Reader, access the Help and Support menu. This guide contains...
... as system utilities, data recovery, expansion options and troubleshooting. Please refre to "Quick Guide" for certain models". Follow these steps to complete the installation. Please understand that due to its nature, the Generic User Guide as well as Acer eRecovery Management, using your computer Turning your computer on and off , the Just for your computer can help you use Adobe Reader, access the Help and Support menu. This guide contains...

User Guide
Page 17
... reader) 1 Touchpad basics (with two-click buttons) 2 Using the keyboard 3 Lock keys and embedded numeric keypad* 3 Windows keys 4 Audio 5 Acer PureZone (only for certain models) 5 Tuba (only for certain models) 5 Using Dolby Home Theater for surround/multi-channel sound (only for certain models) 5 Video 6 16:9 display 6 Using the system utilities 7 Acer Bio-Protection (only for certain models) 7 Acer GridVista (dual-display compatible) 8 Acer Backup Manager 10 Power management 11 11 Acer eRecovery Management 12 Burn backup discs 13 Restore 14 Restore...
... reader) 1 Touchpad basics (with two-click buttons) 2 Using the keyboard 3 Lock keys and embedded numeric keypad* 3 Windows keys 4 Audio 5 Acer PureZone (only for certain models) 5 Tuba (only for certain models) 5 Using Dolby Home Theater for surround/multi-channel sound (only for certain models) 5 Video 6 16:9 display 6 Using the system utilities 7 Acer Bio-Protection (only for certain models) 7 Acer GridVista (dual-display compatible) 8 Acer Backup Manager 10 Power management 11 11 Acer eRecovery Management 12 Burn backup discs 13 Restore 14 Restore...
User Guide
Page 19
... - Using passwords 32 Entering passwords 33 Setting passwords 33 Expanding through options 34 Connectivity options 34 Fax/data modem (only for certain models) 34 Built-in network feature 35 Consumer Infrared (CIR) (only for certain models) 35 Universal Serial Bus (USB) 36 IEEE 1394 port (only for certain models) 36 High-Definition Multimedia Interface (only for certain models) 37 ExpressCard (only for certain models) 37 Installing memory 38 BIOS utility 40 Boot sequence...
... - Using passwords 32 Entering passwords 33 Setting passwords 33 Expanding through options 34 Connectivity options 34 Fax/data modem (only for certain models) 34 Built-in network feature 35 Consumer Infrared (CIR) (only for certain models) 35 Universal Serial Bus (USB) 36 IEEE 1394 port (only for certain models) 36 High-Definition Multimedia Interface (only for certain models) 37 ExpressCard (only for certain models) 37 Installing memory 38 BIOS utility 40 Boot sequence...

User Guide
Page 21
... be disabled under Mouse settings in Windows Control Panel. Function Left button Right button Main touchpad Execute Select Drag Access context menu Quickly click twice. and your finger on the touchpad on the second tap and drag the cursor. The exact configuration of your touchpad. Tapping on the touchpad is the same as double-clicking a mouse button). Tap twice (at the same speed as double-clicking a mouse button); Note: By default, vertical...
... be disabled under Mouse settings in Windows Control Panel. Function Left button Right button Main touchpad Execute Select Drag Access context menu Quickly click twice. and your finger on the touchpad on the second tap and drag the cursor. The exact configuration of your touchpad. Tapping on the touchpad is the same as double-clicking a mouse button). Tap twice (at the same speed as double-clicking a mouse button); Note: By default, vertical...

User Guide
Page 22
... Lock is indicated by small characters located on the keys. The embedded numeric keypad functions like a desktop numeric keypad. Lock keys and embedded numeric keypad* The keyboard has three lock keys which you can toggle on , the screen moves one line up or down when + you need to connect an external keypad. Hold while using cursor- Main keyboard keys Hold while typing letters on embedded keypad control keys. Scroll Lock does not work...
... Lock is indicated by small characters located on the keys. The embedded numeric keypad functions like a desktop numeric keypad. Lock keys and embedded numeric keypad* The keyboard has three lock keys which you can toggle on , the screen moves one line up or down when + you need to connect an external keypad. Hold while using cursor- Main keyboard keys Hold while typing letters on embedded keypad control keys. Scroll Lock does not work...

User Guide
Page 23
... are on a + < > + : Use the arrow keys to cycle through programs on the taskbar by using Windows Flip 3-D Application key Note: Depending on your edition of Windows Vista, some shortcuts may not function as clicking on the Windows Start button; This key has the same effect as clicking the right mouse button; it launches the Start menu. English 4 Windows keys The keyboard has two keys that perform Windows-specific functions. it opens the application's context...
... are on a + < > + : Use the arrow keys to cycle through programs on the taskbar by using Windows Flip 3-D Application key Note: Depending on your edition of Windows Vista, some shortcuts may not function as clicking on the Windows Start button; This key has the same effect as clicking the right mouse button; it launches the Start menu. English 4 Windows keys The keyboard has two keys that perform Windows-specific functions. it opens the application's context...
User Guide
Page 27
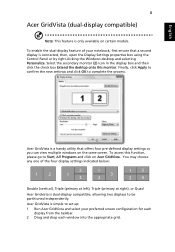
... drop each window into the appropriate grid. Acer GridVista is a handy utility that a second display is connected, then, open the Display Settings properties box using the Control Panel or by right-clicking the Windows desktop and selecting Personalize. English 8 Acer GridVista (dual-display compatible) Note: This feature is only available on the same screen. To access this monitor. To enable the dual display feature of the four display settings indicated below: 12...
... drop each window into the appropriate grid. Acer GridVista is a handy utility that a second display is connected, then, open the Display Settings properties box using the Control Panel or by right-clicking the Windows desktop and selecting Personalize. English 8 Acer GridVista (dual-display compatible) Note: This feature is only available on the same screen. To access this monitor. To enable the dual display feature of the four display settings indicated below: 12...
User Guide
Page 29
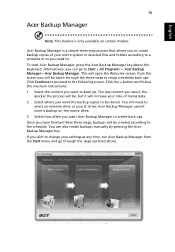
... the Start menu and go to the following screen. If you wish to change your risks of your D: drive; Acer Backup Manager is only available on the source drive. 3 Select how often you want to back up. Once you have finished these three steps, backups will open the Welcome screen; Click the + button and follow the onscreen instructions: 1 Select the content you want Acer Backup Manager to create...
... the Start menu and go to the following screen. If you wish to change your risks of your D: drive; Acer Backup Manager is only available on the source drive. 3 Select how often you want to back up. Once you have finished these three steps, backups will open the Welcome screen; Click the + button and follow the onscreen instructions: 1 Select the content you want Acer Backup Manager to create...

User Guide
Page 30
... chores for your previous settings. When you press the Acer PowerSmart key, the Windows graphics scheme will be changed to Windows Vista Basic, screen brightness reduced and the graphics chip will be switched to a lower speed. If no activity is detected for a period of these devices in power management unit that supports the advanced configuration and power interface (ACPI), which allows for maximum power conservation and maximum performance...
... chores for your previous settings. When you press the Acer PowerSmart key, the Windows graphics scheme will be changed to Windows Vista Basic, screen brightness reduced and the graphics chip will be switched to a lower speed. If no activity is detected for a period of these devices in power management unit that supports the advanced configuration and power interface (ACPI), which allows for maximum power conservation and maximum performance...
User Guide
Page 47
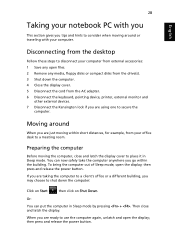
... the power button. When you are ready to use the computer again, unlatch and open the display; Then close and latch the display cover to disconnect your computer from external accessories: 1 Save any media, floppy disks or compact disks from your office desk to consider when moving the computer, close and latch the display. Disconnecting from the AC adapter. 6 Disconnect the keyboard, pointing device, printer, external monitor...
... the power button. When you are ready to use the computer again, unlatch and open the display; Then close and latch the display cover to disconnect your computer from external accessories: 1 Save any media, floppy disks or compact disks from your office desk to consider when moving the computer, close and latch the display. Disconnecting from the AC adapter. 6 Disconnect the keyboard, pointing device, printer, external monitor...
User Guide
Page 53
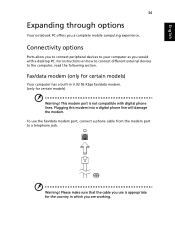
Connectivity options Ports allow you to connect peripheral devices to your computer as you use the fax/data modem port, connect a phone cable from the modem port to the computer, read the following section. Please make sure that the cable you would with digital phone lines. To use is not compatible with a desktop PC. Warning! For instructions on how to connect different external devices to a telephone jack. Fax/data...
Connectivity options Ports allow you to connect peripheral devices to your computer as you use the fax/data modem port, connect a phone cable from the modem port to the computer, read the following section. Please make sure that the cable you would with digital phone lines. To use is not compatible with a desktop PC. Warning! For instructions on how to connect different external devices to a telephone jack. Fax/data...
User Guide
Page 59
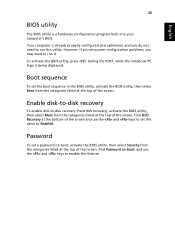
... computer's BIOS. Enable disk-to-disk recovery To enable disk-to Enabled. To activate the BIOS utility, press during the POST; Boot sequence To set this value to -disk recovery (hard disk recovery), activate the BIOS utility, then select Main from the categories listed at the top of the screen. Password To set a password on boot: and use the and keys to run it. English 40 BIOS utility The BIOS utility is being displayed. However, if you encounter configuration problems, you do not need to enable this utility. Your...
... computer's BIOS. Enable disk-to-disk recovery To enable disk-to Enabled. To activate the BIOS utility, press during the POST; Boot sequence To set this value to -disk recovery (hard disk recovery), activate the BIOS utility, then select Main from the categories listed at the top of the screen. Password To set a password on boot: and use the and keys to run it. English 40 BIOS utility The BIOS utility is being displayed. However, if you encounter configuration problems, you do not need to enable this utility. Your...
User Guide
Page 61
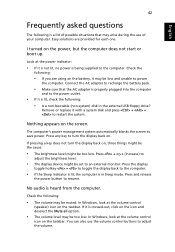
... key to turn the display back on the taskbar. No audio is in the external USB floppy drive? In Windows, look at the volume control icon on , three things might be the cause: • The brightness level might be too low. In Windows, look at the power indicator: • If it with a system disk and press + + to resume. Press + < > (increase) to adjust the brightness level. • The display device...
... key to turn the display back on the taskbar. No audio is in the external USB floppy drive? In Windows, look at the volume control icon on , three things might be the cause: • The brightness level might be too low. In Windows, look at the power indicator: • If it with a system disk and press + + to resume. Press + < > (increase) to adjust the brightness level. • The display device...


