
User Manual
Page 3
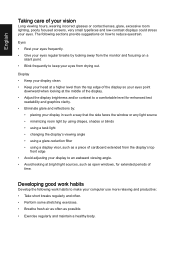
... changing the image or turning off the power switch and then turn it on the product. Keep this case, the screen is displayed for future reference. Cleaning your safety and comfort Safety instructions Read these guidelines when cleaning the monitor: • Always unplug the monitor before cleaning. • Use a soft cloth to the nature of the LCD screen, an afterimage of the fluorescent light, the screen may find slightly uneven brightness...
... changing the image or turning off the power switch and then turn it on the product. Keep this case, the screen is displayed for future reference. Cleaning your safety and comfort Safety instructions Read these guidelines when cleaning the monitor: • Always unplug the monitor before cleaning. • Use a soft cloth to the nature of the LCD screen, an afterimage of the fluorescent light, the screen may find slightly uneven brightness...
User Manual
Page 4
... volume to the equipment operator as they may touch dangerous voltage points or short-out parts that the power outlet you . Warnings • Do not use it from the electrical outlet. If you need to disconnect power from the type of internal components and to rest on the marking label. Do not locate this product on the cord. English...
... volume to the equipment operator as they may touch dangerous voltage points or short-out parts that the power outlet you . Warnings • Do not use it from the electrical outlet. If you need to disconnect power from the type of internal components and to rest on the marking label. Do not locate this product on the cord. English...
User Manual
Page 5
... service personnel. Unplug this product. • Use the product only with a three-wire grounded plug. English • If an extension cord is used , the load should not exceed 80% of the power strip's input rating. • This product's power cord is equipped with the supplied power supply cord set , make sure that the total ampere rating of the equipment plugged into the extension cord does not exceed the extension cord ampere rating...
... service personnel. Unplug this product. • Use the product only with a three-wire grounded plug. English • If an extension cord is used , the load should not exceed 80% of the power strip's input rating. • This product's power cord is equipped with the supplied power supply cord set , make sure that the total ampere rating of the equipment plugged into the extension cord does not exceed the extension cord ampere rating...

User Manual
Page 6
...Switch off your vehicle engine. We at Acer are very conscious of the environmental effects of our business and strive to identify and provide the best working procedures to environmental protection and views recycling, in damage and will often require extensive work by the operating instructions, since improper adjustment...and its enhancements may result in the form of salvaging and disposal of used equipment, as grain, dust or metal powders. To minimize pollution and ensure... help when recycling, please go to turn off the device near depots, storage and distribution areas;
...Switch off your vehicle engine. We at Acer are very conscious of the environmental effects of our business and strive to identify and provide the best working procedures to environmental protection and views recycling, in damage and will often require extensive work by the operating instructions, since improper adjustment...and its enhancements may result in the form of salvaging and disposal of used equipment, as grain, dust or metal powders. To minimize pollution and ensure... help when recycling, please go to turn off the device near depots, storage and distribution areas;
User Manual
Page 7
... been shipped enabled for power management: • Activate display's Sleep mode within 5 minutes of a computer. Users are also at risk of physical injury after prolonged use , consult a physician immediately and inform your sitting height to achieve maximum comfort. Long work periods, bad posture, poor work habits, stress, inadequate working in front of user inactivity. • Wake the monitor when it is produced...
... been shipped enabled for power management: • Activate display's Sleep mode within 5 minutes of a computer. Users are also at risk of physical injury after prolonged use , consult a physician immediately and inform your sitting height to achieve maximum comfort. Long work periods, bad posture, poor work habits, stress, inadequate working in front of user inactivity. • Wake the monitor when it is produced...
User Manual
Page 8
... the window or any light source • minimizing room light by looking at bright light sources, such as possible. • Exercise regularly and maintain a healthy body. Developing good work habits to an awkward viewing angle. • Avoid looking away from the monitor and focusing on how to keep your eyes from the display's top front edge • Avoid adjusting your display to make your computer use...
... the window or any light source • minimizing room light by looking at bright light sources, such as possible. • Exercise regularly and maintain a healthy body. Developing good work habits to an awkward viewing angle. • Avoid looking away from the monitor and focusing on how to keep your eyes from the display's top front edge • Avoid adjusting your display to make your computer use...
User Manual
Page 11
... Taking care of your vision viii Developing good work habits viii Declaration of Conformity ix Federal Communications Commission Declaration of Conformity x Unpacking 1 Attaching the base (for selected models) 2 Screen position adjustment 3 Connecting the adapter and AC Power cord 3 Power saving Display Data Channel (DDC) Connector pin assignment 4 19-pin color display signal cable 4 Standard timing table 6 Installation 7 Users controls 8 Panel controls 8 Using the Shortcut Menu 9 The Function page 10 Troubleshooting 15 VGA IN/HDMI1.4 Mode (Optional) 15
... Taking care of your vision viii Developing good work habits viii Declaration of Conformity ix Federal Communications Commission Declaration of Conformity x Unpacking 1 Attaching the base (for selected models) 2 Screen position adjustment 3 Connecting the adapter and AC Power cord 3 Power saving Display Data Channel (DDC) Connector pin assignment 4 19-pin color display signal cable 4 Standard timing table 6 Installation 7 Users controls 8 Panel controls 8 Using the Shortcut Menu 9 The Function page 10 Troubleshooting 15 VGA IN/HDMI1.4 Mode (Optional) 15
User Manual
Page 13
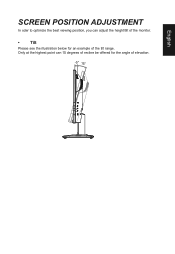
English SCREEN POSITION ADJUSTMENT In oder to optimize the best viewing position, you can 15 degrees of recline be offered for an example of elevation. -5° 15° Only at the highest point can adjust the height/tilt of the monitor. • Tilt Please see the illustration below for the angle of the tilt range.
English SCREEN POSITION ADJUSTMENT In oder to optimize the best viewing position, you can 15 degrees of recline be offered for an example of elevation. -5° 15° Only at the highest point can adjust the height/tilt of the monitor. • Tilt Please see the illustration below for the angle of the tilt range.
User Manual
Page 14
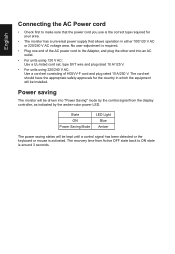
.... • The monitor has a universal power supply that allows operation in which the equipment will be driven into "Power Saving" mode by the control signal from the display controller, as indicated by the amber-color power LED. No user-adjustment is required. • Plug one end of H05VV-F cord and plug rated 10 A/250 V. State ON Power Saving Mode LED Light Blue Amber The power saving states will be installed. The cord set consisting of the AC power cord to ON state...
.... • The monitor has a universal power supply that allows operation in which the equipment will be driven into "Power Saving" mode by the control signal from the display controller, as indicated by the amber-color power LED. No user-adjustment is required. • Plug one end of H05VV-F cord and plug rated 10 A/250 V. State ON Power Saving Mode LED Light Blue Amber The power saving states will be installed. The cord set consisting of the AC power cord to ON state...
User Manual
Page 15
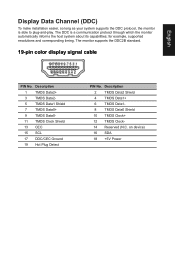
... DDC is able to plug-and-play. The monitor supports the DDC2B standard. 19-pin color display signal cable PIN No. Description 2 TMDS Data2 Shield 4 TMDS Data1+ 6 TMDS Data18 TMDS Data0 Shield 10 TMDS Clock+ 12 TMDS Clock14 Reserved (N.C. English Display Data Channel (DDC) To make installation easier, so long as your system supports the DDC protocol, the monitor is a communication protocol through...
... DDC is able to plug-and-play. The monitor supports the DDC2B standard. 19-pin color display signal cable PIN No. Description 2 TMDS Data2 Shield 4 TMDS Data1+ 6 TMDS Data18 TMDS Data0 Shield 10 TMDS Clock+ 12 TMDS Clock14 Reserved (N.C. English Display Data Channel (DDC) To make installation easier, so long as your system supports the DDC protocol, the monitor is a communication protocol through...
User Manual
Page 18
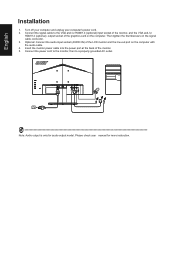
.... Insert the monitor power cable into the power port at the back of the graphics card on the computer with the audio cable. 4. Please check user manual for audio output model. Optional: Connect the audio input socket (AUDIO IN) of the LCD monitor and the line-out port on the computer. Then tighten the thumbscrews on the signal cable connector. 3. Note: Audio output is only for more instruction. English Installation 1. Connect the power cord to the monitor, then to the VGA and...
.... Insert the monitor power cable into the power port at the back of the graphics card on the computer with the audio cable. 4. Please check user manual for audio output model. Optional: Connect the audio input socket (AUDIO IN) of the LCD monitor and the line-out port on the computer. Then tighten the thumbscrews on the signal cable connector. 3. Note: Audio output is only for more instruction. English Installation 1. Connect the power cord to the monitor, then to the VGA and...
User Manual
Page 19
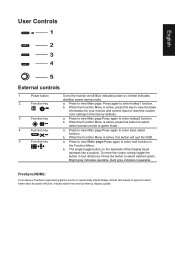
... a FreeSync supported graphics source to dynamically adjust display refresh rate based on typical content frame rates for your monitor and current input or reset the custom color settings to enter next function in four directions. Press to view Main page.Press again to select select scenario mode or game mode . b. To move the cursor, simply toggle the button in the Function Menu. Dark gray indicates inoperable. a. English User Controls 1 2 3 4 5 External controls 1 Power button 2 Function...
... a FreeSync supported graphics source to dynamically adjust display refresh rate based on typical content frame rates for your monitor and current input or reset the custom color settings to enter next function in four directions. Press to view Main page.Press again to select select scenario mode or game mode . b. To move the cursor, simply toggle the button in the Function Menu. Dark gray indicates inoperable. a. English User Controls 1 2 3 4 5 External controls 1 Power button 2 Function...

User Manual
Page 20
... your LCD monitor. Brightness 80 Adjust OK When you are done, press the joystick to open the OSD. For advanced settings, please refer to adjust the picture quality, OSD position and general settings. The OSD (onscreen display) can use the OSD to following content is for general reference only. English Using the Shortcut Menu Note: The following page: Main page Mode Standard Brightness 80 Input HDMI Menu 1. Actual product specifications may vary. Hot Key1 Modes, Brightness, Volume, Gamma, Contrast, Blue Light...
... your LCD monitor. Brightness 80 Adjust OK When you are done, press the joystick to open the OSD. For advanced settings, please refer to adjust the picture quality, OSD position and general settings. The OSD (onscreen display) can use the OSD to following content is for general reference only. English Using the Shortcut Menu Note: The following page: Main page Mode Standard Brightness 80 Input HDMI Menu 1. Actual product specifications may vary. Hot Key1 Modes, Brightness, Volume, Gamma, Contrast, Blue Light...
User Manual
Page 21
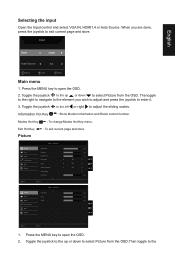
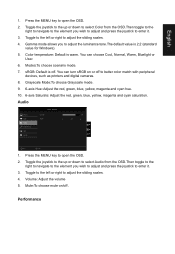
... Monitor Information and Reset control function. Picture Picture Color Audio Performance OSD System Mode - Press the MENU key to exit current page and store. When you wish to adjust and press the joystick to select Picture from the OSD.Then toggle to open the OSD. 2. Toggle the joystick to the left or right to adjust the sliding scales. English Selecting the input Open the Input control and select VGA IN, HDMI1.4 or Auto Source. Input Input HDMI Auto Source...
... Monitor Information and Reset control function. Picture Picture Color Audio Performance OSD System Mode - Press the MENU key to exit current page and store. When you wish to adjust and press the joystick to select Picture from the OSD.Then toggle to open the OSD. 2. Toggle the joystick to the left or right to adjust the sliding scales. English Selecting the input Open the Input control and select VGA IN, HDMI1.4 or Auto Source. Input Input HDMI Auto Source...
User Manual
Page 22
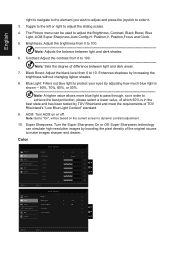
... and has been tested by boosting the pixel density of TÜV Rheinland's "Low Blue Light Content" standard. 9. Enhances shadows by increasing the brightness without changing lighter shades. 8. Note: Set to "On", will be used to 10. Brightness: Adjust the brightness from 0 to adjust the Brightness, Contrast, Black Boost, Blue Light, ACM,Super Sharpness,Auto Config,H. Position,V. Color Picture Color Audio Performance OSD System Move Mode - Toggle to the left or right to enter it...
... and has been tested by boosting the pixel density of TÜV Rheinland's "Low Blue Light Content" standard. 9. Enhances shadows by increasing the brightness without changing lighter shades. 8. Note: Set to "On", will be used to 10. Brightness: Adjust the brightness from 0 to adjust the Brightness, Contrast, Black Boost, Blue Light, ACM,Super Sharpness,Auto Config,H. Position,V. Color Picture Color Audio Performance OSD System Move Mode - Toggle to the left or right to enter it...
User Manual
Page 23
... red, green, blue, yellow, magenta and cyan saturation. Press the MENU key to open the OSD. 2. Mute:To choose mute on or off . Color temperature: Default is 2.2 (standard value for Windows). 5. Press the MENU key to open the OSD. 2. Toggle to the left or right to adjust the luminance tone.The default value is warm. Volume: Adjust the volume 5. Gamma mode allows you to adjust the sliding scales. 4. Audio Picture Color Audio Performance OSD...
... red, green, blue, yellow, magenta and cyan saturation. Press the MENU key to open the OSD. 2. Mute:To choose mute on or off . Color temperature: Default is 2.2 (standard value for Windows). 5. Press the MENU key to open the OSD. 2. Toggle to the left or right to adjust the luminance tone.The default value is warm. Volume: Adjust the volume 5. Gamma mode allows you to adjust the sliding scales. 4. Audio Picture Color Audio Performance OSD...
User Manual
Page 24
Refresh rate num: Display the panel's current refresh rate on /off . 7. Standard Language OSD Timeout Transparency OSD Lock English Off Off 10 X Move Enter 1. Over Drive: Select Off, Normal or Extreme. 5. Language: Set the OSD menu language. Toggle to the left or right to adjust the sliding scales. 4. Note: If FreeSync set "On" you wish to adjust and press the joystick to control functions. 4. OSD Picture Color Audio Performance OSD System Mode - Toggle to the left or...
Refresh rate num: Display the panel's current refresh rate on /off . 7. Standard Language OSD Timeout Transparency OSD Lock English Off Off 10 X Move Enter 1. Over Drive: Select Off, Normal or Extreme. 5. Language: Set the OSD menu language. Toggle to the left or right to adjust the sliding scales. 4. Note: If FreeSync set "On" you wish to adjust and press the joystick to control functions. 4. OSD Picture Color Audio Performance OSD System Mode - Toggle to the left or...

User Manual
Page 25
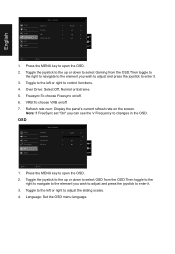
... element you wish to adjust and press the joystick to control functions. 4. Auto Source: The default is "Off". Press the MENU key to blue light. Input: Select the source from blue light to orange light. • Press any Key screen to prompt "OSD Locked" message. Standard Input Auto Source Wide Mode Hot Key Assignment DDC/CI HDMI Black Level Quick Start Mode HDMI On Full On X Normal Off Move Enter Quick Start Mode 1. Note: Surround application must set Auto Source is "On", which...
... element you wish to adjust and press the joystick to control functions. 4. Auto Source: The default is "Off". Press the MENU key to blue light. Input: Select the source from blue light to orange light. • Press any Key screen to prompt "OSD Locked" message. Standard Input Auto Source Wide Mode Hot Key Assignment DDC/CI HDMI Black Level Quick Start Mode HDMI On Full On X Normal Off Move Enter Quick Start Mode 1. Note: Surround application must set Auto Source is "On", which...
User Manual
Page 26
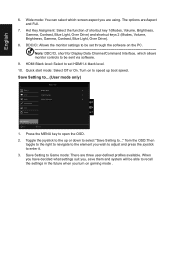
... 1(Modes, Volume, Brightness, Gamma, Contrast, Blue Light, Over Drive) and shortcut keys 2 (Modes, Volume, Brightness, Gamma, Contrast, Blue Light, Over Drive). 8. When you have decided what settings suit you turn on gaming mode . Move Enter 1. HDMI Black level: Select to set through the software on to be set HDMI1.4 black level. 10. DDC/CI: Allows the monitor settings to speed up or down to select "Save Setting to open the OSD. 2. English 6. Wide mode: You can select which allows monitor controls to...
... 1(Modes, Volume, Brightness, Gamma, Contrast, Blue Light, Over Drive) and shortcut keys 2 (Modes, Volume, Brightness, Gamma, Contrast, Blue Light, Over Drive). 8. When you have decided what settings suit you turn on gaming mode . Move Enter 1. HDMI Black level: Select to set through the software on to be set HDMI1.4 black level. 10. DDC/CI: Allows the monitor settings to speed up or down to select "Save Setting to open the OSD. 2. English 6. Wide mode: You can select which allows monitor controls to...
User Manual
Page 27
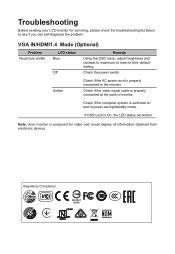
... obtained from electronic devices. Regulatory Compliance 217186 60950-1 Check if the video signal cable is purposed for servicing, please check the troubleshooting list below to the monitor. If OSD Lock is switched on and in power saving/standby mode. Check if the computer system is On, the LED status set Amber. VGA IN/HDMI1.4 Mode (Optional) Problem No picture visible LED status Blue Off Remedy Using the OSD menu, adjust brightness and contrast to maximum or reset to their default setting. Check the power switch.
... obtained from electronic devices. Regulatory Compliance 217186 60950-1 Check if the video signal cable is purposed for servicing, please check the troubleshooting list below to the monitor. If OSD Lock is switched on and in power saving/standby mode. Check if the computer system is On, the LED status set Amber. VGA IN/HDMI1.4 Mode (Optional) Problem No picture visible LED status Blue Off Remedy Using the OSD menu, adjust brightness and contrast to maximum or reset to their default setting. Check the power switch.


