User Manual
Page 3
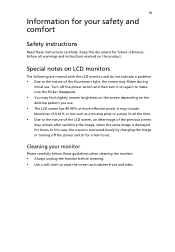
... by changing the image or turning off the power switch and then turn it on again to the nature of 0.01% or less such as a missing pixel or a pixel lit all warnings and instructions marked on LCD monitors The following are normal with the LCD monitor and do not indicate a problem. • Due to make sure the flicker disappears. • You may flicker during initial use . • The LCD screen...
... by changing the image or turning off the power switch and then turn it on again to the nature of 0.01% or less such as a missing pixel or a pixel lit all warnings and instructions marked on LCD monitors The following are normal with the LCD monitor and do not indicate a problem. • Due to make sure the flicker disappears. • You may flicker during initial use . • The LCD screen...

User Manual
Page 4
... short current or damage internal devices. • The adapter is used for other similar surface. Safe listening To protect your hearing, follow these instructions. • Gradually increase the volume until you can 't hear people speaking near you. iv Accessibility Be sure that the power outlet you plug the power cord into is provided. • Never push objects of...
... short current or damage internal devices. • The adapter is used for other similar surface. Safe listening To protect your hearing, follow these instructions. • Gradually increase the volume until you can 't hear people speaking near you. iv Accessibility Be sure that the power outlet you plug the power cord into is provided. • Never push objects of...
User Manual
Page 5
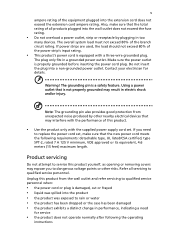
... from the wall outlet and refer servicing to service this product. • Use the product only with a three-wire grounded plug. Make sure the power outlet is equipped with the supplied power supply cord set , make sure that is not properly grounded may expose you need for details. If power strips are used, the load should not exceed 80% of this product yourself, as opening or removing covers may...
... from the wall outlet and refer servicing to service this product. • Use the product only with a three-wire grounded plug. Make sure the power outlet is equipped with the supplied power supply cord set , make sure that is not properly grounded may expose you need for details. If power strips are used, the load should not exceed 80% of this product yourself, as opening or removing covers may...

User Manual
Page 6
...facilities, vehicles using liquefied petroleum gas (such as propane or butane), and areas where the air contains chemicals or particles such as one of radio equipment in progress. Potentially explosive environments Switch off your...help when recycling, please go to turn off the device near gas pumps at Acer are very conscious of the environmental effects of our business and strive to identify and provide the best working procedures to environmental protection and views recycling, in damage and will often require extensive work by the operating instructions, since improper adjustment...
...facilities, vehicles using liquefied petroleum gas (such as propane or butane), and areas where the air contains chemicals or particles such as one of radio equipment in progress. Potentially explosive environments Switch off your...help when recycling, please go to turn off the device near gas pumps at Acer are very conscious of the environmental effects of our business and strive to identify and provide the best working procedures to environmental protection and views recycling, in damage and will often require extensive work by the operating instructions, since improper adjustment...

User Manual
Page 7
... the risk of working conditions, personal health and other musculoskeletal disorders. Observe the following section provides tips for comfortable use . The following tips: • refrain from Sleep mode by adjusting the viewing angle of the monitor, using a footrest, or raising your sitting height to remove the strain on the recorded image and does not constitute a malfunction. vii LCD pixel statement The LCD unit is...
... the risk of working conditions, personal health and other musculoskeletal disorders. Observe the following section provides tips for comfortable use . The following tips: • refrain from Sleep mode by adjusting the viewing angle of the monitor, using a footrest, or raising your sitting height to remove the strain on the recorded image and does not constitute a malfunction. vii LCD pixel statement The LCD unit is...
User Manual
Page 8
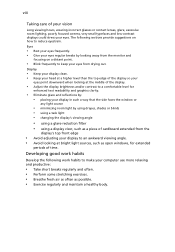
... side faces the window or any light source • minimizing room light by using drapes, shades or blinds • using a task light • changing the display's viewing angle • using a glare-reduction filter • using a display visor, such as a piece of your vision Long viewing hours, wearing incorrect glasses or contact lenses, glare, excessive room lighting, poorly focused screens, very small typefaces and low-contrast displays could stress...
... side faces the window or any light source • minimizing room light by using drapes, shades or blinds • using a task light • changing the display's viewing angle • using a glare-reduction filter • using a display visor, such as a piece of your vision Long viewing hours, wearing incorrect glasses or contact lenses, glare, excessive room lighting, poorly focused screens, very small typefaces and low-contrast displays could stress...
User Manual
Page 9
TABLE OF CONTENTS UNPACKING 1 ATTACHING / REMOVING THE BASE 2 SCREEN POSITION ADJUSTMENT 2 CONNECTING THE POWER CORD 3 SAFETY PRECAUTION 3 CLEANING YOUR MONITOR 3 POWER SAVING 4 DDC...4 CONNECTOR PIN ASSIGNMENT 5 STANDARD TIMING TABLE 8 INSTALLATION 10 MHL (Mobile High-Definition Link) (Only for MHL-input Models)... 11 USER CONTROLS 12 TROUBLESHOOTING 19
TABLE OF CONTENTS UNPACKING 1 ATTACHING / REMOVING THE BASE 2 SCREEN POSITION ADJUSTMENT 2 CONNECTING THE POWER CORD 3 SAFETY PRECAUTION 3 CLEANING YOUR MONITOR 3 POWER SAVING 4 DDC...4 CONNECTOR PIN ASSIGNMENT 5 STANDARD TIMING TABLE 8 INSTALLATION 10 MHL (Mobile High-Definition Link) (Only for MHL-input Models)... 11 USER CONTROLS 12 TROUBLESHOOTING 19

User Manual
Page 11
... the monitor stand arm to avoid scratching the screen. 1. 2. use a cloth to the Ensure that the base is locked onto the base. monitor stand arm. The monitor can adjust the tilt of the monitor as shown in the figure below . ATTACHING / REMOVING THE BASE Note: Remove the monitor and monitor base from its packaging. Carefully place the monitor face-down as indicated by using both of your hands to optimize the best viewing position, you...
... the monitor stand arm to avoid scratching the screen. 1. 2. use a cloth to the Ensure that the base is locked onto the base. monitor stand arm. The monitor can adjust the tilt of the monitor as shown in the figure below . ATTACHING / REMOVING THE BASE Note: Remove the monitor and monitor base from its packaging. Carefully place the monitor face-down as indicated by using both of your hands to optimize the best viewing position, you...
User Manual
Page 12
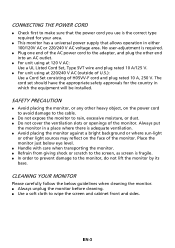
... damage to the monitor, do not lift the monitor by its base. CONNECTING THE POWER CORD Check first to make sure that the power cord you use is the correct type required for the country in which the equipment will be installed. EN-3 Always put the monitor in either 100/120V AC or 220/240 V AC voltage area. The cord set should have the...
... damage to the monitor, do not lift the monitor by its base. CONNECTING THE POWER CORD Check first to make sure that the power cord you use is the correct type required for the country in which the equipment will be installed. EN-3 Always put the monitor in either 100/120V AC or 220/240 V AC voltage area. The cord set should have the...
User Manual
Page 13
... a communication protocol through which the monitor automatically informs the host system about its capabilities, for example, supported resolutions and corresponding timing. EN-4 DDC To make your system also supports DDC protocol. POWER SAVING The monitor will be driven into "Power Saving" mode by the control signal from Active OFF state back to Plug and Play with your system if your installation easier, the monitor is activated.
... a communication protocol through which the monitor automatically informs the host system about its capabilities, for example, supported resolutions and corresponding timing. EN-4 DDC To make your system also supports DDC protocol. POWER SAVING The monitor will be driven into "Power Saving" mode by the control signal from Active OFF state back to Plug and Play with your system if your installation easier, the monitor is activated.

User Manual
Page 14
NC 2. TMDS Data2+ 14. +5V Power 3. Hot Plug Detect 5. TMDS Clock+ 12. Logic Ground 4. TMDS Data0+ 7. TMDS Data 0/5 Shield 8. TMDS Data 1/3 Shield 23. DDC TMDS Clock- * only for certain models EN-5 DDC Clock 18. TMDS Data1- 21. TMDS Data0- 6. TMDS Data 2/4 Shield 15. TMDS Clock Shield 11. NC 16. NC 9. CONNECTOR PIN ASSIGNMENT 24-Pin Color Display Signal Cable* PIN Meaning PIN Meaning 1. DDC Data 19. NC 20. NC 10. TMDS Data2- 13. NC 17. TMDS Data1+ 22. NC 24.
NC 2. TMDS Data2+ 14. +5V Power 3. Hot Plug Detect 5. TMDS Clock+ 12. Logic Ground 4. TMDS Data0+ 7. TMDS Data 0/5 Shield 8. TMDS Data 1/3 Shield 23. DDC TMDS Clock- * only for certain models EN-5 DDC Clock 18. TMDS Data1- 21. TMDS Data0- 6. TMDS Data 2/4 Shield 15. TMDS Clock Shield 11. NC 16. NC 9. CONNECTOR PIN ASSIGNMENT 24-Pin Color Display Signal Cable* PIN Meaning PIN Meaning 1. DDC Data 19. NC 20. NC 10. TMDS Data2- 13. NC 17. TMDS Data1+ 22. NC 24.

User Manual
Page 15
... (N.C. TMDS Clock Shield 12. DDC/CEC Ground 18. +5V Power 19. 19-Pin Color Display Signal Cable* PIN Meaning 1. TMDS Clock- 13. on device) 15. SDA 17. TMDS Data1+ 5. CEC 14. TMDS Data2+ 2. TMDS Data2 Shield 3. TMDS Data1- 7. SCL 16. Hot Plug Detect PIN 7. 9. 18. 19. 5, 11, 17 * only for certain models 19-Pin Color Display Signal Cable* PIN Meaning 10.
... (N.C. TMDS Clock Shield 12. DDC/CEC Ground 18. +5V Power 19. 19-Pin Color Display Signal Cable* PIN Meaning 1. TMDS Clock- 13. on device) 15. SDA 17. TMDS Data1+ 5. CEC 14. TMDS Data2+ 2. TMDS Data2 Shield 3. TMDS Data1- 7. SCL 16. Hot Plug Detect PIN 7. 9. 18. 19. 5, 11, 17 * only for certain models 19-Pin Color Display Signal Cable* PIN Meaning 10.
User Manual
Page 16
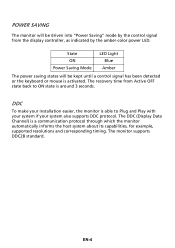
GND 12. AUX_CH (n) 16. DP Power EN-7 Lane0(p) 2. Lane1(p) 5. GND 6. Config1 14. Config2 15. 20-Pin Color Display Signal Cable* PIN Description 1. Lane3(n) 13. AUX_CH (p) 18. DP Power_Return 20. Lane1(n) 7. Lane0(n) 4. GND 17. Lane3(n) 10. Lane3(p) * only for certain models PIN Description 11. GND 3. Lane2(p) 8. Hot Plug Detect 19. GND 9.
GND 12. AUX_CH (n) 16. DP Power EN-7 Lane0(p) 2. Lane1(p) 5. GND 6. Config1 14. Config2 15. 20-Pin Color Display Signal Cable* PIN Description 1. Lane3(n) 13. AUX_CH (p) 18. DP Power_Return 20. Lane1(n) 7. Lane0(n) 4. GND 17. Lane3(n) 10. Lane3(p) * only for certain models PIN Description 11. GND 3. Lane2(p) 8. Hot Plug Detect 19. GND 9.
User Manual
Page 19
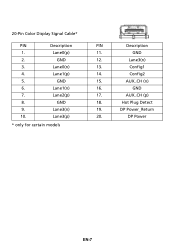
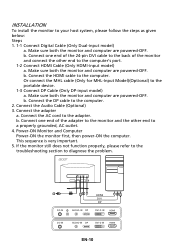
... DVI-D IN HDMI DC DC-IN AUDIO-IN DP HDMI DVI DP DVI-D IN HDMI DC-IN AUDIO-IN DP DVI-D IN HDMI EN-10 Power-ON Monitor and Computer Power-ON the monitor first, then power-ON the computer. b. b. Or connect the MHL cable (Only for MHL-Input Model)(Optional) to the computer. 2. INSTALLATION To install the monitor to diagnose the problem. Connect the Audio Cable (Optional) 3. Make sure both the monitor and computer are powered-OFF. Connect the adapter a. Make...
... DVI-D IN HDMI DC DC-IN AUDIO-IN DP HDMI DVI DP DVI-D IN HDMI DC-IN AUDIO-IN DP DVI-D IN HDMI EN-10 Power-ON Monitor and Computer Power-ON the monitor first, then power-ON the computer. b. b. Or connect the MHL cable (Only for MHL-Input Model)(Optional) to the computer. 2. INSTALLATION To install the monitor to diagnose the problem. Connect the Audio Cable (Optional) 3. Make sure both the monitor and computer are powered-OFF. Connect the adapter a. Make...
User Manual
Page 20
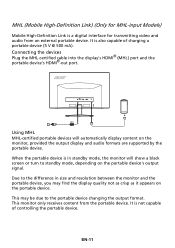
... Due to the portable device changing the output format. MHL (Mobile High-Definition Link) (Only for MHL-input Models) Mobile High-Definition Link is also capable of controlling the portable device. DC-IN AUDIO-IN DP DVI-D IN HDMI MHL DC MHL Using MHL MHL-certified portable devices will show a black screen or turn to standby mode, depending on the portable device...
... Due to the portable device changing the output format. MHL (Mobile High-Definition Link) (Only for MHL-input Models) Mobile High-Definition Link is also capable of controlling the portable device. DC-IN AUDIO-IN DP DVI-D IN HDMI MHL DC MHL Using MHL MHL-certified portable devices will show a black screen or turn to standby mode, depending on the portable device...

User Manual
Page 21
Exit If the OSD is turned ON. EN-12 USER CONTROLS Base Controls Icon / Item Power button/ indicator Description To turn the monitor ON or OFF. Lights up to indicate the power is active, press Auto to open the Acer eColor key Management OSD and access the scenario modes. OSD functions Press to toggle between the OSD options. Minus / plus If the OSD is active, press the Minus or Plus button to view the OSD. Empowering Press the Empowering key to exit the OSD.
Exit If the OSD is turned ON. EN-12 USER CONTROLS Base Controls Icon / Item Power button/ indicator Description To turn the monitor ON or OFF. Lights up to indicate the power is active, press Auto to open the Acer eColor key Management OSD and access the scenario modes. OSD functions Press to toggle between the OSD options. Minus / plus If the OSD is active, press the Minus or Plus button to view the OSD. Empowering Press the Empowering key to exit the OSD.

User Manual
Page 22
... mode Adjusts the settings to select the mode Features and Benefits Main Sub Menu Sub Menu Menu icon icon item Description N/A User mode User defined. Reflects native display mode capability N/A Graphic mode Enhances colors and emphasize fine detail. Pictures and photographs appear in clearest detail. EN-13 Presents great visuals, even in unsuitably-lit environments. Acer eColor Management Operation instructions Step 1: Press " " Key to open the Acer eColor Management OSD and...
... mode Adjusts the settings to select the mode Features and Benefits Main Sub Menu Sub Menu Menu icon icon item Description N/A User mode User defined. Reflects native display mode capability N/A Graphic mode Enhances colors and emphasize fine detail. Pictures and photographs appear in clearest detail. EN-13 Presents great visuals, even in unsuitably-lit environments. Acer eColor Management Operation instructions Step 1: Press " " Key to open the Acer eColor Management OSD and...
User Manual
Page 23
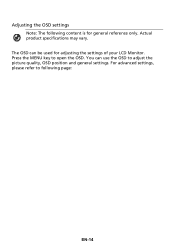
Adjusting the OSD settings Note: The following page: EN-14 Press the MENU key to following content is for adjusting the settings of your LCD Monitor. You can be used for general reference only. The OSD can use the OSD to adjust the picture quality, OSD position and general settings. Actual product specifications may vary. For advanced settings, please refer to open the OSD.
Adjusting the OSD settings Note: The following page: EN-14 Press the MENU key to following content is for adjusting the settings of your LCD Monitor. You can be used for general reference only. The OSD can use the OSD to adjust the picture quality, OSD position and general settings. Actual product specifications may vary. For advanced settings, please refer to open the OSD.
User Manual
Page 24
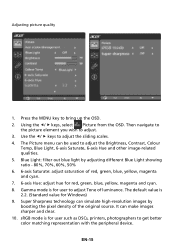
.... sRGB mode is for user to adjust the Brightness, Contrast, Colour Temp, Blue Light, 6-axis Saturate, 6-axis Hue and other image-related qualities. 5. It can be used to adjust Tone of luminance. Using the / keys, select Picture from the OSD. EN-15 Adjusting picture quality 1. Gamma mode is 2.2. (Standard value for red, green, blue, yellow, magenta and cyan. 8. Super Sharpness technology can simulate high-resolution images by adjusting different Blue Light showing...
.... sRGB mode is for user to adjust the Brightness, Contrast, Colour Temp, Blue Light, 6-axis Saturate, 6-axis Hue and other image-related qualities. 5. It can be used to adjust Tone of luminance. Using the / keys, select Picture from the OSD. EN-15 Adjusting picture quality 1. Gamma mode is 2.2. (Standard value for red, green, blue, yellow, magenta and cyan. 8. Super Sharpness technology can simulate high-resolution images by adjusting different Blue Light showing...
User Manual
Page 28
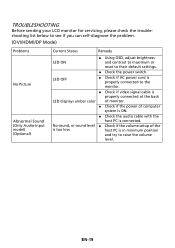
... audio cable with the host PC is properly connected to raise the volume level. EN-19 LED OFF Check if AC power cord is connected. TROUBLESHOOTING Before sending your LCD monitor for servicing, please check the troubleshooting list below to see if you can self-diagnose the problem. (DVI/HDMI/DP Mode) Problems No Picture Abnormal Sound (Only Audio-Input model) (Optional) Current Status Remedy LED ON Using OSD, adjust brightness and contrast to maximum or reset to their default settings. Check...
... audio cable with the host PC is properly connected to raise the volume level. EN-19 LED OFF Check if AC power cord is connected. TROUBLESHOOTING Before sending your LCD monitor for servicing, please check the troubleshooting list below to see if you can self-diagnose the problem. (DVI/HDMI/DP Mode) Problems No Picture Abnormal Sound (Only Audio-Input model) (Optional) Current Status Remedy LED ON Using OSD, adjust brightness and contrast to maximum or reset to their default settings. Check...

