
User Manual
Page 3
...Base view 16 Using the keyboard 18 Lock keys 18 Special keys 18 Hotkeys 19 EzelTM Hinge 20 Active Stylus 22 Fast-charging 22 Remove or insert the stylus 23 The Windows OS Desktop 25 Tips and hints for using Windows.......... 26 Where are my apps 26...Connecting to a wireless network.......... 42 Connecting to a wireless LAN 42 Connecting with a cable 46 Built-in network feature 46 ConceptD Palette 47 The ConceptD Palette main screen....... 47 Color profile setting 47 TrueHarmony setting 49 Performance control 49 Monitoring 50 Split Screen 50 App Center 51...
...Base view 16 Using the keyboard 18 Lock keys 18 Special keys 18 Hotkeys 19 EzelTM Hinge 20 Active Stylus 22 Fast-charging 22 Remove or insert the stylus 23 The Windows OS Desktop 25 Tips and hints for using Windows.......... 26 Where are my apps 26...Connecting to a wireless network.......... 42 Connecting to a wireless LAN 42 Connecting with a cable 46 Built-in network feature 46 ConceptD Palette 47 The ConceptD Palette main screen....... 47 Color profile setting 47 TrueHarmony setting 49 Performance control 49 Monitoring 50 Split Screen 50 App Center 51...
User Manual
Page 17
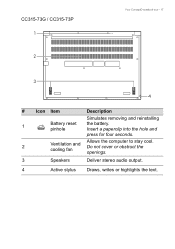
Insert a paperclip into the hole and press for four seconds. 2 Ventilation and cooling fan Allows the computer to stay cool. Do not cover or obstruct the openings. 3 Speakers Deliver stereo audio output. 4 Active stylus Draws, writes or highlights the text. CC315-73G / CC315-73P 1 2 Your ConceptD notebook tour - 17 3 4 # Icon Item Description Simulates removing and reinstalling 1 Battery reset pinhole the battery.
Insert a paperclip into the hole and press for four seconds. 2 Ventilation and cooling fan Allows the computer to stay cool. Do not cover or obstruct the openings. 3 Speakers Deliver stereo audio output. 4 Active stylus Draws, writes or highlights the text. CC315-73G / CC315-73P 1 2 Your ConceptD notebook tour - 17 3 4 # Icon Item Description Simulates removing and reinstalling 1 Battery reset pinhole the battery.
User Manual
Page 22
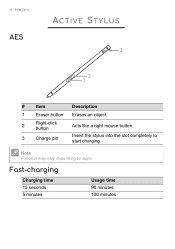
22 - Insert the stylus into the slot completely to start charging. Note Function may vary depending on apps. Fast-charging Charging time 15 seconds 5 minutes Usage time 90 minutes 100 minutes Active Stylus AES ACTIVE STYLUS 3 2 1 # Item Description 1 Eraser button Erases an object. 2 Right-click button 3 Charge pin Acts like a right mouse button.
22 - Insert the stylus into the slot completely to start charging. Note Function may vary depending on apps. Fast-charging Charging time 15 seconds 5 minutes Usage time 90 minutes 100 minutes Active Stylus AES ACTIVE STYLUS 3 2 1 # Item Description 1 Eraser button Erases an object. 2 Right-click button 3 Charge pin Acts like a right mouse button.
User Manual
Page 23
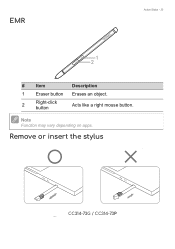
Note Function may vary depending on apps. EMR Active Stylus - 23 1 2 # Item Description 1 Eraser button Erases an object. 2 Right-click button Acts like a right mouse button. Remove or insert the stylus CC314-73G / CC314-73P
Note Function may vary depending on apps. EMR Active Stylus - 23 1 2 # Item Description 1 Eraser button Erases an object. 2 Right-click button Acts like a right mouse button. Remove or insert the stylus CC314-73G / CC314-73P
User Manual
Page 24
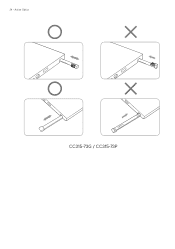
Active Stylus CC315-73G / CC315-73P 24 -
Active Stylus CC315-73G / CC315-73P 24 -


