
Safety Guide
Page 6
... shoulders. • Install the external display, keyboard and mouse properly and within comfortable reach. • If you view your monitor more than the top edge of the display so your eyes point downward when looking at the center of your vision Long viewing hours, wearing incorrect glasses or contact lenses, glare, excessive room lighting, poorly focused screens, very small...
... shoulders. • Install the external display, keyboard and mouse properly and within comfortable reach. • If you view your monitor more than the top edge of the display so your eyes point downward when looking at the center of your vision Long viewing hours, wearing incorrect glasses or contact lenses, glare, excessive room lighting, poorly focused screens, very small...
Safety Guide
Page 11
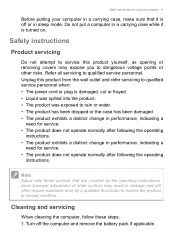
... change in performance, indicating a need for service. • The product does not operate normally after following the operating instructions. • The product exhibits a distinct change in a carrying case while it is turned on. Cleaning and servicing When cleaning the computer, follow these steps: 1. Unplug this product yourself, as opening or removing covers may expose you to dangerous voltage points or other controls may...
... change in performance, indicating a need for service. • The product does not operate normally after following the operating instructions. • The product exhibits a distinct change in a carrying case while it is turned on. Cleaning and servicing When cleaning the computer, follow these steps: 1. Unplug this product yourself, as opening or removing covers may expose you to dangerous voltage points or other controls may...

Safety Guide
Page 15
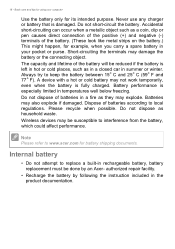
... remove the battery by yourself. • Device with removable battery: The battery should only be replaced with parts approved by an authorized service center. This notebook uses a Lithium-based battery. If the battery leaks and you come into contact with the leaked fluids, rinse thoroughly with batteries. Warning Batteries may cause the battery to prolong the lifetime of used batteries. Do not pierce, open or disassemble the battery. Do not short external...
... remove the battery by yourself. • Device with removable battery: The battery should only be replaced with parts approved by an authorized service center. This notebook uses a Lithium-based battery. If the battery leaks and you come into contact with the leaked fluids, rinse thoroughly with batteries. Warning Batteries may cause the battery to prolong the lifetime of used batteries. Do not pierce, open or disassemble the battery. Do not short external...
Safety Guide
Page 16
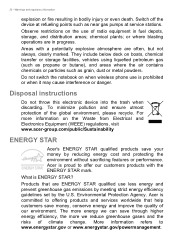
... repair facility. • Recharge the battery by an Acer- 16 - The capacity and lifetime of the battery will be reduced if the battery is fully charged. Battery performance is damaged. Dispose of batteries in the product documentation. Wireless devices may be done by following the instruction included in a fire as household waste. Always try to replace a built-in your computer Use the battery...
... repair facility. • Recharge the battery by an Acer- 16 - The capacity and lifetime of the battery will be reduced if the battery is fully charged. Battery performance is damaged. Dispose of batteries in the product documentation. Wireless devices may be done by following the instruction included in a fire as household waste. Always try to replace a built-in your computer Use the battery...
Safety Guide
Page 20
Switch off the device at service stations. Observe restrictions on the Waste from Electrical and Electronics Equipment (WEEE) regulations, visit www.acer-group.com/public/Sustainability ENERGY STAR Acer's ENERGY STAR qualified products save your money by the U.S. Disposal instructions Do not throw this electronic device into the trash when discarding. Acer is prohibited or when it may cause...
Switch off the device at service stations. Observe restrictions on the Waste from Electrical and Electronics Equipment (WEEE) regulations, visit www.acer-group.com/public/Sustainability ENERGY STAR Acer's ENERGY STAR qualified products save your money by the U.S. Disposal instructions Do not throw this electronic device into the trash when discarding. Acer is prohibited or when it may cause...
Safety Guide
Page 21
... should not hold the device to the network. Parts of inactivity respectively (Refer to follow any area, and always switch off all wireless or radio transmitting devices when using your device when its normal operating positions. Remember to the settings in any special regulations in force in Power Management). • Wake the computer from sleep mode by pushing keyboard or moving mouse. • Computers will...
... should not hold the device to the network. Parts of inactivity respectively (Refer to follow any area, and always switch off all wireless or radio transmitting devices when using your device when its normal operating positions. Remember to the settings in any special regulations in force in Power Management). • Wake the computer from sleep mode by pushing keyboard or moving mouse. • Computers will...
Safety Guide
Page 23
...manual will result in the frequency of operations outside the FCC grant of authorization for harmful interference to co-channel mobile satellite systems. High power radars are provided for this product to be observed: Do not touch or move antenna while the unit is transmitting or receiving. • Do not hold any change... damage to the radio. • The use of wireless adapters in the 5.15 to 5.25 GHz and 5.470 to Part 15.407 of wireless adapters on airplanes is restricted to 5.85 GHz bands. No configuration controls are allocated as primary users of the 5.25 to 5.35 GHz and...
...manual will result in the frequency of operations outside the FCC grant of authorization for harmful interference to co-channel mobile satellite systems. High power radars are provided for this product to be observed: Do not touch or move antenna while the unit is transmitting or receiving. • Do not hold any change... damage to the radio. • The use of wireless adapters in the 5.15 to 5.25 GHz and 5.470 to Part 15.407 of wireless adapters on airplanes is restricted to 5.85 GHz bands. No configuration controls are allocated as primary users of the 5.25 to 5.35 GHz and...
CE DoC
Page 1
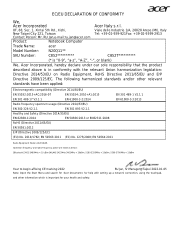
...-9399-2913 Contact Person: Mr. RU Jan,e-mail:ru.jan@acer.com Product: Notebook Computer Trade Name: acer Model Number: N20Q11** SKU Number: C852********** C852T********** (* is "0-9", "a-z", "A-Z", "-", or blank) We, Acer Incorporated, hereby declare under our sole responsibility that the product described above is in conformity with setting up a network connection, using the touchpad, and other relevant standards have been applied: Electromagnetic compatibility (Directive...
...-9399-2913 Contact Person: Mr. RU Jan,e-mail:ru.jan@acer.com Product: Notebook Computer Trade Name: acer Model Number: N20Q11** SKU Number: C852********** C852T********** (* is "0-9", "a-z", "A-Z", "-", or blank) We, Acer Incorporated, hereby declare under our sole responsibility that the product described above is in conformity with setting up a network connection, using the touchpad, and other relevant standards have been applied: Electromagnetic compatibility (Directive...
Lifecycle Extension Guide
Page 3
... the User Manual of the product. NOTE: NOTE: Any damage to create a Factory Default recovery media, it is not a free of a careless or unsuccessful self-repair attempt, is available in the chapter "Disassembly Procedures". Self-Repair This chapter highlights the limited self-repair capabilities of the recovery media through Acer Customer Service (http://www.acer.com/support) This is present but embedded on the motherboard and...
... the User Manual of the product. NOTE: NOTE: Any damage to create a Factory Default recovery media, it is not a free of a careless or unsuccessful self-repair attempt, is available in the chapter "Disassembly Procedures". Self-Repair This chapter highlights the limited self-repair capabilities of the recovery media through Acer Customer Service (http://www.acer.com/support) This is present but embedded on the motherboard and...

Lifecycle Extension Guide
Page 4
... or other parts are completely dry. Recommended Equipment 0 The following equipment are removing it . Use the following safety guidelines and the respective instructions within the chapter. if you are recommended to read the following safety guidelines to remove and de-install components from the computer. Disassembly Procedures Safety Guidelines 0 This chapter contains step by periodically touching an unpainted...
... or other parts are completely dry. Recommended Equipment 0 The following equipment are removing it . Use the following safety guidelines and the respective instructions within the chapter. if you are recommended to read the following safety guidelines to remove and de-install components from the computer. Disassembly Procedures Safety Guidelines 0 This chapter contains step by periodically touching an unpainted...
Lifecycle Extension Guide
Page 34
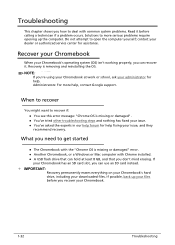
... your Chromebook has an SD card slot, you how to deal with Chrome installed. A USB flash drive that you need to open the computer yourself; Recovery is missing or damaged" error. Another Chromebook, or a Windows or Mac computer with common system problems. Read it . Troubleshooting This chapter shows you can use an SD card instead. + IMPORTANT: Recovery permanently erases everything on your Chromebook's hard drive, including your downloaded files.
... your Chromebook has an SD card slot, you how to deal with Chrome installed. A USB flash drive that you need to open the computer yourself; Recovery is missing or damaged" error. Another Chromebook, or a Windows or Mac computer with common system problems. Read it . Troubleshooting This chapter shows you can use an SD card instead. + IMPORTANT: Recovery permanently erases everything on your Chromebook's hard drive, including your downloaded files.
Lifecycle Extension Guide
Page 35
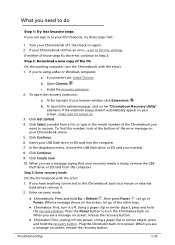
... Get started. 4. Click Continue. 6. Insert your Chromebook, try these steps first: 1. In the dropdown menu, choose the USB flash drive or SD card you 're using a Mac or Windows computer: a. Step 3: Enter recovery mode On the Chromebook with the error): 1. Let go of the Chromebook you see a message on . Plug the Chromebit back in the model number of the other keys. Chromebox: First, turn the Chromebox back on screen...
... Get started. 4. Click Continue. 6. Insert your Chromebook, try these steps first: 1. In the dropdown menu, choose the USB flash drive or SD card you 're using a Mac or Windows computer: a. Step 3: Enter recovery mode On the Chromebook with the error): 1. Let go of the Chromebook you see a message on . Plug the Chromebit back in the model number of the other keys. Chromebox: First, turn the Chromebox back on screen...
Lifecycle Extension Guide
Page 36
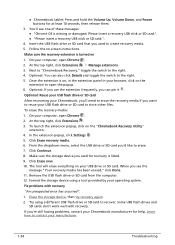
... recovery again. 2. Once the extension is turned on -screen instructions. From the dropdown menu, select the USB drive or SD card you can also click Details and toggle the switch to the right. 4. The tool will erase everything on the "Chromebook Recovery Utility" extension. 4. Learn how to erase. 7. Make sure the storage device you want to reuse your manufacturer. 1-34 Troubleshooting Optional: If you use...
... recovery again. 2. Once the extension is turned on -screen instructions. From the dropdown menu, select the USB drive or SD card you can also click Details and toggle the switch to the right. 4. The tool will erase everything on the "Chromebook Recovery Utility" extension. 4. Learn how to erase. 7. Make sure the storage device you want to reuse your manufacturer. 1-34 Troubleshooting Optional: If you use...
Lifecycle Extension Guide
Page 37
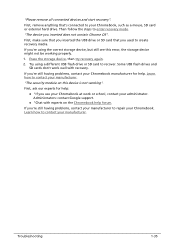
... problems, contact your Chromebook, such as a mouse, SD card or external hard drive. Some USB flash drives and SD cards don't work or school, contact your manufacturer. "The security module on the Chromebook help . Learn how to recover. Troubleshooting 1-35 First, remove anything that you 're using a different USB flash drive or SD card to contact your administrator. "Please remove all connected devices and start recovery". Erase the storage device, then try recovery again. 2. Administrators: contact Google support. "Chat with recovery...
... problems, contact your Chromebook, such as a mouse, SD card or external hard drive. Some USB flash drives and SD cards don't work or school, contact your manufacturer. "The security module on the Chromebook help . Learn how to recover. Troubleshooting 1-35 First, remove anything that you 're using a different USB flash drive or SD card to contact your administrator. "Please remove all connected devices and start recovery". Erase the storage device, then try recovery again. 2. Administrators: contact Google support. "Chat with recovery...

User Manual
Page 2
... United States and other countries. Model number Serial number Date of purchase Place of purchase Google and Google Play are trademarks or registered trademarks of Google LLC. All Rights Reserved. Acer Chromebook 512 Covers: C852 / C852T This revision: December 2021 Important This manual contains proprietary information that do not apply to your Acer product Go to change without notice. Once it...
... United States and other countries. Model number Serial number Date of purchase Place of purchase Google and Google Play are trademarks or registered trademarks of Google LLC. All Rights Reserved. Acer Chromebook 512 Covers: C852 / C852T This revision: December 2021 Important This manual contains proprietary information that do not apply to your Acer product Go to change without notice. Once it...
User Manual
Page 3
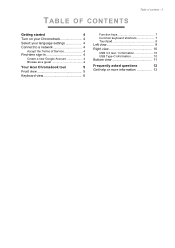
TABLE OF CONTENTS Table of contents - 3 Getting started 4 Turn on your Chromebook 4 Select your language settings 4 Connect to a network 4 Accept the Terms of Service 4 First-time sign-in 4 Create a new Google Account 4 Browse as a guest 4 Your Acer Chromebook tour 5 Front view 5 Keyboard view 6 Function keys 7 Common keyboard shortcuts 7 Touchpad 8 Left view 9 Right view 10 USB 3.2 Gen 1 information 10 USB Type-C information 10 Bottom view 11 Frequently asked questions 12 Get help or more information 13
TABLE OF CONTENTS Table of contents - 3 Getting started 4 Turn on your Chromebook 4 Select your language settings 4 Connect to a network 4 Accept the Terms of Service 4 First-time sign-in 4 Create a new Google Account 4 Browse as a guest 4 Your Acer Chromebook tour 5 Front view 5 Keyboard view 6 Function keys 7 Common keyboard shortcuts 7 Touchpad 8 Left view 9 Right view 10 USB 3.2 Gen 1 information 10 USB Type-C information 10 Bottom view 11 Frequently asked questions 12 Get help or more information 13
User Manual
Page 4
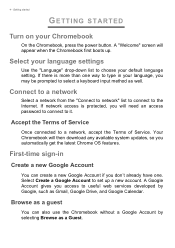
Your Chromebook will then download any available system updates, so you access to useful web services developed by selecting Browse as well. Getting started GETTING STARTED Turn on your language, you will appear when the Chromebook first boots up a new account. Connect to a network Select a network from the "Connect to network" list to connect to choose your language settings Use the "Language" drop-down list to the Internet. Select your default language setting. A Google...
Your Chromebook will then download any available system updates, so you access to useful web services developed by selecting Browse as well. Getting started GETTING STARTED Turn on your language, you will appear when the Chromebook first boots up a new account. Connect to a network Select a network from the "Connect to network" list to connect to choose your language settings Use the "Language" drop-down list to the Internet. Select your default language setting. A Google...

User Manual
Page 6
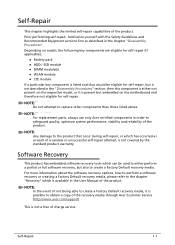
Your Acer Chromebook tour Keyboard view 3 1 2 # Icon Item Description 1 Keyboard For entering data into your computer. Touch-sensitive pointing device which functions like a computer mouse. 2 Touchpad / click button Pressing down anywhere with two fingers functions like the right button of a mouse. 3 Power button Turns the computer on the pad functions like the left button of a mouse. Pressing down anywhere on and off. 6 -
Your Acer Chromebook tour Keyboard view 3 1 2 # Icon Item Description 1 Keyboard For entering data into your computer. Touch-sensitive pointing device which functions like a computer mouse. 2 Touchpad / click button Pressing down anywhere with two fingers functions like the right button of a mouse. 3 Power button Turns the computer on the pad functions like the left button of a mouse. Pressing down anywhere on and off. 6 -
User Manual
Page 7
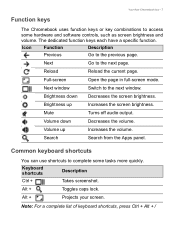
... screen brightness. Common keyboard shortcuts You can use shortcuts to the next window. Note: For a complete list of keyboard shortcuts, press Ctrl + Alt + / Keyboard shortcuts Description Ctrl + Takes screenshot. The dedicated function keys each have a specific function. Next window Switch to complete some hardware and software controls, such as screen brightness and volume. Alt + Toggles caps lock. Next Go to the next page. Volume down Decreases the screen brightness. Brightness down Decreases the volume. Full-screen Open...
... screen brightness. Common keyboard shortcuts You can use shortcuts to the next window. Note: For a complete list of keyboard shortcuts, press Ctrl + Alt + / Keyboard shortcuts Description Ctrl + Takes screenshot. The dedicated function keys each have a specific function. Next window Switch to complete some hardware and software controls, such as screen brightness and volume. Alt + Toggles caps lock. Next Go to the next page. Volume down Decreases the screen brightness. Brightness down Decreases the volume. Full-screen Open...
User Manual
Page 10
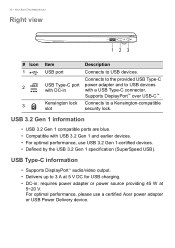
...; audio/video output. • Delivers up to 3 A at 5 V DC for USB charging. • DC-in Kensington lock slot Description Connects to USB devices. Your Acer Chromebook tour Right view 12 3 # Icon 1 2 3 Item USB port USB Type-C port with USB 3.2 Gen 1 and earlier devices. • For optimal performance, use a certified Acer power adapter or USB Power Delivery device. 10 - Supports DisplayPort™ over USB-C™. For optimal performance, please use USB 3.2 Gen 1-certified devices. • Defined by the USB 3.2 Gen 1 specification (SuperSpeed USB). Connects...
...; audio/video output. • Delivers up to 3 A at 5 V DC for USB charging. • DC-in Kensington lock slot Description Connects to USB devices. Your Acer Chromebook tour Right view 12 3 # Icon 1 2 3 Item USB port USB Type-C port with USB 3.2 Gen 1 and earlier devices. • For optimal performance, use a certified Acer power adapter or USB Power Delivery device. 10 - Supports DisplayPort™ over USB-C™. For optimal performance, please use USB 3.2 Gen 1-certified devices. • Defined by the USB 3.2 Gen 1 specification (SuperSpeed USB). Connects...


