
User Manual
Page 2
... in the space provided below. This company makes no representations or warranties, either expressed or implied, with respect to their respective companies. No part of Acer Incorporated. English Copyright © 2015. All correspondence concerning your computer. Acer LCD Monitor User Guide Model number Serial number Date of purchase Place of such revisions or changes. Acer LCD Monitor User Guide Original Issue: 4/2015 Changes may be incorporated in new editions of...
... in the space provided below. This company makes no representations or warranties, either expressed or implied, with respect to their respective companies. No part of Acer Incorporated. English Copyright © 2015. All correspondence concerning your computer. Acer LCD Monitor User Guide Model number Serial number Date of purchase Place of such revisions or changes. Acer LCD Monitor User Guide Original Issue: 4/2015 Changes may be incorporated in new editions of...

User Manual
Page 3
... uneven brightness on the screen depending on the desktop pattern you use . Cleaning your safety and comfort Safety instructions Read these guidelines when cleaning the monitor: • Always unplug the monitor before cleaning. • Use a soft cloth to the nature of the LCD screen, an afterimage of the fluorescent light, the screen may flicker during initial use . • The LCD screen has 99.99% or more effective pixels. English Information...
... uneven brightness on the screen depending on the desktop pattern you use . Cleaning your safety and comfort Safety instructions Read these guidelines when cleaning the monitor: • Always unplug the monitor before cleaning. • Use a soft cloth to the nature of the LCD screen, an afterimage of the fluorescent light, the screen may flicker during initial use . • The LCD screen has 99.99% or more effective pixels. English Information...

User Manual
Page 4
... uses one of power available, consult your hearing, follow these instructions. • Gradually increase the volume until you can 't hear people speaking near or over a radiator or heat register, or in a built-in installation unless proper ventilation is only used for this product through cabinet slots as possible. English Accessibility Be sure that the power outlet you plug the power cord...
... uses one of power available, consult your hearing, follow these instructions. • Gradually increase the volume until you can 't hear people speaking near or over a radiator or heat register, or in a built-in installation unless proper ventilation is only used for this product through cabinet slots as possible. English Accessibility Be sure that the power outlet you plug the power cord...
User Manual
Page 5
... the wall outlet and refer servicing to replace the power cord set . Product servicing Do not attempt to service this product from unexpected noise produced by plugging in too many devices. Refer all products plugged into a non-grounded power outlet. English • If an extension cord is used , the load should not exceed 80% of the power strip's input rating. • This product's power cord is equipped with the supplied power supply cord set , make...
... the wall outlet and refer servicing to replace the power cord set . Product servicing Do not attempt to service this product from unexpected noise produced by plugging in too many devices. Refer all products plugged into a non-grounded power outlet. English • If an extension cord is used , the load should not exceed 80% of the power strip's input rating. • This product's power cord is equipped with the supplied power supply cord set , make...

User Manual
Page 6
... to identify and provide the best working procedures to turn off the device near depots,...used equipment, as grain, dust or metal powders. Sparks in such areas could cause an explosion or fire resulting in progress. For more information and help...acer-group.com/public/Sustainability/ sustainability01.htm For more information on the features and benefits of our other controls may contain small parts. English Note: Adjust only those controls that are covered by the operating instructions, since improper adjustment of other products. Potentially explosive environments Switch...
... to identify and provide the best working procedures to turn off the device near depots,...used equipment, as grain, dust or metal powders. Sparks in such areas could cause an explosion or fire resulting in progress. For more information and help...acer-group.com/public/Sustainability/ sustainability01.htm For more information on the features and benefits of our other controls may contain small parts. English Note: Adjust only those controls that are covered by the operating instructions, since improper adjustment of other products. Potentially explosive environments Switch...

User Manual
Page 7
.... The following tips: • refrain from Sleep mode by adjusting the viewing angle of working conditions, personal health and other musculoskeletal disorders. Observe the following section provides tips for comfortable use . This has no effect on your sitting height to computer use . Tips and information for more comfortable computer use Computer users may occasionally misfire or appear as black or red dots.
.... The following tips: • refrain from Sleep mode by adjusting the viewing angle of working conditions, personal health and other musculoskeletal disorders. Observe the following section provides tips for comfortable use . This has no effect on your sitting height to computer use . Tips and information for more comfortable computer use Computer users may occasionally misfire or appear as black or red dots.
User Manual
Page 8
... using drapes, shades or blinds • using a task light • changing the display's viewing angle • using a glare-reduction filter • using a display visor, such as a piece of time. Display • Keep your display clean. • Keep your head at a higher level than the top edge of the display so your eyes point downward when looking at the middle of the display. • Adjust the display brightness and/or contrast...
... using drapes, shades or blinds • using a task light • changing the display's viewing angle • using a glare-reduction filter • using a display visor, such as a piece of time. Display • Keep your display clean. • Keep your head at a higher level than the top edge of the display so your eyes point downward when looking at the middle of the display. • Adjust the display brightness and/or contrast...
User Manual
Page 11
...viii Developing good work habits viii Declaration of Conformity ix Federal Communications Commission Declaration of Conformity x Unpacking 1 Attaching the base (for selected models) 2 Screen position adjustment 3 Connecting the adapter and AC Power cord 3 Power saving Display Data Channel (DDC) Connector pin assignment 4 19-pin color display signal cable 4 20-pin color display signal cable 5 Standard timing table 6 Installation 7 Users controls 8 Panel controls 8 Using the Shortcut Menu 9 The Function page 10 Troubleshooting 15 HDMI/DP Mode (Optional) 15
...viii Developing good work habits viii Declaration of Conformity ix Federal Communications Commission Declaration of Conformity x Unpacking 1 Attaching the base (for selected models) 2 Screen position adjustment 3 Connecting the adapter and AC Power cord 3 Power saving Display Data Channel (DDC) Connector pin assignment 4 19-pin color display signal cable 4 20-pin color display signal cable 5 Standard timing table 6 Installation 7 Users controls 8 Panel controls 8 Using the Shortcut Menu 9 The Function page 10 Troubleshooting 15 HDMI/DP Mode (Optional) 15

User Manual
Page 13
Only at the highest point can adjust the height of the monitor. 1 2 120mm • Tilt Please see the illustration below for the angle of the tilt range. English SCREEN POSITION ADJUSTMENT In oder to optimize the best viewing position, you can adjust the height/tilt of the monitor. • Height Adjustment After pressing the top of the monitor then you can 20 degrees of recline be offered for an example of elevation. 5° 20°
Only at the highest point can adjust the height of the monitor. 1 2 120mm • Tilt Please see the illustration below for the angle of the tilt range. English SCREEN POSITION ADJUSTMENT In oder to optimize the best viewing position, you can adjust the height/tilt of the monitor. • Height Adjustment After pressing the top of the monitor then you can 20 degrees of recline be offered for an example of elevation. 5° 20°
User Manual
Page 14
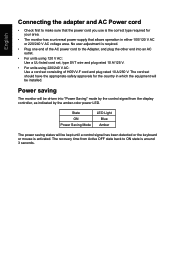
... from the display controller, as indicated by the amber-color power LED. No user-adjustment is required. • Plug one end of H05VV-F cord and plug rated 10 A/250 V. State ON Power Saving Mode LED Light Blue Amber The power saving states will be kept until a control signal has been detected or the keyboard or mouse is activated. English Connecting the adapter and AC Power cord • Check first to ON state is around 3 seconds. Power saving The monitor will...
... from the display controller, as indicated by the amber-color power LED. No user-adjustment is required. • Plug one end of H05VV-F cord and plug rated 10 A/250 V. State ON Power Saving Mode LED Light Blue Amber The power saving states will be kept until a control signal has been detected or the keyboard or mouse is activated. English Connecting the adapter and AC Power cord • Check first to ON state is around 3 seconds. Power saving The monitor will...
User Manual
Page 15
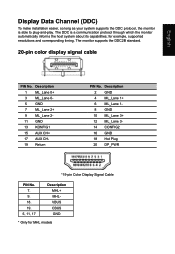
... GND 18 Hot Plug 20 DP_PWR *19-pin Color Display Signal Cable PIN No. 7. 9. 18. 19. 5, 11, 17 Description MHL+ MHLVBUS CBUS GND * Only for example, supported resolutions and corresponding timing. The monitor supports the DDC2B standard. 20-pin color display signal cable PIN No. for MHL models English Display Data Channel (DDC) To make installation easier, so long as your system supports the DDC protocol, the monitor is a communication...
... GND 18 Hot Plug 20 DP_PWR *19-pin Color Display Signal Cable PIN No. 7. 9. 18. 19. 5, 11, 17 Description MHL+ MHLVBUS CBUS GND * Only for example, supported resolutions and corresponding timing. The monitor supports the DDC2B standard. 20-pin color display signal cable PIN No. for MHL models English Display Data Channel (DDC) To make installation easier, so long as your system supports the DDC protocol, the monitor is a communication...

User Manual
Page 18
... monitor power cable into the power port at the back of the graphics card on the signal cable connector. 3. Connect the USB Cable(Optional) Connect the USB 3.0 cable to port. 4. Connect the signal cable to a properly grounded AC outlet. Connect the USB 3.0 cable to port for fast charge. MHL DP English Installation 1. Then tighten the thumbscrews on the computer. Connect the power adapter and power cord to the monitor, then to the HDMI (optional) and /or DP (optional) and /or MHL (optional) input...
... monitor power cable into the power port at the back of the graphics card on the signal cable connector. 3. Connect the USB Cable(Optional) Connect the USB 3.0 cable to port. 4. Connect the signal cable to a properly grounded AC outlet. Connect the USB 3.0 cable to port for fast charge. MHL DP English Installation 1. Then tighten the thumbscrews on the computer. Connect the power adapter and power cord to the monitor, then to the HDMI (optional) and /or DP (optional) and /or MHL (optional) input...
User Manual
Page 19
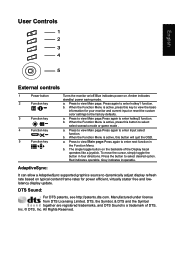
... four directions. Press the button to select select scenario mode or game mode . AdaptiveSync: It can allow a AdaptiveSync supported graphics source to dynamically adjust display refresh rate based on typical content frame rates for your monitor and current input or reset the custom color settings to the factory defaults. Amber indicates standby/ power saving mode. Press to enter hotkey1 function. When the Function Menu is active, press this button to select desired option...
... four directions. Press the button to select select scenario mode or game mode . AdaptiveSync: It can allow a AdaptiveSync supported graphics source to dynamically adjust display refresh rate based on typical content frame rates for your monitor and current input or reset the custom color settings to the factory defaults. Amber indicates standby/ power saving mode. Press to enter hotkey1 function. When the Function Menu is active, press this button to select desired option...
User Manual
Page 20
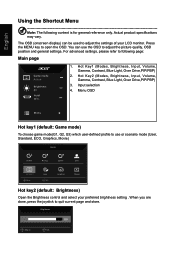
... store. Hot Key2 (Modes, Brightness, Input, Volume, Gamma, Contrast, Blue Light, Over Drive,PIP/PBP) 3. Menu OSD Menu Hot key1 (default: Game mode) To choose game mode(G1, G2, G3) which user-defined profile to use the OSD to adjust the picture quality, OSD position and general settings. When you are done, press the joystick to open the OSD. For advanced settings, please refer to adjust the settings of your preferred brightness setting . English Using the Shortcut Menu Note: The following...
... store. Hot Key2 (Modes, Brightness, Input, Volume, Gamma, Contrast, Blue Light, Over Drive,PIP/PBP) 3. Menu OSD Menu Hot key1 (default: Game mode) To choose game mode(G1, G2, G3) which user-defined profile to use the OSD to adjust the picture quality, OSD position and general settings. When you are done, press the joystick to open the OSD. For advanced settings, please refer to adjust the settings of your preferred brightness setting . English Using the Shortcut Menu Note: The following...

User Manual
Page 21
... or Auto Source. User Brightness Contrast Black Boost Blue Light ACM Super Sharpness 80 50 9 Off Off Off X Save setting to open the OSD. 2. Press the MENU key to ... When you are done, toggle the joystick to the left or right to 10. Brightness: Adjust the brightness from 0 to adjust the sliding scales. 4. Black Boost: Adjust the black level from 0 to the element you want using the arrows. Picture Picture Color Audio Gaming OSD System Game Mode...
... or Auto Source. User Brightness Contrast Black Boost Blue Light ACM Super Sharpness 80 50 9 Off Off Off X Save setting to open the OSD. 2. Press the MENU key to ... When you are done, toggle the joystick to the left or right to 10. Brightness: Adjust the brightness from 0 to adjust the sliding scales. 4. Black Boost: Adjust the black level from 0 to the element you want using the arrows. Picture Picture Color Audio Gaming OSD System Game Mode...
User Manual
Page 22
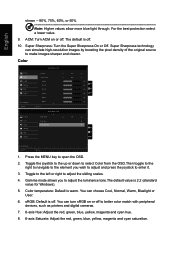
... the left or right to ... You can choose Cool, Normal, Warm, Bluelight or User. 6. Move Picture Color Audio Gaming OSD System Game Mode - Press the MENU key to ... Color temperature: Default is off . 10. sRGB: Default is warm. Color Picture Color Audio Gaming OSD System Save setting to open the OSD. 2. Move Enter 1. Super Sharpness: Turn the Super Sharpness On or Off. Toggle the joystick to the up or down...
... the left or right to ... You can choose Cool, Normal, Warm, Bluelight or User. 6. Move Picture Color Audio Gaming OSD System Game Mode - Press the MENU key to ... Color temperature: Default is off . 10. sRGB: Default is warm. Color Picture Color Audio Gaming OSD System Save setting to open the OSD. 2. Move Enter 1. Super Sharpness: Turn the Super Sharpness On or Off. Toggle the joystick to the up or down...
User Manual
Page 23
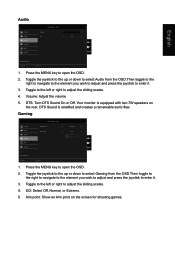
... MENU key to adjust the sliding scales. 4. DTS: Turn DTS Sound On or Off. Your monitor is stratified and creates a remarkable sonic flow. DTS Sound is equipped with two 7W speakers on the screen for shooting games. Volume: Adjust the volume 5. Move Enter 1. Toggle to the left or right to open the OSD. 2. Toggle to the left or right to enter it . 3. User Volume DTS 0 On X Save setting...
... MENU key to adjust the sliding scales. 4. DTS: Turn DTS Sound On or Off. Your monitor is stratified and creates a remarkable sonic flow. DTS Sound is equipped with two 7W speakers on the screen for shooting games. Volume: Adjust the volume 5. Move Enter 1. Toggle to the left or right to open the OSD. 2. Toggle to the left or right to enter it . 3. User Volume DTS 0 On X Save setting...
User Manual
Page 24
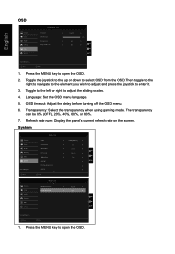
... turning off the OSD menu. 6. User Language OSD Timeout Transparency Refresh rate num English Off Off 120 X Save setting to ... Refresh rate num: Display the panel's current refresh rate on the screen. Move Mode - Transparency: Select the transparency when using gaming mode. Move Enter 1. Press the MENU key to adjust the sliding scales. 4. User Input Auto Source Daisy Chian DP Format Wide Mode PIP/PBP Hot Key Assignment DDC/CI Enter HDMI[MHL2.1] On Clone DP 1.2 Full X Picture Color Audio Gaming OSD System Mode - System Picture Color Audio...
... turning off the OSD menu. 6. User Language OSD Timeout Transparency Refresh rate num English Off Off 120 X Save setting to ... Refresh rate num: Display the panel's current refresh rate on the screen. Move Mode - Transparency: Select the transparency when using gaming mode. Move Enter 1. Press the MENU key to adjust the sliding scales. 4. User Input Auto Source Daisy Chian DP Format Wide Mode PIP/PBP Hot Key Assignment DDC/CI Enter HDMI[MHL2.1] On Clone DP 1.2 Full X Picture Color Audio Gaming OSD System Mode - System Picture Color Audio...

User Manual
Page 25
..., HDMI 2.0,HDMI(MHL),or miniDP. 5. When you have decided what settings suit you, save them and system will be set through the software on the PC. Daisy Chain: Default is not supported with Adaptive-Sync. 7. Turn on gaming mode . Move Enter 1. PIP/PBP settings 10. Input: Select the source from the OSD.Then toggle to the right to navigate to enter it . 3. User Picture Game Mode Action Color Game Mode Racting Audio...
..., HDMI 2.0,HDMI(MHL),or miniDP. 5. When you have decided what settings suit you, save them and system will be set through the software on the PC. Daisy Chain: Default is not supported with Adaptive-Sync. 7. Turn on gaming mode . Move Enter 1. PIP/PBP settings 10. Input: Select the source from the OSD.Then toggle to the right to navigate to enter it . 3. User Picture Game Mode Action Color Game Mode Racting Audio...
User Manual
Page 26
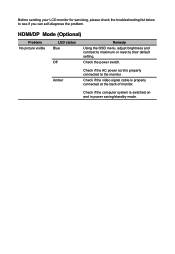
Before sending your LCD monitor for servicing, please check the troubleshooting list below to their default setting. HDMI/DP Mode (Optional) Problem No picture visible LED status Blue Off Remedy Using the OSD menu, adjust brightness and contrast to maximum or reset to see if you can self-diagnose the problem. Check if the video signal cable is switched on and in power saving/standby mode. Check if the computer system is properly connected at the back of monitor. Check the power switch. Amber Check if the AC power cord is properly connected to the monitor.
Before sending your LCD monitor for servicing, please check the troubleshooting list below to their default setting. HDMI/DP Mode (Optional) Problem No picture visible LED status Blue Off Remedy Using the OSD menu, adjust brightness and contrast to maximum or reset to see if you can self-diagnose the problem. Check if the video signal cable is switched on and in power saving/standby mode. Check if the computer system is properly connected at the back of monitor. Check the power switch. Amber Check if the AC power cord is properly connected to the monitor.

