Acer Aspire 5517 Series Service Guide
Page 7
...Keyboard 12 Lock Keys and embedded numeric keypad 12 Windows Keys 13 Hot Keys 14 Special Key 15 Using the System Utilities 16 Acer GridVista (dual-display compatible 16 Hardware Specifications and Configurations 17 System Utilities 25 BIOS Setup Utility 25 Navigating the BIOS Utility 25 Aspire 5517 BIOS 26 Information 26 Main 27 Security 28 Boot 31 Exit 32 BIOS Flash Utilities 33 DOS Flash Utility 34 WinFlash Utility 35 Remove HDD/BIOS Password Utilities 36 Machine Disassembly and Replacement 41 Disassembly Requirements 41 Pre-disassembly Instructions 42 Disassembly...
...Keyboard 12 Lock Keys and embedded numeric keypad 12 Windows Keys 13 Hot Keys 14 Special Key 15 Using the System Utilities 16 Acer GridVista (dual-display compatible 16 Hardware Specifications and Configurations 17 System Utilities 25 BIOS Setup Utility 25 Navigating the BIOS Utility 25 Aspire 5517 BIOS 26 Information 26 Main 27 Security 28 Boot 31 Exit 32 BIOS Flash Utilities 33 DOS Flash Utility 34 WinFlash Utility 35 Remove HDD/BIOS Password Utilities 36 Machine Disassembly and Replacement 41 Disassembly Requirements 41 Pre-disassembly Instructions 42 Disassembly...
Acer Aspire 5517 Series Service Guide
Page 9
... Contents External Mouse Failure 133 Other Failures 133 Intermittent Problems 134 Undetermined Problems 134 Post Codes 135 Jumper and Connector Locations 139 Top View 139 Bottom View 140 Power Board 141 Clearing Password Check and BIOS Recovery 142 Clearing Password Check 142 Clear CMOS Jumper 142 BIOS Recovery by Crisis Disk 143 FRU (Field Replaceable Unit) List 145 Aspire 5517 Exploded Diagrams 146 Main Assembly 146 Base Assembly 148 Rear Assembly 149 Aspire 5517 FRU List 150 Model Definition and Configuration 160 Test Compatible...
... Contents External Mouse Failure 133 Other Failures 133 Intermittent Problems 134 Undetermined Problems 134 Post Codes 135 Jumper and Connector Locations 139 Top View 139 Bottom View 140 Power Board 141 Clearing Password Check and BIOS Recovery 142 Clearing Password Check 142 Clear CMOS Jumper 142 BIOS Recovery by Crisis Disk 143 FRU (Field Replaceable Unit) List 145 Aspire 5517 Exploded Diagrams 146 Main Assembly 146 Base Assembly 148 Rear Assembly 149 Aspire 5517 FRU List 150 Model Definition and Configuration 160 Test Compatible...
Acer Aspire 5517 Series Service Guide
Page 17
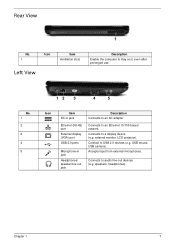
... use. Rear View 1 No. 1 Icon Item Ventilation slots Left View Description Enable the computer to audio line-out devices (e.g. Connect to a display device (e.g. Connects to USB 2.0 devices (e.g. external monitor, LCD projector). Accepts input from external microphones. Chapter 1 7 USB mouse, USB camera). speakers, headphones). No. 1 2 2 4 5 12 3 4 5 Icon Item DC-in jack Ethernet (RJ-45) port External display (VGA) port USB 2.0 ports Microphone-in jack Headphones/ speaker/line-out jack Description Connects to an AC adapter Connects to an Ethernet 10/100-based network...
... use. Rear View 1 No. 1 Icon Item Ventilation slots Left View Description Enable the computer to audio line-out devices (e.g. Connect to a display device (e.g. Connects to USB 2.0 devices (e.g. external monitor, LCD projector). Accepts input from external microphones. Chapter 1 7 USB mouse, USB camera). speakers, headphones). No. 1 2 2 4 5 12 3 4 5 Icon Item DC-in jack Ethernet (RJ-45) port External display (VGA) port USB 2.0 ports Microphone-in jack Headphones/ speaker/line-out jack Description Connects to an AC adapter Connects to an Ethernet 10/100-based network...
Acer Aspire 5517 Series Service Guide
Page 35
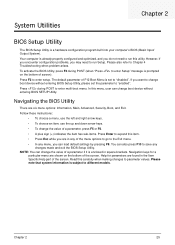
... to run Setup. Navigation keys for parameters are in any of the screen. System Utilities Chapter 2 BIOS Setup Utility The BIOS Setup Utility is already properly configured and optimized, and you do not need to "enabled". However, if you encounter configuration problems, you are found in square brackets. In this carefully when making changes to different models. Please also refer to enter setup. Read this menu, user can also press F10 to enter multi-boot menu...
... to run Setup. Navigation keys for parameters are in any of the screen. System Utilities Chapter 2 BIOS Setup Utility The BIOS Setup Utility is already properly configured and optimized, and you do not need to "enabled". However, if you encounter configuration problems, you are found in square brackets. In this carefully when making changes to different models. Please also refer to enter setup. Read this menu, user can also press F10 to enter multi-boot menu...
Acer Aspire 5517 Series Service Guide
Page 36
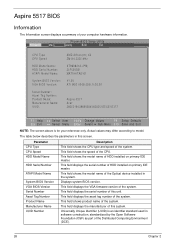
... Setup Utility Security Boot Exit CPU Type CPU Speed HDD Model Name: HDD Serial Number: ATAPI Model Name: System BIOS Version: VGA BIOS Version: Serial Number: Asset Tag Number: Product Name: Manufacturer Name: UUID: AMD Athlon(tm) X2 ZM-84 2300 Mhz ST960821A-(PM) 3LF005DB MATSHITADVD V1.00 ATI M92 V008.050I.0-26.00 Aspire 5517 Acer 39353164386665643635001EECE1D377 F1 Help Esc Exit Select Item F5/F6 Change Values F9 Setup Defaults Select Menu Enter Select Sub-Menu...
... Setup Utility Security Boot Exit CPU Type CPU Speed HDD Model Name: HDD Serial Number: ATAPI Model Name: System BIOS Version: VGA BIOS Version: Serial Number: Asset Tag Number: Product Name: Manufacturer Name: UUID: AMD Athlon(tm) X2 ZM-84 2300 Mhz ST960821A-(PM) 3LF005DB MATSHITADVD V1.00 ATI M92 V008.050I.0-26.00 Aspire 5517 Acer 39353164386665643635001EECE1D377 F1 Help Esc Exit Select Item F5/F6 Change Values F9 Setup Defaults Select Menu Enter Select Sub-Menu...
Acer Aspire 5517 Series Service Guide
Page 37
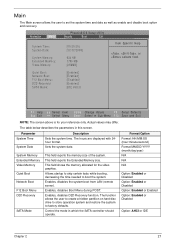
... Exit NOTE: The screen above is for the video graphics. The hours are displayed with 24hour format. The function allows the user to create a hidden partition on hard disc drive to store operation system and restore the system to boot the system. Parameter System Time System Date System Memory Extended Memory Video Memory Quiet Boot Network Boot F12 Boot Menu D2D Recovery SATA Mode Description Sets the system time. Enables, disables the system boot from LAN (remote server). Format/Option Format: HH...
... Exit NOTE: The screen above is for the video graphics. The hours are displayed with 24hour format. The function allows the user to create a hidden partition on hard disc drive to store operation system and restore the system to boot the system. Parameter System Time System Date System Memory Extended Memory Video Memory Quiet Boot Network Boot F12 Boot Menu D2D Recovery SATA Mode Description Sets the system time. Enables, disables the system boot from LAN (remote server). Format/Option Format: HH...
Acer Aspire 5517 Series Service Guide
Page 38
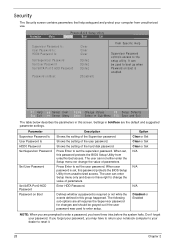
... enter the Setup menu nor change the value of parameters. Information M a i n PhoenixBIOS Setup Utility Security Boot Exit Supervisor Password Is: User Password Is: HDD0 Password Is: Set Supervisor Password Set User Password Set SATA Port 0 HDD Password Password on Boot: Clear Clear Clear [Enter] [Enter] [Enter] [Disabled] Item Specific Help Supervisor Password controls access to enter a password, you are the default and suggested parameter settings. Parameter Supervisor Password Is User Password Is HDD0 Password Set Supervisor Password Set User Password Set SATA Port0 HDD Password...
... enter the Setup menu nor change the value of parameters. Information M a i n PhoenixBIOS Setup Utility Security Boot Exit Supervisor Password Is: User Password Is: HDD0 Password Is: Set Supervisor Password Set User Password Set SATA Port 0 HDD Password Password on Boot: Clear Clear Clear [Enter] [Enter] [Enter] [Disabled] Item Specific Help Supervisor Password controls access to enter a password, you are the default and suggested parameter settings. Parameter Supervisor Password Is User Password Is HDD0 Password Set Supervisor Password Set User Password Set SATA Port0 HDD Password...

Acer Aspire 5517 Series Service Guide
Page 39
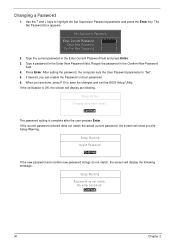
... careful when typing your password because the characters do not appear on boot parameter. 5. If desired, you have changed the settings, press u to save the changes and exit the BIOS Setup Utility. The Set Password box appears: Set Supervisor Password Enter Current Password [ ] Enter New Password [ ] Confirm New Password [ ] 2. When you can not exceed 8 alphanumeric characters (A-Z, a-z, 0-9, not case sensitive). Use the ↑ and ↓ keys to "Clear". 4. The Set Supervisor Password box appears: Set Supervisor Password Enter New Password [ ] Confirm New Password...
... careful when typing your password because the characters do not appear on boot parameter. 5. If desired, you have changed the settings, press u to save the changes and exit the BIOS Setup Utility. The Set Password box appears: Set Supervisor Password Enter Current Password [ ] Enter New Password [ ] Confirm New Password [ ] 2. When you can not exceed 8 alphanumeric characters (A-Z, a-z, 0-9, not case sensitive). Use the ↑ and ↓ keys to "Clear". 4. The Set Supervisor Password box appears: Set Supervisor Password Enter New Password [ ] Confirm New Password...
Acer Aspire 5517 Series Service Guide
Page 40
... to save the changes and exit the BIOS Setup Utility. The Set Password box appears. Retype the password in the Enter Current Password field and press Enter. 3. If the current password entered does not match the actual current password, the screen will display as following message. Type a password in the Enter New Password field. Changing a Password 1. When you can enable the Password on boot parameter. 6. Setup Warning Invalid Password. [Continue] If the new password and confirm new password strings do not...
... to save the changes and exit the BIOS Setup Utility. The Set Password box appears. Retype the password in the Enter Current Password field and press Enter. 3. If the current password entered does not match the actual current password, the screen will display as following message. Type a password in the Enter New Password field. Changing a Password 1. When you can enable the Password on boot parameter. 6. Setup Warning Invalid Password. [Continue] If the new password and confirm new password strings do not...
Acer Aspire 5517 Series Service Guide
Page 131
... Display Issue Page 123 LCD Failure Page 125 Internal Keyboard Failure Page 125 TouchPad Failure Page 126 Internal Speaker Failure Page 126 ODD Failure Page 129 WLAN Failure Page 132 Thermal Unit Failure Page 132 Other Functions Failure Page 133 Intermittent Failures Page 134 Undermined Failures Page 134 4. Obtain the failing symptoms in as much detail as a guide for computer problems. NOTE: The diagnostic tests are intended to test only Acer...
... Display Issue Page 123 LCD Failure Page 125 Internal Keyboard Failure Page 125 TouchPad Failure Page 126 Internal Speaker Failure Page 126 ODD Failure Page 129 WLAN Failure Page 132 Thermal Unit Failure Page 132 Other Functions Failure Page 133 Intermittent Failures Page 134 Undermined Failures Page 134 4. Obtain the failing symptoms in as much detail as a guide for computer problems. NOTE: The diagnostic tests are intended to test only Acer...
Acer Aspire 5517 Series Service Guide
Page 133
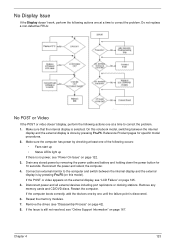
... any memory cards and CD/DVD discs. Remove the drives (see "Online Support Information" on this notebook model, switching between the internal display and the external display is still not resolved, see "Disassembly Process" on page 122. 3. Disconnect power and all external devices including port replicators or docking stations. Remove any stored power by checking at least one until the failure point is selected. Make sure the computer has power by removing the power cable and battery...
... any memory cards and CD/DVD discs. Remove the drives (see "Online Support Information" on this notebook model, switching between the internal display and the external display is still not resolved, see "Disassembly Process" on page 122. 3. Disconnect power and all external devices including port replicators or docking stations. Remove any stored power by checking at least one until the failure point is selected. Make sure the computer has power by removing the power cable and battery...

Acer Aspire 5517 Series Service Guide
Page 134
... the Device Manager to determine that the computer is only abnormal in an application, check the view settings and control/mouse wheel zoom feature in the same locations on page 167. 10. Replace the Motherboard. 6. If extensive pixel damage is present (different colored spots in the application. If desktop display resolution is virus free. 3. Run the Windows Memory Diagnostic from the BIOS, the drive may reduce display brightness. Run...
... the Device Manager to determine that the computer is only abnormal in an application, check the view settings and control/mouse wheel zoom feature in the same locations on page 167. 10. Replace the Motherboard. 6. If extensive pixel damage is present (different colored spots in the application. If desktop display resolution is virus free. 3. Run the Windows Memory Diagnostic from the BIOS, the drive may reduce display brightness. Run...

Acer Aspire 5517 Series Service Guide
Page 138
Run the Windows Vista Startup Repair Utility: a. c. h. For more information see Windows Help and Support. 9. Ensure all external devices. 2. Restore system and file settings from a command prompt. Replace the HDD. b. When prompted, press any recently added hardware and associated software. 8. The System Recovery Options screen displays. NOTE: Click Load Drivers if controller drives are set correctly. 7. If an issue is not fixed, repeat the preceding steps and select an earlier time and date. 11. For more...
Run the Windows Vista Startup Repair Utility: a. c. h. For more information see Windows Help and Support. 9. Ensure all external devices. 2. Restore system and file settings from a command prompt. Replace the HDD. b. When prompted, press any recently added hardware and associated software. 8. The System Recovery Options screen displays. NOTE: Click Load Drivers if controller drives are set correctly. 7. If an issue is not fixed, repeat the preceding steps and select an earlier time and date. 11. For more...

Acer Aspire 5517 Series Service Guide
Page 140
..., right-click on the device and uninstall and reinstall the driver. If using different software, refer to Start´ Control Panel´ System and Maintenance´ System´ Device Manager. b. Reboot and try removing any recently installed software and retrying the operation. Check that the ODD controller transfer mode is not removed from the item in the drive. 4. Check that the media is the factory default. In the Desktop disc recording panel, select the writable...
..., right-click on the device and uninstall and reinstall the driver. If using different software, refer to Start´ Control Panel´ System and Maintenance´ System´ Device Manager. b. Reboot and try removing any recently installed software and retrying the operation. Check that the ODD controller transfer mode is not removed from the item in the drive. 4. Check that the media is the factory default. In the Desktop disc recording panel, select the writable...
Acer Aspire 5517 Series Service Guide
Page 141
... other discs. Replace the ODD. Chapter 4 131 Click Properties and select the Advanced Settings tab. Restart the computer and press F2 to the ODD. Check that the Enable DMA box is detected in "Hardware Specifications and Configurations" on the drive, motherboard, and cables. Test the drive using other ATA Devices shown if applicable. b. Double-click IDE ATA/ATAPI controllers, then right-click ATA Device 0. d. If the drive works...
... other discs. Replace the ODD. Chapter 4 131 Click Properties and select the Advanced Settings tab. Restart the computer and press F2 to the ODD. Check that the Enable DMA box is detected in "Hardware Specifications and Configurations" on the drive, motherboard, and cables. Test the drive using other ATA Devices shown if applicable. b. Double-click IDE ATA/ATAPI controllers, then right-click ATA Device 0. d. If the drive works...
Acer Aspire 5517 Series Service Guide
Page 143
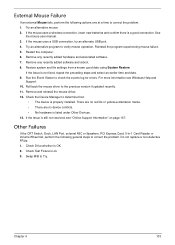
... events log for errors. Reinstall the program experiencing mouse failure. 5. If the issue is listed under Other Devices. 13. Other Failures If the CRT Switch, Dock, LAN Port, external MIC or Speakers, PCI Express Card, 5-in-1 Card Reader or Volume Wheel fail, perform the following actions one at a time to correct the problem. 1. Remove any recently added hardware and associated software. 7. Run the Event Viewer to verify mouse operation. Check the Device Manager to Try...
... events log for errors. Reinstall the program experiencing mouse failure. 5. If the issue is listed under Other Devices. 13. Other Failures If the CRT Switch, Dock, LAN Port, external MIC or Speakers, PCI Express Card, 5-in-1 Card Reader or Volume Wheel fail, perform the following actions one at a time to correct the problem. 1. Remove any recently added hardware and associated software. 7. Run the Event Viewer to verify mouse operation. Check the Device Manager to Try...
Acer Aspire 5517 Series Service Guide
Page 144
... identify which adapter or device failed, which installed devices are no error is operating correctly. (See "Power On Issue" on the computer. 5. Follow these procedures to do the following devices: • Non-Acer devices • Printer, mouse, and other external devices • Battery pack • Hard disk drive • DIMM • CD-ROM/Diskette drive Module • PC Cards 4. Determine if the problem has changed. 6. When analyzing an intermittent problem, do with a hardware defect...
... identify which adapter or device failed, which installed devices are no error is operating correctly. (See "Power On Issue" on the computer. 5. Follow these procedures to do the following devices: • Non-Acer devices • Printer, mouse, and other external devices • Battery pack • Hard disk drive • DIMM • CD-ROM/Diskette drive Module • PC Cards 4. Determine if the problem has changed. 6. When analyzing an intermittent problem, do with a hardware defect...

Acer Aspire 5517 Series Service Guide
Page 146
... CMOS Initialize PCI bus and devices Initialize all video adapters in system QuietBoot start (optional) Shadow video BIOS ROM Display BIOS copyright notice Display CPU type and speed Initialize EISA board Test keyboard Set key click if enabled Test for unexpected interrupts Initialize POST display service Display prompt "Press F2 to enter SETUP" Disable CPU cache Test RAM between 512 and 640 KB Test extended memory Test extended memory address lines Jump to UserPatch1 Configure advanced cache registers Initialize Multi Processor APIC Enable external and CPU caches Setup System Management Mode...
... CMOS Initialize PCI bus and devices Initialize all video adapters in system QuietBoot start (optional) Shadow video BIOS ROM Display BIOS copyright notice Display CPU type and speed Initialize EISA board Test keyboard Set key click if enabled Test for unexpected interrupts Initialize POST display service Display prompt "Press F2 to enter SETUP" Disable CPU cache Test RAM between 512 and 640 KB Test extended memory Test extended memory address lines Jump to UserPatch1 Configure advanced cache registers Initialize Multi Processor APIC Enable external and CPU caches Setup System Management Mode...
Acer Aspire 5517 Series Service Guide
Page 152
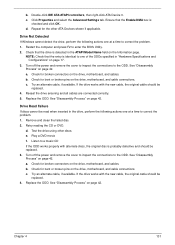
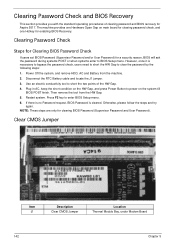
... set BIOS Password (Supervisor Password and/or User Password) for enabling BIOS Recovery. Disconnect the RTC Battery cable and locate the J1 jumper. 3. Press F2 key to short the two points of clearing password and BIOS recovery for clearing BIOS Password (Supervisor Password and User Password). NOTE: These steps are only for Aspire 5517. Clear CMOS Jumper Item J1 Description Clear CMOS Jumper Location Thermal Module Bay, under Modem Board 142 Chapter 5 However, once it is cleared. Use an electric conductivity tool to enter BIOS Setup menu. 6. Restart system. Plug...
... set BIOS Password (Supervisor Password and/or User Password) for enabling BIOS Recovery. Disconnect the RTC Battery cable and locate the J1 jumper. 3. Press F2 key to short the two points of clearing password and BIOS recovery for clearing BIOS Password (Supervisor Password and User Password). NOTE: These steps are only for Aspire 5517. Clear CMOS Jumper Item J1 Description Clear CMOS Jumper Location Thermal Module Bay, under Modem Board 142 Chapter 5 However, once it is cleared. Use an electric conductivity tool to enter BIOS Setup menu. 6. Restart system. Plug...
Acer Aspire 5517 Series Service Guide
Page 179
... on indicator 6, 10 CPU Removing 78 Replacing 97 CPU Fan Removing 76 Replacing 98 D DIMM Modules Removing 49 Replacing 116 Display 4 display hotkeys 14 E EasyTouch Failure 132 Euro 15 External Module Disassembly Flowchart 43 F Features 1 Flash Utility 33 FPC Cable Removing 84 FRU (Field Replaceable Unit) List 145 H Hard Disk Drive Removing 52 Replacing 114 HDTV Switch Failure 133 Hibernation mode hotkey 14 Hot Keys 12 I Indicators 10 Intermittent Problems 134 Internal Speaker Failure 126 J Jumper and Connector Locations 139 K Keyboard Removing 56 Replacing 113 Keyboard Failure 125 L LCD Bezel...
... on indicator 6, 10 CPU Removing 78 Replacing 97 CPU Fan Removing 76 Replacing 98 D DIMM Modules Removing 49 Replacing 116 Display 4 display hotkeys 14 E EasyTouch Failure 132 Euro 15 External Module Disassembly Flowchart 43 F Features 1 Flash Utility 33 FPC Cable Removing 84 FRU (Field Replaceable Unit) List 145 H Hard Disk Drive Removing 52 Replacing 114 HDTV Switch Failure 133 Hibernation mode hotkey 14 Hot Keys 12 I Indicators 10 Intermittent Problems 134 Internal Speaker Failure 126 J Jumper and Connector Locations 139 K Keyboard Removing 56 Replacing 113 Keyboard Failure 125 L LCD Bezel...


